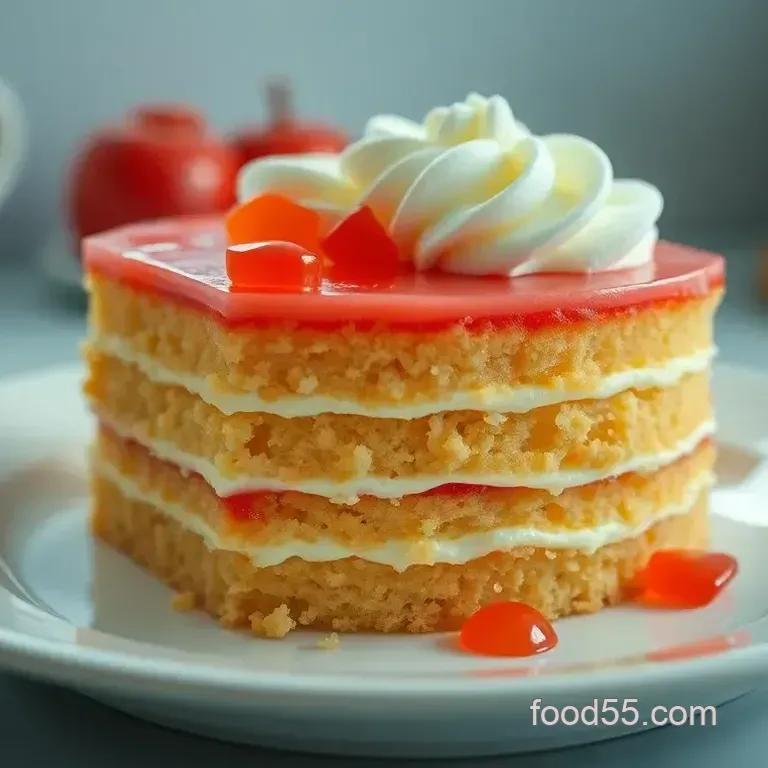
Jolly Layered Cake with Jello Surprise
- Let’s Talk About Jello with Cake: A Nostalgic Treat
- A Sweet Slice of History
- Why You’ll Love This Recipe
- Transitioning Into Your Ingredients
- Essential Ingredients Guide: Creating Flavorful Wonders
- Mastering the Art of Cooking: Elevate Your Game!
- Additional Recipe Information: Jolly Layered Cake with Jello Surprise
- Frequently Asked Questions
- 📝 Recipe Card
Let’s Talk About Jello with Cake: A Nostalgic Treat
Oh my gosh, has there ever been a dessert that hits harder than a slice of jello with cake ? i remember my childhood days when summer meant backyard bbqs, and cool and colorful jello desserts were always on the table.
Whenever someone brought out that jiggly goodness, all the kids would gather around, saying, “what’s that?” with wide eyed excitement!
There's something undeniably fun about this dessert. it’s a whimsical blend of textures! the soft, moist cake perfectly contrasts with the jello’s bouncy jiggle.
And let’s not underestimate the vibrant colors it’s like eating a little bit of happiness. you know, the kind that reminds you of those classic crown jewel jello desserts .
A Sweet Slice of History
So, where did this all begin? the roots of jello desserts trace back to the ’50s and ’60s. they became wildly popular at potlucks and family gatherings across america.
It’s like a fun throwback to a simpler time when everything was vibrant and playful. today, with modern twists and flavor combos (hello, filipino jello dessert vibes!), this recipe is still as relevant as ever.
Don't freak out if layered desserts give off a vibe of complexity. honestly, making this jolly layered cake is a breeze with just a little patience.
The total time needed is around 4 hours and 45 minutes but most of that is chilling time. and trust me; the result is worth every second.
Psst, this dessert can serve about 10 to 12 people . Perfect for weekend get-togethers!
Why You’ll Love This Recipe
Let's talk about the health benefits because, yes, desserts can be a little good for you! while it's not exactly a health food, you can sneak in some jello add-ins like fruits or even nuts.
And for those keeping a close eye on sugar, try making it with a sugar-free jello option.
Not to mention, this chocolaty layered jello salad recipe is versatile. whether it’s a birthday bash, summer picnic, or just a random tuesday, it’s the kind of fun dish that brightens the mood.
You could easily present it in individual food in glasses ideas for an even more chic vibe. seriously, how cute would that be? each person gets their own mini dessert!
Plus, compared to other complex confections, jello desserts like this one stand out with their playful approach. you can even stretch your creativity with vegan jello desserts or the trendy rainbow jello mold .
Oh, and let’s not forget the unique selling points of this recipe are its colorful layers and the sheer nostalgia of digging in.
I mean, who doesn’t have fond memories of a family gathering where this dessert was the star?
Transitioning Into Your Ingredients
So, are you ready to dive into this jolly layered cake with a delightful jello surprise? grab your aprons! let’s move on to the ingredient list.
Whether you’re a seasoned baker or a novice just trying to impress your friends, this recipe brings joy and sweetness to any gathering.
It’s time to channel your inner baking genius and whip up some deliciousness!
Essential Ingredients Guide: Creating Flavorful Wonders
Alright, my fellow home cooks, let’s talk about what makes our dishes pop! whether you're whipping up a layered jello salad or a good old-fashioned meatloaf, understanding your ingredients is key.
So, let's dive into the essentials to stock your kitchen with everything you need to bring your culinary dreams to life!
Premium Core Components
Measurements matter:
when it comes to baking, precise measurements can spell success or disaster. for instance, if you’re baking that jolly layered cake with jello surprise , for example, you’ll need 1 ¾ cups of all-purpose flour (that's about 220 grams if you're weighing it).
That simple switch can change everything trust me!
Quality indicators:
look for fresh ingredients. for flour, check for dust free packaging and a clear expiration date. when it comes to butter, feel free to sniff your way through the dairy section.
It should have a creamy smell, not sour.
Storage guidelines:
to maximize shelf life, store your ingredients properly. keep flour and baking soda in a cool, dry place.
Jello should hang out in your pantry until you need it, but once mixed, it’s prime real estate for the fridge!
Freshness Tips:
For picking fruits like those strawberries that would be
amazing
for your layered jello salad look for bright colors and firm textures. Soft spots are a no-go.
Signature Seasoning Blend
Spice it up:
your pantry doesn’t have to be a spice shop, but a few essential spices can elevate any dish.
Think black pepper, garlic powder, and paprika. toss in fresh herbs like basil or parsley for instant flavor.
Flavor enhancers:
ever heard of umami? it’s that savory kick. you can find it in ingredients like soy sauce and mushrooms.
A pinch of these in your savory dishes just might be the secret to raving reviews!
Regional variations:
love spicy foods? try chili powder or cayenne for a kick! if you’re feeling adventurous, swap up your seasoning with regional flavors like using cajun spices in your jambalaya.
Talk about a flavor explosion!
Smart Substitutions
Common alternatives:
you run out of buttermilk? no sweat! just mix regular milk with a splash of vinegar or lemon juice to achieve that tangy flavor.
Snake your way around the grocery store with these easy swaps. it’s like cooking magic!
Dietary Modifications:
gluten-free? No problem! Swap all-purpose flour for almond or coconut flour in your cake recipes. Just keep an eye on the texture, as they can behave a little differently.
Emergency Replacements:
Running short on eggs for that creamy frosting? Grab some applesauce. Each egg substitute works best with ¼ cup not only does it keep things moist, but it gives it a unique flavor twist!
Kitchen Equipment Essentials
Must Have Tools:
Every kitchen needs a trusty electric mixer, measuring cups, and a good set of mixing bowls. When making desserts like Crown Jewel Jello Dessert , having the right tools makes a world of difference!
Alternative options:
if you find yourself without a fancy mixer, a good ol’ whisk works just fine for whipping cream.
Yeah, it’ll take a bit longer, but hey, a workout never hurt anyone, right?
Storage Solutions:
Don’t let your ingredients get messy! Stackable bins are your best friends. Having a place for everything keeps your workspace tidy and inspires more cooking!
Alright, folks, before we jump into making your jello with cake , make sure you've got all these essentials handy.
It’s all about enjoying the process in the kitchen and creating something delightful. so gear up, pour that love (and maybe a little jello) into your cooking, and let’s craft something gorgeous!
In the words of a wise food lover, "Cool Once, Eat Twice." Let's get those vibrant layers and treat our taste buds! Ready to dive into the detailed instructions? Let's do this!
Mastering the Art of Cooking: Elevate Your Game!
We all know the secret behind those restaurant quality dishes it’s not just fancy ingredients. we're diving deep into professional cooking methods today! with a blend of essential prep steps, step-by-step processes, expert techniques, and some success strategies, you’ll transform your kitchen game.
Trust me; you’ll want to stay for these tips, especially if you’ve daydreamed about making something as delightful as jello with cake .
Essential Preparation Steps
Let’s kick it off with mise en place . sounds fancy, huh? but it’s just a french term for “everything in its place.
” grab all your ingredients before you start. this not only makes cooking less chaotic but also feels like a pro move.
You know how it is; things can get wild in the kitchen, and one missing ingredient can throw off the whole vibe!
Now, let’s talk time management . set a timer for everything! seriously, whether it's chopping veggies or simmering that fabulous sauce, keep your timing on point.
Maybe set a reminder every 15 minutes if you’re a newbie.
Organization is key. keep your workspace tidy! i learned the hard way that a cluttered counter leads to a cluttered mind.
Too much mess? you’ll be crying over spilled flour faster than you can say “i need a coffee.”
And let’s not forget safety . always handle knives with care, and if you’re working with hot stuff, remember to use mitts! burnt fingers are no fun at all trust me on that.
step-by-step Cooking Process
It’s time to get our hands dirty. Here’s a simple breakdown you can follow:
- Preheat your oven. For example, if you’re baking, set that baby to 350° F ( 175° C) .
- Gather your ingredients. When I make my layered jello salad recipes, I always keep them within arm’s reach; it’s like magic.
- Follow your recipe closely ; timing is everything! For instance, baking a cake typically takes about 25 minutes . Pull that cake when a toothpick comes out clean.
- Control your temperature diligently. Let’s say you’re searing meat; aim for high heat, then reduce it. Each dish has its sweet spot .
Use visual cues for doneness. Ever looked at something and thought, “Yikes, that’s overcooked”? If it’s too brown, it’s time to rethink your approach.
Expert Techniques
When I first made that stunning Crown Jewel Jello Dessert , I was a bundle of nerves. But there are techniques you can master:
- Layering is critical. When making jello with cake, pour that jello before it fully sets ; trust me, it’s key to keeping layers intact!
- Quality checkpoints are non-negotiable! Check for proper texture. If it feels too runny or dry, adjust before moving on.
- I can't stress enough how important it is to taste as you go . You’ll immediately know if something’s off. I’ve fixed many a dish by simply adding an extra pinch of salt.
Success Strategies
Let’s wrap this up with some solid tips.
Avoid common mistakes, like not reading your recipe in full before starting. I mixed up oven temps once, and you can guess how that dinner turned out! Always double check your ingredients, too.
To ensure quality, keep some handy make-ahead options . even if you’re cooking for a crowd, prepping your jello a day earlier can save stress.
Plus, how cool is it to pull out a stunning rainbow jello mold ?
Remember, even the pros mess up! if something doesn’t turn out, don't sweat it . troubleshoot! if your jello layer refuses to set, toss it back in the fridge a little longer.
Sometimes, that extra chill is just what it needs.
Final Thoughts
There you have it professional cooking methods that can elevate your culinary game from basic to badass . with a little practice and patience, you can whip up show stopping dishes like that layered cake with jello surprise.
You can impress your friends or just indulge for yourself. whatever you choose, happy cooking!
Stay tuned for our next section— Additional Information —for even more tips, tricks, and creative ideas to keep your kitchen sizzling!
Additional Recipe Information: Jolly Layered Cake with Jello Surprise
Alright, friends! let’s dive deeper into this whimsical world of jello with cake . i promise it’s not just about sweet flavors; it’s about making memories and taking your dessert game to a whole new level.
Trust me, once you nail this, you’ll be the star of every potluck and backyard bbq.
Pro Tips & Secrets
Let’s kick off with some of my chef’s secrets that’ll elevate your cake from 'meh' to ‘wow’:
- Time saving techniques: Mix it up! Instead of waiting for your jello to get chunky, make it the night before. Yeah, pop it in the fridge while you binge watch your favorite show.
- Flavor enhancement tips: Don’t shy away from adding jello add-ins ! Think fresh fruit or even a splash of juice. It’s like a flavor explosion happening right in your cake.
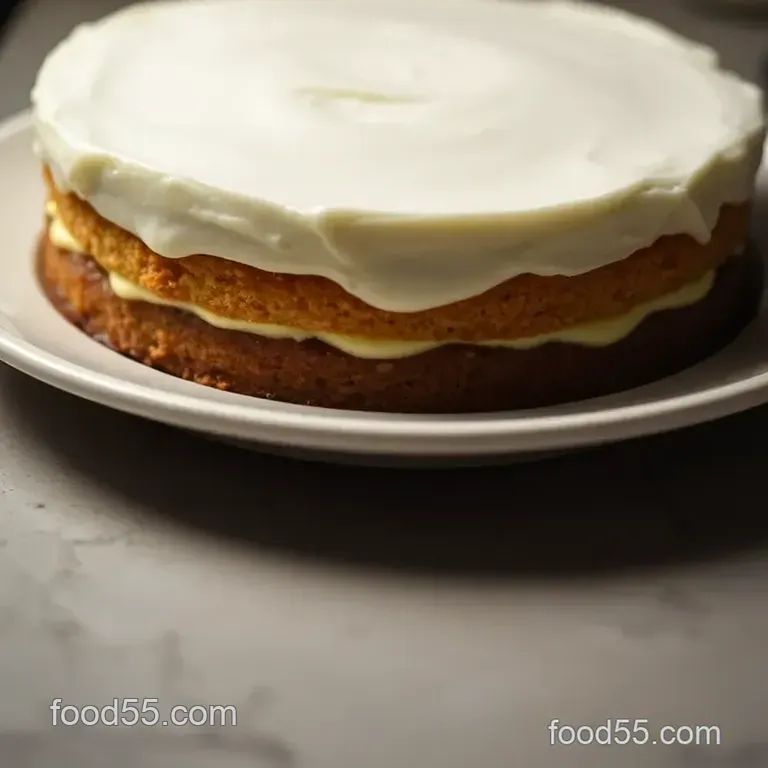
- Presentation advice: Layer that cake beautifully! When you serve it up, make it look like it belongs on the dessert menu at a fancy restaurant. Flowers, fresh fruit, or just a sprinkle of powdered sugar will do wonders!
Perfect Presentation
Now, let’s talk about how to WOW your guests with presentation. This isn’t just a cake; it’s a Crown Jewel Jello Dessert !
- Plating techniques: Use a big, beautiful platter to really showcase your cake. It makes a statement right off the bat.
- Garnish ideas: Mint leaves add that pop of color and freshness! Trust me; your friends will think you’re a culinary genius.
- Color combinations: Go for vibrant colors in your jello! A Rainbow Jello Mold can make your dessert a centerpiece that no one can ignore.
- Visual appeal tips: Slice it carefully to show those stunning layers! Everyone will snap a pic before digging in, so give them something to remember.
Storage & make-ahead
Planning ahead? You got it! Here are some quick tips to keep your jello cake fresh:
- Storage guidelines: This gem can last up to a week if stored covered in the fridge. Just be sure it’s in an airtight container or wrapped tightly to keep it fresh.
- Preservation methods: If you have leftovers, and honestly, who wouldn’t want seconds? Wrap the cake tightly to prevent dryness and chill.
- Reheating instructions: There’s no need for reheating here! Serve it cold, just like a Filipino Jello Dessert .
- Freshness duration: For the best taste, aim to consume it within five days. The jello will still be delightful, but the cake starts to lose moisture after that.
Creative Variations
Don’t feel boxed in! Here’s where you can let your culinary creativity run wild:
- Flavor adaptations: Swap out that classic strawberry jello for a bold green apple or berry combo. Get adventurous!
- Dietary modifications: Want to make it vegan? Substitute eggs with flaxseed meal or applesauce. Vegan jello desserts can still be delicious!
- Seasonal twists: For summer vibes, use raspberry jello, and in winter, maybe a spiced apple flavor. Seasonal ingredients always impress!
- Regional variations: Think about adding a regional flair. A layered jello salad recipe inspired by your childhood can create nostalgia amongst friends.
Complete Nutrition Guide
And because we can’t ignore the health side of things, here's a quick breakdown:
- Calories: This beauty packs about 320 calories per slice. Not too bad for a dessert!
- Health benefits: The fruit and even gelatin bring some goodness your way. Gelatin is known for supporting healthy joints and gut health. Win-win!
- Dietary considerations: It’s friendly for most dietary needs unless someone is gluten sensitive just swap in gluten-free flour!
- Portion guidance: A slice is generous enough, serving 10-12 should be just right. Plus, seconds are a must when you’ve got something as delicious as this on the table!
There you have it! your ultimate guide to mastering jello with cake . enjoy every bite, and don’t be afraid to share your results! trust me, your friends will be begging for the recipe.
Keep experimenting, and who knows? you might just come up with the next best dessert twist! happy baking, and remember, make it fun!
Frequently Asked Questions
What is the best way to layer jello with cake?
To properly layer jello with cake, ensure your jello is slightly thickened before adding it to the cake. This helps it stay in place instead of sliding off. It's also a good idea to cool both the cake and jello adequately. Patience is key here!
Can I use other flavors of jello with cake?
Absolutely! While strawberry is a classic choice, feel free to explore other flavors like lime, orange, or even mixed berry jello. Just remember that the jello flavor should complement the cake think fruity and refreshing for the best results.
How do I store jello with cake leftovers?
If you have any leftover jello with cake, store it in an airtight container in the refrigerator. It’s best consumed within 3-4 days for optimal freshness, but the jello may start to lose its texture over time, so don’t wait too long!
Is jello with cake a good option for a party?
Yes, jello with cake makes for an eye-catching dessert at any gathering! Its playful combination of textures and vibrant colors can really impress your guests. Plus, it’s a nostalgic treat that appeals to both kids and adults alike!
Can I make jello with cake ahead of time?
You can definitely make jello with cake the day before your event! Just prepare everything as directed, allow it to chill in the fridge overnight, and it'll be ready to serve the next day. Just don't frost it until you're close to serving to keep the cream fresh!
Are there any healthier versions of jello with cake?
Yes! You can make a healthier version by using a sponge cake recipe that incorporates whole wheat or almond flour as a gluten-free option. Also, consider adding in fresh fruits in the layers instead of extra sugary jello this adds natural sweetness and benefits!
Jolly Layered Cake With Jello Surprise

Ingredients:
Instructions:
Nutrition Facts:
| Calories | 320 |
|---|---|
| Fat | 18g |
| Fiber | 1g |
