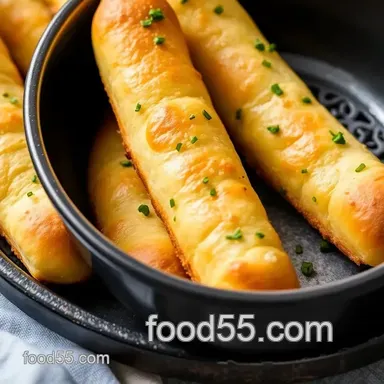
Bake Garlic Bread Cylinders
- Look into Into Deliciousness: The Story of Bake Garlic Bread Cylinders | Irresistibly Tasty
- Your Go-To Essential Ingredients Guide
- Get Ready for Some Deliciousness: The Professional Cooking Method
- Pro Tips & Secrets for Bake Garlic Bread Cylinders | Irresistibly Tasty
- Perfect Presentation
- Storage & Make-Ahead
- Creative Variations
- Complete Nutrition Guide
- Frequently Asked Questions
- 📝 Recipe Card
Look into Into Deliciousness: The Story of Bake Garlic Bread Cylinders | Irresistibly Tasty
Let me start with a little story! one evening, i decided to tackle dinner for my family. i was struggling to come up with a side that would knock their socks off.
You know those moments when you need to impress but end up just staring at your fridge? yeah, i’ve been there.
It hit me: what’s better than some piping hot, buttery garlic bread? but, in a twist, i thought, why not try something new? that's when i decided to bake garlic bread cylinders | irresistibly tasty a fun spin on the classic garlic bread.
Trust me, they turned out so good, i could hardly keep my hands off 'em!
These delicious little rolls hail from classic Italian roots but have found their place in modern American kitchens everywhere. If you're looking for an easy garlic bread recipe that doubles as a showstopper, you’ve hit the jackpot!
What’s the Deal with Garlic Bread Cylinders?
Now, you're probably wondering what makes these stacks of goodness so special. traditionally, garlic bread rolls are pretty straightforward, but these cylinders bring a savory bread recipe to new heights.
The soft dough is infused with a garlic butter filling that keeps things exciting a must try for any garlic lover out there!
In terms of prep, it’s a charming little journey. expect about 20 minutes of active prep time with a little patience for the dough to rise.
Yes, we’re cooking with yeast here, so be prepared to roll up your sleeves and let the dough do its magic!
You should also know this recipe yields 12 perfectly golden rolls , making it a total win whether you're hosting a dinner party or prepping for weekday meals.
Also, let's be real: who wants to check their pockets while cooking? the cost here is reasonable, too. grab some basic ingredients flour, yeast, butter, and garlic and you’re well on your way to creating a tasty garlic side dish without breaking the bank.
Why You’ll Love These Garlicky Delights
If you're still not convinced, let’s talk benefits. first off, these garlic bread cylinders are not just about the taste; they pack some nutritional flair too! when you make your own homemade garlic bread , you control what's going in no sketchy additives here.
Plus, those garlic cloves aren’t just for flavor; they have health perks with their immune boosting properties. gotta love that!
Furthermore, this recipe stands out because of its herbed bread rolls magic. the combination of garlic and fresh parsley really kicks things up a notch.
You can serve these at any occasion from family dinners to outdoor barbecues, and they’ll be the star of the show!
But let’s not overlook how versatile these rolls are. crispy bread rolls can be paired with soups, salads, or even just enjoyed on their own for a quick snack.
Trust me, your taste buds will thank you.
Get Ready to Gather Your Ingredients!
Now, before we roll up our sleeves and get to baking, let’s talk about what you’ll need. you'll be mixing up some warm water, sugar, flour, and of course, a hearty dose of garlic.
( quick tip: if garlic isn’t your jam, you can whip up a flavored garlic bread version with herbs think rosemary or thyme for a fresh twist.
)
So, gather your baking equipment, and get ready to unleash those dough rising tips you’ve been itching to try. whether it’s your first time or you’re a seasoned pro in homemade bread baking , this recipe will be a delightful ride.
Just one thing make sure to hang tight, as we’re diving into those gourmet rolls next. Can't wait to share the magic of Bake Garlic Bread Cylinders | Irresistibly Tasty with you! Are you excited yet? Because I sure am!
Your Go-To Essential Ingredients Guide
Alright, friends! let’s talk about the essential ingredients that will take your cooking game to a whole new level. from premium core components to signature seasoning blends , i've got you covered.
Follow along as we dive into the world of flavors and culinary basics to whip up some stunning dishes!
Premium Core Components
To start off, let’s get our measurements right. when you’re gathering ingredients, always remember 3 ½ cups of all-purpose flour (440g) makes a perfect base for your dough.
Using the metric system can be super helpful if you’re trying out different recipes from around the world.
Then, there's quality. trust me, fresh ingredients = tasty food. look for active dry yeast that’s still lively and fluffy; if it’s clumpy, toss it.
You want that stuff to be in its prime! and don’t forget about storage guidelines . for instance, keep your flour in a cool, dry place and use it within six months for the best flavor.
Freshness is key! Always opt for fragrant herbs. A quick sniff can tell you if your rosemary or thyme is still good. This will really make your homemade garlic bread sing.
Signature Seasoning Blend
Next up, let’s chat about that magical world of spices and herbs. a signature seasoning blend can turn a basic dish into something spectacular.
Think about your italian garlic bread cylinders . you can’t go wrong with a simple garlic and parsley combo in the filling.
For additional flavor bombs, consider adding a sprinkle of dried oregano or even a bit of lemon zest for a zing! if you’re feeling adventurous, try swapping herbs for those that reflect your vibe, whether that’s some fresh basil or maybe even thai basil if you’re feeling fancy.
Smart Substitutions
Ever run out of something mid-cook? i feel you! here’s where your brain has to kick into gear. a pinch of sugar can replace that white wine in a pinch, adding sweetness to your dish.
And if you don’t have unsalted butter , just grab some coconut oil for that savory bread recipe you have in mind.
Let’s not forget the dietary modifications . if you need something dairy-free for a buddy, simply swap butter with a dairy-free alternative .
Trust me, no one will even notice the difference when you bake those golden crispy bread rolls!
Kitchen Equipment Essentials
Now, let’s get down to business with some must have kitchen tools. i’m talking about the basics: a quality mixing bowl , a trusty wooden spoon , and, of course, that ever important baking sheet .
Don’t have a rolling pin? no worries! a wine bottle can do the job just fine if you’re in a pinch.
Speaking of things that make life easier, getting some parchment paper will save you from a stick disaster when whipping up your garlic roll recipe .
And storage? oh man, i can’t stress this enough. invest in some airtight containers to keep your flour and sugar fresh and fly-free.
Just imagine pulling out that easy garlic bread recipe without a single bug in sight heaven!
Wrapping It Up
So there you have it, friends! your essential ingredients guide lays the groundwork for rocking your kitchen, whether you're making comforting flavored garlic bread or trying your hand at those perfect herb infused rolls .
Each of these components and tips helps you create magic right from the oven.
Next, we’ll dive straight into the instructions for how to Bake Garlic Bread Cylinders | Irresistibly Tasty . You’re going to want to stick around for that, trust me!
Get Ready for Some Deliciousness: The Professional Cooking Method
So, you're diving into the world of pro cooking? awesome! let’s talk about some crucial prep steps before we whip up something fancy like bake garlic bread cylinders | irresistibly tasty .
Trust me, whether you’re a newbie or have some experience, these tips will make your cooking journey way smoother.
Essential Preparation Steps
Mise en Place is Key
First up, let's chat mise en place . it’s a fancy french term that just means having everything set up before you start cooking.
Lay out your ingredients for the garlic roll recipe first. that way, when it’s time to mix that buttery garlic filling, you’re not running around like a headless chicken looking for your garlic or butter!
Time Management Tips
Alright, let’s tackle time management next. set a timer for each step, especially for that dough rising phase. yeast is kinda like that person who takes forever to get ready it needs time! aim for about 60 minutes , giving it a cozy spot to chill out and double in size.
Organization Strategies
Organization is everything in the kitchen. keep your area clutter free. i like to have a little space for prep, cooking, and plating.
This helps keep everything neat and makes cleaning up a breeze!
Safety Considerations
Safety first! when you’re baking, that oven gets hot think 375° f ( 190° c) hot. always use oven mitts, and watch out for sharp tools when you’re slicing those yummy garlic bread cylinders.
Oh, and if you’ve got kids around, keep those in mind during your cooking adventure!
Step-by-step Process
Now that we’re set up, let's dive into the steps for our Bake Garlic Bread Cylinders . Grab your measuring cups and let’s get cooking!
Activate Yeast : Combine warm water (about 110° F/ 43° C ), sugar, and yeast.
Let sit till it’s frothy, around 5- 10 minutes .
Make Dough : In a bowl, add flour and salt. Mix in your yeast mixture and olive oil until a dough forms.
Knead Dough : Flip that dough onto a floured surface and knead for about 8- 10 minutes until it’s smooth.
First Rise : Pop it in a greased bowl, cover it, and wait for it to double in size about 1 hour .
Prepare Filling : Mix that garlic butter filling (you won’t regret it!) until it's smooth and ready to spread.
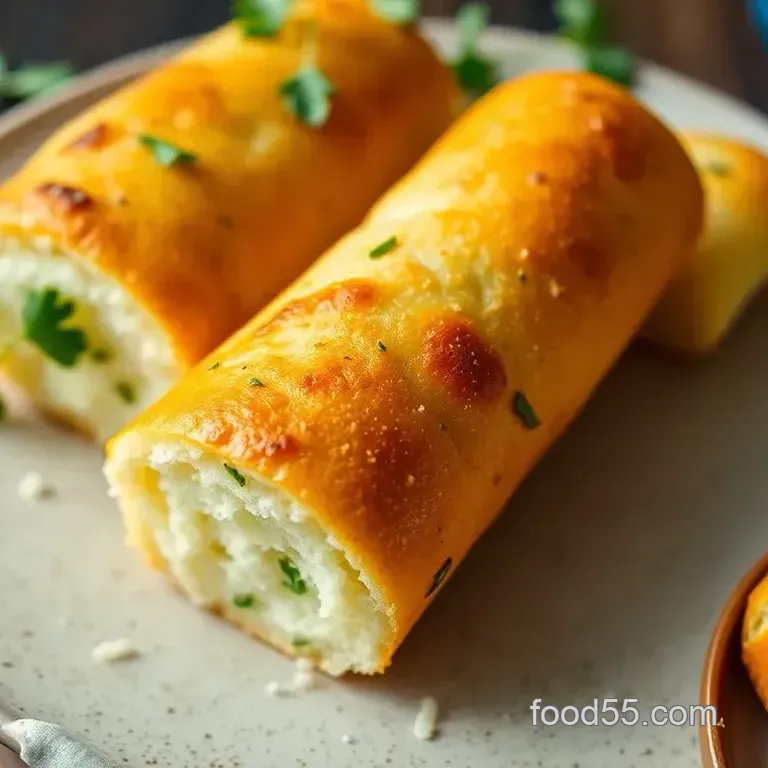
Shape Cylinders : Roll out that dough, spread the filling, and roll it into a log. Slice it into 12 equal pieces .
Second Rise : Let those bad boys puff up for 20- 30 minutes after placing them on a baking sheet.
Preheat Oven : Get your oven going at 375° F ( 190° C) .
Bake : Bake until they’re golden brown and happy, about 20- 25 minutes .
Expert Techniques
As you get comfy with this homemade garlic bread, let’s sprinkle on a bit of expert technique for good measure.
Professional Methods
For amazing texture, make sure your dough is well kneaded. If you find it too sticky, sprinkle a tad more flour but don’t overdo it. A little patience goes a long way!
Critical Steps Explained
The first and second rises ? Crucial! They help develop texture and flavor. Always give your dough that full time to rise.
Quality Checkpoints
You’ll know they’re done when they’re golden brown and make a hollow sound when tapped. Nothing like that satisfaction, am I right?
Troubleshooting Tips
If your dough doesn’t rise , check if your yeast is alive and kickin’. Often, old yeast can be blamed for less than perfect results.
Success Strategies
To ensure your baking is a slam dunk, remember:
Common Mistakes : Avoid over kneading and under rising. Both can ruin your cylinders!
Quality Assurance Tips : Make sure you measure ingredients accurately. Spoiler: Using the spoon and-level method for flour works wonders.
Perfect Results Guide : Focus on temperatures and timing. Trust me, it makes a world of difference.
make-ahead Options : You can prepare the filling ahead of time. Just store it in the fridge and spread it on when you’re ready to roll.
With these pointers in hand, you’re ready to bake some irresistibly tasty garlic bread that’ll have everyone coming back for more.
And guess what? mastering these skills not only means cozy dinners but also creating those yummy garlic snacks that are perfect as appetizers or as comfort food!
So as you dive deeper into your cooking journey, keep your spirit high and don’t hesitate to experiment. There’s so much joy in baking, and who knows? You might just come up with an entirely new twist on the classic!
Now, let’s move on to some Additional Information to keep this flavor train rolling!
Pro Tips & Secrets for Bake Garlic Bread Cylinders | Irresistibly Tasty

Alright my friends, if you’re diving into the world of baked garlic goodness , let me share some pro tips that’ll elevate your experience.
The key here is knowing a few secrets that i’ve picked up along my culinary journey.
Chef's Personal Insights
First off, patience is a virtue! when you’re activating that yeast, give it a solid 10 minutes . you want to see those bubbles form like a mini volcano this means it’s ready to party.
Honestly, without this step, your homemade garlic bread could flop.
Time Saving Techniques
Wanna save some time? you can actually make the dough a day ahead. just let it rise and shape it, then pop it in the fridge.
The next day, let it come to room temp, and you’re ready to rock! your easy garlic bread recipe will still shine.
Flavor Enhancement Tips
For extra oomph, consider mixing a pinch of grated parmesan into your garlic filling. trust me, it’s a game changer! and if you’re feeling bold, toss in some fresh herbs a few sprigs of rosemary or thyme can really elevate those garlic roll recipes .
Presentation Advice
Now, when it comes to serving, make it pretty! Arrange those puppies on a large platter. Drizzle a little extra herbed oil over them before serving talk about fancy!
Perfect Presentation
Making something look good is part of the fun, right? Here’s how to nail that presentation.
Plating Techniques
Try standing the garlic bread cylinders upright against each other on a colorful plate. It looks super inviting.
Garnish Ideas
Chopped fresh parsley or a sprinkle of red pepper flakes really pop against that golden crust. It’s not just about the taste; we eat with our eyes first!
Color Combinations
Pair your bread with a vibrant side salad like a fresh Caprese salad with juicy tomatoes and creamy mozzarella. This brings vibrant colors to the table.
Visual Appeal Tips
And let’s not forget the power of a good dip! a small bowl of marinara sauce adds not only great flavor but also a splash of red against your yummy garlic snacks .
Storage & make-ahead
Wondering how to keep those tasty rolls fresh? Let’s talk storage.
Storage Guidelines
Store your golden crispy bread in an airtight container to maintain that fluffy texture. if you feel your rolls hardening, you can pop them in the microwave for a few seconds just don’t overdo it.
Preservation Methods
These rolls are best enjoyed fresh, but you can freeze them! Once baked and cooled, wrap them tightly and store in the freezer for up to three months .
Reheating Instructions
To reheat from frozen, let them sit at room temp for about 30 minutes, then pop them in a 375° f ( 190° c) oven for about 10- 15 minutes until heated through.
Freshness Duration
If kept properly at room temperature, expect them to stay fresh for about two days . After that, they’re still edible but not as delightfully fluffy.
Creative Variations
Variety is the spice of life! Let’s jazz up this classic recipe.
Flavor Adaptations
How about some cheesy garlic rolls ? Just add your favorite shredded cheese to that filling. It’ll melt beautifully and give you a gooey center that’s to die for!
Dietary Modifications
If you’re on a gluten-free journey, swap the all-purpose flour for a gluten-free blend and watch those cylinders rise!
Seasonal Twists
Try adding in some finely diced roasted red peppers when in season. That sweet peppery flavor complements the savory bread recipe vibe beautifully.
Regional Variations
Feeling adventurous? Go for a version inspired by Italian garlic bread cylinders by adding bits of sun-dried tomatoes for that extra zing!
Complete Nutrition Guide
Let's talk health. Here’s the rundown on what you’re eating.
Detailed Breakdown
Each roll comes in at around 210 calories with about 3g of protein. Not too shabby for a warm treat, right?
Health Benefits
Garlic is fantastic for heart health, so load it up! With the added benefit of fresh herbs, you’re elevating not only the flavor but also your health game.
Dietary Considerations
Watch out for folks with dairy allergies if you add cheese. Just a heads up!
Portion Guidance
One roll per person as a side is a good rule of thumb. Want more? Who’s stopping you?
In conclusion, whipping up these bake garlic bread cylinders | irresistibly tasty is a culinary adventure you won’t regret. whether you're enjoying them with soup, as a comfort food recipe, or just snacking on them straight from the oven, they’re a surefire crowd pleaser.
So roll up your sleeves, get that dough rising, and enjoy the process. you got this, my friend!
Frequently Asked Questions
What are Bake Garlic Bread Cylinders | Irresistibly Tasty best served with?
These irresistible garlic bread cylinders are perfect when paired with marinara sauce for dipping, or served alongside a fresh salad or soup. They also complement various Italian dishes and can be enjoyed as a standalone snack!
How do I store leftovers from Bake Garlic Bread Cylinders | Irresistibly Tasty?
To store leftovers, let the garlic bread cylinders cool completely, then wrap them in plastic wrap or place them in an airtight container. They can be stored at room temperature for up to 2 days or refrigerated for up to 5 days. Reheat in the oven to restore some crispiness before serving.
Can I make Bake Garlic Bread Cylinders | Irresistibly Tasty ahead of time?
Yes! You can prepare the dough and filling ahead of time. Once you shape the cylinders, you can store them in the refrigerator overnight before the second rise and baking. Alternatively, you can freeze the shaped, uncooked cylinders for up to 3 months; just make sure to bake them directly from the freezer, adding a few extra minutes to the baking time.
What are some variations I can try for Bake Garlic Bread Cylinders | Irresistibly Tasty?
You can experiment with different fillings, such as adding shredded cheese for cheesy garlic bread cylinders or incorporating fresh herbs like thyme or basil into the filling. For a spicy twist, consider mixing in crushed red pepper flakes to the garlic filling!
Can I use store-bought dough for Bake Garlic Bread Cylinders?
Absolutely! Using store-bought pizza or bread dough can save time. Just roll it out, spread your garlic filling, shape your cylinders, and proceed with baking as directed in the recipe. This is a great shortcut for beginners or busy cooks!
What nutritional considerations should I keep in mind for Bake Garlic Bread Cylinders?
Each cylinder contains approximately 210 calories, primarily from carbohydrates and fats. If you're looking to lighten them up, consider reducing the amount of butter in the filling or using a healthier oil. Additionally, complementing these cylinders with fresh vegetables can enhance the meal's nutritional balance!
Bake Garlic Bread Cylinders Irresistibly Tasty