Garlic Butter Bread Rolls: Proper Fluffy Dinner Rolls, Just Like a Bistro
- Elevating the Everyday: Why These Rolls Are a Game Changer
- Achieving Cloud and Like Texture: The Science of Fluffy Yeast Dough
- Essential Components for the Ultimate Garlic Butter Bread Rolls
- Baking Armory: Necessary Tools and Kitchen Setup
- A Step and by-Step Guide to Baking Perfect Dinner Rolls
- The Critical Window: Preparing the Garlic Butter Bread Rolls Before Baking
- Troubleshooting and Advanced Techniques for Homemade Rolls
- Storage Solutions and Reheating Methods for Leftover Rolls
- Recipe FAQs
- 📝 Recipe Card
Elevating the Everyday: Why These Rolls Are a Game Changer
Let’s be honest. When you order bread rolls at a restaurant, half the time they’re dense, sad little disks, or they taste vaguely of cardboard and regret. I used to think that was just the price of a dinner roll. Then I started playing around with enriched doughs at home, and everything changed.
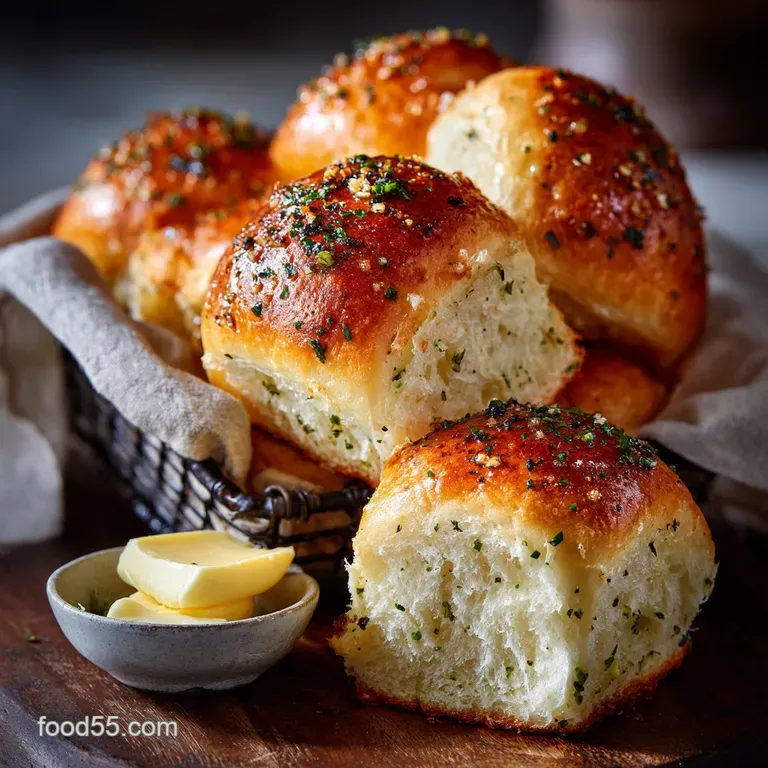
These Garlic Butter Bread Rolls aren’t just bread. They are a vehicle for pure, unadulterated comfort. What makes them different is that we’re not just tossing dried seasoning onto stale bread; we are creating a cloud and like texture (thanks to milk and egg in the dough) and then infusing them with pungent, fresh garlic butter immediately after they exit the oven.
That heat draws the garlicky fat deep into the crumb, making every single bite moist, flavourful, and utterly addictive. Trust me, you’ll never look at store and bought bread the same way again. I warned you.
Achieving Cloud and Like Texture: The Science of Fluffy Yeast Dough
The secret here lies in enrichment. A simple French bread uses just flour, water, yeast, and salt. That gives you a chewy crust and an airy interior. Delicious, but not what we want for these rolls. We want them soft enough to compress easily but sturdy enough to hold a puddle of butter.
To get this, we add fat specifically, whole milk, melted butter, and an egg.
Adding these ingredients slows down the gluten development slightly, but more importantly, it coats the gluten strands, preventing them from tightening up too much. This results in a tender, moist crumb structure, which is what gives these Garlic Butter Dinner Rolls their almost famous softness.
Don’t skimp on the fat. Honestly, using low and fat milk here is just missing the point of what makes these so good.
Demystifying Yeast: A Foolproof Approach for Beginners
Yeast is not scary. It's just a tiny fungus that needs a warm bath and a snack. If you treat it right, it works.
The key step is activation. Grab your milk and heat it up until it’s warm to the touch (around 105°F to 115°F, or about 40°C to 46°C). If it’s too hot, you kill the little guys. Too cold, and they sleep through the whole party. Stir in your sugar (that’s the snack!) and the yeast.
Wait about five to ten minutes. If a creamy, bubbly foam forms on the surface, you are golden. If nothing happens, your yeast is dead, or your milk was too hot. Start over with new yeast and check that temperature. It’s the single most important step in making any yeasted bread recipe homemade.
The Secret to Pungent Perfection: Mastering the Garlic Butter Soak
This is where the magic happens, and frankly, where most recipes fall flat. They usually tell you to brush the rolls with butter before baking, and then maybe again after. We are skipping the pre and bake brush entirely we want maximum flavour infusion at the end.
The secret is using raw fresh garlic, finely minced, mixed into the melted butter and herbs, and then applying it immediately after baking. Why raw? Because baking the garlic causes it to mellow out and taste a bit roasted.
We want that sharp, vibrant pungency that bursts through the richness of the butter. The hot rolls literally suck up the glaze like a sponge, ensuring every cell is permeated with garlic goodness.
Comparing Baking Methods: Stand Mixer vs. Hand Kneading
If you have a stand mixer with a dough hook, use it. It is absolutely the superior way to get the perfectly developed gluten structure these rolls need without breaking a sweat. However, you can totally knead by hand. It’s therapeutic, if you ask me.
| Method | Time Required (Kneading) | Effort Level | Result Quality |
|---|---|---|---|
| Stand Mixer | 6– 8 minutes | Low | Consistent, superior gluten development. |
| Hand Kneading | 10– 12 minutes | High | Excellent, provided you are thorough. |
If you’re kneading by hand, don't get tempted to keep adding flour when the dough is sticky. Just scrape, fold, and keep going. After about five minutes, the stickiness should start to turn into tackiness.
Essential Components for the Ultimate Garlic Butter Bread Rolls
The difference between a good roll and a truly great roll is the richness provided by the liquid and fat. We use whole milk because the fat content contributes directly to the soft, tender crumb we are aiming for, far more than water or even low and fat milk would.
The single egg also adds richness and a bit of protein, giving the rolls structure and that lovely golden hue when baked.
Critical Note: Make sure all your dairy ingredients (milk, egg, and the butter melted for the dough) are measured accurately. Bread baking is a precise science disguised as a casual hobby.
Baking Armory: Necessary Tools and Kitchen Setup
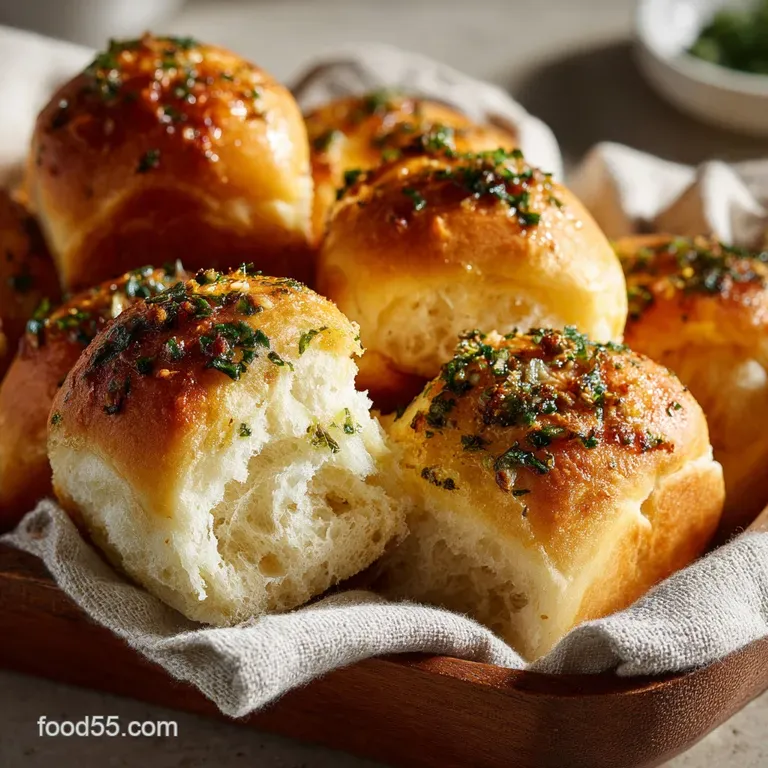
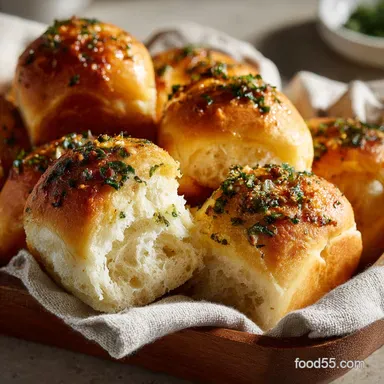
You don’t need a commercial kitchen, but having the right tools makes a difference, especially for kneading and proving. While the stand mixer is an absolute champion, the real necessity is the baking vessel. I insist on using a standard 9x13 inch casserole dish or baking pan for these rolls. Why?
Because we want them touching. Baking them snugly forces them to rise up, not out, resulting in soft sides that are easy to tear apart the hallmark of proper homemade bread rolls.
Sourcing the Best Ingredients: Butter Fat and Flour Type Explained
When making Garlic Butter Milk Bread Rolls, we rely heavily on high and quality fat. Choose a butter you actually like the taste of, ideally one with a higher butterfat percentage (often labeled as "European style").
Since the butter is the flavour carrier in both the dough and the glaze, don’t cheap out here.
For the flour, standard All and Purpose (AP) flour works perfectly fine because we are adding the egg and milk for tenderness. You could use bread flour, but the extra protein might make the rolls a bit too chewy for my liking. We’re going for light and pillowy, remember?
The Role of Salt and Sugar in Yeast Activation
This is where beginners sometimes trip up. Sugar is food for the yeast; it helps them activate quickly. Salt, however, is a regulator. It controls the yeast's activity and, crucially, strengthens the gluten structure, which prevents your rolls from collapsing.
The cardinal rule here is: never let the salt touch the yeast directly before mixing. It can absolutely kill it. I always mix my salt into the bulk of the flour first, then add the wet yeast mixture to that bowl. This ensures proper distribution without yeast casualties.
Substituting Dairy: Making These Rolls Lactose and Friendly
If you or a friend can’t do dairy, don't despair! You can absolutely still enjoy these.
- Milk: Substitute with unsweetened oat milk or soy milk. They have enough fat content to provide decent richness. Almond milk is too watery, so avoid that if you can.
- Butter: Use high and quality vegan butter sticks (the ones designed for baking) in equal measure for both the dough and the final glaze. It works beautifully, though you might lose a tiny bit of that classic butter flavour profile.
Related Recipes Worth Trying
- Thanksgiving Recipes: Rich Sage and Brown Butter Gravy, Ready in 40 Min — Thanksgiving Recipes require the perfect gravy. Our ultimate brown butter and sage recipe elevates standard pan drippings for deep, savory flavour. This is...
- Lemon Garlic Butter Chicken Tenders Ready in 27 Minutes — Lemon Garlic Butter Chicken Tenders is your new favorite Weeknight Chicken Tenders recipe Master this simple PanSeared Chicken Tenders technique for a rich...
- Butternut Lentil Stew Easy Creamy Coconut Squash Soup Recipe — This Butternut Lentil Stew is the perfect onepot comfort meal Its a naturally vegan Butternut Squash Stew with creamy coconut milk and warming Indian spices...
A Step and by-Step Guide to Baking Perfect Dinner Rolls
While the recipe outline covers the technical steps, the real key to success is observation. You must pay attention to the dough’s feel rather than relying solely on the clock. Is your kitchen cold today? It will take longer. Is it humid and warm? Faster rise!
I always treat the mixing phase as an aerobic workout for the dough. Kneading isn't just mixing; it's developing long, elastic strands that will trap the gas created by the yeast, giving us that spectacular lift.
The Critical Window: Preparing the Garlic Butter Bread Rolls Before Baking
This phase is where impatient people (like me, sometimes!) make mistakes. Don’t rush the rises. If you rush, the texture will be dense, and the flavour won't develop fully.
The Windowpane Test: Knowing When Your Dough is Fully Kneaded
How do you know when you've kneaded enough? The dough should be smooth, elastic, and when you poke it, the indentation should slowly spring back. But the real litmus test is the windowpane.
Tear off a small marble and sized piece of dough. Gently stretch it between your fingers. If you can stretch it thin enough to see light pass through it (like a thin pane of glass) before it tears, your gluten is perfectly developed. If it tears instantly, knead for another minute or two and test again.
Think of it like stretching old chewing gum. It needs to be pliable.
First Rise Philosophy: Achieving Optimum Bulk Fermentation
The first rise (bulk fermentation) is where the flavour is built. Don't worry too much about the clock here. Aim for the dough to visibly double in size. I often use my oven, turned off , but warmed for just 30 seconds beforehand. It creates a cosy, draught and free environment that yeast loves.
This rise typically takes me between 60 and 90 minutes.
Shaping Mastery: Ensuring Uniform Roll Size
I know, I know. Weighing the dough seems fussy. But for the sake of even baking, try to get those 12 portions as close to the same weight as possible (around 65 grams). Once divided, you need to form each piece into a tight ball.
Tuck the edges underneath and roll it quickly against the counter with a cupped hand until the surface is smooth and the ball has some internal tension. This surface tension ensures a beautiful, tall rise.
Post and Bake Strategy: Infusing Maximum Garlic Flavor
This is my absolute favourite moment. The rolls are baked, golden, and slightly domed. The glaze is ready. Do not wait even 30 seconds. Pull the tray out, and immediately grab that pastry brush.
Brush liberally, focusing especially on the cracks and seams where the rolls meet, ensuring that rich butter and minced fresh garlic seep down into the sides. Then, if you want a textural contrast, sprinkle that flaky sea salt right over the wet butter. It seals the deal.
Troubleshooting and Advanced Techniques for Homemade Rolls
Having trouble getting that perfect loaf? Here are a few common issues and solutions:
- Dense Rolls (No Rise): The likely culprit is dead yeast (too hot milk!) or an overly cold kitchen during proofing. Ensure your milk temperature is spot on, and find a warm spot for your dough.
- Dry Dough: You added too much flour during the initial mixing or kneading. Always measure flour by lightly spooning it into the measuring cup, not scooping it directly out of the bag, which compacts it.
- Too Much Garlic Heat: If the raw garlic is too strong for you, you can microwave the prepared glaze for 15 seconds before brushing. This slightly mellows the edge without cooking it completely.
Storage Solutions and Reheating Methods for Leftover Rolls
These are best eaten the day they are made. Honestly, you probably won't have leftovers. But if you manage to squirrel some away, store them in an airtight container at room temperature for up to three days.
To revive them, my preferred method is wrapping them loosely in foil and heating them in a 300°F (150°C) oven for about 8– 10 minutes. The foil traps the moisture, keeping them soft, and the heat brings the garlic aroma back to life.
Avoid the microwave if possible, as it tends to make the texture tough.
Can I Prepare the Dough Overnight?
Absolutely, and I highly recommend it if you want an even deeper flavour profile. This is called cold proofing.
After the initial kneading (Stage 1), put the dough ball in the oiled bowl, cover it tightly, and place it in the refrigerator for 8 to 16 hours. The cold temperature slows the yeast way down, allowing complex flavours to develop.
When you are ready to bake, pull the dough out, let it warm up for about 45 minutes on the counter, then proceed immediately to dividing, shaping, and the second rise (Stage 2).
Nutritional Breakdown and Serving Suggestions
Yes, these rolls are rich. They have butter, milk, and an egg. We are not making diet food here; we are making comfort food.
Serve these Garlic Butter Dinner Rolls alongside something that needs sauce and mopping. Think hearty, rustic dishes. A rich ragu, a simple roast chicken, or a huge bowl of slow and simmered vegetarian chilli. They are the perfect sponge.
Flavor Swaps: Herb Variations for Garlic Butter Bread Rolls
Not a huge fan of Italian herbs? No problem. The garlic and butter base is super flexible. Try these variations for the glaze:
- Lemon & Thyme: Add the zest of half a lemon and 1 tablespoon of fresh thyme leaves to the melted butter for a brighter, more acidic finish.
- Rosemary & Black Pepper: Use finely chopped fresh rosemary and a generous crack of black pepper instead of parsley and Italian herbs.
- Chives & Smoked Paprika: If serving alongside a soup or chili, finely chop chives and add a pinch of smoked paprika to the butter for a savory, slightly smoky lift.
Identifying and Correcting Under and Proofed Dough
If your rolls go into the oven and seem to explode rather than gently rise, they were likely under and proofed during the second rise. This means they hadn't developed enough gas before baking.
The easy way to check is the "poke test." Gently poke the side of a shaped roll with a floured fingertip:
- If the indentation springs back immediately: Keep proofing.
- If the indentation slowly springs back halfway: They are perfectly proofed and ready for the oven.
- If the indentation stays and the dough deflates slightly: They are over and proofed. Bake them immediately to salvage what texture you can, but they will likely be dense.

Recipe FAQs
I'm hosting a big roast. Can I prepare these Garlic Butter Bread Rolls in advance?
Absolutely. For a stunning prep ahead strategy, complete the first rise, shape the rolls, and then cover and refrigerate them overnight for a slow, cold proof. Just let them warm up on the counter for 30 minutes before baking as usual.
My dough seems a bit heavy and dense what have I done wrong, guv'nor?
That usually means you've accidentally added too much flour, or your yeast wasn't properly activated; remember, bread dough should be elastic and tacky, but never dry or crumbly. If the kneading was spot on, ensure your proofing location was warm enough, as cold dough won't rise properly.
I only have margarine in the fridge. Will that work instead of proper unsalted butter?
While margarine can technically substitute the butter within the roll dough, for a dish where butter is the undisputed star, using high-quality unsalted butter is non-negotiable for that rich, satisfying flavour and texture. Don't skimp on the final glaze!
How can I store leftover rolls, and how long do they keep fresh?
Store any leftovers in an airtight container at room temperature for up to two days, though they are certainly best enjoyed on the day of baking. To revive them to their fluffy former glory, wrap them loosely in foil and reheat briefly in a 350°F (175°C) oven until piping hot.
Can I substitute powdered garlic in the glaze, or must I use fresh minced cloves?
For a truly exceptional flavour profile that avoids tasting flat or metallic, you must use fresh, finely minced garlic in the glaze; the raw, vibrant pungency is what defines these rolls, making the extra effort well worth it.
Garlic Butter Bread Rolls Recipe
Ingredients:
Instructions:
Nutrition Facts:
| Calories | 139 kcal |
|---|---|
| Protein | 3.0 g |
| Fat | 5.0 g |
| Carbs | 19.0 g |
