Instant Pot Pot Roast: Tender Beef

- Time: Active 20 minutes, Passive 1 hour, Total 1 hour 20 mins
- Flavor/Texture Hook: Shatter apart beef with a velvety, umami rich gravy
- Perfect for: A comforting Sunday family dinner or stress free meal prep
- Crafting the Most Tender Instant Pot Pot Roast
- Why These Flavor Layers Build So Seamlessly
- Component Analysis for the Deepest Beef Umami
- Selecting Your Elements for the Best Results
- Essential Tools Needed for a Succulent Result
- Mastering Every Stage of the Cooking Process
- Avoiding Common Pitfalls for Better Pressure Cooking
- Scaling Your Meal for Any Occasion
- Clever Modifications Designed for Your Personal Palate
- Keeping Your Leftovers Fresh and Using Everything
- Plating Your Meal for a Shared Experience
- High in Sodium ⚠️
- Recipe FAQs
- 📝 Recipe Card
Crafting the Most Tender Instant Pot Pot Roast
The second that 3 lbs Beef Chuck Roast hits the hot stainless steel, you hear it that aggressive, rhythmic sizzle that promises a world of flavor. I still remember the first time I tried this; I was so skeptical that a machine could mimic my grandmother’s eight hour oven braise.
But as the aroma of rosemary and searing beef filled my kitchen, I knew I was onto something special. There’s something truly magical about the way the pressure pushes seasoned broth deep into the fibers of the meat, turning a humble roast into something that practically melts.
We have all been there, staring at a tough piece of meat and wondering if it will ever soften up. This recipe isn't just about speed; it is about creating a shared experience around a table with people you love.
Whether it’s the way the 1 lb Red Potatoes soak up the beef bone broth or how the 4 large Carrots retain their sweetness, this dish is designed to bring everyone together. Let’s get into why this method is actually superior to the old school ways we grew up with.
Why These Flavor Layers Build So Seamlessly
Collagen Transformation: High pressure raises the internal temperature of the liquid above the standard boiling point, which rapidly melts tough collagen into silky gelatin. This process is what creates that signature mouthfeel where the meat seems to dissolve without being dry.
Maillard Reaction Reinforcement: By searing the beef first in 2 tbsp Neutral Oil, we create hundreds of new flavor compounds that the pressure cooker later distributes throughout the entire 2 cups Beef Bone Broth.
This ensures the gravy doesn't just taste like salt, but has a deep, caramelized complexity.
Infusion Dynamics: The sealed environment of the pot prevents aromatic compounds from escaping into the air, forcing the oils from the fresh rosemary and thyme directly into the beef. This creates a much more intense herbal profile than open air roasting ever could.
| Method | Cook Time | Texture | Best For |
|---|---|---|---|
| Instant Pot | 1 hour | Ultra tender, moist | Busy weeknights or quick Sunday lunch |
| Oven Braise | 3-4 hours | Traditional, slightly drier | When you want the house to smell like beef all day |
| Stovetop | 3 hours | Concentrated sauce | Smaller cuts that need constant basting |
While the oven is classic, the pressure cooker wins on moisture retention every single time because the steam has nowhere to go but back into the meat. If you find yourself wanting to try a different slow cook approach later, you might enjoy my Slow Cooker Pot recipe which uses a similar flavor base but over a much longer timeline.
Component Analysis for the Deepest Beef Umami
| Ingredient | Science Role | Pro Secret |
|---|---|---|
| Beef Bone Broth | Provides the liquid medium and natural gelatin | Use a low sodium version so you can control the salt levels perfectly. |
| Worcestershire Sauce | Acts as an acid and umami booster | The fermented anchovies in the sauce act as a hidden flavor multiplier. |
| Cornstarch Slurry | Stabilizes the sauce and adds "body" | Always mix with cold water first to prevent starchy lumps from forming. |
The key to a successful roast is selecting a cut with heavy marbling. I always look for a chuck roast that has thick white veins of fat running through it, as this fat will render down and baste the meat from the inside out during the cook. If you're interested in how different cuts of beef respond to dry heat versus wet heat, looking at a Classic Herb Crusted Bottom recipe can give you a great comparison for leaner roasts.
Selecting Your Elements for the Best Results
- 3 lbs Beef Chuck Roast: This is the heart of the dish. Why this? The high fat content ensures the meat stays succulent under high pressure. (Substitute: Beef Brisket)
- 2 tsp Coarse Kosher Salt: Essential for drawing out moisture and seasoning. (Substitute: Sea Salt)
- 1 tsp Cracked Black Pepper: Adds a necessary bite to the rich fats. (Substitute: White Pepper)
- 2 tbsp Neutral Oil: Used for the over high heat sear. (Substitute: Grapeseed Oil)
- 1 large Yellow Onion: Provides a sweet, aromatic base. (Substitute: White Onion)
- 4 cloves Garlic: Smashed to release oils slowly. (Substitute: 1 tsp Garlic Powder)
- 2 cups Beef Bone Broth: The liquid foundation. Why this? Bone broth has more protein and depth than standard stock. (Substitute: Beef Stock)
- 2 tbsp Worcestershire Sauce: Adds tang and fermented depth. (Substitute: Soy Sauce)
- 2 sprigs Fresh Rosemary: Provides a piney, earthy aroma. (Substitute: 1 tsp Dried Rosemary)
- 4 sprigs Fresh Thyme: Adds a subtle floral note. (Substitute: 1/2 tsp Dried Thyme)
- 1 lb Red Potatoes: These hold their shape well during pressure cooking. (Substitute: Yukon Gold)
- 4 large Carrots: Cut into 2 inch chunks for texture. (Substitute: Parsnips)
- 2 tbsp Cornstarch: For the final thickening. (Substitute: Arrowroot Powder)
- 2 tbsp Cold Water: To create the slurry. (Substitute: Cold Beef Broth)
Chef's Tip: Freeze your beef for 15 minutes before searing. It firms up the exterior fat, allowing you to get a much darker, crispier crust without overcooking the inside of the meat.
Essential Tools Needed for a Succulent Result
You don't need a kitchen full of gadgets for this, but a few specific items make the process much smoother. Obviously, a 6 quart or 8 quart Instant Pot is the star here. You will also want a pair of heavy duty tongs for flipping that heavy roast.
A sharp chef's knife is non negotiable for prepping those 2 inch carrot chunks and halving the potatoes.
Finally,, have a small whisk or a fork ready for the cornstarch slurry. Getting that gravy to a velvety consistency requires a quick, vigorous stir once the pot is on the sauté setting.
If you have a fat separator, that is a bonus for the gravy, but a large spoon and a little patience work just as well to skim off any excess oil.
Mastering Every Stage of the Cooking Process

Phase 1: The Sear and Deglaze
- Season the meat. Rub the 2 tsp Coarse Kosher Salt and 1 tsp Cracked Black Pepper over all sides of the 3 lbs Beef Chuck Roast. Note: This creates a seasoned crust during the sear.
- Sear the beef. Set the pot to Sauté and add 2 tbsp Neutral Oil. Cook the roast for 5 minutes per side until a deep brown crust forms and the meat releases easily.
- Aromatize the base. Remove the meat and add the 1 large Yellow Onion and 4 cloves Garlic. Sauté for 2 minutes until the onion edges start to soften and turn translucent.
- Deglaze the pot. Pour in 1/2 cup of the 2 cups Beef Bone Broth. Use a wooden spoon to scrape every bit of brown "fond" off the bottom. Note: This prevents the "Burn" notice and adds massive flavor.
Phase 2: The Pressure Cook
- Build the liquid. Stir in the remaining broth, 2 tbsp Worcestershire Sauce, 2 sprigs Fresh Rosemary, and 4 sprigs Fresh Thyme.
- Return the roast. Place the beef back into the pot, submerging it halfway in the liquid.
- Set the pressure. Secure the lid and set to High Pressure for 1 hour. Wait for the pot to reach full pressure and begin its countdown.
- Natural release. Once the timer ends, let the pressure release naturally for 10 minutes before venting the remaining steam. Note: This prevents the meat fibers from seizing up and becoming tough.
Phase 3: The Vegetables & Finishing
- Add the vegetables. Open the lid and nestle the 1 lb Red Potatoes and 4 large Carrots around the meat. Pressure cook on High for an additional 10 minutes.
- Thicken the gravy. Remove the meat and veggies. Whisk the 2 tbsp Cornstarch and 2 tbsp Cold Water, then stir into the simmering liquid until the sauce becomes thick and velvety.
Avoiding Common Pitfalls for Better Pressure Cooking
Why Your Pot Roast is Tough
If the meat feels "rubbery" rather than "fall apart," it usually means it hasn't cooked long enough to break down the connective tissue. Unlike a steak, chuck roast gets more tender the longer it braises.
Also, skipping the natural release is a huge mistake; a sudden drop in pressure causes the muscle fibers to squeeze out all their moisture.
Why Your Gravy is Thin
A watery gravy usually happens because too much moisture was released from the vegetables or the lid wasn't sealed perfectly. This is why the cornstarch slurry is vital. If it’s still too thin, let the sauce simmer on Sauté for a few extra minutes to reduce and concentrate the flavors.
| Problem | Root Cause | Solution |
|---|---|---|
| Burn Notice | Bits of meat stuck to the bottom | Deglaze thoroughly with broth and scrape with a wooden spoon. |
| Mushy Carrots | Cooked for the full hour with the meat | Only add vegetables for the final 10 minutes of pressure cooking. |
| Bland Sauce | Not enough salt or searing | Increase the sear time and check seasoning before adding cornstarch. |
Common Mistakes Checklist
- ✓ Always sear the meat in batches if it doesn't fit comfortably - overcrowding prevents browning.
- ✓ Never skip the deglazing step - those brown bits are the "gold" of the gravy.
- ✓ Check that the sealing ring is properly seated in the lid before starting.
- ✓ Ensure the carrots are cut into large 2 inch chunks so they don't disintegrate.
- ✓ Use cold water for your slurry - warm water creates lumps that won't dissolve.
Scaling Your Meal for Any Occasion
If you are cooking for a smaller crowd, you can easily halve this recipe. Use a 1.5 lb roast and reduce the cook time by about 10-15%. For the liquids, keep them the same; the Instant Pot needs a minimum amount of liquid (usually 1 cup) to come to pressure safely.
If you only have one egg for a different recipe you're scaling, you can beat it and use half, but here, the scaling is mostly about the meat and veg volume.
Scaling up to a 5 lb roast requires a bit more care. You don't necessarily need to double the cook time, but you should add about 20 minutes to the pressure cycle. Keep the salt and spices to about 1.5x the original amount rather than doubling them to avoid over seasoning.
Most importantly, do not fill your Instant Pot past the "Max Fill" line, as the steam needs space to circulate for even cooking.
Clever Modifications Designed for Your Personal Palate
Instant Pot Pot Roast Onion Soup Mix
For a nostalgic, flavor packed version, you can replace the rosemary and thyme with one packet of onion soup mix. This adds a huge punch of toasted onion flavor and extra saltiness. If you do this, reduce the kosher salt to just 1 tsp to keep the balance right.
For a Red Wine Variation
Swap out 1 cup of the beef bone broth for a dry red wine like Cabernet Sauvignon or Merlot. Add the wine during the deglazing step and let it simmer for 2 minutes to cook off the raw alcohol smell. This creates a much richer, darker gravy that feels very sophisticated for a dinner party.
- If you want a thicker sauce: Use 3 tbsp of cornstarch instead of two.
- If you want it keto friendly: Swap the potatoes for cauliflower florets and use Xanthan gum instead of cornstarch.
- If you want a kick: Add 1 tbsp of prepared horseradish to the finished gravy.
Keeping Your Leftovers Fresh and Using Everything
This roast actually tastes better the next day as the flavors continue to meld in the fridge. Store the beef and vegetables in the gravy in an airtight container for up to 4 days. When reheating, I recommend doing it on the stove over medium low heat with a splash of extra broth to keep it moist.
Microwaving can sometimes make the beef feel a bit "stringy."
For zero waste, don't you dare throw out those onion scraps or herb stems! I keep a bag in my freezer for veggie scraps. When the bag is full, I throw them in the pot with some water to make a "scrap stock" for future soups.
If you have leftover beef but no veggies, shred the meat and toss it with some BBQ sauce for the easiest pulled beef sandwiches you've ever had. You can also freeze the cooked roast in its gravy for up to 3 months just thaw it overnight in the fridge before reheating.
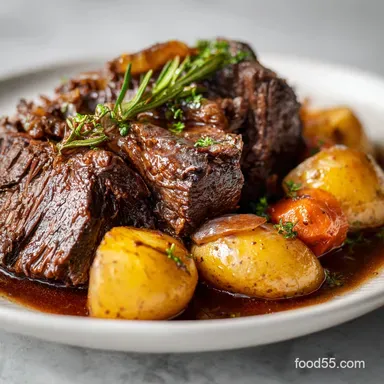
Plating Your Meal for a Shared Experience
When it’s time to serve, I love to bring the whole roast to the table on a large, warmed platter. Arrange the potatoes and carrots around the perimeter and place the beef right in the center. Instead of slicing it into perfect portions, I prefer to use two forks to gently pull it into large, rustic chunks.
This highlights the tenderness and makes it feel more like a communal, shared meal.
Pour a generous amount of that velvety gravy over everything, but keep a small boat of it on the side for those who want to drown their potatoes. A sprinkle of fresh parsley adds a pop of color that makes the deep browns of the meat and gravy really stand out. It’s a simple, honest meal that invites everyone to dig in and stay a while. If you are looking for a snack to serve while the roast finishes, these How to Roast Peanuts recipe are a great, crunchy contrast to the soft textures of the pot roast.

High in Sodium ⚠️
1045 mg 1045 mg of sodium (45% 45% of daily value)
The American Heart Association recommends limiting sodium intake to no more than 2,300mg per day for most adults. Reducing sodium can help maintain healthy blood pressure.
Tips to Reduce Sodium in Your Beef Chuck Roast:
-
Low-Sodium Broth-30%
Replace the regular beef bone broth with a low-sodium or no-sodium beef broth. This can significantly reduce the overall sodium content.
-
Reduce Added Salt-25%
Cut back on the amount of coarse kosher salt. Start by using only 1 teaspoon instead of 2, and taste as you cook to adjust.
-
Low-Sodium Worcestershire-20%
Use a low-sodium version of Worcestershire sauce or reduce the amount you add by half. Consider adding a splash of balsamic vinegar for depth of flavor.
-
No Salt on Potatoes-10%
Skip adding any salt directly to the potatoes while cooking. The reduced sodium broth and other flavorings should be sufficient.
-
Enhance with Herbs
Experiment with other fresh or dried herbs and spices like bay leaf, paprika, garlic powder (ensure it's just garlic, no salt!), onion powder, or dried mustard to enhance the flavor of the roast without adding sodium.
Recipe FAQs
How long do you cook a beef roast in the Instant Pot?
For a standard 3 lb chuck roast, cook for 60 minutes at high pressure. After the cooking cycle, allow a 10 minute natural pressure release before manually venting to ensure maximum tenderness.
Is an Instant Pot good for pot roast?
Yes, it is an excellent method for pot roast. The high pressure rapidly converts tough collagen into silky gelatin, resulting in fork tender beef far faster than traditional oven braising.
Is it better to slow cook or pressure cook a pot roast?
Pressure cooking is better for speed and moisture retention. While slow cooking yields great results, the Instant Pot achieves similar tenderness in about one-quarter of the time because it forces moisture into the meat fibers.
Why is my pot roast still tough in the Instant Pot?
The roast likely needs significantly more time under pressure. Toughness usually means the connective tissue hasn't fully broken down; try adding 15-20 minutes more cooking time next time, followed by a full natural release.
How to get a good sear on the beef before pressure cooking?
Set the Instant Pot to Sauté mode and use high heat with oil until a deep brown crust forms. Ensure the beef releases easily from the bottom before flipping; if it sticks, it needs more time to sear.
Should I add potatoes and carrots for the entire cook time?
No, always add the root vegetables during the final stage of cooking. They should only cook for about 10 minutes under high pressure after the beef is done, otherwise they will turn to mush.
Can I use a leaner cut of beef like a top round roast?
No, leaner cuts are generally not recommended for pressure cooking pot roast. Leaner beef dries out quickly under pressure; focus on well marbled cuts like chuck or brisket for that fall apart texture. If you mastered the texture control in this recipe, you can see how that technique changes for leaner cuts in our Classic Herb Rump Roast.
Instant Pot Pot Roast
Ingredients:
Instructions:
Nutrition Facts:
| Calories | 648 kcal |
|---|---|
| Protein | 48.4 g |
| Fat | 38.2 g |
| Carbs | 24.6 g |
| Fiber | 3.8 g |
| Sugar | 4.2 g |
| Sodium | 1045 mg |
