Low Carb Chicken Recipe with Garlic
- Time: Active 15 mins, Passive 10 mins, Total 25 mins
- Flavor/Texture Hook: Shatter crisp skin with a velvety garlic butter finish
- Perfect for: Busy weeknights, keto meal prep, or beginner friendly date nights
- Understanding the Thermal Mechanics for Succulent Results
- Establishing Essential Metrics for Successful Poultry Preparation
- Sourcing Premium Components for Your Low Carb Meal
- The Best Tools for Achieving a Professional Sear
- Detailed Instructions for a Perfectly Seared Garlic Chicken
- Troubleshooting Guide for Common Searing and Flavor Issues
- Adapting Recipe Yield for Groups and Meal Prep
- Debunking Searing Misconceptions and Cold Pan Methods
- Guidelines for Storing and Reheating Leftover Chicken Thighs
- The Best Low Carb Sides to Complement Garlic
- High in Sodium
- Recipe FAQs
- 📝 Recipe Card
Close your eyes and imagine the sound of a heavy cast iron pan hitting the burner. You drop in a tablespoon of oil, and the second that chicken touches the surface, there's that aggressive, beautiful sizzle that promises a world of flavor.
Within seconds, the aroma of browning poultry fills the kitchen, soon followed by the sweet, intoxicating scent of smashed garlic cloves melting into golden butter. It is the kind of smell that brings people running to the stove, asking, "When do we eat?"
I used to be the person who overcooked chicken thighs because I was terrified of undercooking them. I’d end up with something resembling a rubber tire rather than a meal. But after years of experimenting in my own kitchen, I discovered that the secret isn't just the heat it's the timing and the aromatic bath at the end.
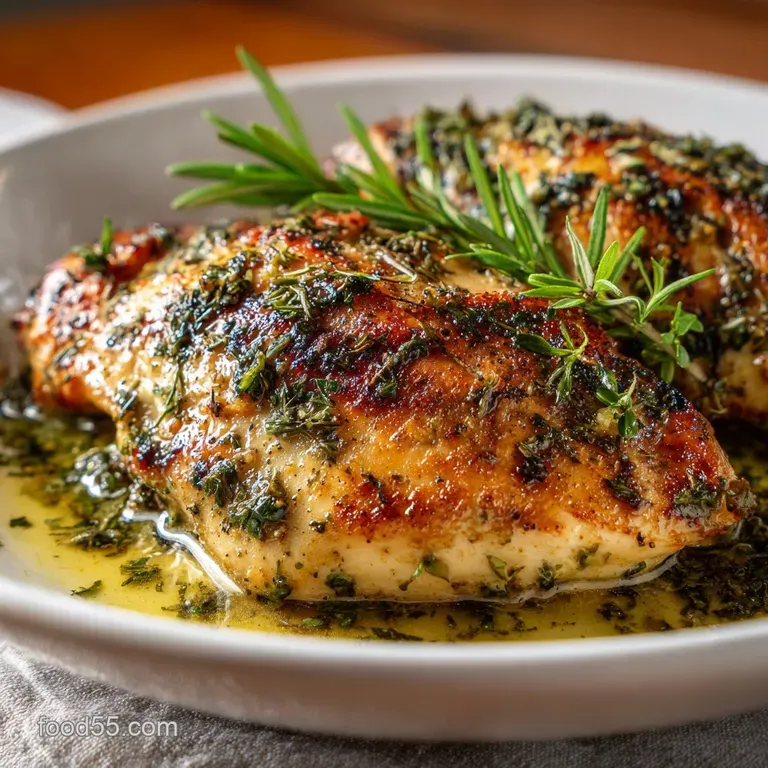
This low carb chicken recipe with garlic and herbs is a simple, flavorful weeknight dinner winner.
We are going to focus on achieving that elusive mahogany crust without a single gram of flour or breading. By understanding how fat and aromatics interact with the meat, you'll produce a dish that feels like a shared celebration, even on a random Tuesday.
This isn't just about fuel; it's about the joy of a perfectly cooked piece of protein that brings everyone together around the table.
Understanding the Thermal Mechanics for Succulent Results
The secret to this chicken lies in the Maillard reaction, which is the chemical dance between amino acids and reducing sugars that happens around 300°F. Since we aren't using sugary glazes, we rely on the chicken’s own proteins and the high smoke point of avocado oil to create that savory, brown exterior.
This process doesn't just change the color; it creates hundreds of new flavor compounds that give the meat its characteristic "roasted" depth.
Chef Tip: Pat the chicken thighs bone dry with paper towels until they feel almost tacky. Any surface moisture will turn to steam the moment it hits the pan, which prevents the skin from getting that satisfying shatter crisp texture.
Heat Conductivity: Heavy pans like cast iron hold onto thermal energy, preventing the temperature from dropping when the cold meat is added. This consistent heat ensures an even sear across the entire surface of the thigh.
Fat Soluble Aromatics: Garlic and rosemary contain flavor molecules that are hydrophobic, meaning they dissolve better in fat than in water. By infusing the butter at the end, we're essentially creating a flavor saturated vehicle that carries the garlic's essence into every nook and cranny of the meat.
| Thickness of Thigh | Internal Temp | Rest Time | Visual Cue |
|---|---|---|---|
| 0.75 inch | 165°F | 5 mins | Juices run clear when pierced |
| 1.0 inch | 165°F | 7 mins | Firm to the touch, no springiness |
| 1.5 inches | 165°F | 10 mins | Deep mahogany crust, opaque center |
When you are aiming for that restaurant style finish, the resting period is just as vital as the cooking itself. During the rest, the muscle fibers that tightened up under the intense heat begin to relax, allowing the juices to redistribute.
If you cut into it too soon, all that velvety moisture will end up on your cutting board instead of in your mouth.
Establishing Essential Metrics for Successful Poultry Preparation
Before we get to the stove, we need to look at the numbers. While I love the stovetop method for the control it provides, some people prefer the "set it and forget it" nature of the oven. Both work, but the results vary in texture and time.
This low carb chicken recipe with garlic performs best when you can see the butter foaming, but let's look at the trade offs.
| Cooking Method | Active Time | Texture Outcome | Best For |
|---|---|---|---|
| Cast Iron Stovetop | 15 minutes | Maximum crunch, juicy interior | Achieving a professional sear |
| oven-roasted | 5 minutes | Even browning, softer skin | Hands off meal prep |
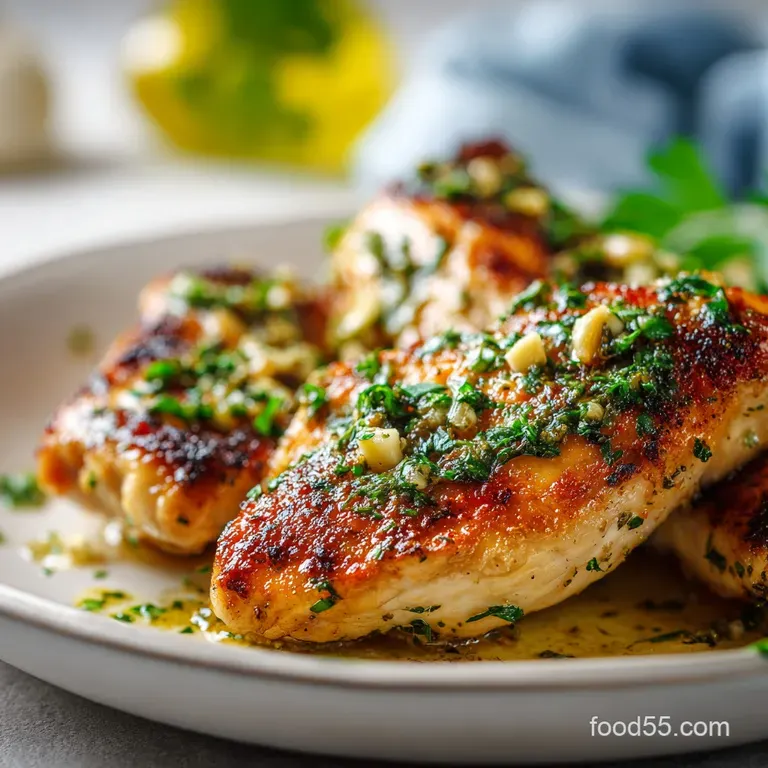
The stovetop method allows for "basting," which is the process of spooning hot, flavored butter over the meat. This acts like a mini deep fry for the top of the chicken while the bottom sears. It's a technique used by high end steakhouses, and it's the fastest way to add a layer of luxury to a simple protein.
Identifying the Component Analysis for Flavor
Every ingredient in this dish has a specific job. We aren't just adding garlic for the sake of it; we’re using it to build a bridge between the earthy herbs and the rich fat of the chicken thighs. Selecting high-quality fats like grass fed butter makes a tangible difference in the final mouthfeel of the sauce.
| Ingredient | Science Role | Pro Secret |
|---|---|---|
| Avocado Oil | High Smoke Point | Use this for the initial sear to avoid acrid, burnt oil flavors. |
| Fresh Garlic | Sulfur Compounds | Smash, don't mince. Smashed cloves release oils without burning as quickly. |
| Sea Salt | Protein Denaturation | Salt 10 mins early to draw out moisture, then pat dry for a better crust. |
| Fresh Rosemary | Essential Oils | Keep the sprigs whole; the woody stem infuses the butter without leaves burning. |
Using the right fat at the right time is the hallmark of a skilled cook. We start with oil because it can handle the high heat needed for the sear, then we finish with butter for the flavor and the "velvety" finish.
This two stage approach prevents the milk solids in the butter from burning during the long searing process.
Sourcing Premium Components for Your Low Carb Meal
To get the best results, you'll want to use the exact measurements listed below. I've tested this with various quantities, and this ratio provides the perfect balance of herb fragrance and garlic punch. If you find yourself wanting a bit more kick, similar to the technique used in The Creamy Garlic recipe, you can always double the red chili flakes.
- 1.5 lbs Boneless Skinless Chicken Thighs: These are more forgiving than breasts and stay juicy even under high heat.
- 1.5 tsp Sea Salt: Essential for bringing out the natural flavors of the poultry.
- 1 tsp Cracked Black Pepper: Provides a subtle heat that cuts through the richness of the butter.
- 2 tbsp Avocado Oil: A neutral oil that won't smoke you out of your kitchen.
- 4 tbsp Grass Fed Butter: Adds a nutty, rich depth that defines the sauce.
- 6 cloves Fresh Garlic, smashed: The star of the show; provides the aromatic backbone.
- 4 sprigs Fresh Thyme: Adds a bright, lemony herbal note.
- 2 sprigs Fresh Rosemary: Provides an earthy, piney aroma.
- 1 tsp Red Chili Flakes: Offers a gentle warmth at the back of the throat.
| Original Ingredient | Substitute | Why It Works |
|---|---|---|
| Avocado Oil | Ghee (Clarified Butter) | High smoke point with a buttery flavor. Note: Very stable at high heat. |
| Fresh Thyme | Dried Thyme (1/2 tsp) | Concentrated flavor. Note: Add earlier in the process to rehydrate. |
| Chicken Thighs | Chicken Breasts | Leaner option. Note: Reduce cook time by 2-3 mins to avoid drying out. |
When choosing your chicken, look for "air chilled" varieties if possible. Most chicken is chilled in water baths, which adds extra moisture that leaks out in the pan, causing the meat to boil rather than sear. Air chilled chicken has less water weight and yields a much better crust.
The Best Tools for Achieving a Professional Sear
You don't need a kitchen full of gadgets, but a few specific items will make your life much easier. I always reach for my cast iron skillet for this recipe. It’s a workhorse that provides the most even heat distribution, which is crucial for preventing "hot spots" that might burn your garlic before the chicken is done.
A digital meat thermometer is non negotiable for me. I used to guess based on "feel," but chicken can be deceptive. One thigh might be thicker than the other, and the thermometer ensures every piece is safe and juicy. I recommend a reliable brand like Thermapen or a budget friendly alternative like the ThermoPro.
Finally, a pair of sturdy stainless steel tongs is your best friend. You need to be able to flip the chicken with precision and hold it on its side if you're trying to render any specific bits of fat.
Avoid silicone tipped tongs for over high heat searing, as they don't always provide the grip needed for heavier cuts of meat.
Detailed Instructions for a Perfectly Seared Garlic Chicken
Now, let's get into the rhythm of the kitchen. This process is fast, so have all your ingredients measured and ready (your mise en place) before you turn on the heat. You want to focus on the sounds and smells as they change.
- Prep the chicken. Pat the 1.5 lbs of chicken thighs dry on both sides with paper towels. Note: This is the most important step for a crispy exterior.
- Season thoroughly. Sprinkle the 1.5 tsp sea salt and 1 tsp cracked black pepper evenly over both sides of the meat.
- Heat the pan. Place your skillet over medium high heat and add the 2 tbsp avocado oil, tilting the pan to coat.
- Initiate the sear. Place the chicken in the hot pan until you hear a loud, vigorous sizzle. Work in batches if necessary to avoid overcrowding.
- Brown the first side. Cook for 5-7 minutes without moving the meat until the edges are golden and the meat releases easily from the pan.
- Flip and continue. Turn the chicken over and cook for another 5 minutes.
- Create the infusion. Reduce heat to medium and add the 4 tbsp butter, 6 smashed garlic cloves, thyme, rosemary, and 1 tsp chili flakes.
- Baste the meat. As the butter foams, tilt the pan slightly and use a spoon to pour the hot garlic butter over the chicken repeatedly for 2-3 minutes.
- Check for doneness. Use a thermometer to ensure the thickest part of the thigh reaches 165°F.
- Rest the poultry. Remove the chicken to a plate and pour the remaining pan juices over it, letting it sit for 5 minutes until the juices settle and the aroma intensifies.
Science Note: The "basting" phase is actually a form of convection cooking. The hot butter transfers heat more efficiently than air, finishing the interior of the meat while the aromatics infuse the surface.
If you find that the stovetop method is a bit too hands on for your schedule, you might enjoy the approach used in this Slow Cooker Chicken recipe, which trades the crispy sear for a more tender, fall apart texture. However, for this specific dish, that butter basting is what creates the "velvety" mouthfeel we’re looking for.
Troubleshooting Guide for Common Searing and Flavor Issues
Even the best cooks run into hiccups. The most common issue with this recipe is the garlic. Garlic has a high sugar content and can go from "sweet and fragrant" to "bitter and black" in a matter of seconds if the heat isn't managed correctly.
Why is my garlic bitter and black?
Garlic burns at a lower temperature than chicken sears. If you add the garlic at the beginning of the process, it will definitely burn. The key is adding it during the last few minutes of cooking when you've dropped the heat to medium. This allows the garlic to soften and release its oils without carbonizing.
Why didn't my chicken get crispy?
If your chicken looks gray or pale, it's likely because the pan wasn't hot enough or the chicken was too wet. If you crowd the pan with too many pieces of meat, the temperature drops and the moisture released from the chicken has nowhere to go, so it steams the meat instead of searing it.
| Problem | Root Cause | Solution |
|---|---|---|
| Rubbery Texture | Underactive heat or no resting | Ensure a hard sear and rest for 5 full minutes. |
| Burnt Butter | Heat too high during basting | Lower heat to medium before adding butter; it should foam, not smoke. |
| Bland Flavor | Insufficient salt | Salt the meat before cooking, not just the sauce at the end. |
Common Mistakes Checklist
- ✓ Skipping the paper towel step (leads to soggy skin).
- ✓ Using a non stick pan (prevents a deep, flavorful crust).
- ✓ Moving the chicken too early (tears the meat and stops browning).
- ✓ Using old, dried out garlic (loses that essential pungency).
- ✓ Slicing the chicken immediately after cooking (loses all the juice).
Adapting Recipe Yield for Groups and Meal Prep
If you're cooking for a crowd or trying to stock your fridge for the week, you can easily scale this recipe. However, don't just double everything blindly. When you double the chicken, you don't necessarily need to double the salt or the herbs at the same rate.
When scaling up (2x-4x), work in batches. If you try to put 3 lbs of chicken in one skillet, you'll end up with a mess. Sear the first batch, move it to a warm oven (around 200°F), and then do the second batch.
Only make the butter sauce at the very end when all the chicken is cooked, so it stays fresh and foamy.
When scaling down (1/2), keep the garlic and herb amounts mostly the same. These aromatics provide the "soul" of the dish, and reducing them too much will leave the chicken tasting a bit plain. You can use a smaller 8 inch skillet to ensure the butter still pools enough for basting.
Debunking Searing Misconceptions and Cold Pan Methods
There is a long standing myth that searing meat "seals in the juices." Science has shown us that this isn't true; moisture loss actually happens faster at higher temperatures. What we are really doing is creating flavor through the Maillard reaction.
The "juiciness" comes from the fat content of the thighs and the proper resting period, not the crust itself.
Another misconception is that you should always start with a cold pan for chicken. While this works for rendering fat on skin on duck breasts, for boneless, skinless thighs, you want that pan screaming hot.
We want the exterior to finish quickly so the interior stays tender and doesn't overcook while waiting for the color to develop.
Guidelines for Storing and Reheating Leftover Chicken Thighs
Leftover garlic chicken is a gift to your future self. It holds up beautifully in the fridge for up to 4 days when kept in an airtight container. The flavors actually continue to meld, and the garlic becomes slightly more mellow over time.
For Zero Waste, don't throw away that leftover garlic butter in the pan! Pour it into a small jar and keep it in the fridge. It's incredible for sautéing vegetables the next day or spreading over a piece of low carb toast.
If you have herb stems left over, toss them into a bag in the freezer to use for your next batch of bone broth.
To reheat, avoid the microwave if you can it tends to make the chicken "rubbery." Instead, place the chicken in a cold pan with a splash of water or broth, cover it, and heat it over medium low. This creates a gentle steam that warms the meat through without drying it out further.
The Best Low Carb Sides to Complement Garlic
To keep this meal within your dietary goals, pair it with sides that can soak up that incredible garlic butter. A bed of cauliflower mash or some roasted asparagus works perfectly.
If you are looking for a more hearty pairing, consider how the flavor profiles in How My Grandmother's recipe use acidity to balance out rich fats.
A simple arugula salad with a heavy squeeze of lemon and some shaved parmesan is my personal favorite. The bitterness of the greens and the sharpness of the lemon cut right through the buttery richness of the chicken, making every bite feel fresh.
Whatever you choose to serve it with, the goal is connection. This is the kind of meal that encourages people to slow down, pass the platter, and enjoy the simple magic of good food. It’s a testament to the fact that you don't need carbs or complex techniques to create something truly memorable.
Right then, let's get that pan heating!

High in Sodium
885 mg mg of sodium per serving (38% of daily value)
The American Heart Association recommends limiting sodium intake to about 2,300mg per day.
Sodium Reduction Tips for Your Chicken Thighs Recipe
-
Reduce Sea Salt-25%
Sea salt contributes significantly to the sodium content. Try reducing the amount of sea salt from 1.5 tsp to 0.75 tsp, which can significantly lower the sodium. You can always add more salt to taste if needed.
-
Unsalted Butter-10%
Using unsalted butter instead of salted butter can also help to reduce the overall sodium content of the dish. Replace the 4 tbsp of grass fed butter with unsalted grass fed butter.
-
Control the Chili Flakes
While red chili flakes don't contain sodium, excessive use can make you perceive the dish as bland if you reduce salt. Use sparingly to avoid needing to compensate with more salt.
-
Herbs & Spices
Enhance the flavor profile with generous amounts of fresh herbs and spices. Experiment with other herbs like oregano, marjoram, or sage in addition to the thyme and rosemary to create a more complex and satisfying flavor without increasing sodium.
Recipe FAQs
What is the best type of pan to use for this low carb garlic chicken?
Cast iron is ideal for this recipe. It holds heat exceptionally well, ensuring an even sear and preventing temperature drops when adding the chicken.
How do I ensure my chicken skin gets crispy?
Pat the chicken thighs completely dry with paper towels. Any excess moisture will create steam, preventing the skin from achieving that desirable shatter crispness.
Why is my garlic bitter after cooking?
Garlic burns easily, so add it in the last few minutes of cooking. Reduce the heat to medium before adding butter and garlic to soften them without charring.
Can I use chicken breasts instead of thighs?
Yes, but adjust the cooking time. Chicken breasts are leaner and can dry out quickly; reduce the searing and basting time by 2-3 minutes to avoid overcooking.
How long should I rest the chicken after cooking?
Rest the chicken for at least 5-10 minutes. This crucial step allows the juices to redistribute throughout the meat, ensuring a tender and moist result.
What are the best low carb sides to serve with this chicken?
Cauliflower mash or roasted asparagus are excellent choices. They absorb the garlic butter well and keep the meal low in carbohydrates.
How should I store and reheat leftovers?
Store leftovers in an airtight container in the fridge for up to 4 days. Gently reheat in a pan with a splash of broth over medium low heat to prevent drying out, rather than using a microwave.
Low Carb Garlic Chicken

Ingredients:
Instructions:
Nutrition Facts:
| Calories | 378 kcal |
|---|---|
| Protein | 32.5 g |
| Fat | 26.8 g |
| Carbs | 1.8 g |
| Fiber | 0.4 g |
| Sugar | 0.2 g |
| Sodium | 885 mg |
