Peanut Butter Pie: the Decadent No-Bake Cloud Pie Recipe
- Introducing the No-Bake Peanut Butter Cloud Pie Phenomenon
- Understanding the Science Behind the Perfect Set
- Required Ingredients for Your Decadent Peanut Butter Pie
- Step-by-Step Method: Assembling the Cloud Pie
- Expert Tips for the Ultimate Peanut Butter Pie Success
- Storage Solutions: Maximizing Freshness and Texture
- Elevating Your Dessert: The Best Pairings for Peanut Butter Pie
- Recipe FAQs
- 📝 Recipe Card
Introducing the No-Bake Peanut Butter Cloud Pie Phenomenon
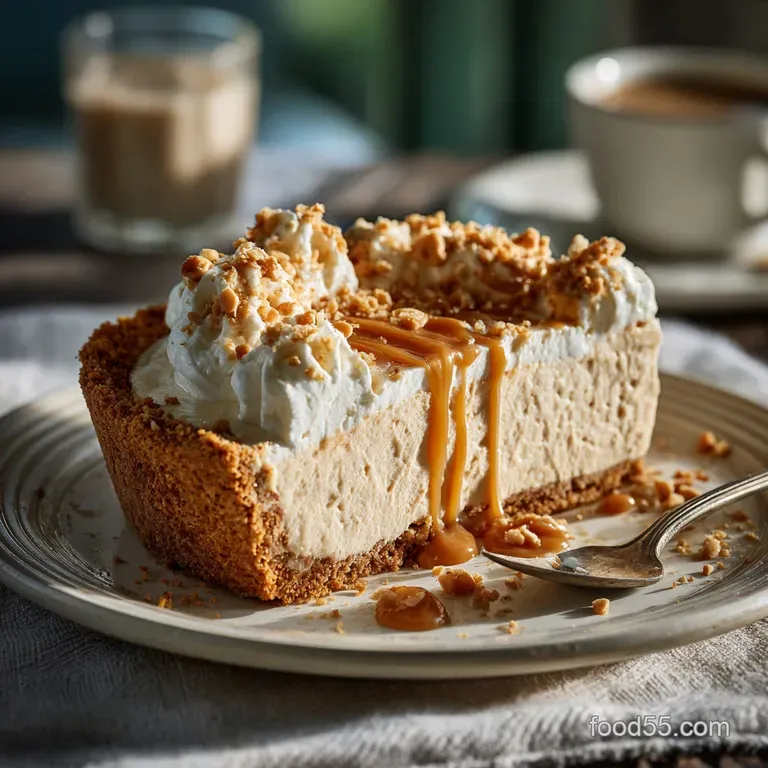
You bite into this pie and everything else just stops. Forget heavy, dense desserts; this peanut butter pie is pure velvet, somehow rich and airy all at once. It sits on a dark, almost bittersweet chocolate crust that offers the perfect salty crunch.
That incredible texture contrast creamy filling against firm crust is what makes this dessert a guaranteed favorite.
This recipe is seriously a lifesaver, especially when you need a spectacular dessert without turning the oven on. It comes together in about 20 minutes of active work, relying on basic pantry staples like peanut butter and cream cheese.
It proves you don't need fancy techniques or expensive ingredients to nail a restaurant quality sweet treat.
I spent years making runny, disappointing peanut butter pies that weeped when sliced (a total nightmare). This version fixes all those structural problems by focusing on stabilization and proper aeration. Let’s crack on and talk about exactly how we turn standard ingredients into this gravity defying, glorious NoBake Peanut Butter Pie: The Ultimate Creamy, Easy Dessert .
Understanding the Science Behind the Perfect Set
Making a no-bake dessert means we are relying on fats and chill time, not heat, to hold everything together. This isn't baking; it's chemistry, baby! We exploit the power of cold cream and room temperature dairy to create stability.
Why We Call It the "Cloud Pie" (Focusing on Airiness)
The key to the "Cloud Pie" texture is whipping heavy cream until it holds stiff peaks, then folding it gently into the creamy base. Whipped cream introduces tons of tiny air bubbles, which not only lighten the final texture dramatically but also help the pie maintain its shape once set.
We're not just stirring it in, we are incorporating air; treat that spatula like you’re handling priceless silk.
The Secret to a Deeply Flavorful Chocolate Biscuit Crust
While many people use graham crackers, I swear by dark chocolate sandwich biscuits for this pie. The bitter depth of the cocoa is essential here. It acts as a necessary counterpoint to the intense sweetness and richness of the peanut butter filling, preventing the whole dessert from tasting cloyingly sweet.
You must press this crust firmly. Use the flat bottom of a glass to really compact the crumbs, forcing the melted butter to bind everything tight.
Comparing Baked vs. No-Bake Peanut Butter Desserts
Baked peanut butter pies often involve eggs or cornstarch, giving them a much denser, custard like texture. This no-bake method, however, delivers a light mousse that melts instantly on your tongue. If you love that rich, dense texture, you might prefer trying an Amish Peanut Butter Cream Pie: Easy No-Bake Recipe for Ultimate Comfort , but for airy indulgence, this Cloud Pie wins every time.
Balancing the Sweetness: The Role of Salted Peanut Butter
Peanut butter pie is inherently sweet that’s just a fact. But if you use only unsalted peanuts and bland butter, it tastes flat. We use stabilized, salted peanut butter (like Jif or Skippy) for the best flavor payoff.
Crucially, a small pinch of sea salt in the crust and sometimes another tiny pinch in the filling enhances the peanut flavor and cuts through the powdered sugar beautifully. Salt is your friend here!
Achieving the Lightest Texture with Stabilized Whipped Topping
We rely on full fat cream cheese for stabilization. When blended with peanut butter and sugar, the fat structure of the cream cheese creates a sturdy foundation. When the whipped heavy cream is folded in, the cream cheese matrix locks the air bubbles into place, ensuring the filling sets up firm enough to slice cleanly without resorting to gelatin.
The Essential Chill Time for Structural Integrity
This might be the hardest part of the recipe, honestly. You need patience. The pie needs a minimum of four hours, but overnight is genuinely better. During this time, the fats in the cream cheese and cream solidify completely, and the butter in the crust re-hardens.
Rushing the chill time will give you a messy, runny slice, and nobody wants that kind of drama after all this effort.
Required Ingredients for Your Decadent Peanut Butter Pie
Here are the specific ingredients you need, along with the substitutions I've personally tested and approved. Remember: Full fat only! Skimping on the fat means compromising the structure.
Choosing the Right Cream Cheese and Peanut Butter (Texture Matters)
For the best results, use Philadelphia or a similar full fat block of cream cheese, ensuring it is utterly, completely at room temperature before you start. Seriously, if it’s cold, you will get lumps, and those lumps will not disappear.
Chef’s Note: Do not use natural, oily peanut butter here. The separated oil prevents the filling from setting up properly and results in weeping. Go for the classic, homogenized, stabilized stuff it’s necessary for structure in this no-bake application.
Crust Components: Dark Cocoa Biscuits vs. Graham Cracker Base
If you absolutely cannot find chocolate sandwich biscuits (like Oreos), you can use standard graham crackers. However, you will need to add 2 tablespoons of unsweetened cocoa powder to the graham crumbs to bring that necessary dark depth back into the crust.
You could also use crushed gingersnaps for a spiced kick, which is surprisingly good!
| Ingredient | Substitution | Reason |
|---|---|---|
| Full Fat Cream Cheese | Vegan Cream Cheese Block | Must be a block, not a spreadable tub, for stability. |
| Chocolate Biscuits | Salted Pretzels + 1 Tbsp Sugar | Provides a crunchy, savory sweet crust. |
| Heavy Whipping Cream | Well Chilled Full Fat Coconut Cream | Scrape only the solidified cream off the top of the can. |
Stabilizing the Filling: Heavy Cream vs. store-bought Whipped Topping
I prefer using freshly whipped heavy cream because the flavor and texture are far superior, making the pie truly feel like a cloud. However, if you are pressed for time, you can definitely substitute the heavy cream with 3 cups of thawed, store-bought frozen whipped topping (like Cool Whip).
Just fold it in very gently.
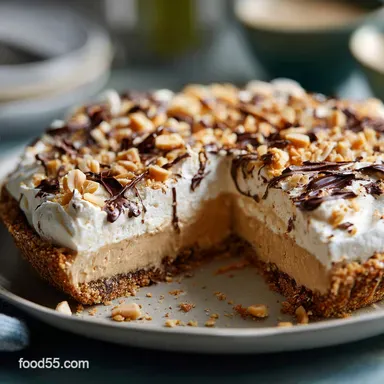
Optional Garnishes: Chocolate Shavings and Peanut Dust
A naked pie is fine, but a dressed pie is brilliant. A scattering of finely chopped roasted peanuts adds crucial texture, and a swirl of chocolate shavings or a dusting of cocoa powder makes it look incredibly sophisticated. Don't skip the garnish; it’s the jewelry for your dessert.
step-by-step Method: Assembling the Cloud Pie

This process moves quickly once you start, so have all your ingredients measured and ready to go.
Phase 1: Compressing and Chilling the Chocolate Crust
- Pulse the biscuits in a food processor until they are fine, even crumbs. Combine these crumbs with the melted butter and sea salt until everything is thoroughly moistened.
- Press the mixture firmly into your 9 inch pie dish, making sure the edges are thick and even. Trust me on this: pressing hard now saves you from a crumbly disaster later.
- Chill the crust in the fridge for a mandatory 30 minutes. This lets the butter firm up, locking those crumbs into place.
Phase 2: Creaming the Peanut Butter Base (The Filling Foundation)
- In a large bowl, beat the room temperature cream cheese until it is smooth and lump free. Seriously, beat it for a good minute or two on medium speed.
- Add the peanut butter, powdered sugar, and vanilla. Beat this mixture until it’s perfectly uniform, smooth, and slightly pale about 3 minutes. Stop and scrape down the sides often.
Phase 3: Gently Folding for Maximum Airiness (Incorporating the Whipped Element)
- Whip your heavy cream until stiff peaks form. Stiff peaks mean the cream holds its shape when you lift the whisk.
- Gently fold one-third of the whipped cream into the peanut butter mixture to lighten the base. Then, add the remaining cream in two additions.
- Use an under and over motion with your spatula. Stop folding the instant you no longer see white streaks of cream. Overmixing is the death of airiness!
Phase 4: Final Touches and Minimum Setting Time
- Spoon the airy peanut butter filling into the chilled crust. Smooth the top with the back of a spoon or spatula.
- Cover the pie dish loosely (foil works great) and refrigerate for at least 4 hours. Ideally, let it rest overnight. The longer it chills, the firmer and easier to slice it will be.
Expert Tips for the Ultimate Peanut Butter Pie Success
The difference between a good pie and a spectacular pie is always in the details. These are the things I learned the hard way after many failed attempts.
Preventing a Runny Filling: Temperature Control is Key
If your filling is runny, two things probably happened: your cream cheese was cold and lumpy, or you used natural, oily peanut butter. Ensure the cream cheese is truly soft, and stick to the stabilized peanut butter brands. Also, ensure your heavy cream is ICE cold before whipping for the best volume and stability.
How to Achieve Clean Slices Every Time
This is the holy grail of no-bake pies! You must chill it overnight. To slice, run a long, thin, sharp chef’s knife under very hot water, wipe it completely dry, and make one full cut. Reheat and wipe the knife before every single slice. This ensures the blade glides cleanly through the chilled, sticky filling.
Troubleshooting a Crumbly Crust
A crumbly crust happens when you either didn't use enough butter, or more likely, you didn't press hard enough. Next time, make sure the crumb mixture feels like wet sand, and use serious pressure like, lean into it when pressing it into the dish and up the sides.
Storage Solutions: Maximizing Freshness and Texture
Best Practices for Refrigerated Storage (Up to 4 days)
This pie holds up beautifully in the fridge for up to four days. Store it loosely covered (a pie dome or foil tent works best) to prevent condensation from making the crust soggy. If you plan to store it for more than 2 days, wait to add the garnishes (chopped nuts, extra whipped cream) until just before serving.
Can You Successfully Freeze No-Bake Peanut Butter Pie?
You bet! This pie freezes incredibly well, making it a perfect make-ahead option. Slice the pie into individual servings first. Place the slices on a baking sheet and freeze until solid (about 2 hours).
Wrap each solid slice tightly in plastic wrap, then foil, and store in the freezer for up to one month. Thaw individual slices overnight in the fridge do not try to thaw them on the counter, as the texture will suffer.
Elevating Your Dessert: The Best Pairings for Peanut Butter Pie
The richness of this Cloud Pie needs something strong and often slightly acidic or bitter to balance it out. We’re aiming for perfect harmony here, not just more sweetness.
The Perfect Beverage Pairing (Coffee or Creamy Liqueurs)
Serve this pie with a strong, unsweetened espresso or a robust dark roast coffee; the slight bitterness is fantastic against the creamy sugariness. For an adult indulgence, a small glass of Irish cream liqueur or a creamy coffee liqueur is a decadent, complementary match.
It feels incredibly fancy but takes zero extra effort!

Recipe FAQs
How long must the pie chill, and can I rush this step?
The pie requires a minimum of 6 hours in the refrigerator, but preferably overnight, to allow the filling to set completely and achieve the signature "cloud" texture. Rushing this step will result in a runny, unstable filling, as the whipped cream and stabilizers need adequate time to firm up.
Always ensure the filling is completely cold before serving.
Why is my peanut butter filling grainy or too runny?
This usually happens if the cream cheese was not sufficiently softened before mixing, leading to tiny lumps, or if the peanut butter used was the natural, oil-separated variety. For the best texture, ensure all dairy ingredients are fully blended, and always use a smooth, shelf stable brand of peanut butter (like Jif or Skippy) that contains stabilizers.
Can I substitute the chocolate biscuit crust with a graham cracker crust?
Absolutely; substituting the crust is an excellent way to customize the flavor profile. A standard graham cracker or vanilla wafer crust works perfectly and offers a slightly sweeter base that contrasts well with the rich peanut butter filling.
Ensure you maintain the correct ratio of melted butter to crumbs for stability, typically 1 cup of crumbs to 3-4 tablespoons of butter.
Can I freeze the Peanut Butter Cloud Pie for longer storage?
Yes, this pie freezes beautifully due to its stable, high fat filling. Once fully chilled and set, wrap the pie tightly first in plastic wrap and then in aluminum foil, and freeze for up to 3 months. Thaw it overnight in the refrigerator before serving, though it is also delightful served slightly frozen on a hot day.
I only have natural peanut butter. Can I still use it?
Using natural, oil-separated peanut butter is strongly discouraged for this specific recipe, as the excess oil can destabilize the whipped cream structure. The result is often a greasy, thin, and unstable filling that won't achieve the cloud consistency.
If you must use it, meticulously drain off as much oil as possible before incorporating it into the mixture.
How can I make this recipe dairy-free or vegan?
This recipe is easily adaptable by substituting the cream cheese with a vegan cream cheese alternative and replacing the heavy cream with a stabilized, chilled coconut cream or vegan whipping cream substitute. Ensure your chocolate biscuits or base crust is also verified dairy-free to maintain the vegan standard.
The texture should remain very similar.
How long can I store leftover pie, and how should it be covered?
Leftover pie should be stored covered tightly in the refrigerator; it will maintain its best texture and freshness for 3 to 4 days. Use a dome lid or plastic wrap pressed gently against the filling surface to prevent moisture loss and absorb any strong odors from the fridge.
After four days, the crust may begin to soften significantly.
No Bake Peanut Butter Cloud Pie
Ingredients:
Instructions:
Nutrition Facts:
| Calories | 456 kcal |
|---|---|
| Protein | 9.0 g |
| Fat | 31.0 g |
| Carbs | 37.0 g |
