Classic Peanut Butter Lunch Lady Cookie Bar with Chocolate Frosting
- Classic Peanut Butter Lunch Lady Cookie Bar with Chocolate Frosting
- The Science of Textural Harmony
- Understanding Your Recipe Specs
- Sourcing the Very Best Ingredients
- Essential Tools for Success
- From Initial Prep to Plate
- Solving Common Baking Hurdles
- Creative Flavor Twists to Try
- Proper Storage and Reheating Tips
- Suggestions for Serving and Enjoying
- Recipe FAQs
- 📝 Recipe Card
Classic Peanut Butter Lunch Lady Cookie Bar with Chocolate Frosting
Remember that specific, heavy "thwack" of a plastic tray landing on a cafeteria table? I can still smell it. It’s a mix of floor wax, industrial dish soap, and then, suddenly, that one tray shaking aroma that changed everything: warm peanut butter and boiled chocolate.
Indulge in this classic peanut butter lunch lady cookie bar with chocolate frosting, a truly unforgettable treat. It wasn't just a dessert; it was a cultural exchange between the staff who spent hours in those hairnets and us kids who just wanted something that didn't taste like canned green beans.
Whenever I make these, the air in my kitchen shifts. It starts with the heavy, sweet scent of creamed butter and peanut butter hitting the air, followed by the malty, toasted perfume of graham crackers baking. We've all tried those modern "artisanal" bars, but they never quite capture the soul of the original.
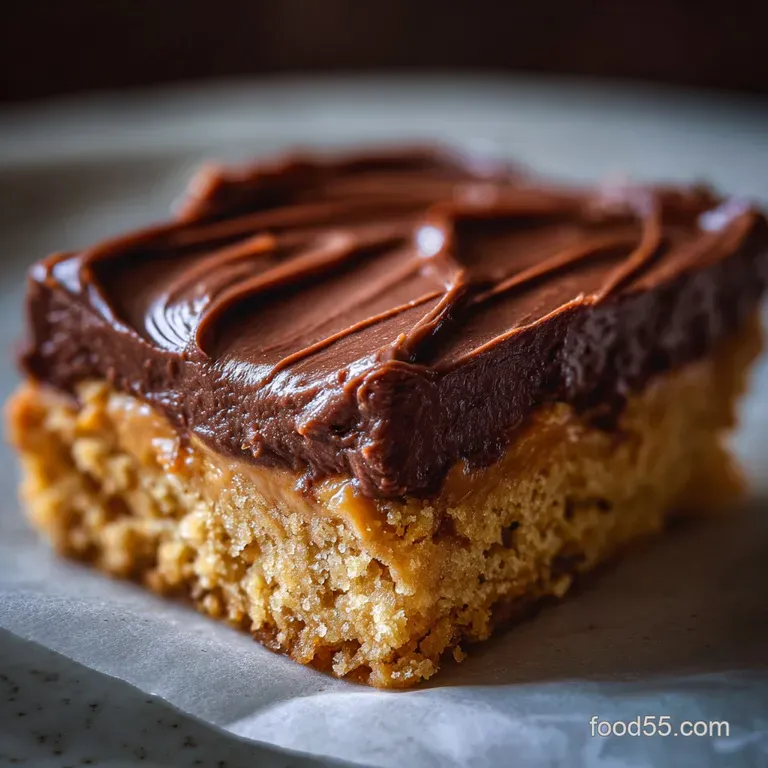
There is something about that specific "shatter" of the frosting when your teeth hit the fudge layer that brings people together in a way few other desserts can.
Right then, we are going to recreate that exact experience, but with a few home cook tricks I've picked up after dozens of batches. We’re looking for a base that is dense but soft, a middle layer that is purely velvety, and a top frosting that sets into a firm, crackly fudge.
Trust me on this, once you put a plate of these on a table, the conversation stops and the nostalgia begins. Let's crack on and get these in the oven.
The Science of Textural Harmony
The Physics of the Crumb: Graham cracker crumbs act as a secondary binder that absorbs moisture differently than flour, creating a dense, velvety structure that resists staling.
The high fat content from the peanut butter interferes with gluten formation, ensuring the bars stay tender rather than bread like.
| Method | Time | Texture | Best For |
|---|---|---|---|
| Classic Oven Bake | 20 minutes | Dense, chewy, crackly top | Authentic nostalgia and gatherings |
| Quick Fridge Set | 10 minutes | Softer, more fudge like | Last minute cravings (No bake base) |
| Double Layer Bake | 25 minutes | Extra crispy edges | Texture lovers who like a "snap" |
The reason these bars feel so different from a standard cookie is the hydration balance. By using both granulated and brown sugar, we are playing with hygroscopic properties the brown sugar pulls in moisture to keep the center fudgy, while the granulated sugar helps the edges get that slight golden crisp. This is similar to the balance we look for in a Classic Peanut Butter recipe, where the fat to flour ratio determines if the cookie is a "cake" or a "chew."
| Ingredient | Science Role | Pro Secret |
|---|---|---|
| Graham Crumb | Moisture Absorption | Use fine crumbs for a uniform, silkier bite |
| Creamy Peanut Butter | Lipid Structural Base | Use processed (not natural) for emulsification |
| Unsweetened Cocoa | Acidic Reaction | Whisk with hot liquids to "bloom" the flavor |
| Baking Soda | Leavening & Browning | Helps the Maillard reaction for a nutty aroma |
When the sugars and fats cream together, you're actually aerating the batter just enough to keep it from becoming a brick. But the real magic happens in the "Boiled Fudge Finish." By boiling the milk, butter, and cocoa, you’re creating a stable emulsion that crystallizes as it cools.
That crystallization is what gives you that signature "shatter" when you bite into the frosting. It’s a delicate dance of temperature and timing that we will master together.
Understanding Your Recipe Specs
This recipe is designed to feed a crowd, just like the original school batches. If you are looking for a quick win, keep these precision checkpoints in mind: Bake for exactly 20 minutes, ensure your oven is preheated to 350°F, and aim for a flour weight of 250g.
- Time: Active 15 minutes, Passive 20 minutes, Total 35 minutes
- Flavor/Texture Hook: Nutty, velvety base with a crackly chocolate shatter
- Perfect for: Shared meals, potlucks, and bringing people together
Sourcing the Very Best Ingredients
The beauty of the "lunch lady" style is that it doesn't require fancy, imported ingredients. It’s about the humble staples working in harmony. You want standard, creamy peanut butter here the kind that doesn't separate.
Save the natural, oily stuff for your morning toast; here, we need the stabilizers to keep the crumb consistent.
- Unsalted Butter (1 cup + 0.5 cup): Softened for the base, cold for the frosting.
- Sugars (1 cup granulated, 1 cup brown): This duo provides the perfect chew.
- Large Eggs (2): Room temperature is non negotiable for a smooth emulsion.
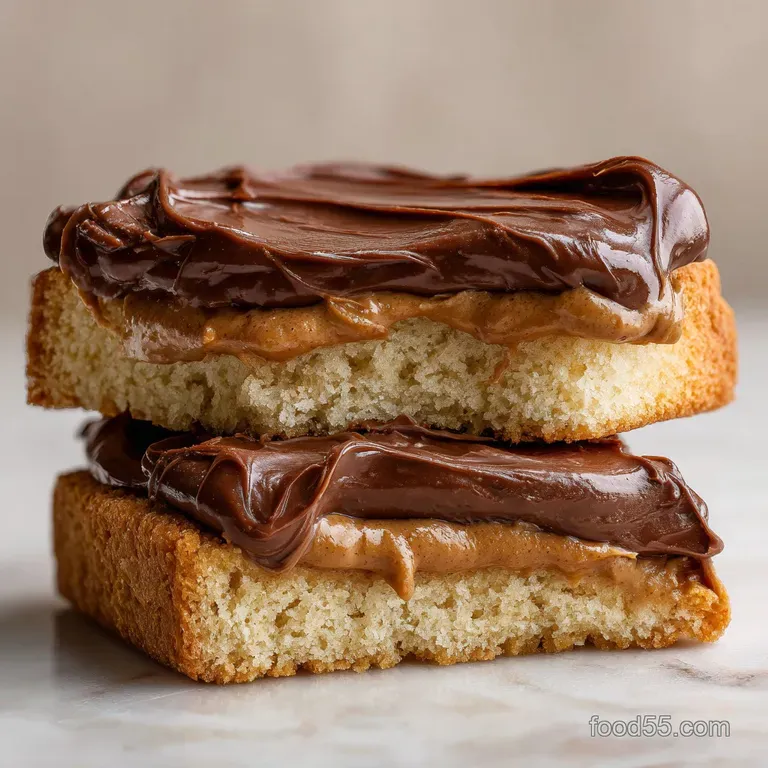
- Creamy Peanut Butter (1.5 cups divided): 1 cup for the dough, 0.5 cup for the "secret" layer. Why this? Processed PB provides the structural fats needed for a velvety finish.
- All purpose Flour (2 cups / 250g): The backbone of our bar.
- Graham Cracker Crumbs (1 cup): Adds a toasted, honey like depth.
- Cocoa Powder (0.25 cup): Unsweetened natural cocoa works best with the baking soda.
- Whole Milk (0.33 cup): The fat in whole milk ensures the frosting is rich, not watery.
- Powdered Sugar (3.5 cups): Sift this! Nobody wants a lumpy topping.
| Original Ingredient | Substitute | Why It Works |
|---|---|---|
| Graham Crumbs | Digestive Biscuits | Similar texture, slightly less sweet than honey grahams |
| Whole Milk | Evaporated Milk | Adds a deeper, caramelized flavor to the frosting |
| Creamy PB | Sunflower Butter | Great nut free option; keep sugar ratios the same |
If you find yourself out of graham crackers, don't panic. You can use crushed vanilla wafers or even extra flour in a pinch, though you'll lose that specific "school cafeteria" flavor profile. The graham cracker is really the secret agent in this recipe, providing a grit free texture that feels substantial.
Essential Tools for Success
You don't need a professional kitchen, but a few specific tools will make your life much easier. I always reach for my stand mixer (like a KitchenAid) for the base because creaming the butter and peanut butter requires some serious torque to get it fluffy.
- 9x13 Inch Baking Pan: The standard size for the perfect thickness.
- Stand Mixer or Hand Mixer: Essential for aerating the fats and sugars.
- Medium Saucepan: For boiling the chocolate frosting don't use a skillet!
- Offset Spatula: This is the pro's secret for getting that PB layer perfectly smooth.
- Whisk: To ensure the powdered sugar integrates without lumps.
From Initial Prep to Plate
Before you start, preheat your oven to 350°F and grease your 9x13 pan. I like to line mine with parchment paper, leaving an overhang on the sides. This lets you lift the entire block of bars out once they're set, making those clean, sharp cuts much easier to achieve.
- Cream the fats. Beat 1 cup softened butter, granulated sugar, and brown sugar until light and fluffy. Note: This takes about 3 minutes on medium high speed.
- Add proteins. Incorporate 2 eggs and 1 tsp vanilla extract, mixing until just combined.
- Mix in peanut butter. Add 1 cup of the creamy peanut butter to the wet mixture. Mix until the aroma is rich and nutty.
- Whisk dry ingredients. In a separate bowl, combine 2 cups flour, 1 cup graham crumbs, 1 tsp baking soda, and 0.5 tsp salt.
- Combine. Gradually add dry ingredients to wet. Note: Stop as soon as the last streak of flour disappears to avoid toughness.
- Bake the base. Press dough into the pan and bake for 20 minutes until edges are golden and center is set.
- Apply the secret layer. While hot, spread the remaining 0.5 cup peanut butter over the base. Note: It will melt into a velvety sheen.
- Boil the frosting. In a saucepan, combine 0.5 cup butter, cocoa powder, and milk. Bring to a rolling boil for 1 minute.
- Whisk the finish. Remove from heat; whisk in 3.5 cups powdered sugar and 1 tsp vanilla until glossy and smooth.
- Set and cool. Pour frosting over the PB layer immediately. Let cool for 1 hour until the top is firm and crackly.
Chef's Tip: Freeze your butter for 10 minutes before starting the frosting. When you drop cold butter into the cocoa and milk, it emulsifies more slowly, resulting in a much shinier, professional looking glaze.
Solving Common Baking Hurdles
Even the most seasoned home cooks can run into a snag. The most common issue with these bars is the frosting texture. If your frosting feels "gritty" on the tongue, it usually means the powdered sugar wasn't sifted or the milk mixture didn't reach a true boil to dissolve the sugar crystals.
Why Your Frosting Is Grainy
If the frosting feels sandy, the sugar didn't fully melt into the fat. This happens if you pour the powdered sugar into the liquid before it reaches a boil, or if you don't whisk vigorously enough. To fix this next time, ensure your butter and milk mixture is bubbling actively before moving it off the heat.
Why the Bars Are Crumbly
A crumbly base usually points to over baking or over mixing. Once you add the flour and graham crumbs, you have to be gentle. Over mixing develops gluten, which makes the bars tough. Over baking dries out the fats, leaving you with a base that falls apart when sliced.
| Problem | Root Cause | Solution |
|---|---|---|
| PB Layer Mixing | Base was too hot/liquid | Let base sit for 5 mins before spreading PB |
| Dull Frosting | Didn't boil long enough | Ensure a full 60 second rolling boil |
| Sunken Center | Underbaked | Bake until the center doesn't "jiggle" when shaken |
Common Mistakes Checklist
- ✓ Always use room temperature eggs to prevent the batter from curdling.
- ✓ Sift your powdered sugar this is the only way to avoid those white lumps in the chocolate.
- ✓ Spread the middle peanut butter layer while the bars are warm, not "burn your hand" hot.
- ✓ Let the bars cool completely at room temperature before refrigerating for the best "shatter."
- ✓ Use a hot, wet knife to slice the bars for those perfect, clean cafeteria style squares.
Creative Flavor Twists to Try
While the classic is hard to beat, we all like to experiment. If you're feeling adventurous, you can easily tweak this recipe to fit different vibes. Some people love adding a pinch of espresso powder to the frosting to deepen the chocolate profile, which is a trick I use in my Classic Chewy Chocolate recipe.
- The "Pioneer Woman" Style: Increase the salt in the base to a full teaspoon and use extra chunky peanut butter for more texture.
- The Salted Caramel Twist: Sprinkle flaky sea salt over the chocolate frosting before it sets.
- Dark Chocolate Fudge: Swap the natural cocoa powder for Dutch processed cocoa for a darker, more intense color and flavor.
If you are looking for a different method entirely, you might enjoy Grandma's Classic No recipe, which uses oats instead of a baked flour base. It’s a great alternative for those hot summer days when you don't want to turn on the oven.
Proper Storage and Reheating Tips
These bars are surprisingly hardy, which is why they were a staple in school kitchens. You can keep them at room temperature in an airtight container for up to 3 days. However, for that ultimate "snappy" chocolate topping, I actually prefer keeping them in the fridge.
Storage:Fridge: Up to 5 days. The cold temperature makes the peanut butter layer firm and the chocolate extra crackly. Freezer: Up to 3 months. Wrap individual squares in plastic wrap, then place them in a freezer bag.
They actually taste quite good eaten semi frozen!
Zero Waste Tip: If you end up with the "crumbs" at the bottom of the pan after slicing, don't toss them! Those buttery, chocolatey bits are incredible when folded into vanilla bean ice cream or sprinkled over a morning bowl of yogurt.
You can even pulse them in a food processor and use them as a "crust" for a future pie, much like you would for an Old Fashioned Peanut recipe.
Suggestions for Serving and Enjoying
Serving these is all about the presentation. Since they are quite rich, I recommend cutting them into smaller squares than you think you need. A 9x13 pan should easily yield 24 generous bars.
- The Classic Way: Serve with a cold glass of whole milk. It’s the only way to cut through the richness of the peanut butter.
- The Sundae Way: Warm a bar for 10 seconds in the microwave (just enough to soften the PB layer) and top with a scoop of vanilla ice cream.
- The Coffee Pairing: These are exceptional with a dark roast coffee; the bitterness of the bean complements the sweet fudge perfectly.
No matter how you serve them, these bars are a reminder that the best meals are the ones shared with others. They bring a sense of comfort and connection that spans generations. Whether you're making them for a school bake sale or just a Tuesday night treat, they are sure to bring a smile to everyone at the table.
Enjoy the process, breathe in that nutty aroma, and savor every crackly, velvety bite.

Recipe FAQs
Can I substitute the graham cracker crumbs with regular flour?
No, substituting all crumbs with flour changes the texture significantly. Graham crumbs absorb moisture differently than flour, which is key to achieving that signature dense, velvety bar structure.
How to ensure the chocolate frosting sets with a firm, crackly top?
Bring the milk, butter, and cocoa mixture to a rolling boil for exactly one minute. Boiling dissolves the sugar crystals, and upon cooling, this stable emulsion creates the signature satisfying "shatter."
Why do my bars crumble when I try to slice them neatly?
The bars are likely overbaked or the dough was overmixed. Overmixing develops gluten, leading to toughness, while overbaking dries out the essential fats, causing structural collapse when cut.
Is it true that using natural, separated peanut butter works best for this recipe?
No, stick with conventional, creamy peanut butter for the best results here. The stabilizers in processed peanut butter help maintain a consistent emulsion in the base and the middle layer.
What is the role of the second layer of peanut butter applied immediately after baking?
It creates a velvety barrier and enhances flavor depth before the fudge sets. Spreading it while the base is warm allows it to melt slightly, creating a perfect transition layer, similar to the creamy base in our Classic Peanut Butter recipe.
How long should I cream the butter, sugar, and peanut butter together?
Cream for approximately three minutes on medium high speed until the mixture is noticeably lightened and fluffy. This process incorporates necessary air, ensuring the base isn't overly dense, a crucial step if you enjoyed mastering aeration in your Cookie Dough Cheesecake recipe.
Can these bars be frozen for later consumption?
Yes, these bars freeze exceptionally well for up to three months. Wrap individual squares tightly in plastic wrap before bagging to prevent freezer burn and maintain the integrity of the frosting layer.
Peanut Butter Lunch Lady Bars

Ingredients:
Instructions:
Nutrition Facts:
| Calories | 394 kcal |
|---|---|
| Protein | 6.2 g |
| Fat | 20.5 g |
| Carbs | 49.6 g |
| Fiber | 1.6 g |
| Sugar | 37.1 g |
| Sodium | 158 mg |
