Baked Sweet Potato Upgrade: Perfect High-Heat Recipe for Crispy Skin
- Elevating the Humble Side Dish: The Ultimate Baked Sweet Potato
- The Science of the Perfect Spud: Why This over High heat Method Works
- Essential Components for the Best Baked Sweet Potatoes
- Step-by-Step Guide: Achieving the 'Jacket Potato' Texture
- Troubleshooting and Expert Tips for Baking Success
- Make-Ahead and Storage: Keeping Your Baked Sweet Potato Fresh
- Beyond Butter: Creative Serving Suggestions for Your Perfect Potato
- Recipe FAQs
- 📝 Recipe Card
Elevating the Humble Side Dish: The Ultimate Baked Sweet Potato
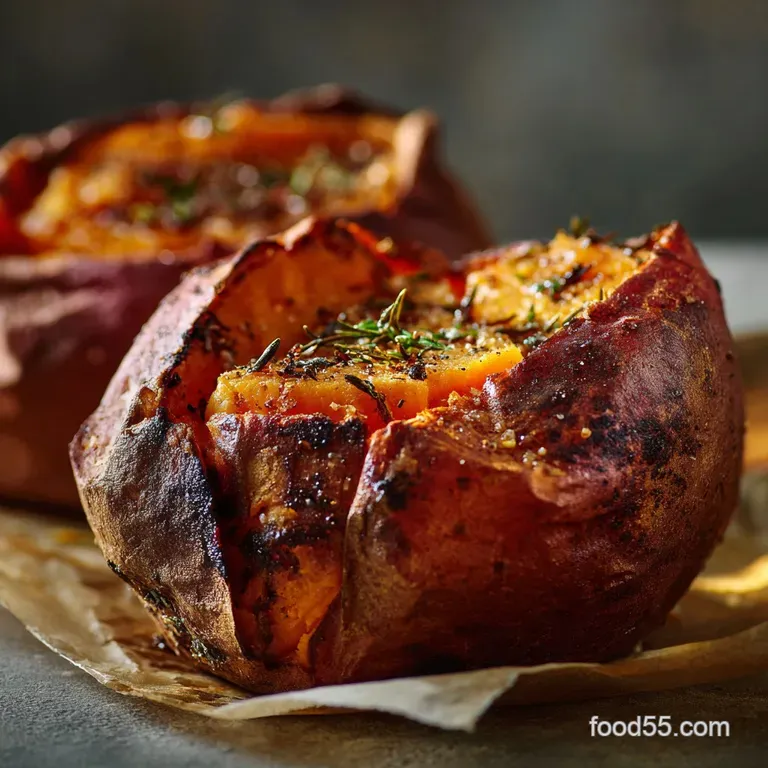
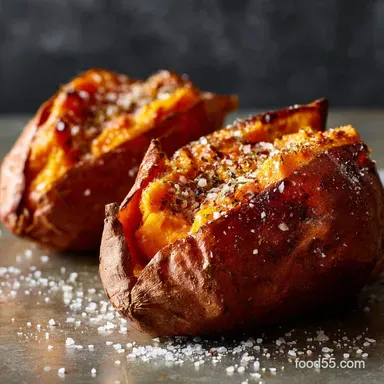
Forget those pale, damp disappointments wrapped limply in foil. This method delivers a baked sweet potato that’s utterly transformative. We are chasing a specific goal here: skin so crispy it almost shatters when you slice it, contrasting beautifully with an interior that is light, fluffy, and tastes unbelievably sweet almost like custard.
When that warm, earthy, caramelised scent fills your kitchen, you know you’ve done it right.
Seriously, this recipe is a total lifesaver for busy weeknights, and the preparation takes maybe five minutes. It’s inherently healthy, incredibly cheap, and scales up easily for potlucks or meal prep. It also provides the perfect canvas for endless toppings, both sweet and savory.
I used to treat sweet potatoes like their white counterparts, but that was a huge rookie mistake. After years of trial and error, I finally cracked the code that maximizes their natural sugars and guarantees that sought after fluffy texture. Ready to ditch the dry brick and get the perfect spud every time?
Let's get cooking.
The Science of the Perfect Spud: Why This over High heat Method Works
Baking a truly perfect sweet potato isn't about luck; it's about controlling moisture and utilizing high heat. We aren't just heating the potato; we are actively turning internal starch into sugar while simultaneously dehydrating the exterior.
This little bit of kitchen chemistry is why this basic recipe reigns supreme.
Why High Heat is the Secret Weapon for Crisp Skin
High temperatures we're talking 425°F (220°C) are non-negotiable for success. This blast of heat immediately addresses any lingering surface moisture, preventing the skin from turning rubbery and gray. The skin essentially gets a head start, guaranteeing a snappy texture.
Texture Profile: Crisp Skin Meets Custard Interior
The rapid cooking time achieved by high heat ensures the exterior browns quickly, locking in the potato's internal moisture before it can evaporate. If you cook them low and slow, the potato dries out entirely, but this fast bake results in that signature fluffy, custardy interior that makes people ask, "How did you do that?"
Quick Overview of the Simple Preparation Process
Preparation is deceptively minimal: scrub, pierce, oil, and salt. That’s it! The key here is focusing on dryness before the oiling stage; oil acts as a crucial barrier and heat conductor.
The Maillard Reaction for Exterior Caramelization
Sweet potatoes naturally contain sugars, and when combined with the applied oil and high heat, they undergo the Maillard reaction. This process creates hundreds of complex flavour compounds, giving the skin that deep amber color and irresistible, salty, caramelised crust. That crunchy exterior is everything.
Maximizing Starch-to-Sugar Conversion (Sweetness Boost)
Sweet potatoes store energy primarily as starch, but baking converts that starch into maltose (a sugar). The steady, high heat cooks the potato evenly, allowing optimal conversion, which significantly boosts the natural, inherent sweetness of the flesh. We want maximum sugar content!
Preventing the 'Soggy Center' Syndrome
You must pierce the potato deeply, maybe 8 to 10 times, all over before baking. This seemingly small step is critical because it allows steam to escape during cooking, which stops the internal pressure from building up and prevents the flesh from becoming dense, gluey, or bursting in your oven.
Essential Components for the Best Baked Sweet Potatoes
We are only dealing with three ingredients, so make them count. Quality matters, even in the simplest dishes.
Choosing the Right Variety and Size for Baking
I highly recommend using Jewel or Beauregard varieties; they are widely available and bake up perfectly fluffy. Crucially, select potatoes that are uniform in size. If you mix small and large spuds, the little ones will inevitably burn before the larger ones are tender.
Stick to medium sized potatoes (around 7 ounces each) for the specified cooking time.
Oil vs. Dry Baking: Achieving Maximum Crispness
Some recipes suggest baking dry, but I disagree completely. Rubbing the potato generously with oil (like olive oil) before salting is non-negotiable. The oil acts as a heat conductor, helping the high temperature crisp the skin faster, and ensures the salt sticks beautifully for that textural crust.
Ingredient Adjustments and Simple Salt Swaps
The coarse salt is vital for texture. Don't skip it! If you need to make a swap, here’s how I handle ingredient adjustments when I’m running low.
| Ingredient | My Recommendation | Substitution |
|---|---|---|
| Olive Oil | Standard cooking olive oil | Avocado or rapeseed oil (neutral flavour) |
| Coarse Sea Salt | Flaky salt (Maldon, Kosher) | Fine table salt (reduce amount by half) |
| Sweet Potato | Jewel or Beauregard | Japanese White Sweet Potato (may need 10 mins longer cook time) |
Recommended Tools and Equipment Checklist
You don't need fancy gadgets for the perfect baked sweet potato, but a couple of things make life easier. Grab a sturdy fork or metal skewer for piercing and testing doneness. Parchment paper, while optional, is excellent for quick cleanup, especially if the oil drips and caramelizes onto the baking sheet.
step-by-step Guide: Achieving the 'Jacket Potato' Texture

This is the exact sequence I follow every time for reliably perfect, Best Baked Sweet Potatoes.
Preparation: Scrubbing, Pricking, and Seasoning
First, scrub your sweet potatoes well under cold water to remove any dirt or eyes, then pat them absolutely, completely dry with a kitchen towel. This dry step is the single most important action for getting crispy skin.
Pierce each potato aggressively all over, then rub them down with the olive oil until coated. Finally, sprinkle generously with coarse salt and pepper.
Optimal Oven Rack Placement and Temperature Setting
Preheat your oven to a fierce 425°F (220°C). Place the potatoes directly on a parchment lined baking sheet on the middle rack. This position ensures even heat circulation and prevents the bottoms from getting scorched, which can happen easily if you place them too low.
The Doneness Test: Internal Temperature and Squeeze Check
Bake them for 50 minutes without peeking. After 50 minutes, gently squeeze the largest potato it should yield easily under pressure.
For the most accurate test, slide a metal skewer or paring knife into the center; it should glide in and out effortlessly, like it’s going through hot butter. If there’s any resistance, keep baking in 5 minute increments.
How to Achieve the Signature Fluffy Interior
The moment they exit the oven, you must slice them immediately down the length, forming a canoe shape, but stop before you cut through the bottom skin. Give the ends a gentle squeeze toward the center to push the flesh open.
Use a fork to quickly fluff the insides, which releases the trapped steam and prevents the flesh from turning gluey as it cools.
Troubleshooting and Expert Tips for Baking Success
I have made every mistake possible, from dry, hard centers to sad, floppy skins. Here are the fixes that actually work.
Identifying Common Mistakes (e.g., Wrapping in Foil)
The biggest failure point is wrapping the potato in foil. People think it speeds up cooking or keeps it moist, but it traps all the moisture against the skin. That process is steaming, not baking, and it yields a grey, floppy exterior that is completely flavorless.
Chef's Note: If you wrap the potato in foil, you are essentially steaming it, not baking it. Foil is for transportation or keeping warm after it's crispy, never during the main bake.
Cutting Down Cook Time Safely
If you are seriously pressed for time, you can microwave the potatoes for 3 minutes before oiling and baking. However, do this sparingly, as microwaving slightly diminishes the crispy skin texture. The better, safer option is to choose smaller, thinner potatoes from the start; they bake much faster! You could also serve this alongside a quick dish like my Baked Cod Sheet Pan Dinner: The Minimal Cleanup, Easy Sheet Pan Dinner to maximize oven efficiency.
Quick Fixes if the Skin Isn't Crisp Enough
Did the skin turn out rubbery? Don't panic. If the flesh is cooked but the skin is lacking, crank the oven up to 450°F (230°C) for the last 5 minutes.
Alternatively, slide the baking sheet onto the very top rack and blast the potatoes under the broiler for 60 to 90 seconds, watching them like a hawk to prevent scorching.
make-ahead and Storage: Keeping Your Baked Sweet Potato Fresh
Baked Sweet Potatoes are wonderful for meal prep, but you must store them correctly to maintain food safety and texture.
How to Cool Baked Sweet Potatoes Correctly Before Storage
Potatoes are starchy, which means they hold heat for a long time. You must cool them quickly. Place the cooked potatoes on a wire rack immediately after baking, allowing air to circulate fully around them. Wait until they are fully room temperature (about one hour) before storing them.
Refrigeration and Reheating Instructions
Once cooled, store the whole, uncut sweet potatoes in an airtight container in the fridge. They will keep nicely for 3 to 4 days. When reheating, skip the microwave it turns the skin mushy.
For crispy skin, reheat the whole potato in a 350°F (175°C) oven or an air fryer for about 10– 15 minutes until piping hot throughout.
Freezing Cooked Sweet Potatoes (Best Practices)
But does it freeze well? You bet! While I prefer to freeze the pulp rather than the whole Perfect Baked Sweet Potato, freezing the whole spud works fine, though the texture will be slightly softer upon thawing. Scoop the flesh out and freeze it in a bag for use in baking or to thicken things like my Cream of Potato Soup: Chefs Signature Velvety, Silky Smooth Perfection later.
Beyond Butter: Creative Serving Suggestions for Your Perfect Potato
The glorious, buttery flesh of the Oven Baked Sweet Potatoes is perfect plain, but it's an even better vehicle for bolder flavours.
For a hearty dinner, serve the crispy skinned sweet potato alongside a perfectly cooked protein. We often pair this with a simple seasoned protein, perhaps alongside my easy Garlic Butter Steak and Potatoes Skillet Easy One-Pan Recipe .
Need a full meal inside the potato? Try one of these fun flavour combinations:
- Tex-Mex Loaded: Black beans, corn salsa, a dollop of Greek yogurt (instead of sour cream), and fresh cilantro.
- Mediterranean Delight: Feta cheese, chopped sun-dried tomatoes, black olives, and a drizzle of balsamic glaze.
- Sweet Breakfast Spud: Butter, cinnamon, maple syrup, and maybe a handful of toasted pecans or walnuts. Trust me, it’s brilliant.
- Herb Butter Finish: Right when they come out of the oven, brush the skin with softened butter blended with finely chopped fresh rosemary and minced garlic.

Recipe FAQs
Why are my baked sweet potatoes dry or stringy instead of creamy?
This usually indicates overbaking or using an incorrect temperature, which draws too much moisture out before the starches fully caramelize. Ensure you are baking at a high heat setting (400°F+) and test for doneness when the potato is easily pierced, avoiding extended baking times.
How do I ensure the sweet potato skin gets truly crispy like a jacket potato?
Achieving crisp skin requires high heat and a little fat; lightly rub the skin with oil, such as avocado or coconut, and sprinkle with coarse salt before baking. High temperatures (400°F and above) allow the exterior moisture to evaporate rapidly, creating that desirable crust.
How can I tell if my sweet potato is perfectly done without cutting it open?
The easiest method is the "squeeze test" or "fork test"; a perfectly baked sweet potato should feel soft and yield slightly when squeezed gently with oven mitts, or a fork should slide into the center with virtually no resistance.
For absolute precision, an instant read thermometer should register 205 212°F (96 100°C).
Why did my sweet potatoes leak sticky, brown syrup onto the baking sheet?
That sticky substance is highly concentrated, caramelized sugars leaking through the skin as the intense heat breaks down the starches. This is a positive sign of a sweet, properly cooked potato, but you should always bake them on a foil or parchment lined tray for easy cleanup.
Do I really need to pierce the sweet potato before baking?
Yes, piercing the potato (at least 4 6 times deep) is crucial to allow the internal steam to escape safely during high heat cooking. Failing to pierce the skin can cause the potato to split aggressively or, rarely, build up enough pressure to rupture in the oven.
How long do baked sweet potatoes last, and what is the best way to reheat them?
Fully baked sweet potatoes can be stored in an airtight container in the refrigerator for 3 to 5 days. For the best texture, reheat them in the oven at 350°F (175°C) for 10 15 minutes, or use an air fryer, as microwave reheating often results in a rubbery texture.
Can I bake sweet potatoes ahead of time and freeze them for later?
While whole baked potatoes can be frozen, the resulting texture upon thawing is often mushy and less appealing. It is better to scoop out the cooked flesh, mash it, and freeze it in portions for future use in purees, batters, or casseroles.
Perfect High Heat Baked Sweet Potato
Ingredients:
Instructions:
Nutrition Facts:
| Calories | 194 kcal |
|---|---|
| Protein | 4.0 g |
| Fat | 0.1 g |
| Carbs | 45.0 g |
