Silky Chocolate and Raspberry Tart: Restaurant-Quality Pastry at Home
- Capturing the Elegance: The Ultimate Silky Chocolate and Raspberry Tart
- The Culinary Chemistry of Silk: Balancing Texture and Acidity
- Ingredient Dossier: The Quality Components of the Silky Tart
- Method Guide: Crafting Your Silky Chocolate and Raspberry Tart (The 4 Stages)
- Patisserie Expertise: Troubleshooting and Advanced Techniques
- Post-Bake Care: Storage, Freezing, and Shelf Life of the Tart
- The Perfect Curtain Call: Presentation and Serving Pairings
- Recipe FAQs
- 📝 Recipe Card
Capturing the Elegance: The Ultimate Silky Chocolate and Raspberry Tart
Have you ever cut into a dessert and felt the snap of the pastry before the blade sinks into something impossibly smooth? That’s the moment. This Silky Chocolate and Raspberry Tart is pure theater.
You get the richness of intense dark chocolate that melts instantly, immediately followed by the brilliant, sharp pop of fresh raspberries. It’s a sensory masterpiece that makes everyone gasp just a little bit.
I know what you're thinking: Tart equals fuss, right? Wrong. This recipe is an absolute lifesaver when you need a showstopper without the four days of effort usually demanded by French patisserie. We bypass complicated custards and temperamental techniques.
We are making a superior dark chocolate ganache filling that sets up perfectly every time, provided you follow two simple rules.
Trust me, this simple technique will instantly upgrade your dessert game from "nice cake" to "did you buy this from a fancy Parisian shop?" We are diving deep into the secrets of the perfect pâté sucrée shell and the velvetiest ganache known to man.
Let's crack on and master this Silky Chocolate Raspberry Tart.
The Culinary Chemistry of Silk: Balancing Texture and Acidity
The Patisserie Secret: Mastering the Pâté Sucrée Base
If you want a truly tender crust, you have to use a pâté sucrée . Unlike savory shortcrust, this sweet dough incorporates powdered sugar and relies on the creaming method (or chilling the butter aggressively) to inhibit gluten development.
It’s what gives the shell that delicate, sandy texture. The result is a pastry that literally melts in your mouth and doesn’t fight the richness of the chocolate. Always remember: Cold butter and minimal handling.
Achieving Velvet: What Makes This Ganache Silky Smooth
Achieving that signature "silky" texture, similar to how we get [Chinese eggplant with garlic sauce: Get Silky, Restaurant Quality Texture] in savory cooking, is all about the emulsion. We aren’t just melting chocolate into cream.
We pour the hot cream over the chopped chocolate, let it sit, and then whisk slowly from the center outward. This gentle action creates a stable bond between the fat and the liquid. Adding room temperature butter at the end? That’s my secret weapon for extra gloss and undeniable smoothness.
Acidity vs. Dark Chocolate: Perfecting the Flavor Profile
Dark chocolate is beautiful but can be overwhelming on its own. That’s why the raspberries are non-negotiable here. Their sharp acidity (the 'tart' part of the tart) perfectly cuts through the intense richness of the 70% cacao. It stops the dessert from feeling heavy or cloying. We need that flavor contrast.
The Essential Raspberry Layer: Preventing Soggy Tart Shells
A soggy bottom is a crime against baking, plain and simple. Even the best blind baked shell can succumb to a wet filling. I learned this the hard way after one too many collapsed pies something that also plagues making a proper crust for my [Roast chicken ham and leek pie: The Ultimate Creamy Comfort Recipe].
To combat this, we brush the fully baked shell with melted raspberry jam before pouring the ganache. The cooked sugar in the jam creates an immediate moisture barrier, protecting your crisp pastry foundation.
Chef's Note: Don’t skip the jam barrier! Use seedless jam for the smoothest finish, and make sure the tart shell is completely cool before application.
Ingredient Dossier: The Quality Components of the Silky Tart
Choosing Your Cacao: Dark Chocolate Percentages for Intensity
Listen up: The quality of your chocolate dictates the quality of this tart. Period. You need a minimum of 70% cocoa solids for that deep, complex flavor that stands up to the raspberries. Anything less will be overly sweet and potentially fail to set properly due to the lower cocoa butter content.
Finely chopping the chocolate chips or bars ensures rapid melting and a smoother final ganache.
Flour, Butter, and Sugar Notes for the Crisp Shell
We use powdered sugar in the dough, not granulated. This keeps the pâté sucrée beautifully tender. The butter must be ice-cold and cut into small cubes. This is how we achieve a properly laminated, flaky base. If your butter is soft, your shell will shrink in the oven.
Smart Ingredient Swaps and Dietary Notes (Dairy/Gluten)
Life happens, and sometimes we need alternatives. Don't let allergies stop you from enjoying this! Here are the swaps I endorse:
| Ingredient | Substitute | Notes |
|---|---|---|
| Heavy Cream | Full fat Coconut Cream | Refrigerate a can overnight and scoop only the thick, white cream off the top. |
| All-Purpose Flour | 1:1 gluten-free Baking Blend | Ensure the blend includes Xanthan Gum for structure. |
| Egg Yolk (in crust) | 1 tablespoon Milk or Non-dairy Milk | Only add if the dough refuses to come together. |
| Fresh Raspberries | Fresh Blackberries or Pitted Cherries | They offer a similar acidity and visual appeal. |
Essential Equipment Checklist: Tart Pans and Baking Weights
You must use a tart tin with a removable bottom. Trying to serve this elegant dessert from a fixed pie dish is a nightmare. Trust me, I once tried to flip a tart out, and it ended badly. We don’t talk about that. Also, use dedicated ceramic baking weights or dried beans for blind baking.
They provide the necessary pressure to keep the crust from bubbling or shrinking.
Method Guide: Crafting Your Silky Chocolate and Raspberry Tart (The 4 Stages)

Stage 1: Blind Baking the Pâté Sucrée Shell
First, make your dough, quickly cutting in the butter until it looks like coarse meal. Add the single egg yolk and stop mixing as soon as it binds. If you want a truly non-shrinking crust, don't skimp on the chilling time!
Roll it out, press it into your fluted pan, and then crucially, freeze the lined shell for 15 minutes . Bake it initially with weights, then remove the weights to bake the bottom until it’s a beautiful light golden color.
Stage 2: Building the Raspberry Jam Barrier and Fresh Berry Placement
Once the tart shell is stone cold, gently warm your seedless raspberry jam in a small saucepan. You just want it runny enough to spread smoothly. Brush a thin, even layer over the entire interior surface of the shell. This sets up the moisture barrier.
Don't add the fresh raspberries yet they go on after the ganache sets, or they will sink!
Stage 3: The Hot Pour Ganache and Setting Process
Place your finely chopped chocolate in a bowl. Heat the heavy cream until steam rolls off the top but it's not boiling violently. Pour the hot cream over the chocolate and walk away for 90 seconds. Don’t touch it! Then, start whisking slowly in the middle.
As the gloss develops, slowly widen your circles until the mixture is uniform and shiny. Stir in the vanilla and the small cubes of room temperature butter for maximum silkiness. Pour the warm ganache into the jam-lined shell, tap it once or twice to release air bubbles, and transfer it straight to the fridge.
Stage 4: Finishing Touches and Critical Chilling Time
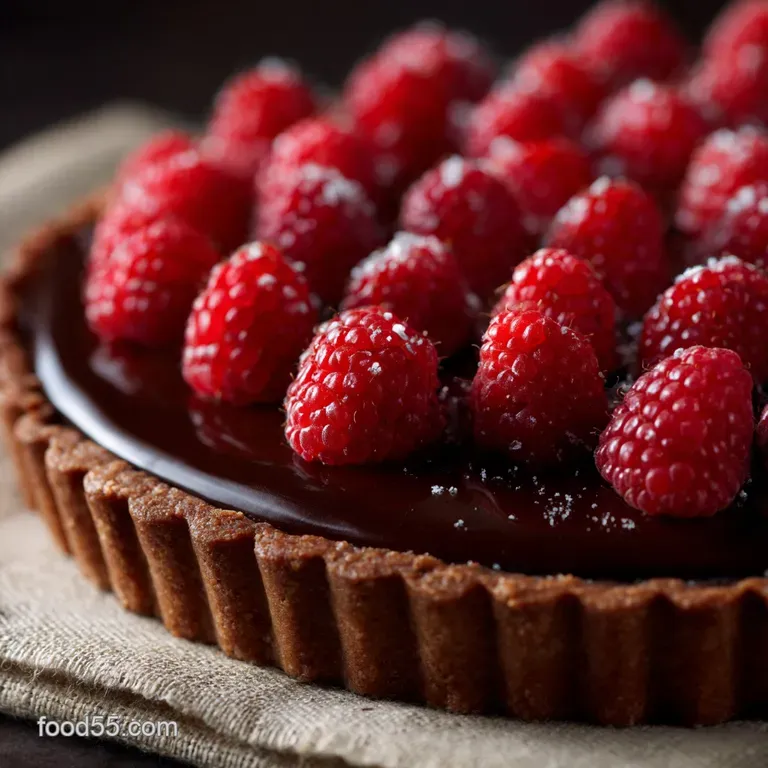
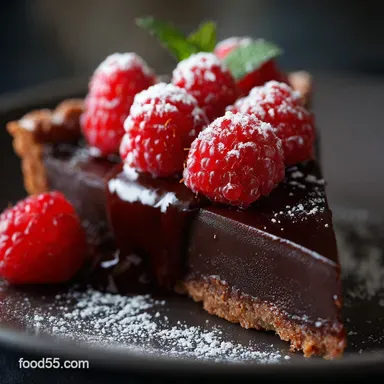
This is the hardest part: waiting. You absolutely must chill this tart for a minimum of four hours. Ideally, let it sit overnight. The ganache needs that time to firm up fully. Only when it is completely set should you arrange your beautiful fresh raspberries on top.
They look best clustered near the edge or placed in neat rows, dusted lightly with icing sugar.
Patisserie Expertise: Troubleshooting and Advanced Techniques
Preventing Ganache Splitting: Emulsification Fixes
If your ganache starts to look grainy, oily, or "split" (where the fats separate from the liquid), panic quickly, then fix it! Your emulsion broke. This usually happens because you stirred too fast or the cream wasn't hot enough.
To fix it, remove 1 tablespoon of the split ganache and vigorously whisk in 1 teaspoon of warm milk or cream until it miraculously snaps back together. Then whisk that small portion back into the main batch.
Solving the Shrinking Tart Shell Problem (Détrempe Techniques)
My old pastry teacher called the dough détrempe . If your shell shrank 10% from the side, you overworked the gluten. Next time, mix the dough minimally and chill it for longer.
For an instant fix: Roll the dough slightly thicker than you think you need, then press it into the tin and let the excess dough overhang the sides. Chill it. Blind bake it before trimming the edges flush with the tin. The overhang holds the weight and prevents sag.
Achieving the Mirror Smooth Ganache Surface
For that perfectly reflective surface, make sure you sieve your heavy cream before heating it, just in case. When you pour the ganache into the shell, use a rubber spatula to gently guide the fill, but don't touch the surface once the ganache is fully poured.
If you see any tiny air bubbles, hold a kitchen torch briefly over the surface, or gently pop them with a toothpick.
Post Bake Care: Storage, Freezing, and Shelf Life of the Tart
Best Practices for Refrigerated Storage
Due to the high cream and butter content, this tart must be refrigerated. Store the tart uncovered for the first 24 hours to prevent condensation from making the crust soggy. After that, loosely cover it with plastic wrap. It will stay wonderfully fresh and silky for up to 4 days.
Can You Successfully Freeze Chocolate Ganache Tarts?
But does it freeze well? You bet. The high fat content in the ganache makes it very stable in the freezer. Wrap the unsliced tart (without the fresh raspberry garnish!) tightly in plastic wrap, followed by a layer of foil. It will keep beautifully for up to 2 months.
Optimal Thawing and Serving Temperature
When ready to serve, thaw the frozen tart slowly overnight in the refrigerator. Never thaw chocolate at room temperature , or you risk massive condensation and "blooming" (a gray streak on the chocolate).
For the best flavor, pull the tart out of the fridge about 30 minutes before serving. The slightly softened chocolate filling is just heavenly.
The Perfect Curtain Call: Presentation and Serving Pairings
This tart is already stunning, but a few simple additions make it unforgettable.
Try serving a thin slice with a light, acidic counterpoint. I love pairing the richness with a tiny dollop of fresh crème fraîche or a light, barely sweetened cloud of whipped mascarpone.
If you are serving this for a cozy evening, consider having coffee ready. The bitterness of a robust espresso provides the perfect partner for the sweetness. If you want another great pairing that cuts richness, maybe try a slice alongside my ultra moist [Chocolate Chip Banana Bread Recipe Ultra Moist Easy] for a double dose of dessert indulgence!

Recipe FAQs
Why did my chocolate ganache filling split or become grainy?
A grainy or split ganache is usually a sign of a broken emulsion, often caused by the cream cooling too quickly or aggressive mixing. Ensure the hot cream is poured slowly and steadily over the chopped chocolate, allowing the mixture to sit for two minutes before stirring gently from the center outwards until smooth and glossy.
If it splits, sometimes adding one teaspoon of hot milk or cream and stirring vigorously can bring it back together.
My shortcrust pastry (pâté sucrée) shrank significantly during blind baking. How do I prevent this?
Crust shrinkage is prevented through proper chilling and support. After fitting the dough into the pan, chill it deeply for at least 30 minutes to relax the gluten before baking. Always use pie weights, ceramic beads, or dried beans to fully line the shell during the initial blind baking phase; remove the weights for the last 10 minutes to allow the base to crisp up.
Can I use frozen raspberries instead of fresh ones in this tart?
While fresh raspberries are preferred for their vibrant look and firmness, you can use frozen berries if thawed and drained thoroughly first. Excess moisture from frozen fruit will weep into the crust, softening it prematurely and potentially causing the chocolate layer to seize.
To maximize crispness, brush the blind baked shell with a thin layer of melted white chocolate before adding the raspberries.
What type of chocolate provides the best "silky" texture for the filling?
For the ideal silky texture, use a high-quality baking bar or couverture chocolate that is 60 72% cocoa solids. This range offers the best balance of rich flavor and appropriate fat content for emulsification.
Avoid using chocolate chips, as they often contain stabilizers that prevent them from melting into a perfectly smooth ganache.
How far in advance can I make the tart, and how should I store it?
The tart is best served within 24 hours of being fully assembled. You can prepare and blind bake the shell up to 3 days in advance, storing it at room temperature in an airtight container.
Once the tart is filled, it must be stored in the refrigerator, but allow it to sit out at room temperature for 30 45 minutes before serving for the optimal melt-in-your mouth filling texture.
Can this recipe be adapted to be completely dairy-free or vegan?
Yes, this recipe is highly adaptable for dietary needs. For the crust, substitute the butter with a high-quality plant based vegan butter substitute. For the ganache, replace the heavy cream with the thick, solid cream skimmed from a can of full fat coconut milk that has been chilled overnight, and ensure you use high-quality vegan dark chocolate.
Silky Chocolate Raspberry Tart Recipe
Ingredients:
Instructions:
Nutrition Facts:
| Calories | 603 kcal |
|---|---|
| Protein | 11.3 g |
| Fat | 33.3 g |
| Carbs | 64.6 g |
