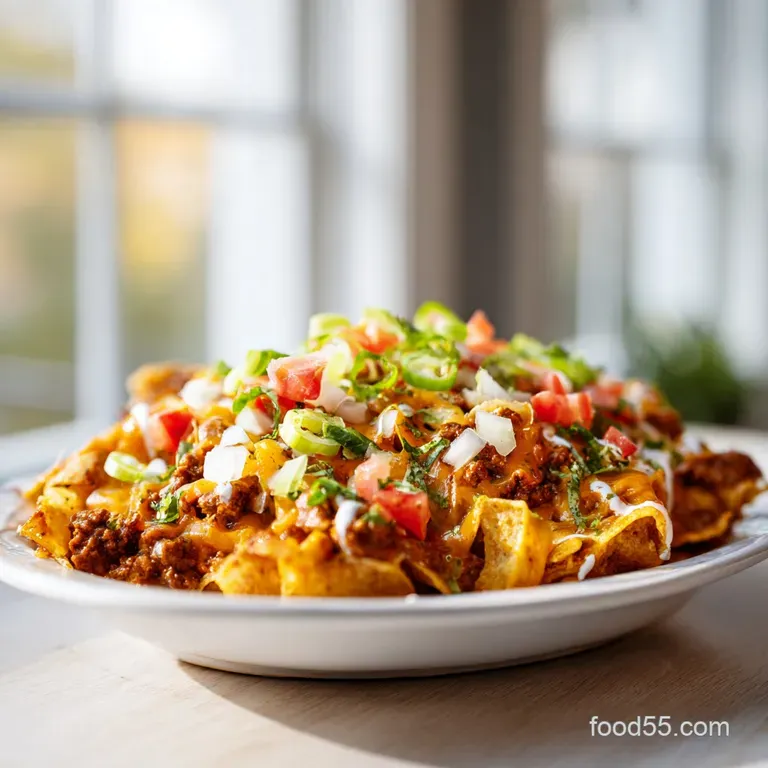
Walking Taco Casserole: Rich and Crispy
- Time: Active 15 minutes, Passive 25 minutes, Total 40 minutes
- Flavor/Texture Hook: A combination of molten sharp cheddar, silky refried beans, and a high impact salty crunch.
- Perfect for: Game day gatherings, busy Tuesday nights, or anytime you crave the vibrant flavors of a local street fair.
- The Bold Fusion of Crunch and Creaminess in Walking Taco Casserole 2
- Why This Works
- Understanding the Recipe Specs for Your Next Crowd-Pleasing Dinner
- Gathering Your Essentials for the Perfect Latin Inspired Flavor Layers
- Equipment Needed to Master This Easy One Dish Family Meal
- Key Steps to Building Texture and Heat in Every Bite
- Troubleshooting Common Issues
- What Can Go Wrong (and How to Fix It) for Success
- Flavor Variations to Try for a Custom Spice Experience
- Freezing and Reheating Guide for Busy Weeknight Meal Prep
- Serving Suggestions to Bring That Authentic Street Food Vibe Home
- Scaling the Recipe for Any Crowd Size
- Kitchen Myths Debunked
- Storage and Zero Waste Tips
- Very High in Sodium
- Recipe FAQs
- 📝 Recipe Card
The Bold Fusion of Crunch and Creaminess in Walking Taco Casserole 2
You know that specific sound? That rhythmic crinkle crinkle of a foil bag being shaken up at a high school football game or a neighborhood block party? That's the sound of a walking taco being born.
There’s something so nostalgic about eating seasoned meat and cold lettuce straight out of a chip bag, but let’s be honest it’s a logistical nightmare when you’re trying to feed a family of six or a dozen rowdy friends.
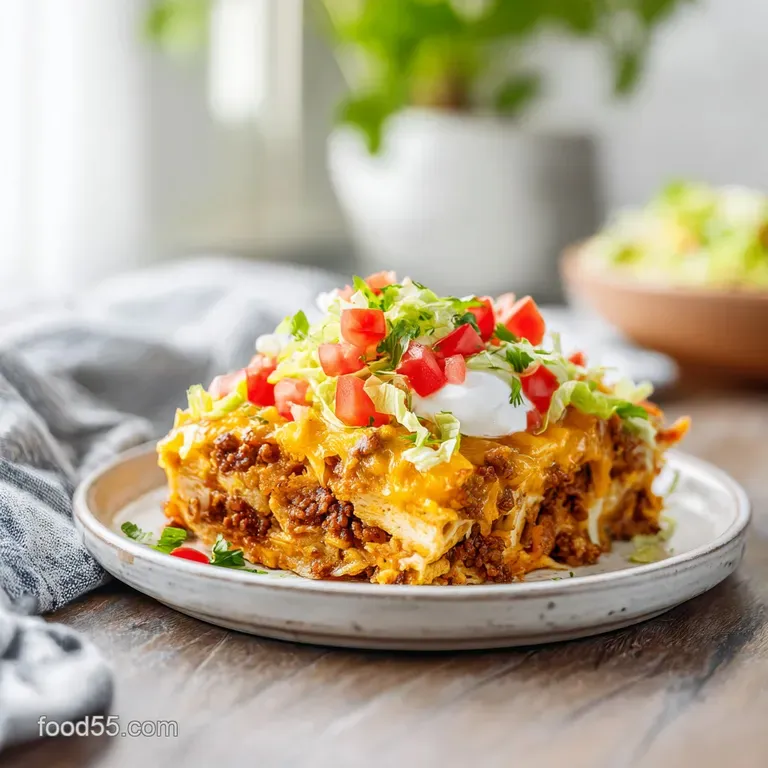
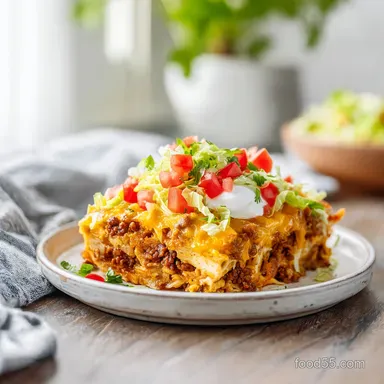
My walking taco casserole 2 takes all that vibrant street food energy and settles it into a 9x13 inch baking dish, making it way more manageable without losing a single bit of that iconic texture.
I first realized I needed a better version of this dish after a particularly messy birthday party where three different toddlers managed to tip their individual taco bags onto my white rug.
I sat there with the carpet cleaner thinking, "There has to be a way to get this flavor into a scoopable, stable format." The secret, I discovered, isn't just throwing everything in a bowl; it’s about the architecture of the layers.
We want the beef to stay juicy, the cheese to stay molten, and most importantly, we want those corn chips to keep their signature shatter.
This version is a total win because it feels like a cheat meal but takes only 40 minutes from start to finish. You get the savory depth of the seared beef, the earthy weight of the refried beans, and this incredibly cooling, tangy cream cheese layer that acts as a buffer.
It’s the kind of meal where the kids actually ask for seconds, and the adults secretly go back for thirds when no one is looking. Plus, it uses pantry staples that you probably already have, meaning you can pull this off even when the fridge looks a little bleak.
Why This Works
- The Moisture Buffer: By mixing the cream cheese and sour cream into a distinct middle layer, we create a barrier that prevents the beef juices from migrating into the chips, keeping the bottom layer from turning into mush.
- Maillard Magic: Searing the lean ground beef undisturbed for 3 minutes develops a deep brown crust that adds a savory, umami rich base that a simple "boil in-the pan" method lacks.
- Dual Phase Crunching: Adding half the Fritos before the bake and the other half after ensures you have some chips that are slightly softened and cheese coated, while others provide a fresh, sharp snap.
- Aromatics First: Sautéing the onion and garlic after the beef has browned allows them to soften in the rendered fat without burning, releasing a sweet fragrance that permeates the entire taco casserole 2.
Serving Size Calculator
| Servings | Ingredient Adjustments | Pan Size | Cook Time |
|---|---|---|---|
| 4 people | 225g beef, 1/2 can beans, 4 oz cheese | 8x8 inch square | 20 minutes |
| 8 people | 454g beef, 16 oz beans, 8 oz cheese | 9x13 inch dish | 25 minutes |
| 16 people | 908g beef, 32 oz beans, 16 oz cheese | Two 9x13 inch dishes | 30 minutes |
Building this dish is all about timing and temperature. If you’ve ever made my Weight Watchers Taco Soup, you know how important it is to let those spices bloom. In this casserole, the water added to the taco seasoning creates a light sauce that binds the beef and beans together, ensuring the bottom layer isn't dry or crumbly when you scoop it out.
Component Analysis
| Ingredient | Science Role | Pro Secret |
|---|---|---|
| Lean Ground Beef (90/10) | Structural protein and fat carrier | Leave it undisturbed for 3 mins to get a "steak like" sear. |
| Cream Cheese | Emulsified fat barrier | Use full fat for a silky texture that won't separate under heat. |
| Fritos Corn Chips | Starch and sodium contrast | Use the "Original" size, not "Scoops," for better layering. |
| Sharp Cheddar | Low moisture melting agent | Grate your own from a block to avoid the grainy cellulose coating. |
Understanding the Recipe Specs for Your Next Crowd Pleasing Dinner
Before we get the skillet screaming hot, let’s look at what we’re actually dealing with here. This is a fast paced recipe. Once that beef starts to brown, things move quickly, so having your onion diced and your garlic minced is non negotiable.
We are looking for a total time of 40 minutes — 15 minutes of hands on prep and 25 minutes of passive baking.
The heat management is also key. We start high on the stovetop to get that sizzle and then drop to a moderate 175°C (350°F) in the oven. This moderate oven temp is the "goldilocks" zone; it’s hot enough to melt the cheddar into a molten blanket but gentle enough that the cream cheese layer doesn't break and leak oil.
If you've got a convection oven, you might want to shave 3 or 4 minutes off that cook time to keep the chips from browning too much.
Fresh vs. Shortcut Comparison
| Element | Fresh Approach | Shortcut Version | Result |
|---|---|---|---|
| Beef Seasoning | Toasted cumin, chili, oregano | Packet taco seasoning | Packet is faster; fresh is more complex. |
| Cheese | Hand grated sharp cheddar | Pre shredded bag cheese | Hand grated melts much smoother. |
| Beans | Home cooked pinto beans | Canned refried beans | Canned provides the perfect "paste" texture. |
Gathering Your Essentials for the Perfect Latin Inspired Flavor Layers
The beauty of this casserole 2 is in the simplicity of its components, but that doesn't mean we can't be picky about quality. When you’re at the store, look for the leanest ground beef you can find 90/10 is the sweet spot.
Anything fattier will leave a pool of oil at the bottom of your dish, and nobody wants a soggy walking taco.
For the Protein & Bean Base
- 454g (1 lb) lean ground beef: Provides the savory backbone. Why this? Higher protein content ensures the meat holds its shape during the bake.
- 15ml (1 tbsp) olive oil: Helps the initial sear.
- 1 small yellow onion: Finely diced for subtle sweetness.
- 2 cloves garlic: Freshly minced is a must for that punchy aroma.
- 28g (1 packet) taco seasoning: I prefer low sodium to control the salt.
- 60ml (1/4 cup) water: To deglaze the pan and create a sauce.
- 450g (16 oz) refried beans: Acts as a thickener and binder for the meat.
For the Velvety Cream Layer
- 225g (8 oz) cream cheese: Make sure it's softened to room temperature. Why this? It creates the essential moisture barrier between meat and chips.
- 120ml (1/2 cup) sour cream: Adds a necessary tang to cut through the richness.
- 115g (4 oz) diced green chiles: These should be drained well.
For the Assembly & Toppings
- 225g (2 cups) shredded sharp cheddar: Sharpness stands up to the salty chips.
- 262g (9.25 oz) Fritos corn chips: The soul of the dish.
- Shredded iceberg lettuce: For a cooling, watery crunch.
- Diced tomatoes, jalapeños, and olives: The vibrant finishes.
If you are looking to swap things out, here is how you do it without ruining the vibe:
| Original Ingredient | Substitute | Why It Works |
|---|---|---|
| Ground Beef | Ground Turkey (93/7) | Similar texture; needs a splash more oil during the sear. |
| Refried Beans | Black Beans (rinsed) | Adds more individual texture but is less "spreadable." |
| Fritos | Cool Ranch Doritos | Adds a zesty, herby profile; Note: Chips are thinner, so add later. |
Equipment Needed to Master This Easy One Dish Family Meal
You don't need a professional kitchen to pull this off, but a couple of specific tools will make your life much easier. First and foremost, you need a large, heavy bottomed skillet. A cast iron pan is my personal favorite here because it retains heat so well, which is vital for getting that 3 minute sear on the beef.
If the pan isn't hot enough, the meat will just steam in its own juices, and you'll miss out on those crispy, browned bits.
You’ll also need a 9x13 inch (about 3 liter) baking dish. Glass or ceramic works best as they distribute heat evenly. I’ve tried making this in a metal cake pan before, and the edges of the refried beans got a bit too crusty before the center was molten.
Also, grab a sturdy spatula you're going to be spreading some thick layers, and you don't want a flimsy one snapping mid process!
Chef's Tip: If your cream cheese is still a bit cold, pop it in the microwave for 15 seconds. It needs to be completely smooth when you mix it with the sour cream, or you’ll end up with little white lumps in your casserole that don't look very appetizing.
Key Steps to Building Texture and Heat in Every Bite
Troubleshooting Common Issues
| Issue | Solution |
|---|---|
| Build the Foundation | 1. Heat the oil: Get that 15ml of olive oil in your skillet over medium high heat. Wait until it shimmers. 2. Sear the beef: Drop the 454g of ground beef into the pan. Do not touch it for 3 |
| Apply the Creamy Barrier | 7. Whisk the cream: In a separate bowl, blend the softened cream cheese, sour cream, and drained green chiles. It should be velvety and thick. 8. The Spread: Carefully dollop the cream mixture |
| Achieve the Perfect Bake | 9. Layer the crunch: Sprinkle exactly half of your Fritos over the cream layer. Then, cover the whole thing with the 225g of shredded cheddar. 10. The Bake: Slide it into the oven at 175°C (35 |
| Finish for Maximum Crunch | 11. The Final Top: Immediately after pulling it from the oven, dump the remaining Fritos on top. This creates a "texture sandwich" of soft and crispy chips. 12. Fresh Finish: Scatter the lettu |
What Can Go Wrong (and How to Fix It) for Success
The most common heartbreak with any walking taco casserole is the "soupy bottom." This usually happens because the onions released too much water or the green chiles weren't drained properly.
If you find your meat mixture looks a bit like soup before you put it in the dish, let it simmer on the stove for an extra 5 minutes without a lid. The evaporation will thicken it right up.
Another issue is the "grease slick." This happens if you use 80/20 beef or if you don't drain the fat after browning. I always keep a clean glass jar nearby to pour off excess grease before adding the seasoning and water. It's a small step that makes a massive difference in the final mouthfeel.
Why Is My Casserole Soupy?
If the base of your casserole is watery, it’s usually because the refried beans weren't heated enough to activate their thickening starches, or the onions were too large and released excess moisture.
Next time, try dicing the onions smaller and ensures the beef bean mixture is thick enough that a spoon can stand upright in it before you transfer it to the baking dish.
Why Did My Cheese Turn Oily?
This is a classic case of using pre shredded cheese. Those bags are coated in potato starch or cellulose to prevent clumping. When that coating hits the high heat of the oven, it can prevent the cheese from emulsifying properly, leading to a layer of oil on top.
Stick to the block cheese and grate it yourself it's an extra 3 minutes of work for a vastly superior result.
Quick Fix Table
| Problem | Root Cause | Solution |
|---|---|---|
| Soggy Chips | Moisture migrated from the beef | Ensure the cream cheese layer is spread edge to edge as a seal. |
| Dry Meat | Simmered too long after adding water | Stir in an extra 2 tablespoons of salsa to rehydrate. |
| Grainy Sauce | Cream cheese was too cold when mixing | Whisk the cream mixture over a warm water bath to smooth out. |
Common Mistakes Checklist:
- ✓ Don't skip the 3 minute undisturbed sear on the beef; that's where the flavor lives.
- ✓ Always drain the diced green chiles through a fine mesh sieve.
- ✓ Let the cream cheese soften for at least 30 minutes on the counter.
- ✓ Add the fresh lettuce only right before serving to prevent wilting.
- ✓ Use sharp cheddar rather than mild for a more pronounced flavor profile.
Flavor Variations to Try for a Custom Spice Experience
If you want to take this walking taco casserole 2 to the next level, there are a few ways to pivot the flavor profile. If you're a fan of heat, swap the mild green chiles for diced habaneros or add a tablespoon of chipotle in adobo to the beef mixture.
The smokiness of the chipotle pairs beautifully with the corn chips.
For a slightly lighter version, you can substitute the ground beef for ground turkey or even a plant based crumble. Just be aware that turkey has less fat, so it won't brown as deeply you might need to add a teaspoon of Worcestershire sauce to help with that savory depth.
If you want a different carb experience, try using Nacho Cheese Doritos instead of Fritos. It changes the flavor entirely, leaning more into that "taco bell" nostalgic vibe.
Decision Shortcut: If you want Maximum Spice, add 1 tbsp of diced jalapeños into the beef while sautéing. If you want Extra Creaminess, double the sour cream in the middle layer.
If you want a Textural Shift, swap half the refried beans for whole black beans.
I often think about the time I tried to make this with leftover Mexican Chicken Rice Casserole as the base. It worked surprisingly well! The rice added a whole different level of heartiness. If you have leftover shredded chicken, feel free to use that instead of the ground beef for a "Walking Chicken Taco" variation.
Freezing and Reheating Guide for Busy Weeknight Meal Prep
This casserole is a meal prepper's dream, but you have to be smart about the chips. Never freeze the chips. If you want to make this ahead of time, prepare the beef and bean layer and the cream cheese layer in the dish. Cover it tightly with plastic wrap and then foil.
It will stay fresh in the freezer for up to 3 months.
When you’re ready to eat, let it thaw in the fridge overnight. Bake it as directed, but add about 10 minutes to the cook time since the base will be cold. Only add the Fritos and cheese right before it goes into the oven. This ensures the chips are never subjected to the moisture of the freezer.
For leftovers, the microwave is okay, but the toaster oven is better. A quick 5 minutes at 180°C will help revive some of that chip crunch. If the chips have already gone soft, I usually just scrape them off and add a fresh handful of Fritos before reheating.
It’s an easy fix that makes the leftovers feel brand new.
Serving Suggestions to Bring That Authentic Street Food Vibe Home
When I serve this, I like to lean into the "build your own" aspect. I’ll put the hot casserole 2 in the middle of the table and surround it with small bowls of extra toppings. Think pickled red onions, fresh cilantro, lime wedges, and a really good hot sauce (something like Cholula or a smoky Valentina).
If you’re hosting a larger party, this dish pairs beautifully with a light, acidic side. A simple cucumber and radish salad with a lime vinaigrette helps cut through the heavy, cheesy layers of the taco casserole. And of course, you can't go wrong serving this alongside some Crispy Fish Tacos if you're doing a full blown Mexican themed spread.
Scaling the Recipe for Any Crowd Size
When you're scaling down for a solo dinner or a couple's night, use a smaller baking dish like an 8x8 inch square. You'll want to reduce the baking time by about 5 minutes since the edges will heat up faster.
For the egg based recipes, you'd use half an egg, but here, just use half a can of beans and half a block of cream cheese the measurements are very forgiving.
Scaling up for a big party is even easier. Just double everything and use two 9x13 inch dishes. I don't recommend using one giant deep pan because the middle will take too long to heat through, and by the time it’s molten, the edges will be burnt.
If you're doubling the spices, remember that salt and heat can intensify; I usually only use 1.5x the taco seasoning if I'm doubling the meat to keep it from becoming a salt bomb.
Kitchen Myths Debunked
One common myth is that you must use Fritos for it to be a walking taco. While it’s the traditional choice, any sturdy corn chip will work. However, avoid thin "restaurant style" tortilla chips; they don't have the structural integrity to hold up under the weight of the beef and cream cheese and will turn to mush almost instantly.
Another myth is that searing meat "seals in the juices." Science tells us that's not true moisture is lost during searing regardless. What searing actually does is create a complex array of new flavor molecules through the Maillard reaction.
So, don't skip the sear thinking you're saving moisture; do it because you want that deep, savory taste that makes the casserole 2 stand out.
Storage and Zero Waste Tips
- Fridge Life: This will stay good in an airtight container for up to 4 days. The chips will soften, but the flavor actually deepens as the spices meld.
- Zero Waste Onions: If you have half an onion left over, dice it and freeze it in a small bag for your next sauté. It’ll be ready to go!
- Leftover Bean Dip: If you find you have a little bit of the beef and bean mixture left that didn't fit in the dish, it makes an incredible dip for lunch the next day. Just heat it up and serve with carrot sticks or more chips.
- Taco Scraps: Don't toss those wilted lettuce ends. If they are still crisp enough, they can be finely chopped and added to a morning omelet for a bit of extra fiber and volume.
This walking taco casserole 2 is more than just a quick dinner; it’s a way to bring people together over a dish that's unpretentious and purely focused on flavor. Whether it’s a game night or a frantic Monday, this is the recipe you’ll find yourself coming back to again and again.
It's vibrant, it’s crunchy, and it’s exactly what a home cooked meal should feel like. Enjoy every bite!

Very High in Sodium
920 mg of sodium per serving (40% of daily value)
The American Heart Association recommends limiting sodium intake to no more than 2,300mg per day, with an ideal limit of 1,500mg for most adults.
Tips to Reduce Sodium
-
Choose Low-Sodium Taco Seasoning-30%
The largest sodium contributor is likely the taco seasoning packet. Opt for a brand labeled 'low-sodium' or 'reduced sodium'. You can also make your own from scratch with herbs and spices to control the salt.
-
Rinse Canned Refried Beans-20%
Canned refried beans can be surprisingly high in sodium. Rinsing them under cold water before adding them to the recipe can significantly reduce their sodium content.
-
Use Reduced Fat Cream Cheese & Cheddar-10%
While not always lower in sodium, some 'reduced fat' or 'light' versions of cream cheese and cheddar cheese may have slightly less sodium. Always check the nutrition labels.
-
Select Low-Sodium Olives-15%
Pickled olives, especially black olives, can add a considerable amount of sodium. Look for 'low-sodium' or 'no-salt added' varieties if available.
-
Boost Flavor with Fresh Herbs & Spices
Instead of relying solely on the seasoning packet, add fresh cilantro, a pinch of chili powder, cumin, or smoked paprika for a flavor boost without added salt.
-
Reduce Amount of Cheddar Cheese-5%
Sharp cheddar cheese contributes to the sodium count. Using slightly less cheese will help lower the overall sodium without a dramatic change in taste.
Recipe FAQs
What is walking taco casserole?
It is a baked comfort meal that mimics the classic fair food "walking taco" by layering seasoned ground beef, refried beans, a creamy green chile mixture, and crunchy Fritos in a 9x13 pan.
What is Jackie Kennedy's casserole?
This is a misattribution. Jackie Kennedy is not associated with this recipe; walking taco casserole is a modern American potluck dish built around convenience and corn chips rather than historical culinary archives.
Are walking tacos healthy to lose weight?
No, this is a calorie dense dish. At 598 kcal per serving, it is intended as a hearty comfort meal rather than a weight loss recipe.
Can walking taco casserole be made ahead of time?
Yes, but keep the chips separate. You can assemble the beef, bean, and cheese layers in the baking dish ahead of time, then bake it and add the fresh toppings and Fritos right before serving to maintain the best texture.
How to sear the beef properly for this recipe?
Heat olive oil over medium high heat until it shimmers, then add the beef. Leave the meat undisturbed for 3 minutes to develop a deep, savory crust before breaking it into crumbles; if you enjoyed this browning technique, see how we apply similar heat control to our savory beef reduction.
How to prevent the casserole from becoming soggy?
Create a moisture barrier with the cream cheese layer. Whisk the softened cream cheese, sour cream, and drained green chiles together, then spread them evenly over the beef and bean mixture to keep the base ingredients contained and separate from the top layer of chips.
How to achieve the perfect crunch when serving?
Add the remaining Fritos immediately after baking. By reserving half of the chips to top the casserole once it comes out of the oven at 350°F, you ensure a crisp contrast to the molten cheese and beef filling.
Walking Taco Casserole Bake
Ingredients:
Instructions:
Nutrition Facts:
| Calories | 598 kcal |
|---|---|
| Protein | 28 g |
| Fat | 41 g |
| Carbs | 33 g |
| Fiber | 5 g |
| Sugar | 4 g |
| Sodium | 920 mg |
