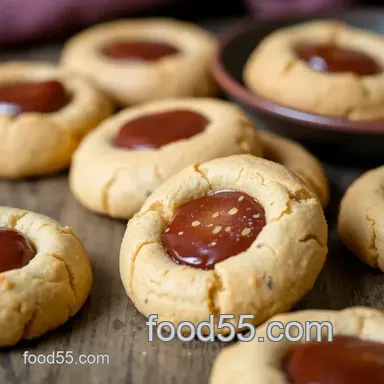
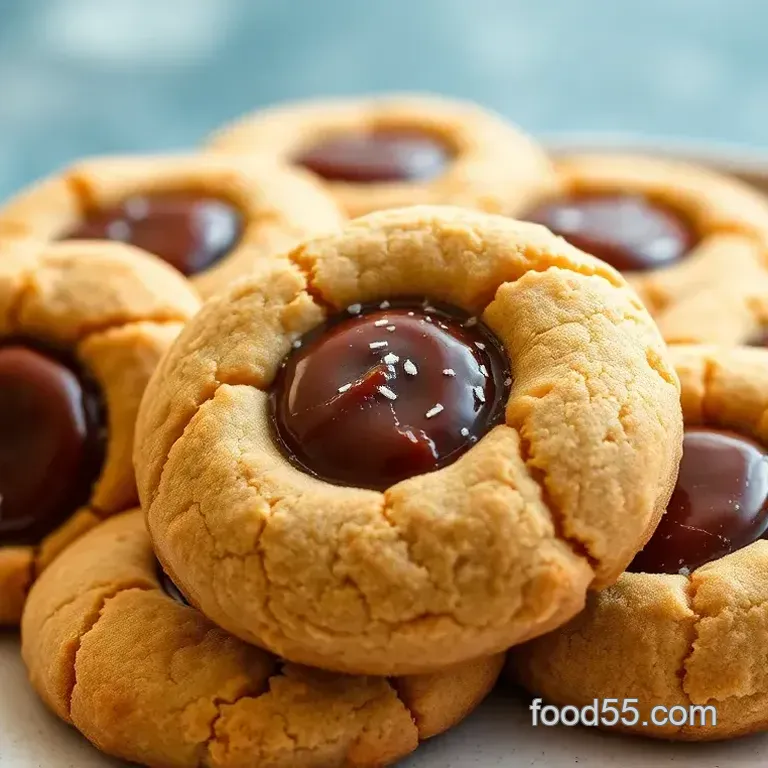
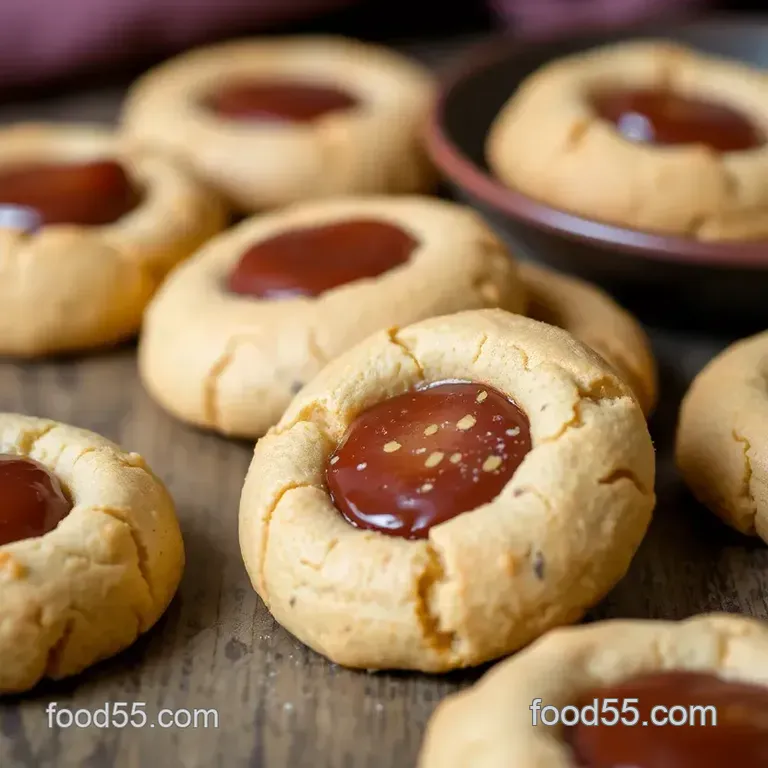
Chestnut Flour Thumbprint Cookies
Oh, let me tell you about my first time baking chestnut flour thumbprint cookies ! i was at my buddy mike's place, and he casually mentioned he wanted something sweet but with a twist something gluten-free.
Now, i’m all for the classics, but i thought, why not shake things up a bit? so, i poked around his pantry and found chestnut flour.
I mean, how often do you get to play with alternative flour recipes ? it was a moment of pure inspiration!
These cookies are not just any baked good; they’re a delightful blend of nutty flavors and rich jam fillings. i remember the way the sweet aroma wafted through the air once they were baking sweet and a bit earthy.
The entire vibe was so comforting and homey. before i knew it, every bite was devoured, with approval all around.
Seriously, they vanished like hot cakes! and let's be real, who doesn’t want a sweet snack idea that hits all the right spots, especially when it checks the gluten-free box?
Recipe Overview
Chestnut flour cookies trace their roots back to the mediterranean, where folks have enjoyed nutty and unique flavors for ages.
These modern day delights are making a name for themselves in kitchens all across america. with their rustic charm and easy preparation, they’re perfect whether you’re hosting a fancy get-together or just want something special for yourself.
Now, the time commitment is pretty chill around 57 minutes total , with just 15 minutes of active work. this includes a quick chill for the dough, which makes all the difference in texture.
They yield about 24 cookies , and honestly, they get eaten up faster than you can say "thumbprint!" the cost is quite friendly, too, making it a great option for family friendly cookie recipes without breaking the bank.
Key Benefits
Let’s get real who doesn’t want to indulge in something that’s also good for them ? Here’s why you should run to the kitchen:
Health Benefits: Chestnut flour is gluten-free, packed with fiber, and has a lower glycemic index, making it a great alternative for those watching their carbs. Plus, it’s nutty flavors are just scrumptious!
Unique Selling Points: These cookies stand out with their light and crumbly texture . Each one is like a tiny gift waiting for that fruity jam surprise right in the center.
Perfect for Occasions: Whether it's a holiday gathering, a cozy brunch, or just a casual Friday night treat, these fruit filled cookies can swoop in and save the day.
Versatile Variations: Think about it; you can switch up the jam or even try filling them with nut butter! It’s all about making these easy dessert recipes fit your fancy.
So, are you ready to Bake Chestnut Flour Thumbprint Cookies Now! ? Grab your apron; we're about to embark on a baking adventure that’s fun, rewarding, and sure to impress anyone who gets a taste!
In the next section, let’s dive into the ingredients you’ll need. you’ll see just how simple it is to whip these up.
Trust me, once you taste these cookies, you'll be back for more!
Essential Ingredients Guide
When it comes to baking, knowing your essential ingredients can truly make or break your creation. let’s dive into what you need to whip up those dreamy chestnut flour thumbprint cookies now!
we’ll chat about high-quality bakers' essentials, signature flavor blends, smart substitutes, and the must have kitchen equipment you'll need.
Baking should be fun, not frustrating!
Premium Core Components
So, what's first on the list? chestnut flour ! it’s the star of our recipe, bringing a gorgeous nutty flavor that elevates your cookies to another level.
For the dough , you’ll need 1 cup (150g) of chestnut flour. make sure it’s fresh; don’t just grab your flour from the back of the cupboard! freshness matters.
When choosing flour, look for a fine texture and a nutty aroma. chestnut flour can last for about 6 months in an airtight container in a cool, dark place.
If it smells off or tastes bitter, toss it!
Next, we need granulated sugar ½ cup (100g) will do the trick. sugar should be white and free of any lumps.
If you want to try a healthier option, coconut sugar gives a nice caramel like taste while being a great alternative for those looking to lower their sugar intake.
Signature Seasoning Blend
Now let’s talk signature seasoning! the real magic happens when we combine flavors. along with the basic salt and baking powder, consider adding a pinch of cinnamon or nutmeg to the dough.
They create a warmth that complements our nutty flour perfectly. and while chestnut flour is unique on its own, don’t shy away from exploring regional alternatives, like using almond flour for different flavors.
Herbs and spices can enhance your cookies even further. Imagine a nutty cookie with hints of cardamom or ginger! Isn’t baking exciting?
Smart Substitutions
Here’s the deal: we all have those days when we’re low on supplies, right? no worries! if you find yourself without chestnut flour , almond flour is a solid option, although it carries a slightly different nutty vibe.
Need to make it dairy-free? Swap out that butter for coconut oil. And hey, if you’re out of granulated sugar, use honey or maple syrup the cookies won’t know the difference!
Kitchen Equipment Essentials
Now onto the kitchen tools you’ll need. you don’t require fancy gadgets. a simple mixing bowl and a hand mixer (or a good old whisk) are all you really need to get your dough together.
However, if you’ve got a stand mixer, bless you! it’ll save your arm a workout.
Make sure you have a baking sheet lined with parchment paper. this makes clean up a breeze and ensures your cookies won’t stick like a bad memory.
And, if you're feeling adventurous, a cookie scoop helps create uniform dough balls for even baking.
Conclusion
We’ve covered so much about baking essentials ! the kitchen can feel like a world of possibilities, with endless variations just waiting to be discovered.
As you start gathering your components think about those tasty jam fillings that’ll go in those thumbprint cookies. will it be raspberry or maybe apricot?
Now that you have your ingredient guide, it’s time to pull everything together and dive right into the preparations for those Chestnut Flour Thumbprint Cookies ! Trust me; your taste buds are about to throw a dance party! So don’t wait, let’s get baking!
Unleashing the Art of Professional Cooking
Cooking isn’t just about throwing ingredients together. it’s a whole vibe! if you want your meals to shine like a michelin star dish, you’ve got to master some pro techniques.
Let’s dive into a few essential cooking methods that will make anyone swoon over your culinary creations.
Essential Preparation Steps
First off, let's talk mise en place . this fancy french term simply means, “everything in its place.” yep, it’s just organizing your ingredients before diving in.
Chop your veggies, measure out your spices, and have everything ready to go. it saves time and ensures you don’t scramble for that last ingredient while your pan is smoking.
Now, time management is key, folks! set a cooking timeline before you start. make sure to preheat your oven to 350° f if you're doing some baking.
Do little tasks in batches. while your cookies are chilling (more on that later!), maybe prep a salad or start on a sauce.
Speaking of being organized, keep your cooking space tidy. trust me; a cluttered kitchen leads to a cluttered mind. safety is no joke either.
Always watch those knife skills, and remember, hot surfaces can burn! keep a pair of oven mitts handy at all times.
step-by-step Process
Ready to bring your culinary creation to life? Here’s a straightforward recipe to get you started. Follow these steps carefully:
- Preheat the Oven: You know the drill. Start by preheating that oven to 350° F .
- Prepare the Baking Sheet: Line it with parchment paper. This keeps things from sticking.
- Cream Butter and Sugar: Beat ½ cup unsalted butter with ½ cup granulated sugar until fluffy.
- Add Egg Yolks: Toss in 1 large egg yolk and 1 teaspoon vanilla extract and give it a good mix.
- Combine Dry Goods: In another bowl, whisk together 1 cup chestnut flour , ½ teaspoon baking powder , and a pinch of salt.
- Mix Together: Slowly combine your wet and dry ingredients until just mixed.
- Chill Dough: Pop it in the fridge for 30 minutes . This makes the dough easier to handle.
- Form Cookies: Scoop out small balls of dough and put them on your baking sheet.
- Create Thumbprints: Dents are a must! Use your thumb or a teaspoon to poke holes.
- Fill with Jam: Add your choice of fruit jam it's like giving each cookie a little personality!
- Bake: Bake for 12- 15 minutes until they’re golden around the edges.
- Cool: Let them chill on a wire rack and enjoy the sweet aromas wafting through your kitchen!
Expert Techniques
Now, let’s kick it up a notch. when you’re baking, temperature control matters like whoa! use what you call a thermometer if you can; it’s your best friend.
If you're trying something fancy like a soufflé, exact timing matters too! trust me, cooking is as much about timing as it is about ingredient quality.
One critical step to remember is quality checkpoints. keep an eye on the cookies as they bake, looking for that golden hue.
And if the dough is too sticky, sprinkle a bit more chestnut flour to fix that. classic troubleshooting, right?
Success Strategies
A few common mistakes, and i’m putting my hand up here too, can ruin your dish. don’t mix too vigorously; you don’t want to deflate any air.
If you’re swapping ingredients, make sure to account for moisture levels both butter and eggs can drastically change the texture.
If you’re thinking ahead, these Chestnut Flour Thumbprint Cookies can be made in advance and stored. They’re gluten-free and absolutely perfect for any gathering, especially around the holidays!
Baking Delight
Now that you’ve seen how to master these professional cooking methods, let’s get into the good stuff. bake chestnut flour thumbprint cookies now! indulge in sweet jam-filled goodies that are perfect any time of year.
Whether you’re munching on a nutty flavor cookie with your coffee or impressing guests with a unique mediterranean dessert, these babies deliver!
Look into into those flavorful jam fillings and explore new creations with alternative flour recipes. and guess what? you can even make variations to satisfy different dietary needs.
Get your cookie baking tips right, and you’ll have irresistible treats everyone will savor!
Feeling ready? Grab those ingredients, roll up those sleeves, and let your inner chef shine!
Additional Information
If you’re eager for more delightful recipes or gadget tips, stay tuned. There’s always more to discover in the culinary world. Happy cooking!
Pro Tips & Secrets You’ll Love
Baking is an art, but sometimes it’s less about strict rules and more about playful experimentation ! Here are some personal tips from my own baking adventures with chestnut flour recipes .
First off, chill your dough . trust me on this. chilling the dough for about 30 minutes not only keeps your cookies from spreading like wild but also gives you that perfect, tender texture.
I usually pop it in the fridge while i clean up a bit, multi tasking like a pro!
Next up, when you’re creaming the butter and sugar , make sure your butter is room temperature . that way, it gets fluffy quicker, and you won’t be left with dense cookies .
Nobody wants that. and if you're looking to amp up the flavor, add a pinch of sea salt to your dough.
It makes a world of difference!
Perfect Presentation
After all the baking sweat equity, you want your cookies to look as good as they taste. so let's talk about plating.
Plating techniques can elevate your cookie game. place three or four cookies on a cute plate and sprinkle some powdered sugar on top.
That touch of white makes everything pop!
For that extra flair, dollop some whipped cream or fresh berries next to your cookies. think of it like decorating a holiday tree it's all about the details and color combinations.
If you use different jams, align them in color order for a visually appealing effect.
Storage & make-ahead Hacks
So you’ve baked a batch of gluten-free cookies . awesome! but how do you keep them fresh? these chestnut flour thumbprint cookies can last up to a week if you store them in an airtight container at room temp.
However, if they’re filled with jam, stick them in the fridge to keep the filling from getting too loose.
You can also make the dough ahead of time! just wrap it tightly in plastic and pop it in your freezer.
When the cookie craving hits, let it thaw, shape, and bake. you can whip out fresh, homemade thumbprint cookies anytime!
Creative Variations to Jazz It Up
Feeling adventurous? there are endless possibilities! you can swap out the jam for chocolate ganache for a seriously indulgent treat.
Try adding spices like cinnamon or cardamom to the batter for a seasonal twist . imagine cooking with those enticing aromas wafting through your kitchen total bliss!
And if you’re looking for dietary modifications , simply use sugar substitutes for baking like monk fruit or stevia to create a healthier cookie alternative .
Plus, if you’re working with allergies, substitute with nut-free options like sunflower seed butter!
Complete Nutrition Guide: The Lowdown
Now, let’s break down the nutrition of these cookies. each one is around 120 calories , making them a great sweet snack idea without breaking the bank on your waistline! high in fiber , thanks to chestnut flour, they come with a side of benefits.
Chestnut flour is packed with complex carbs, making it a great energy booster. it’s also a fantastic choice for those looking to bake gluten-free treats.
If you’re counting calories, maybe consider portion guidance on serving sizes 2-3 cookies should be just right.
So, after all those delicious tips, it’s time to get baking! bake chestnut flour thumbprint cookies now! you’ll be amazed at how such simple ingredients come together in perfect harmony for a comfy, indulgent experience.
Your kitchen will smell divine, and you’ll wow friends and family with your gourmet dessert ideas. who wouldn’t want that?
Remember, cooking is all about having fun and trying new things so don’t be shy, whip out that mixing bowl and get started on these light and crumbly cookies! I can’t wait to hear how your baking adventure turns out!
Frequently Asked Questions
Can I use a different type of flour to bake Chestnut Flour Thumbprint Cookies now?
Yes, you can substitute chestnut flour with almond flour, but the flavor and texture will vary. If using almond flour, you may need to adjust the liquid ingredients since almond flour is typically more absorbent. Experiment to find the best balance for your cookies!
What type of jam works best for thumbprint cookies?
Fruity jams like raspberry, apricot, or strawberry are popular choices for filling thumbprint cookies. You can also experiment with unique flavors such as fig or blueberry to cater to your taste preferences. Just ensure that the jam is thick enough to hold its shape during baking!
How do I store my Chestnut Flour Thumbprint Cookies after baking?
Store your cookies in an airtight container at room temperature for up to a week. If you want to keep them longer, you can freeze the cookies for up to 3 months. Just make sure to layer them with parchment paper to prevent sticking.
Why is chilling the dough important when I bake Chestnut Flour Thumbprint Cookies now?
Chilling the dough is crucial because it helps solidify the fats in the mixture, resulting in cookies that hold their shape better during baking. This approach also enhances the flavor and texture, giving you that tender and crumbly finish you're aiming for!
Can I make these cookies vegan?
Absolutely! To make vegan Chestnut Flour Thumbprint Cookies, substitute the egg yolk with a flaxseed or chia egg (1 tablespoon of ground flaxseed or chia seeds mixed with 2.5 tablespoons of water, let sit until thickened).
You can also replace butter with coconut oil or a vegan butter substitute for a dairy-free option!
Are Chestnut Flour Thumbprint Cookies gluten-free?
Yes! Chestnut flour is naturally gluten-free, making these thumbprint cookies a great option for those with gluten sensitivities. Just ensure that any other ingredients used, like the jam and baking powder, are also gluten-free to maintain that quality.
Bake Chestnut Flour Thumbprint Cookies Now