Earl Grey Tea: a Comforting Classic

- Earl Grey Tea: A Comforting Classic
- Essential Ingredients Guide: Your Go-To for Epic Cooking
- Professional Cooking Method: The Secret Sauce for Success
- Pro Tips & Secrets for Brewing Earl Grey Tea
- Perfect Presentation: Elevating Your Tea Experience
- Storage & Make-Ahead Tips
- Creative Variations to Explore
- Complete Nutrition Guide for Your Earl Grey
- Wrapping Up Your Earl Grey Journey
- Frequently Asked Questions
- 📝 Recipe Card
Earl Grey Tea: A Comforting Classic
Oh my gosh, let me take you back to that cozy saturday afternoon last fall. i was snuggled up in my favorite blanket, the kind you just want to wrap around yourself forever.
I was scrolling through pinterest (you know how it goes!) when i stumbled upon a photo of a steaming cup of brewed earl grey tea: comforting & classic .
The deep, rich color and citrusy aroma practically jumped off the screen! instantly, i was transported back to my grandma’s kitchen, where we’d gather for our afternoon tea ritual.
You ever have one of those moments that just hits you right in the feels? yeah, that was it.
Earl grey has been loved for generations. this classic tea recipe , mixing black tea and the zesty notes of bergamot , hails from england.
It’s got history, yet it feels so modern and relevant today. who knew a simple cup of tea could offer a slice of comfort and nostalgia? the best part? you can whip it up in about 10 minutes ! seriously! whether you’re kicking back before brunch or winding down after a long day, this tea is there for you.
And let’s talk about cost! Making this at home is way more budget friendly than hitting up a café, and it yields two servings . Talk about a win-win!
Why Brew Earl Grey?
Now let’s get into why earl grey is not just another cup of tea. for starters, it’s a soothing beverage that's been celebrated for its unique flavor.
The bergamot flavor gives it a signature twist, and can i just say, it can elevate any afternoon tea experience? i love to serve it with scones, and not to brag, but my homemade lemon loaf cake is the perfect companion!
Besides being delicious, earl grey has its health perks. it’s chock full of antioxidants and is known for boosting your mood while promoting relaxation.
We could all use a little more of that, right? it’s no surprise that this tea has become a staple in cozy gatherings and is perfect for special occasions or just treating yourself to a moment of peace.
Remember, it’s not just tea; it’s about the tea drinking rituals . picture this: your friends gather around, laughter all around, with cups of brewed tea in hand.
There's something special about sharing a drink that’s been cherished through history.
Brewing Tips for Earl Grey
Alright, you might want to take notes here. let’s not mess up this classic! when brewing your earl grey, use filtered water for the best taste.
And really don’t steep for too long, or you’ll be dealing with bitterness, and that’s just a bummer. you want that floral tea blend to shine through!
You can customize it to your liking, for example, some folks like to sweeten their tea with honey or sugar totally your call.
I personally love the creamy twist that comes with a splash of milk! feeling adventurous? try adding a slice of lemon or some dried lavender for a floral kick, turning your morning brew into an aromatic experience fit for royalty.
Let’s Get Brewing!
So, are you ready to dive into a cup of comforting earl grey? gather your ingredients, and let’s make some magic happen.
With just a kettle and a few minutes, you’ll have something that not only warms your hands but also wraps around your heart.
So grab your teapot and let’s get brewing!
Next up, we’ll dive into the ingredients you’ll need for this delightful blend. Trust me; you won’t want to miss it!
Essential Ingredients Guide: Your Go-To for Epic Cooking
Alright, friends, let’s dive into the nitty gritty of cooking essentials! whether you're whipping up your favorite earl grey tea recipe or navigating the bustling world of gourmet meals, having the right ingredients is crucial.
This guide will walk you through everything you need to know about essential ingredients, signature seasoning blends, and smart substitutions.
Premium Core Components
First up, premium core components ! Here, we talk about the basic building blocks of a delicious meal.
For measuring, if you're in the u.s., stick to cups and teaspoons. if you’re feeling fancy and metric, go for milliliters and grams.
Either way, precision matters, especially when you’re trying to nail that perfect cup of brewed earl grey tea: comforting & classic.
Now, let’s talk quality indicators ! you know how you can spot a good tomato by its vibrant color and firm texture? same goes for ingredients.
Fresh herbs should smell fragrant, and spices? well, if they’ve lost their aroma, toss them. no one wants dull flavors, right?
When it comes to storage guidelines and shelf life , here's a quick tip: keep your spices in a dark, cool place.
Most dried herbs and spices can last up to a year, while fresh ingredients like produce should be used promptly to maximize their flavor.
And speaking of freshness, choose ingredients at their peak! For instance, select tea leaves with rich fragrances when brewing your tea. A little effort here makes a huge difference.
Signature Seasoning Blend
Next, let’s jazz things up with a signature seasoning blend ! spice combinations can completely transform your dish. ever tried a pinch of smoked paprika paired with herby thyme? oof, it’s a game changer.
Speaking of spices, there are essential herbs for sure. Rosemary and sage are best pals with turkey, while basil just screams summer with those gorgeous tomatoes.
Now here’s the fun part flavor enhancers . think about a dash of vinegar or citrus zest. those little extras lift your dish, making it unforgettable.
And if you want to mix things up, don’t hesitate to explore regional variations ! a cajun blend? a garam masala? trust me, your taste buds will thank you.
Smart Substitutions
Alright, say you’re in the middle of cooking, and you realize you're out of something. Don’t stress! That’s where smart substitutions come in.
For example, if you didn’t stock up on black tea, fear not herbal tea alternatives like chamomile or peppermint can do the trick.
Need a sugar substitute? maple syrup can sweeten up your tea without a hitch.
Oh, and seasonal options are where it’s at! Fresh lemon in the summer for a zesty touch and cozy spices in fall can make your dishes sing with flavor.
Kitchen Equipment Essentials
Now, let’s talk kitchen equipment essentials . Are you ready? A trusty kettle or a teapot for your Earl Grey tea is non-negotiable! You could use a fancy teapot, but I’ve made do with a regular ol' saucepan keepin' it real!
For measuring, a set of accurate measuring cups and spoons is key. and when it comes to prep, a nice cutting board and sharp knives make your life a breeze.
If you're working with limited space, consider multi purpose tools like a blender that can whip up drinks and soups.
And we can’t forget about storage solutions . Stackable containers, anyone? They’ll keep your pantry in shape and your ingredients organized.
So there you have it your essential ingredients guide for the ultimate cooking journey. whether you’re brewing a classic cup of tea, or experimenting with new flavors, having the right ingredients and equipment can make all the difference.
Are you ready to jump into those recipe instructions? Let's keep this culinary adventure going!
Professional Cooking Method: The Secret Sauce for Success
When you dive into the world of cooking, especially for something as beloved as brewed earl grey tea: comforting & classic , there's a whole methodology that can turn a simple drink into an art form.
Grab your kettle and get comfy; we're about to unpack some essential cooking methods to elevate your culinary game.
Essential Preparation Steps
Before you even heat that water, let's set the stage with some professional tips:
Mise en Place Details
First, gather your ingredients. having everything measured out helps keep the process smooth. for our earl grey tea, you’ll need 2 cups of water , 2 teaspoons of loose leaf tea or tea bags , and optional sweeteners like honey or sugar.
It's like having a clear path in front of you no tripping on rogue ingredients!
Time Management Tips
Timing is everything when brewing tea. Don’t rush it! Make sure you have a total of about 10 minutes set aside. It'll be the most therapeutic row you row all day.
Organization Strategies
Tidy up as you go. keep your work area clean and organized. a clutter free counter lets you focus on your afternoon tea prep without any distractions.
Trust me; it makes a world of difference.
Safety Considerations
Watch out for hot water! Always be careful when boiling. You don’t want to end up with a trip to the ER over a cup of tea that’s not how you want your high tea experience to start!
step-by-step Process
Here’s the meat and potatoes of making your perfect cup. Grab that pen and paper or just bookmark this for easy reference.
- Boil Water: In a kettle or saucepan, bring 2 cups of water to a boil look for those rolling bubbles, that’s your cue!
- Add Tea: Once you’ve hit that boiling point, turn off the heat. Toss in the tea leaves or bags . Let them steep for 3- 5 minutes , depending on how bold you like it.
- Strain or Remove Tea: If you’re using loose leaf tea, strain it out. If you’re using bags, just pull those babies out.
- Sweeten and Add Cream: Stir in honey or sugar to taste. If you’re feeling fancy, splash in some milk or cream hello, creamy tea drinks!
- Garnish, If You Want: Add a slice of lemon or even a sprig of mint for a refreshing twist.
- Serve: Sip and savor!
Expert Techniques
Now that we've covered the basics, let’s talk expert level:
Temperature Control Points: Remember to let boiling water cool for a minute before pouring it over your tea. Too high of a temperature can zap those delicate flavors.
Timing Precision: Don’t linger too long for steeping; otherwise, you might find yourself with bitter tea instead of the comforting drink you hoped for.
Visual Cues for Doneness: Keep an eye on that color deepening. It should be a rich amber, signaling it's go-time.
Success Strategies
Here’s how to avoid the pitfalls we all face in the kitchen:
Common Mistakes to Avoid: Steeping too long is a classic mistake. Remember, bitter tea ain't it, chief!
Quality Assurance Tips: Use filtered water for the best flavor. You’re brewing comfort in a cup don’t skimp on quality.
Perfect Results Guide: Taste as you go! Adjust sweeteners and brewing time to find your personal sweet spot.
make-ahead Options: Brew a big batch and chill it if you're thinking of making iced tea variations. Ain't nobody got time (or patience) for a daily brew.
Now, if you’re thinking these tips will turn you into a pro tea master overnight, well, it might take a few brews. But there you have it your roadmap to tea glory.
And now for a sneak peek into an even bigger world of tea and relaxation a space where you can learn everything from methods to pairings.
Let's dive into some additional information next. trust me; you won't want to miss what i have in store!
Pro Tips & Secrets for Brewing Earl Grey Tea
Oh my gosh! earl grey tea is such a classic! the combination of black tea and bergamot flavor has been warming hearts for generations.
But let’s talk about those little pro tips that can take your tea game from "meh" to "wow!"
Start with quality tea leaves , folks! i know, i know, it’s easy to grab a box of tea bags on your way out of the store.
But trust me, switching to loose leaf tea can really enhance your experience. the flavors are bolder, and you’ll feel like a real tea connoisseur.
Also, when it comes to sweetening your tea , don’t be shy! a spoonful of honey or a dash of sugar can transform your cozy mug into a delightful treat.
And about that steeping time aim for 3 to 5 minutes. anything longer, and you might end up with a bitter brew that’s just plain sad.
Cooling your boiling water for a minute before pouring it over the tea can keep those delicate flavors intact. nobody wants a burnt cup of tea, right?
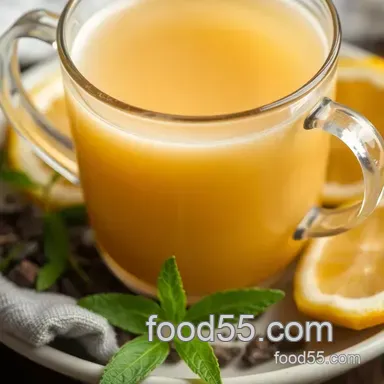
Perfect Presentation: Elevating Your Tea Experience
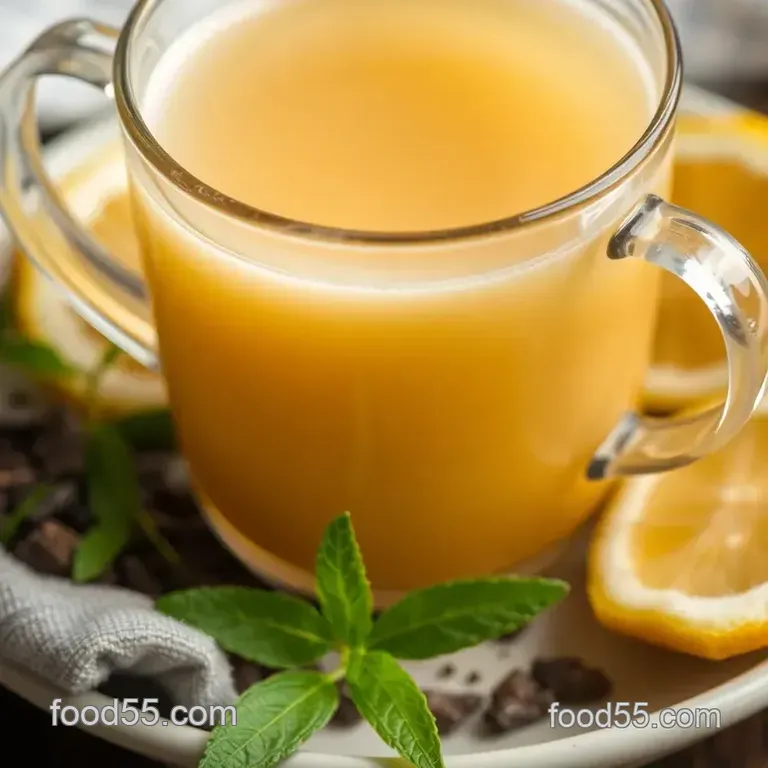
Alright, friends, let's talk presentation . you don’t need to be a professional chef to make your earl grey look fab.
It’s all about those little touches. you can use a charming teapot to serve your brew , or even just a simple clear glass cup.
The goal? make that rich, amber color shine!
Garnishing is key, too! a lemon slice or a sprig of mint can add a pop of color and a refreshing hint.
It’s all about the visual appeal , after all. and let’s be real, serving your brewed earl grey tea: comforting & classic with some tea and scones takes the experience to a whole new level.
Storage & make-ahead Tips
Ever brewed too much tea and wondered what to do with the leftovers? here’s my go-to tip: cool it down and store the brewed tea in the fridge.
Your brewed earl grey tea will be good for about 2-3 days, so you can enjoy a refreshing iced variation later in the week.
Just remember to sweeten it right before serving. otherwise, it’ll turn all syrupy.
When it comes to make-ahead , i recommend preparing your tea blends in advance. you can even mix up a batch of your favorite loose leaf teas and make some quick homemade tea blends for those moments when you need a cozy drink fast.
Creative Variations to Explore
Feeling adventurous? let’s mix it up a little with some creative variations. how about trying a lavender earl grey ? just add a teaspoon of dried lavender flowers into your brew, and you’ll have a soothing floral tea that feels fancy yet homey.
Or if you’re craving something refreshing for summer, try out an iced earl grey ! brew your tea, then chill it, and serve it over ice with a splash of lemonade.
It’s like a sweet sip of sunshine.
Don’t forget those seasonal twists too! in the fall, a splash of pumpkin spice can be the perfect companion to your earl grey.
Who wouldn't love cozying up with a pumpkin flavored tea drink while watching the leaves fall?
Complete Nutrition Guide for Your Earl Grey
Now, let’s get down to the nitty gritty. While sipping on your brewed tea should mainly be about enjoyment, it's nice to know the benefits, right?
A cup of earl grey tea has about 40 calories , mainly from any sweeteners you might add. it offers a small boost of caffeine too, so it’s perfect to enjoy during your afternoon slump.
You can drink this tea guilt free while basking in the health benefits of bergamot , which studies suggest can help reduce stress and improve digestion.
Just remember, if you’re watching your sugar intake or looking for caffeine free options , there are plenty of alternatives out there.
Whether it's swapping for stevia or choosing decaf tea, your cup can be just as reassuring without the jitters.
Wrapping Up Your Earl Grey Journey
At the end of the day, brewing earl grey tea should feel like a comforting ritual that brings joy to your day.
This isn’t just any tea; it’s a link to english tea traditions , a cozy hug in a mug. so whether you sip it solo while reading a book or serve it at a gathering for a bit of that high tea experience , remember, every cup is a chance to savor the moment.
So go ahead, put this all to use! explore the variations, embrace the presentation, and don’t shy away from adding your flair.
After all, tea time is never just a routine it’s a little piece of happiness in your day!
Frequently Asked Questions
What makes Brewed Earl Grey Tea: Comforting & Classic so special?
Brewed Earl Grey Tea is cherished for its unique blend of black tea infused with bergamot, offering aromatic floral and citrus notes. This classic beverage is not only calming but also invigorating, making it perfect for any time of day, whether it's a morning boost or an afternoon pick-me-up.
How can I customize my Brewed Earl Grey Tea: Comforting & Classic?
You can customize your Brewed Earl Grey Tea by adding different ingredients such as lemon slices for a refreshing twist, or a splash of milk or cream for a creamier texture. Additionally, you can experiment with variations like Lavender Earl Grey or Vanilla Earl Grey for a unique flavor experience.
Can I store leftover Brewed Earl Grey Tea?
It's best to consume Brewed Earl Grey Tea fresh for optimal flavor, but if you have leftovers, store it in the refrigerator in a sealed container for up to 24 hours. Reheat gently on the stove or in the microwave, but avoid boiling to maintain the taste.
What are some tips for brewing the perfect Earl Grey tea?
To brew the perfect Earl Grey, start with high-quality loose tea or bags and use filtered water for the best flavor. Steep the tea for 3-5 minutes, and be mindful not to steep too long to avoid bitterness. Experiment with tea quantity and steeping time to find your ideal strength.
Is Brewed Earl Grey Tea healthy?
Brewed Earl Grey Tea offers several health benefits, including antioxidants from black tea and potentially mood enhancing properties from bergamot. It's generally low in calories, especially when served without sweeteners, but be mindful of added sugars and creams to keep it healthier.
What food pairs well with Brewed Earl Grey Tea?
Brewed Earl Grey Tea pairs beautifully with light snacks such as buttery scones, shortbread cookies, or cucumber sandwiches for a traditional tea experience. A slice of lemon loaf cake or a delicate pastry also complements its floral notes, making for an enjoyable afternoon tea.
Brewed Earl Grey Tea Comforting Classic