Bake Garlic Bread Cylinders - Deliciously Crunchy
- About introduction
- The ultimate guide to garlic bread cylinders
- What makes this recipe special
- Health & nutrition highlights
- Recipe at a glance
- Quality ingredients breakdown
- Kitchen equipment essentials
- Perfect cooking technique
- Professional secrets
- Perfect presentation
- Storage & make - ahead
- Creative variations
- Expert faq solutions
- Complete nutrition guide
- 📝 Recipe Card
About introduction
Garlic bread is a beloved staple in many cuisines, especially in italian - american households, its history can be traced back to ancient times when garlic was used not only for flavor but also for its medicinal properties, over the years, this simple dish has evolved into various forms, with garlic bread cylinders
Emerging as a unique twist on the classic recipe, these delightful treats are not just about taste; they bring warmth and comfort to family dinners and gatherings .
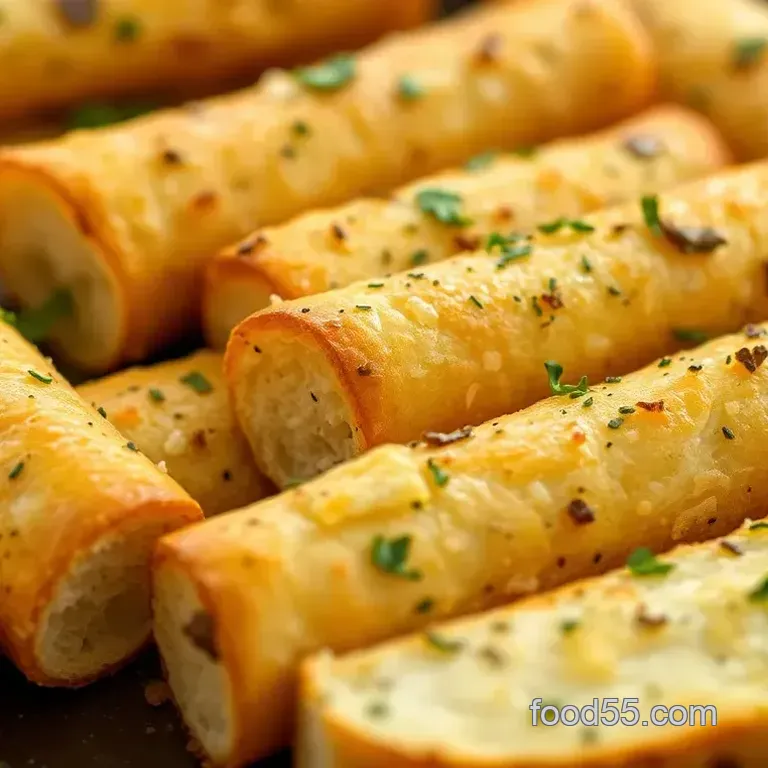
What sets garlic bread cylinders apart is their charming presentation and rich flavor profile, instead of the traditional flat loaf, these cylindrical bites offer an exciting way to serve garlic bread that’s both fun and functional.
The buttery, garlicky filling permeates every bite, making them irresistible, plus, they’re incredibly versatile perfect as an appetizer or side dish alongside spaghetti marinara or creamy chicken alfredo .
The ultimate guide to garlic bread cylinders
Garlic bread cylinders boast a rich culinary heritage rooted in italian tradition yet embraced globally for their deliciousness, imagine sitting at a cozy trattoria in italy with warm loaves of crusty bread slathered generously with aromatic garlic butter it’s truly an experience worth savoring.
The fascinating origin story of this dish revolves around creating something extraordinary from humble ingredients : fresh baguettes or italian loaves brought together with flavorful herbs and spices, today’s rendition the garlic bread cylinder is loved by many not just because it tastes great but also because it
Looks appealing on any dinner table .
In modern - day cuisine, these delightful morsels have gained immense popularity at parties and potlucks due to their easy preparation and impressive presentation, they embody comfort food while allowing chefs (amateur or expert) to showcase creativity.
What makes this recipe special
So what makes these garlic bread cylinders so special ? first off is the unique flavor combination that dances on your palate rich butter mixed with zesty minced garlic creates an explosion of taste that you’ll never forget.
Toss in fresh parsley and oregano for added depth; it transforms each bite into something memorable .
Foolproof techniques make this recipe accessible even for novice cooks looking to impress friends or family without breaking a sweat. the method is straightforward : hollow out some french baguette slices and fill them up generously with homemade garlic butter goodness it really doesn’t get easier than that.
This expert - tested method ensures consistent results every time you whip up these delectable treats a win - win situation if you ask me. and let’s not forget about those invaluable time - saving tips i’ve picked up along my culinary journey : preparing your garlic butter ahead of time allows flavors to meld beautifully while keeping stress levels low during actual cooking .
Health & nutrition highlights
Now onto health highlights these tasty bites aren’t just about indulgence; they offer some nutritional benefits too. garlic itself boasts numerous health advantages due its antioxidant properties which may help boost immunity among other things a total win.
Of course, dietary considerations come into play here as well; using whole grain baguettes instead of white flour options enhances fiber content significantly if you're aiming for balanced nutrition while still enjoying life’s little pleasures like cheesy garlicky goodness.
These little wonders can fit seamlessly within varied diets too whether gluten - free alternatives are needed (hello gluten - free baguette.) or vegan options arise (just swap out regular butter), there’s no need for anyone miss out on this fantastic treat.
Recipe at a glance
Let me break down everything quickly so we know what we’re getting ourselves into :
- total preparation time : approximately 15 minutes
- skill level required : easy - peasy.
- serving size details : serves 4 people comfortably
- cost efficiency : super budget - friendly considering how much joy they bring versus monetary investment you won’t regret making these.
In summary ? garlic bread cylinders offer more than just deliciousness they provide a slice of culinary heritage wrapped up beautifully inside crispy golden edges filled generously with savory delight.
So roll up those sleeves because you’re about to embark on one scrumptious adventure worthy enough for any occasion from casual weeknight dinners right through festive gatherings where everyone will be clamoring for seconds…or thirds.
Quality ingredients breakdown
Cooking delicious garlic bread cylinders starts with the right ingredients, let's break it down into core components, signature seasonings, smart substitutions, and essential kitchen tools .
Premium core ingredients
Unsalted butter (1/2 cup) : look for high - quality unsalted butter; it should be creamy and fresh, i usually go for brands that are grass - fed because they have a richer flavor, when selecting butter, check for a smooth texture and avoid any yellow spots or off smells .
Garlic (4 cloves) : fresh garlic is a must. go for firm cloves with no sprouting or soft spots, the more pungent the better. if you ever find yourself without fresh garlic, those pre - minced jars work in a pinch but nothing beats the taste of freshly minced .
Fresh parsley (2 tablespoons) : bright green leaves signal freshness. choose parsley that has no wilting or browning at the ends this is your friend when it comes to adding brightness to your flavors, store any leftover parsley in water in the fridge to keep it fresh longer .
Dried oregano (1 teaspoon) : opt for high - quality dried oregano; you can tell it's good if it has a strong aroma when you sniff it. if you're feeling adventurous, try using mexican oregano it adds an interesting twist.
Salt & pepper : your everyday table salt works fine here but sea salt is my personal favorite because of its subtle crunch and flavor enhancement, freshly cracked black pepper adds depth, so sprinkle generously.
Signature seasoning blend
The magic happens when we combine these simple ingredients into something truly special .
Spice combinations : you can experiment by adding red pepper flakes or smoked paprika for extra zing. a dash of cayenne pepper might also give your cylinders that unexpected kick which keeps everyone coming back for more .
Herb selections : while parsley shines bright here, feel free to mix things up with basil or thyme if that's what you have on hand or even add some chives if you're feeling fancy.
Flavor enhancers : grated parmesan cheese isn't just optional; it's practically necessary if you want that cheesy goodness melting into every bite.
Aromatic additions : consider incorporating lemon zest into your garlic butter mixture it adds such a refreshing note that complements the richness beautifully .
Smart substitutions
Sometimes life throws curveballs no worries though; we've got alternatives ready.
Alternative options : if you've run out of unsalted butter but have olive oil ? that works too just reduce the amount slightly since oil is thinner than butter.
Dietary swaps : for anyone looking to make this dish dairy - free, vegan margarine does wonders as a substitute without sacrificing flavor .
Emergency replacements : no baguette ? use any crusty bread ciabatta will do nicely too. just adjust baking time accordingly since different breads cook differently .
Seasonal variations : in summertime ? try incorporating seasonal herbs like dill or using roasted garlic instead of raw it’ll give you another layer of sweetness that's divine.
Kitchen equipment essentials
Now let’s chat about what gadgets will make whipping up these tasty garlic bread cylinders easy - peasy .
Must - have tools
1, a serrated knife perfect for slicing through crusty baguettes without squishing them .
1, small knife/spoon for hollowing out those delicious little tunnels filled with goodness .
1, mixing bowl to combine all those savory ingredients easily .
1, baking sheet line this bad boy with parchment paper so cleanup is less hassle later on.
1, pastry bag/spoon - for filling those cylinders efficiently you’re gonna want every last drop of buttery goodness inside there.
Recommended appliances
If you're lucky enough to have one :
1, food processor - makes mincing garlic super quick.
1, oven thermometer - ensures accurate temperatures because trust me; nobody wants burnt bread due to faulty readings.
1, stand mixer - not necessary but definitely saves elbow grease while mixing everything together evenly .
Helpful gadgets
You don’t need everything under the sun but having these can be nice :
1, microplane grater perfect for getting zest from citrus smoothly without fussing around much at all .
1, silicone spatula great when scraping every last bit outta bowls you know how precious each ingredient is.
1, measuring spoons/cups precision matters when cooking even if eyeballing sometimes feels more fun . . .
Pro ingredient tips
Here are some insider secrets i've picked up along my culinary journey :
1, always opt for organic produce whenever possible they tend to boast fuller flavors that'll elevate whatever dish you're making.
2 .avoid buying pre - chopped items unless absolutely necessary they lose their potency over time after processing .
3 .make sure storage containers are airtight the fresher they stay means tastier meals down the line . . .
4 .bulk buying pantry staples like spices ? it saves money long - term and you'll always be prepared next time inspiration strikes while cooking up garlic bread cylinders .
So there ya go a complete breakdown packed full of tips and tricks that'll ensure success in making mouthwatering garlic bread cylinders , happy cooking. ??
Perfect cooking technique
Cooking can be a delightful experience when you know the right techniques, here’s a detailed guide to help you achieve perfect results every time, whether you're making garlic bread cylinders or any other dish .
Essential preparation steps
Mise en place details
start by gathering all your ingredients, for garlic bread cylinders, that means unsalted butter, garlic, parsley, oregano, and your choice of bread, measure everything out beforehand; it saves you time and keeps things organized .
Prep techniques
soften the butter ahead of time leave it at room temperature for about 30 minutes before use, mince the garlic finely to release its flavor better and chop the parsley, you want everything ready to go.
Time management
allocate roughly 15 minutes for prep work and about 12 - 15 minutes for cooking, if you're serving this with a main course like spaghetti marinara, start cooking the pasta while your garlic bread is baking so they finish around the same time .
Organization tips
keep your workspace tidy. use small bowls for each ingredient as you prep them; this helps avoid chaos later on, plus, it looks pretty fancy when you're done.
Professional cooking method
Step - by - step process
1, preheat your oven to 375°f (190°c) . 1, combine softened butter with minced garlic and herbs in a bowl . 1, prepare your baguette by slicing off both ends and hollowing out the inside .
When spreading that delicious garlic butter into those hollowed - out pieces be generous. you want every bite bursting with flavor .
Temperature control maintaining an even oven temperature is key here; too hot will burn those beautiful cylinders before they're crispy golden brown too low might leave them soggy instead of crunchy .
Timing precision set a timer for 12 - 15 minutes , but keep an eye on them after about 10 minutes just in case. ovens are tricky little beasts sometimes . . .
Success indicators you’ll know they’re done when they turn golden brown on top and give off that irresistible garlicky aroma wafting through your kitchen .
Expert techniques
Professional methods if you're feeling adventurous, try adding some parmesan cheese or crushed red pepper flakes over top before baking. it adds an extra layer of flavor that takes these cylinders up a notch .
Critical steps make sure not to overfill those hollows with butter the last thing you want is it oozing everywhere during baking (i’ve learned this lesson… let’s just say my first attempt became quite messy) .
Precision points when using fresh herbs like parsley or oregano, remember : fresher equals more flavorful. always aim for fresh if possible dried works in a pinch but won't have quite the same impact .
Quality checks check them frequently towards the end of their bake time; no one likes burnt edges on their garlic bread cylinders.
Success strategies
Troubleshooting tips if they aren’t browning properly after 15 minutes :
- increase heat slightly
- move closer to heating element (if using electric ovens)
Didn’t get enough flavor ? next time let that buttery mixture sit covered at room temperature for up to an hour it really enhances flavors.
Quality assurance taste as you go you should be able to adjust salt levels easily without waiting until after they're baked if something seems off initially.
Perfect results guide once removed from oven : let cool slightly but serve warm they taste best then. you can cut them into smaller pieces if you'd like more finger - food fun at gatherings or simply enjoy whole ones yourself (i won’t tell.) .
Final touches a sprinkle of additional parsley right before serving gives not only color but also freshness and who doesn’t love garnishing ?
By following these steps closely from preparation all way through final touches you'll create mouth - watering garlic bread cylinders that'll impress anyone lucky enough to snag one from your spread. enjoy every bite . ., trust me; it's worth it.
Professional secrets
Expert techniques for perfect garlic bread cylinders
When it comes to making garlic bread cylinders, a few professional insights can take your dish from good to unforgettable, first off, always use fresh garlic if you can, it really amps up the flavor.
Also, don’t rush the butter mixing process; letting your garlic and herbs mingle in softened butter is where the magic happens, a little patience goes a long way.
Kitchen wisdom you need
One kitchen secret i swear by is using room - temperature butter, cold butter will clump instead of blend smoothly with your ingredients, and here’s another tip : if you're feeling adventurous, try mixing in some roasted garlic for an even deeper flavor profile .
Success guarantees
Remember that even small tweaks can lead to big wins. if you ensure every cylinder is filled generously with that delectable garlic butter mixture, you'll guarantee maximum taste in every bite .
Perfect presentation
Plating techniques that wow
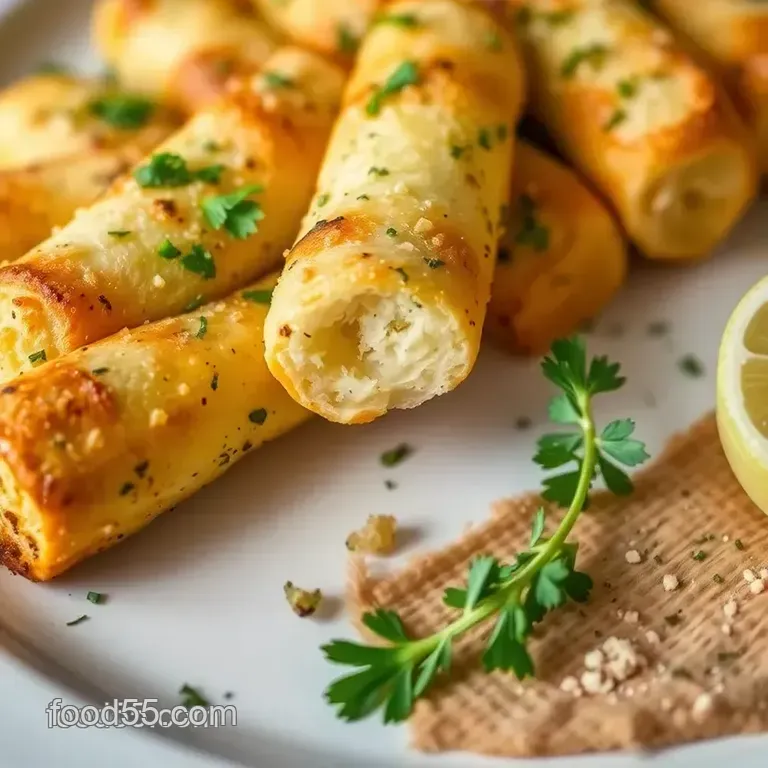
Once those glorious garlic bread cylinders are out of the oven and crispy golden brown, it's time for their grand entrance. arrange them upright on a rustic wooden board or serve them in a basket lined with parchment paper so charming.
Garnish ideas for extra flair
A sprinkle of freshly chopped parsley not only adds color but also freshness that complements this dish beautifully, if you want to get fancy (and why not ?), drizzle a bit of balsamic glaze over them right before serving they’ll look like they belong at a gourmet restaurant .
Serving suggestions to impress
Pair these beauties with marinara sauce or pesto for dipping. it makes for an interactive dining experience and keeps things fun.
Visual appeal tips
Don’t underestimate lighting either when snapping photos. natural light works wonders you want those golden - brown edges shining like stars .
Storage & make - ahead
Storage guidelines for longevity
If you have any leftovers (which i doubt because they’re so good.), store them in an airtight container at room temperature for up to two days, however, they do lose their crispiness over time… sad face .
Preservation methods that work
For longer storage times, wrap individual cylinders tightly in foil and freeze them trust me on this one. they reheat surprisingly well without losing too much texture or flavor .
Reheating instructions made easy
To bring back their glory days after freezing, bake them straight from frozen at 375°f (190°c) until warm about 10 - 12 minutes should do it.
Freshness tips for best results
Always aim to eat these puppies while they’re warm and fresh outta the oven; trust me the aroma alone makes it worth it.
Creative variations
Flavor adaptations to try
Why stick with just classic herbs ? experimenting with flavors can be super fun think sun - dried tomatoes mixed into your garlic butter or swapping parsley with chives or rosemary .
Dietary modifications for everyone
Need something dairy - free ? swap regular butter out for vegan margarine without missing out on all that garlicky goodness..
Seasonal twists to consider
In summer months, toss some fresh basil into the mix; wintertime ? how about adding some crushed walnuts for warmth ?
Regional variations worth exploring
If you're feeling adventurous enough, go italian - style by adding mozzarella cheese inside those cylinders before baking it’s cheesy perfection.
Expert faq solutions
Common concerns addressed here.
Wondering if you can customize this recipe further ? absolutely. just keep proportions similar to what’s suggested above your creativity knows no bounds.
Expert answers you can trust
Stuck wondering how garlicky is too garlicky ? honestly a full four cloves might sound daunting but remember : cooking's all about balance and personal preference rules here.
Troubleshooting guide for newbies
If things seem messy during hollowing out the baguette stage (hey we’ve all been there.), don't fret; just take smaller bites from each side till you've got enough space without tearing through completely .
Complete nutrition guide
Detailed breakdown
each delicious serving has around 180 calories packed full of flavor with healthy fats from that buttery goodness alongside fiber - rich carbs coming straight from our beloved bread cylinder friends .
Health benefits that matter
garlic isn’t just flavorful it offers health perks too like anti - inflammatory properties . . .bonus points if you ask me..
Dietary information you should know
looking at portion guidance ? one cylinder could easily be paired alongside salads or soups as part of meal prep but hey even snacking counts too..
So there ya go all my secrets unveiled along with tips galore about how best to enjoy these irresistible garlic bread cylinders . happy cooking folks...
Bake Garlic Bread Cylinders Deliciously Crunchy