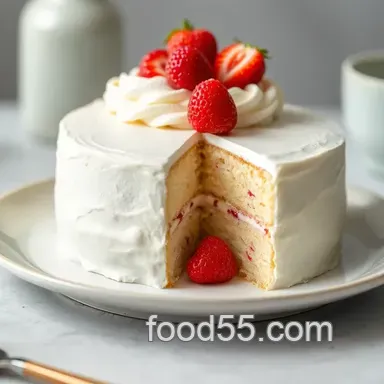
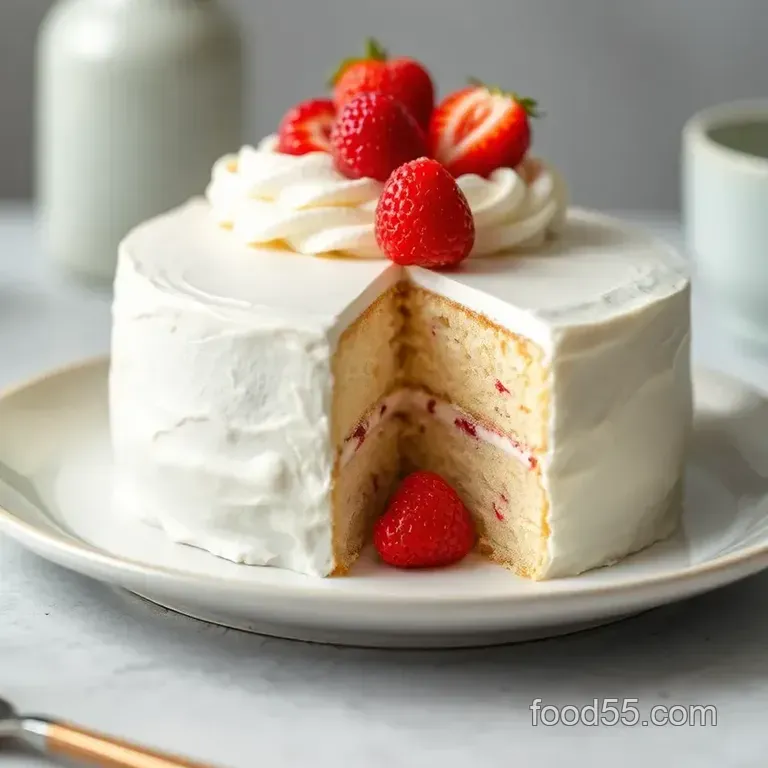
White Velvet Cake: Dreamy & Delicious
- Finding the Flavor: A Sweet Introduction to White Velvet Cake
- Recipe Overview: A Piece of Cake History
- Key Benefits: Why You Need This Cake in Your Life
- Serve It Up: From Celebrations to Just Because
- Your Essential Ingredients Guide: Bake the Best White Velvet Cake
- Mastering the Art of Professional Cooking: Bake White Velvet Cake Like a Pro!
- Pro Tips & Secrets
- Perfect Presentation
- Storage & Make-Ahead
- Creative Variations
- Complete Nutrition Guide
- Wrap-Up
- Frequently Asked Questions
- 📝 Recipe Card
Finding the Flavor: A Sweet Introduction to White Velvet Cake
Oh my gosh, let me tell you about the time i tried to bake my first cake from scratch. spoiler alert: it was a hot mess! i remember standing in my tiny kitchen, flour everywhere, and the eggs just didn’t seem to cooperate.
After a few tries, though, i discovered the white velvet cake talk about a game changer! this beauty is light, fluffy, and perfect for any special occasion…or just a tuesday when you need a little pick-me-up.
Here’s the thing: white velvet cake: dreamy & delicious is not just a fancy name. it’s seriously dreamy! if you’ve ever bit into a cake that melts in your mouth, you know what i’m talking about.
This cake has roots in traditional american cake baking , and today, it’s all the rage for birthdays, weddings, or just because.
Recipe Overview: A Piece of Cake History
So, where did this delightful cake come from? historically, velvet cakes have been around since the 1800s, with the original versions being a bit denser.
These days, we’ve modernized the velvet cake to be super light and fluffy, perfect for any celebration you can think of.
It’s rich in flavor yet delicate, making it the ideal choice for those who love a moist vanilla cake .
Now, for the nitty gritty! this recipe requires about 1 hour and 20 minutes from start to finish 20 minutes of prep, 30 minutes baking, and of course, time for the cake to cool down.
It’s a medium difficulty level , so if you’re comfortable with some basic baking techniques , you’ll be just fine! plus, it yields 12 delightful servings , so you can share or keep it all to yourself (no judgment here!).
When you’re budgeting, expect to spend around $15 for the ingredients. That’s worth every penny for 12 slices of heaven, right?
Key Benefits: Why You Need This Cake in Your Life
You guys, this white velvet cake isn’t just about satisfying your sweet tooth. it brings some serious health benefits too.
Sure, it's a dessert, but it’s light and has way less grease than other cakes. and let’s be real when you slice into that tender crumb cake , you might just feel like you’re treating yourself with a little class.
What sets this cake apart? it's the cream cheese frosting recipe . it adds a rich, tangy flavor that pairs beautifully with the lightness of the cake.
Trust me, this combo will leave your guests drooling for more. whether you’re throwing a birthday bash or having tea with your grandma, this cake is a winner.
Besides all that, baking this cake is a fantastic way to show off your cake decorating ideas . The layers are perfect for displaying a smooth frosting technique just imagine the Instagram pics!
Serve It Up: From Celebrations to Just Because
So, when is a good time to serve this delight? literally, any occasion! holidays, afternoon tea, or even a friday night treat.
I’ve paired it with fresh strawberries to give it a pop of color. and can you imagine it with a scoop of vanilla ice cream? oh.
My. god. you’ve got to try it!
And don’t you worry if you're looking for alternatives. We’ve got you covered with options like a gluten-free cake recipe or dairy-free dessert options to make this dreamy cake accessible for everyone!
If you're ready to dive into baking, just hang tight for the ingredient list. because believe me, you’re going to want to gather everything for this elegant dessert idea.
Let’s make something stunning together!
Your Essential Ingredients Guide: Bake the Best White Velvet Cake
Baking is like a love letter to the senses, don’t you think? and what better way to express that love than with bake white velvet cake: dreamy & delicious ? before we jump into those oh-so-important cake baking techniques, let’s chat about the essentials.
Premium Core Components
When whipping up a light and fluffy cake , having the right ingredients is crucial. Here’s a quick rundown of what you’ll need:
- Flour: 2 ½ cups (315g) all-purpose flour gives your cake structure. Look for finely milled flour it's your best bet for a tender crumb cake .
- Baking Powder: 2 ½ tsp will make it rise like it’s on cloud nine! Grayish powder? Toss it! Fresh stuff means a light cake.
- Salt: Just ½ tsp enhances the flavors. It's the secret ingredient that completes the cake.
- Butter: Use 1 cup (226g) unsalted butter at room temperature. Not too soft, not too hard it should feel like a dreamy pillow when you poke it!
- Granulated Sugar: 1 ½ cups (300g) is where the sweetness lives. Aim for a fine texture for the best results.
- Egg Whites: Five large egg whites, at room temp, whip up into magic! They’ll make your cake rise and shine!
- Vanilla: 1 tsp vanilla extract is the cherry on top just make sure it’s pure!
- Milk: Use 1 cup (240ml) whole milk . It's creamy and keeps the cake moist and dreamy.
For storage, keep your dry ingredients sealed tight in a cool, dry place. Flour can last months when stored right, but check for icky bugs because, well, yuck!
Signature Seasoning Blend
Seasonings don’t just belong to savory dishes! For this cake, a simple vanilla flavor works wonders.
- Essential spice: Nope, we’re not throwing in chili powder; just pure, aromatic vanilla’s good enough.
- Flavor enhancers: A pinch of salt and maybe some almond extract. It’s like a hug for your taste buds!
Smart Substitutions
What if you have an egg allergy? no problem! try 1 tbsp ground flaxseed mixed with 3 tbsp water for each egg.
That’ll help you whip up a moist vanilla cake that’ll knock it out of the park.
Thinking about going gluten-free? Use a gluten-free flour blend in equal quantities. Just keep an eye on the texture some blends can be a bit dense.
Kitchen Equipment Essentials
Every home baker needs a trusty arsenal! Here’s what you’ll need for American cake baking :
- Mixing bowls: Go for a good set— large and medium should do.
- Mixer: A hand mixer or stand mixer makes life a breeze. You’ll save on those arm workouts!
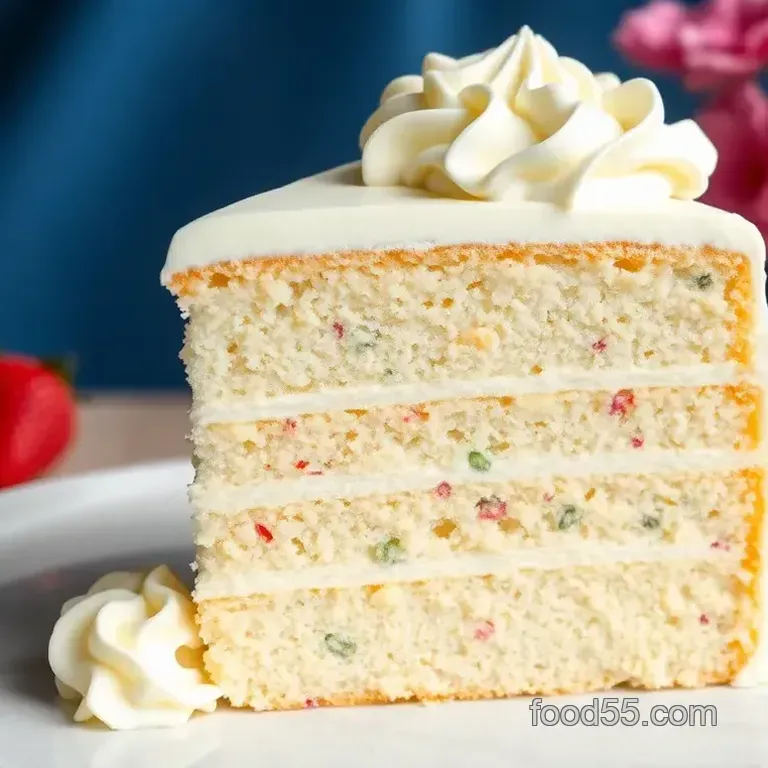
- Cake pans: Two 9 inch round cake pans can help you create that Instagram worthy layer cake.
- Offset spatula: Frosting with finesse, my friends!
Take care of your tools! Wash ’em well, dry them properly, and store in a way that they stay as fresh as your baked treats.
As you dive into these cake baking tips, remember to enjoy the process! baking is a labor of love. who doesn’t love a creaming method baking ? it’s all about beating that butter and sugar until it’s fluffy and dreamy.
So, are we ready to get into those succulent step-by-step instructions for our heavenly White Velvet Cake? Grab those ingredients, get your mixer revving, and let’s create a show stopping dessert that’ll leave everyone wanting seconds!
After all, who can say no to a slice (or two) of this indulgent dessert choice ? It's time to roll up those sleeves and put a little love into your baking!
Mastering the Art of Professional Cooking: Bake White Velvet Cake Like a Pro!
When you think of the ultimate dessert, a stunning white velvet cake comes to mind, right? it’s light, fluffy, and oh-so-delicious.
Whether it's for a birthday bash or just a craving for something decadent, mastering this cake is all about using professional cooking methods.
Today, i'm sharing my secrets on how to bake white velvet cake: dreamy & delicious while incorporating essential professional techniques.
Buckle up, my baking buddies!
Essential Preparation Steps
Let’s dive into the nitty gritty. the first step to success in any kitchen is mise en place . french for “everything in its place,” it means gathering all your velvet cake ingredients before you start.
This helps you stay organized and focused.
Time management is key. start by prepping your ingredients and your workspace. set a timer for 30 minutes to cool your baked cake it’ll help you focus on making that dreamy cream cheese frosting without feeling rushed.
Now, about safety considerations – always remember that the oven can be a sneaky beast! Keep your hot pads handy and avoid wearing loose clothing. We don’t want any baking disasters here!
Step-by-step Process
Okay, let’s get into the fun part! Here’s how you bring your White Velvet Cake to life:
- Preheat the oven to 350° F ( 175° C) . That crisp, golden crust is waiting for you!
- Mix dry ingredients – whisk together 2 ½ cups of flour , 2 ½ teaspoons of baking powder , and ½ teaspoon of salt in a bowl.
- Cream that butter and sugar ! You’ll need 1 cup of softened unsalted butter and 1 ½ cups of granulated sugar . Beat these until they’re light and fluffy about 3- 5 minutes .
- Gradually add in 5 egg whites and 1 teaspoon of vanilla extract . Mix until combined, and get ready for that gorgeous vanilla scented batter!
- Alternate between dry and wet ingredients, adding in two cups of whole milk gradually. Just mix until combined; no one wants a tough cake.
- Divide the batter between two greased and lined 9 inch cake pans and smooth the tops. Bake for 25- 30 minutes , or until a toothpick comes out clean. Timing precision is crucial here!
Let those cakes cool for 10 minutes in the pans before transferring them to wire racks. This will prevent any soggy bottoms!
Expert Techniques
Here’s where the magic happens! quality checkpoints mean testing your batter’s consistency and making sure it’s just right before moving to bake.
If you can dream it, you can make it! if your batter is too thick, try a splash more milk.
Having trouble with mixing? Don’t worry! If your batter feels dense, you might’ve overmixed. Remember, gentle hands mean that light, tender crumb cake you crave.
Success Strategies
Now, let's talk about common mistakes. not using room temperature ingredients can lead to a dense cake. always, i mean always let those eggs, milk, and butter get cozy together before mixing.
Also, let’s make sure to chill your frosting before spreading if it’s too soft this helps with those delicate decorating ideas.
Want to avoid the dreaded dried out cake? stick to the cake cooling tips and make sure it’s completely cool before frosting.
And trust me, if you make extra batter, you now know how to freeze it for future cake emergencies!
Additional Information
So there you have it! follow this roadmap, and you can bake a white velvet cake that’ll leave folks dreaming of a second slice.
Whether it’s for holidays, birthdays, or just a simple dessert night, mastering this recipe is a fun way to bring smiles to your table without breaking a sweat.
Get your apron on, unleash your inner baking guru, and prepare to impress your friends and family with this elegant dessert!
Happy baking, and get ready for everyone to ask for your secret. Just remember it's all about that light and fluffy cake, the perfect swipe of cream cheese frosting, and the love you put into your baking!
Pro Tips & Secrets
When you decide to bake white velvet cake: dreamy & delicious , you’re diving into a delightful adventure of flavors.
Here are some of my top baking techniques to ensure your cake turns out perfect every time.
First off, let’s chat about the creaming method baking . it’s crucial for achieving that light and airy texture. you want to whip your butter and sugar together until it’s light and fluffy aim for about 3- 5 minutes.
Seriously, don’t rush this part! it’s where magic happens.
Next up, time saving techniques : pre-measure your ingredients and have everything at room temperature. this will cut your prep time down, and trust me, it helps in mixing too.
If you can, try to get your milk and eggs out of the fridge a bit before you start baking.
Room temperature works wonders in achieving that moist vanilla cake we all crave.
For flavor enhancement , don’t shy away from extracts! folding in a bit of almond extract can elevate your cake to another level.
And do you know what goes fabulously with a velvet cake ingredients list? a touch of citrus zest from an orange or lemon! just a teaspoon or two can really make your taste buds dance.
When it comes to the presentation , think elegance. a simple dusting of powdered sugar can turn your cake from good to stunning.
You can also drizzle some homemade chocolate and vanilla cake pairing how indulgent does that sound?
Perfect Presentation
Let’s make this cake a showstopper. here are my preferred cake decorating ideas . first, consider the plating techniques. use a cake stand to really call attention to your creation.
Make sure it’s leveled before frosting; it’ll make a huge difference.
For garnishes, fresh fruit is always a winner. berries not only add a pop of color but also a refreshing taste.
Try a mix of strawberries and blueberries for those vibrant contrasts. you can also throw on some mint leaves for a fresh touch.
When you think about color combinations , remember that the more colorful, the more appealing! adding colorful sprinkles on top, or even chopped nuts can make your dessert look especially enticing.
It’s all about those visual appeal tips .
Storage & make-ahead
Want to bake ahead? absolutely! this cake can be made a day in advance and stored in an airtight container.
Just make sure it cools completely before wrapping it up this keeps it from getting soggy.
For storage guidelines , your white velvet cake lasts about 3 days at room temp. if you want to stretch it a bit longer, pop it in the fridge for about a week.
Just wrap it tightly to keep that tender crumb cake texture intact.
Reheating is a breeze! Just grab a slice, pop it in the microwave for about 10-15 seconds, and you’re ready to go. It’ll taste like it just came out of the oven!
Creative Variations
This is where you can let your imagination run wild! For seasonal cake variations , why not try pumpkin spice in the fall? Seriously, a hint of pumpkin puree mixed with your vanilla cake could be spectacular!
If you’re looking into dietary modifications, the cake is easily adaptable. sub out the flour for a gluten-free cake recipe if you have gluten sensitivities, or try a vegan twist by using plant based ingredients.
Just make sure to adjust moisture levels!
Flavor adaptations are fun too! Adding chocolate chips would make this cake even more indulgent. Or try pairing it with a tangy cream cheese frosting recipe —it’s like a dream come true!
Complete Nutrition Guide
Now, let’s break down what you’re munching on. each slice has around 450 calories packed with carbs for that quick energy boost, but you also get 3g of protein from those eggs.
The health benefits of making it from scratch can’t be beaten; you know what goes into your dessert, and you can adjust the sugar to fit your dietary needs.
Don’t forget to keep an eye on your portion sizes. a cake portioning guide is handy if you’re serving at a party, so everyone can indulge without overdoing it.
Be sure to remind your friends that a slice of homemade goodness is always better than a store-bought one!
Wrap-Up
Baking can be a magical experience, especially when you’re whipping up something as delightful as a dreamy & delicious white velvet cake.
Remember, whether you're celebrating a birthday or having a quiet afternoon tea, this cake makes every moment a bit sweeter.
With a few tweaks and tricks, you can make this recipe your own. so grab your apron, put on your favorite tunes, and enjoy the journey of baking.
Happy baking, and don’t forget to share your adventures with friends we all love some sweet treats for celebrations! you got this!
Frequently Asked Questions
What makes the Bake White Velvet Cake: Dreamy & Delicious special?
The Bake White Velvet Cake is renowned for its light and tender crumb, enhanced by a subtle vanilla flavor. It’s an elegant dessert perfect for any celebration, and the rich cream cheese frosting elevates it to a delightful treat that everyone will love.
This cake is often a centerpiece at special occasions due to its stunning appearance and delectable taste.
Can I make this cake in advance and how should I store it?
Yes, you can absolutely bake the White Velvet Cake in advance! Once cooled, wrap the layers tightly in plastic wrap and store them in the refrigerator for up to 3 days or freeze for longer storage (up to 3 months). Just make sure to thaw frozen layers in the fridge before frosting for the best results.
What are some variations I can try with the Bake White Velvet Cake: Dreamy & Delicious?
You can customize this cake by adding citrus zest, such as lemon or orange, for a refreshing twist or using almond extract for a nutty flavor. To cater to dietary needs, consider substituting gluten-free flour or using vegan butter and cream cheese to make it an inclusive dessert for all guests.
How can I achieve the best texture when baking the cake?
For the best texture, ensure all your ingredients, especially butter, eggs, and milk, are at room temperature before beginning. Also, be careful not to overmix the batter after adding the dry ingredients; this will help maintain a light and airy crumb structure for your cake.
What should I do if my cream cheese frosting is too soft?
If your cream cheese frosting is too soft to spread easily, try chilling it in the refrigerator for about 15-30 minutes. This will help it firm up a bit, making it easier to frost the cake. Additionally, you can gradually mix in more powdered sugar to thicken it if necessary.
Can I use different pans for baking the white velvet cake?
While the recipe specifies using two 9 inch round cake pans, you can use different sizes, such as an 8 inch pan or even a bundt pan, with some adjustments to baking time. Just ensure to check for doneness using a toothpick to prevent overbaking, which can dry out the cake.
Bake White Velvet Cake Dreamy Delicious