The No Fry Cracker Ovenbaked Dill Pickles with Zesty Herb Ranch Dip

- Ditch the Deep Fryer: Achieving That Authentic Crunch, Baked Not Battered
- Why This Oven Fried Pickles with Herb Ranch Dip is Your New Game Day Staple
- Assembling Your Crisping Components for Oven Fried Pickles
- The Essential Building Blocks for the Fresh Herb Ranch Dip
- The Two-Step Breading Process for Superior Adhesion
- Mastering the Baking Sheet Setup for Even Cooking
- Troubleshooting Common Issues with Oven Fried Pickles with Herb Ranch Dip
- Creative Variations on the Classic Baked Pickle Concept
- Recipe FAQs
- 📝 Recipe Card
Ditch the Deep Fryer: Achieving That Authentic Crunch, Baked Not Battered
There’s a certain magic that happens when you bite into a perfectly fried pickle that sharp, salty tang followed by a satisfying, audible crunch . For years, that magic required submerging the tangy vegetable into a vat of scorching oil.
But as culinary enthusiasts, we constantly seek ways to capture those iconic textures using simpler, healthier methods. My mission today is to prove that you can achieve truly Crispy Oven Fried Pickles that rival their greasy counterparts, all while using your standard home oven.
We’re taking a classic pub favourite and transforming it into a smart, shareable appetizer that fits beautifully into modern cooking habits. This recipe is built around maximizing surface crispness through strategic breading and heat management, resulting in the absolute best Oven Fried Pickles .
Why This Oven Fried Pickles with Herb Ranch Dip is Your New Game Day Staple
When it comes to Snacks For Party or impressive Fingerfood Party Ideas , these oven baked delights tick every box. They are visually appealing, delightfully addictive, and remarkably easy to manage in large batches compared to frying.
The beauty of this approach is its adaptability; it works wonderfully for Oven Fried Vegetables of various types, but the pickle provides that unbeatable sour salty base.
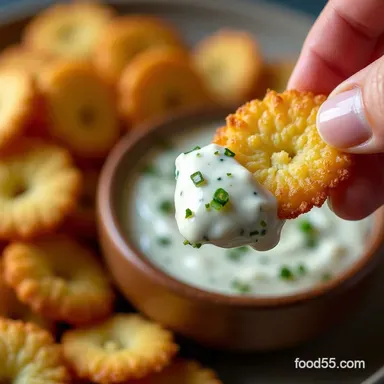
Paired with our cooling, vibrant Herb Ranch Dip Recipe , this combination quickly becomes the star of any gathering. They perform admirably as Game Day Snacks , offering a substantial, flavourful bite that keeps everyone satisfied without weighing them down.
The Secret to Crispy Coating Without Submerging in Oil
The secret to achieving that sought after crunch lies entirely in our breading components and the use of a wire rack. We rely heavily on Panko breadcrumbs, which are large, airy flakes that absorb minimal moisture and crisp up beautifully under dry, high heat.
These are supported by the flour for adhesion and a light spritz of cooking oil applied after breading. This oil is the catalyst; it ensures the coating browns perfectly rather than just drying out into a hard shell.
The entire process is engineered to mimic the action of hot oil, but within the gentler environment of the oven.
A Quick Nod to Healthier Snacking Choices
While we never want to sacrifice flavour, embracing alternatives like Baked Pickles allows us to enjoy comfort food more frequently. By eliminating deep frying, we drastically reduce the amount of absorbed fat, transforming a traditionally heavy snack into something much lighter.
This doesn't mean compromising on taste; it simply means smart ingredient swaps like using thick Greek yogurt in our dip base that enhance the overall profile while keeping things fresh. This is how we deliver Healthy Fried Pickles that genuinely satisfy that craving.
What Makes This Homemade Ranch Truly 'Zesty'
A creamy dip is non-negotiable when serving salty pickles. store-bought ranch often falls flat, heavy on the stabilizers and lacking true herbaceous punch. Our Herb Ranch Dip Recipe combats this by starting with a base of thick Greek yogurt and mayonnaise for the perfect balance of tang and richness.
The true 'zest' comes from the combination of freshly snipped chives and parsley, balanced by a vital teaspoon of dried dill and a sharp squeeze of fresh lemon juice. This bright acidity cuts through the richness of the coating perfectly.
Assembling Your Crisping Components for Oven Fried Pickles
To successfully achieve a coating that stays put and delivers maximum texture, a multi stage breading setup is essential. Before we even think about heat, we must meticulously prepare our three stations.
Think of this as a professional production line, ensuring every pickle is perfectly clad for its journey to crispness.
The Essential Building Blocks for the Fresh Herb Ranch Dip

The dip needs time for the complex fresh herb flavours to meld and deepen, so starting this component while the pickles are draining is an excellent use of time. The goal here is freshness we want vibrant green notes to contrast the savory crunch of the pickles.
Selecting the Perfect Pickle Spear: Thickness Matters
When selecting your pickles, whether chips or spears, aim for uniformity. If you use chips, ensure they are all of a similar thickness so they bake evenly. If using spears, try to choose ones that aren't overly bulbous.
Critically, no matter the shape, they must be drained of excess brine and patted completely dry using paper towels. Any residual liquid on the pickle surface will steam the breading and prevent the adherence needed for successful Oven Fried Pickles .
Our Preferred Panko-to-Cornmeal Ratio for Maximum Crunch
While some recipes rely on cornmeal for texture, for superior oven results, we are focusing heavily on Panko. Our ratio leans heavily toward the Panko about three parts Panko to one part flour.
The flour acts as the initial binder, helping the egg wash grab hold, but the Panko delivers that jagged, airy surface that crisps like a dream in the oven's dry heat. We add key spices smoked paprika for warmth and garlic powder for savoury depth directly into this final coating.
The Essential Toolkit: Gear Needed for Perfect Baking
The equipment setup is paramount to achieving that even bake without turning the bottoms soggy. You absolutely need two large baking sheets, and more importantly, two wire cooling racks that fit snugly inside those sheets.
Baking directly on parchment paper traps steam underneath the pickle; the rack lifts the pickle, allowing 360-degree air circulation, which is fundamental for Baked Pickles success.
Fresh Garden Herbs: Mixing the Dip’s Aromatic Core
For the dip, focus on maximizing fresh ingredients. While dried dill is indispensable for that classic ranch note, the combination of finely snipped fresh chives and parsley provides the necessary brightness.
We mix these aromatics into a blend of thick Greek yogurt (for tang and body) and high-quality mayonnaise (for silkiness). Don't forget that small splash of lemon juice; it’s the final element that wakes up the entire flavour profile.
Related Recipes Worth Trying
- Easy Asian Turkey Meatballs with Zesty Ginger Lime Glaze — Need a healthy Asian turkey meatballs recipe that sings These are lighter packed with ginger and coated in a killer sticky sesame glaze Dinner sorted in 40 mins
- Healthy Greek Turkey Meatballs with Feta Lemon Zest — Forget heavy beef This Greek Turkey Meatballs Recipe is bright zesty and packed with feta and fresh herbs Baked or panfried for a perfect weeknight supper
- Foolproof Spring Asparagus Risotto with Lemon Zest — Learn how to make this vibrant Spring Asparagus Risotto recipe perfectly al dente every time Its a surprisingly easy meatless main dish
The Two-Step Breading Process for Superior Adhesion
Adhesion is everything when baking. We use the classic three stage dredging method, often called "Standard Breading Procedure," adapted for our drier, crispier goal. First, the dry flour coating ensures the subsequent wet egg wash has something dry to stick to. Second, the egg wash acts as the primary adhesive.
Third, the Panko mixture is pressed firmly onto the damp, coated pickle. The key here is to work in small batches and ensure the coating is dense and even across the entire surface area of each pickle piece.
Mastering the Baking Sheet Setup for Even Cooking
Once breaded, the pickles transition immediately to the baking sheets for final preparation before entering the heat. This arrangement is arguably the most crucial technical step after the draining process.
Prepping the Pickles: Patting Down for Crispness
As mentioned, dryness is non-negotiable. After draining the jar, lay the pickles on paper towels and press firmly. When you assemble the breading line, you will be transferring the coated pickle directly to the wire rack set over the parchment lined sheet.
Do not crowd them; leave at least an inch of space between each piece. This separation prevents residual moisture from touching neighbouring pickles and steaming them, ensuring uniform crisping.
Coating Mastery: Ensuring Every Pickle is Fully Encrusted
When pressing the coated pickle into the Panko mixture, use the palm of your hand to gently flatten and adhere the crumbs. You are looking for zero spots where the pickle surface shows through the coating. Once all pieces are placed on the rack, they need setting time.
Lightly spray or brush the tops with your cooking oil or spray. Then, chill them in the refrigerator for about 15 minutes. This short rest allows the egg wash to firm up, locking the Panko in place so it doesn't shed when flipped or baked.
Baking Temperatures and Times: The Golden Hue Sweet Spot
We are aiming high heat for speed and texture. Preheat your oven to a robust 425° F ( 220° C). Bake the pickles on the top rack for 10 to 12 minutes.
After this initial blast, carefully flip each pickle you should see a decent amount of browning already developing. Lightly spray the second side with oil again, and return them to the oven for a final 5 to 8 minutes.
The total cook time should hover around 17 to 20 minutes, yielding that beautiful golden brown finish indicative of perfect Oven Fried Pickles .
Whipping Up the Herb Ranch Dip While the Pickles Bake
This is the ideal moment to finalize the dip. Once the pickles are cooling slightly, you can give the ranch a final stir. Taste it critically does it need more salt? More lemon for zing? A little black pepper for depth?
This cooling time allows the herbaceous flavours in the dip to fully integrate, making it the perfect counterpoint to the warm, crunchy Oven Fried Pickles with Herb Ranch Dip .
Troubleshooting Common Issues with Oven Fried Pickles with Herb Ranch Dip
If you find your Baked Pickles are emerging pale or soggy, there are usually two culprits. First, the pickles weren't dry enough; second, you didn't use enough oil. The oil provides the conduction needed for browning in the dry heat.
If the coating is falling off, you likely skipped the 15-minute chilling period, meaning the breading wasn't set before it hit the hot oven. If the dip is too thin, next time use less mayonnaise or ensure your Greek yogurt is very thick, perhaps even draining it slightly in cheesecloth beforehand.
Creative Variations on the Classic Baked Pickle Concept
While our dill pickle base is superb, don't hesitate to experiment. These techniques work across the board when making Oven Fried Vegetables .
Tips for Storing Leftovers (If They Last That Long!)
Leftover Oven Fried Pickles are best enjoyed fresh, but if you must store them, cool them completely first and place them in a single layer in an airtight container in the fridge for up to two days. To reheat, skip the microwave entirely!
Place them back on a wire rack over a baking sheet and bake at 375° F ( 190° C) for about 5– 7 minutes until they regain their crispness.
Elevating the Dip: Spice Level Adjustments
If you prefer heat, the dip offers an easy avenue for customization. Whisk in a teaspoon of finely minced jalapeño (seeds removed) for a fresh spicy element, or alternatively, incorporate a small dash of your favourite hot sauce into the yogurt base.
This pairing enhances the snacking experience for any vibrant Fingerfood Party Ideas .
Nutritional Spotlight: A Lighter Take on a Comfort Food Classic
This iteration of fried pickles offers a significantly reduced fat content compared to traditional methods, making it a much more approachable indulgence. While the sodium remains present due to the nature of the pickle itself, the overall caloric density drops substantially, offering a guilt free way to enjoy deeply satisfying texture and flavour, aligning perfectly with modern expectations for Healthy Fried Pickles .
Serving Suggestions Beyond Game Day Appetizers
While they are stellar Game Day Snacks , these crispy bites deserve recognition year round. They pair beautifully as a crunchy topping for creamy soups, an unexpected textural element on large composed salads, or served alongside classic American sandwiches like Reubens or pulled pork.
They transform any simple platter into something far more exciting.

Recipe FAQs
Why aren’t my oven fried pickles as crunchy as the deep fried ones?
That’s the age-old challenge when ditching the fryer! The key is twofold: make absolutely sure your pickles are patted bone dry before breading, and don't skimp on the oil spray or brushing on top of the panko. You need that fat to mimic the frying process; a light mist just won't cut it!
Can I make the Herb Ranch Dip ahead of time for my Oven Fried Pickles with Herb Ranch Dip?
Absolutely, and I highly recommend it! The dip is miles better after the flavours have properly married, which takes a few hours in the fridge. You can safely prepare the dip up to two days in advance; just give it a good stir before serving.
What's the trick to stopping the breading from falling off in the oven?
The breading needs a little encouragement to stick tight! Make sure you press the panko firmly onto the wet pickle surface, and never skip the 15-minute chilling step outlined in the recipe. Chilling helps the coating firm up right before it hits the heat, locking everything in place.
I only have pickle spears, not chips; can I still use those?
You certainly can use spears they make for a fantastic dipper! Just be aware that spears require a little longer in the oven to ensure the thickest part cooks through properly without burning the breading. Add about 3 5 extra minutes to the total baking time and check for golden crispness.
How should I store leftovers, and can I reheat them?
Leftover baked pickles are best eaten fresh, but if you must store them, pop them in an airtight container in the fridge for up to two days. To reheat and restore some crunch, spread them on a baking sheet and bake at 350°F (175°C) for about 5 8 minutes; avoid the microwave at all costs!
Is there a way to make this recipe a bit spicier?
If you like a bit of a kick, there are a couple of corking options! Mix a teaspoon of cayenne pepper or chipotle powder directly into your panko breadcrumb mix for heat in the coating. Alternatively, swirl a dash of hot sauce into your Herb Ranch Dip for a zesty finish.
Baked Dill Pickles Ranch
Ingredients:
Instructions:
Nutrition Facts:
| Calories | 160 kcal |
|---|---|
| Fat | 7g |
| Fiber | 1g |
