Cake Pop Stand Delight
- Cake Pop Stand Delight: A Culinary Journey
- Your New Favorite Cake Pop Stand Delight
- Health and Nutrition Highlights
- Recipe at a Glance
- Quality Ingredients Breakdown
- Kitchen Equipment Essentials
- Expert Cooking Method for Cake Pop Stand Delight
- Expert Kitchen Wisdom
- Perfect Presentation
- Storage and Make-Ahead
- Creative Variations
- Complete Nutrition Guide
- Expert FAQ Solutions
- 📝 Recipe Card
Have you ever wondered why cake pops have taken the dessert world by storm? i mean, they’re little bites of joy on a stick, and they seem to make everything, from birthdays to simple get-togethers, feel a touch more festive.
If you’re ready to master these delightful treats, you’re in for a real treat! the cake pop stand delight recipe i’m about to share is not just any cake pop recipe; it’s easy, delicious, and perfect for those times when you want to impress without spending endless hours in the kitchen.
You can whip these up in about an hour, and trust me, they’re as fun to make as they are to eat.
Cake pops trace their origins to the heart of american baking, where cake meets creativity. these charming little sweets are believed to have gained popularity in the early 2000s, thanks in part to their adorable appearance and their ability to turn leftover cake into something magical.
But don’t let their cute exterior fool you! they pack a punch of flavor and are surprisingly easy to make.
What really sets this recipe apart are its unique selling points: it’s not just about the cake; it’s about the entire experience.
This recipe invites you to get your hands a little messy and be a bit creative, something thoroughly enjoyable and rewarding! you can personalize them with flavors, colors, and toppings.
Plus, you get a technical bonus point for making your very own cake pop stand to display your work of art.
Cake Pop Stand Delight: A Culinary Journey
Cake pops are part of a rich culinary heritage that spans both joy and innovation. they remind us of family gatherings filled with laughter and the kitchen adventures that often end in a messy flour fight.
There's a fascinating story behind their rise to fame. they combine the nostalgic comfort of cake with the trendy bite sized treat that people love to share.
Culturally, cake pops bring a sense of lightheartedness wherever they go, often making an appearance at celebrations of all sorts, from children’s birthday parties to holiday gatherings.
They add a bit of pizazz to dessert tables and are especially great as party treats, instantly elevating any event.
Nowadays, they have become practically a must have when it comes to trendy dessert ideas.
Your New Favorite Cake Pop Stand Delight
Imagine biting into a cake pop that explodes with flavor chocolatey goodness enveloped in a sweet candy coating. the potential flavor combinations are practically endless! you can go classic with rich chocolate cake pops, or dare to be different with lemon or red velvet.
The techniques in this recipe are foolproof, making it easy even for novice cooks to succeed. and here’s a little secret i learned from my baking misadventures: give the cake balls a bit of chill time before dipping; it helps keep them from falling apart.
You don’t need fancy tools or a bakery degree to make these; it’s all about the joy of working with your hands.
Plus, with a well thought-out plan, you can save time and money by using simple ingredients most of us already have as staples.
Health and Nutrition Highlights
Now let’s talk about balance a word that suddenly came to mind as i sniffed the cake batter. cake pops can actually have some nutritional benefits, albeit in moderation.
They’re made primarily from flour and sugar, but you can easily adapt them to fit various dietary needs. if you’re gluten-free, try using a gluten-free cake mix; dairy-free options are easy too! the good news is these little treats can also be a fun way to incorporate creativity into healthy eating.
Each cake pop delights the taste buds while providing a little boost of energy. they’re not a replacement for a full meal, but for a sweet treat, they can satisfy your cravings without going completely overboard.
Recipe at a Glance
So, here’s the lowdown on what you need to know at a glance for making these scrumptious cake pops:
- Total preparation time : 30 minutes
- Cooking time : 30 minutes
- Total time : 1 hour (plus cooling time)
- Skill level required : Easy
- Serving size : 12 cake pops
- Cost efficiency : Budget friendly and downright delicious!
Ready to dive into the fun part? Grab your supplies and let’s talk about the ingredients that will turn your kitchen into a cake pop wonderland!
Quality Ingredients Breakdown
Premium Core Ingredients
When making your cake pops , you want to start with the best of the best because who wants a sad cake pop, am i right? here’s a breakdown of what you’ll need for the cake and how to pick out those premium ingredients.
1 cup all-purpose flour : Look for that lovely pale color and a fine texture. It should feel silky and smooth. Keep it in an airtight container to avoid clumps.
1 cup granulated sugar : Ideally, choose a brand that’s bright and free from clumps. Sugar shouldn’t smell odd quite the opposite! Store it in a sealed jar to keep it fresh.
1/2 cup unsweetened cocoa powder : you really can taste the difference here, trust me. go for a rich, dark cocoa to add depth.
Make sure it’s stored away from moisture; it loves to clump together, which can make measuring a bit tricky.
1/2 tsp baking powder & 1/2 tsp baking soda : Check the expiration date on these to ensure they haven’t lost their oomph! Keep them in cool, dry places.
1/4 tsp salt : There's no substitute for kosher salt here its flaky structure does wonders in desserts.
1/2 cup buttermilk : it can easily be made at home with milk and vinegar or lemon juice if you want to save a trip to the store! just blend one cup of milk with a tablespoon of acid.
1/4 cup vegetable oil : Try to snag oil that’s labeled “light,” as it’s neutral in flavor and won’t interfere with our cake pop delight.
1 tsp vanilla extract : Approximately 1/3 of a bottle per recipe! Go for pure vanilla if you can those extracts will simply enhance the magic.
1 large egg : Make sure it’s fresh. Give it a float test if you’re not sure fresh eggs sink, old ones float!
1/2 cup boiling water : It may sound weird, but this step helps the cocoa powder dissolve, leading to a richer cake.
Signature Seasoning Blend
We aren't going for just any cake pops; we want them to burst with flavor. Here’s how to jazz up our cake pop recipe with signature seasonings and touches:
Spice combinations : You might be surprised to hear it, but a pinch of cinnamon can elevate your cocoa game. Yes, please! Just a dash brings out all those yummy chocolate flavors.
Herb selections : Okay, herbs might be a stretch for cake pops, but if you’re feeling adventurous for a new flavor twist, why not try a hint of lavender or mint in your decorations?
Flavor enhancers : Beyond vanilla, consider almond extract for a warm, nutty note. Just remember, a little goes a long way!
Aromatic additions : Toss in some freshly grated orange zest to your chocolate coating for a lovely citrus uplift. Your guests will be raving!
Smart Substitutions
So you are in the middle of baking and realize you’re out of something? No worries! Here are some ideas:
Alternative options : Instead of buttermilk, you can use plain yogurt or even regular milk with vinegar.
Dietary swaps : Looking for gluten-free? Substituting with almond flour works (but be sure to check the moisture).
Emergency replacements : Unexpectedly out of eggs? You can use 1/4 cup of unsweetened applesauce or even a banana just be prepared for a slightly different texture.
Seasonal variations : In autumn, swap the cocoa for pumpkin spice; during summer, think about making these cake pops with a lemon cake base.
Kitchen Equipment Essentials

To whip up those wonderful cake pops, you’ll want the right tools at your side. Trust me, a well equipped kitchen makes all the difference.
Must have tools : You’ll need mixing bowls, measuring cups, and spoons you can never have too many of these.
Recommended appliances : A hand mixer is a lifesaver for the batter; if you have a stand mixer, even better!
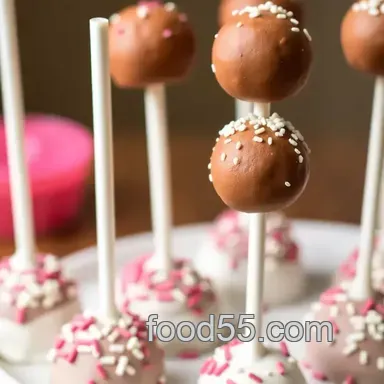
Helpful gadgets : A cake pop stand is essential if you want to showcase your creations beautifully while they set. It’s such a good idea; it seriously makes a difference in presentation.
Home alternatives : If you’re short on a stand, a simple styrofoam block works wonders. That's what I use every time no shame in that game!
Pro Ingredient Tips
Over the years, I’ve learned a few tricks that you might find helpful:
Selection secrets : When you’re picking out your cocoa powder, a taste test might be difficult, but trust your nose. Go for brands with deep, rich aromas.
Quality markers : If the price seems low, it often is for a reason! Splurge a little bit; your cake pops deserve it.
Storage solutions : Keep your candy melts at room temperature. The fridge can cause them to become hard and clumpy.
Money saving tips : Buy ingredients in bulk I’ve saved a ton that way! Just be sure to store them right.
Well, i think we’ve got the ingredients game down pat! now let’s dive into the fun part the instructions for creating these delightful cake pops .
You’re going to have such a blast with this!
Expert Cooking Method for Cake Pop Stand Delight
Let's talk about something that's both fun and delicious: cake pops! these little sweet bites are perfect for birthdays, dessert tables, and celebrations of all kinds.
I remember the first time i made cake pops it was a bit of a comedy show in my kitchen! but believe me, once you get the hang of it, you’ll be whipping these up like a pro.
So grab your supplies, and let’s dive into the cake pop joy!
Essential Preparation Steps
Mise en Place Details
To kick things off, you'll want to gather all your ingredients and tools. You’re going to need:
- Cake ingredients: flour, sugar, cocoa powder, and so on.
- Cake pop coating: candy melts and optional coconut oil.
- Decoration: sprinkles, edible glitter, and colored chocolate for drizzling.
- Supplies for the cake pop stand: a Styrofoam block and lollipop sticks.
Lay everything out on your kitchen counter. It's kind of like setting up your own little pastry shop how fun is that?
Prep Techniques
For optimal success, you can prepare your cake ahead of time. crumbling the cooled cake can be a bit messy, so i usually wear an old apron that can handle flour dust and cocoa splashes.
Seriously, it's like a cooking battle zone in there!
Time Management
The entire project takes about an hour, plus cooling time. so, while your cake bakes, you can clean up, set up your cake pop stand, or even whip up a quick lunch.
Multitasking for the win!
Organization Tips
Keep a close eye on your baking time. you'll bake the cake for 25-30 minutes trust me, the smell alone will have you checking your oven every five minutes! use a timer to make it manageable.
Also, i like to keep a wet cloth nearby to wipe my hands between steps; it helps to stay tidy (which is a rarity for me!).
Professional Cooking Method
Step-by-step Process
- Preheat the Oven: Set it to 350°F (175°C) and prepare an 8 inch round cake pan.
- Mix Dry Ingredients: In one bowl, combine flour, sugar, cocoa, baking powder, soda, and salt.
- Combine Wet Ingredients: Get another bowl for buttermilk, oil, vanilla, and egg. Mix until well blended.
- Combine Mixtures: Pour the wet mixture into the dry one. Then, gradually stir in 1/2 cup of boiling water. It's like magic when it transforms into a smooth batter!
- Bake: Pour the batter into the pan and bake for 25-30 minutes. You’ll know it’s done when a toothpick comes out clean. Let it cool fully on a rack.
Temperature Control
Baking is sensitive business, and I learned this the hard way. A too-hot oven burns the outside while leaving the center gooey no fun! Keep that temperature steady.
Timing Precision
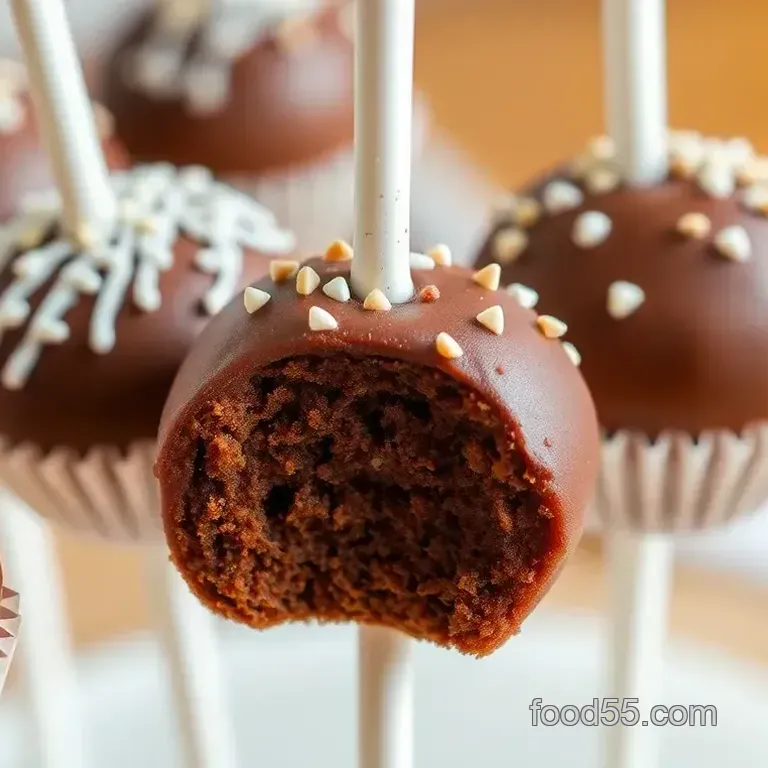
Once your cake is cool, it’s time to crumble. This part is surprisingly cathartic really, you’ll want to keep crumbling until it’s all fine crumbs!
Success Indicators
You’ll know you’ve hit the jackpot when your cake balls hold their shape. If they’re falling apart, they might need a chill in the fridge.
Expert Techniques
Professional Methods
When dipping cake pops in chocolate, a well coated dip is key. if it’s uneven, it’s not pretty. use a fork to tap off the excess coating so you get that smooth, professional finish.
Critical Steps
Always dip your lollipop sticks into the melted candy before inserting them into the cake balls. this helps lock those pops in place.
Trust me, i’ve had more than a few “pop-offs” before learning this trick!
Precision Points
If you find your candy melts too thick, don’t sweat it. Just add a bit of coconut oil to thin them down you'll thank yourself later for that silky dip.
Quality Checks
Before serving, let the cake pops set firmly in your homemade cake pop stand. Nothing's worse than a sad, collapsing cake pop!
Success Strategies
Troubleshooting Tips
If your cake balls crumble as you dip, don’t panic. They might need more refrigeration time before dipping. Just pop them back in the fridge for a little while and try again.
Quality Assurance
When it comes to quality assurance, i keep an eye on the decoration. if it looks good, it generally tastes good too.
Remember to sprinkle while the coating is still wet so the toppings stick.
Perfect Results Guide
Lastly, let them cool completely before serving. This saves you from dealing with sticky fingers and messy plates!
So there you have it the complete guide to making delightful cake pops and a cake pop stand that steals the show! Next, I’ll share some extra tips to make your cake pops even more delightful, including flavor variations and decorating ideas that could turn these sweet treats into your signature party amazingness!
Expert Kitchen Wisdom
Professional Insights
When it comes to baking, i always think back to the first time i attempted to make cake pops. they turned out, let’s say, rather interesting .
The secret? following the recipe to the letter but also being open to improvisation. expert insights suggest that baking is both science and art, and that balance will ensure your cake pops come out just right.
Expert Techniques
One technique i’ve learned is the importance of cooling your cake completely before crumbling it. i once made the mistake of jumping the gun, and my cake pops crumbled.
Not cool! the ideal texture needs that time to firm up so you can mold perfect cake balls. remember to chill!
Kitchen Wisdom
Regularly revisit your recipes to refine them. Maybe those chocolate cake pops need a twist of peppermint next time. Or perhaps you could swirl in some cream cheese frosting. Experimentation is key!
Success Guarantees
With these tips in your back pocket, you’re well on your way to cake pop success. Just remember: baking can be a little messy, but that’s where the fun lies!
Perfect Presentation
Plating Techniques
Now that you’ve got your cake pop stand ready, let’s talk presentation. it’s all about making those little treats look as amazing as they taste.
Arrange them in a circle or a neat row on a decorative tray. just like how some charcuterie boards are crafted, a splash of careful placement can elevate your cake pops from simple to spectacular.
Garnish Ideas
Sprinkles oh goodness, sprinkles! they’re like the confetti of the dessert world. a good sprinkle can make even the most mundane cake pop feel like a celebration.
I often mix edible glitter or drizzle some contrasting chocolate on top because, let’s face it, who doesn’t love a chocolate drizzle?
Serving Suggestions
Serve your pops on that cake pop stand where they can shine. You could even create a fun dessert table at your next get-together, bringing in an array of flavors. Heaven.
Visual Appeal Tips
Always let your creativity shine! sometimes i set my cake pops against a bright backdrop or add fun labels next to different flavors.
It's about engaging the eyes first; after all, we eat with our eyes before we even take a bite!
Storage and make-ahead
Storage Guidelines
If you somehow have leftovers (which, let's be honest, is rare in my house!), store those cake pops in an airtight container in the fridge.
They’ll stay fresh for about a week if they last that long!
Preservation Methods
You can also freeze them if you're planning ahead. wrap each pop individually in cling film before placing them in a freezer safe bag.
Just remember to let them thaw in the fridge before serving!
Reheating Instructions
These aren’t really meant to be reheated, but you can remove them from the fridge and let them come to room temp before devouring.
Freshness Tips
If you see any moisture on them, that means trouble! It’s a sign they weren’t stored properly. A little air circulation can go a long way.
Creative Variations
Flavor Adaptations
I've tried cherry cake pops, vanilla with a hint of almond, and even spicy pumpkin in the fall. The possibilities are endless, my friends.
Dietary Modifications
Need a gluten-free option? Substitute with a cake ball recipe that uses almond flour instead. Or go vegan with flaxseed egg replacers and dairy-free chocolate melts.
Seasonal Twists
In March, I made mint chocolate cake pops for some St. Paddy's flair. Here’s a tip: flavored extracts can really take the taste to the next level!
Regional Variations
Maybe try using batters inspired by local desserts. Incorporating Earl Grey tea into a vanilla batter for a bit of British charm? Yes, please!
Complete Nutrition Guide
Detailed Breakdown
When munching on those tasty treats, keeping an eye on the calories is a must. Each cake pop packs about 150 calories it's a dessert, not a health snack.
Health Benefits
They might not qualify as health food, but hey, it’s about balance! The cocoa in chocolate cake pops gives at least a little antioxidant punch.
Dietary Information
Make sure you know what’s in them especially if you’re making these for kids or friends with allergies. Always good to ask!
Portion Guidance
Having a gathering? Set the expectation of two pops per person; it keeps the sugar rush from overwhelming anyone!
Expert FAQ Solutions
Common Concerns
What if my cake pops fall off the stick? Uh-oh! A too-soft cake ball or too-hot coating could be the culprit.
Expert Answers
Always dip the stick in melted chocolate first it helps anchor it in the cake ball. Trust me; it works like magic!
Troubleshooting Guide
If your candy melts are too lumpy, adding a bit of coconut oil while heating helps smooth things out.
Success Tips
Be patient. Sometimes you may need several tries to get those pops just the way you want.
Conclusion: cake pops are a beautiful blend of creativity and baking magic. with the guidance from this article, you should be well equipped to tackle these sweet treats.
Remember, every kitchen adventure holds potential for laughter and learning. now, go conquer that cake pop stand and impress your friends and family!
Cake Pop Stand Delight