Chilis Skillet Queso: Velvety Copycat Recipe
- Time: Active 5 minutes, Passive 5 minutes, Total 10 minutes
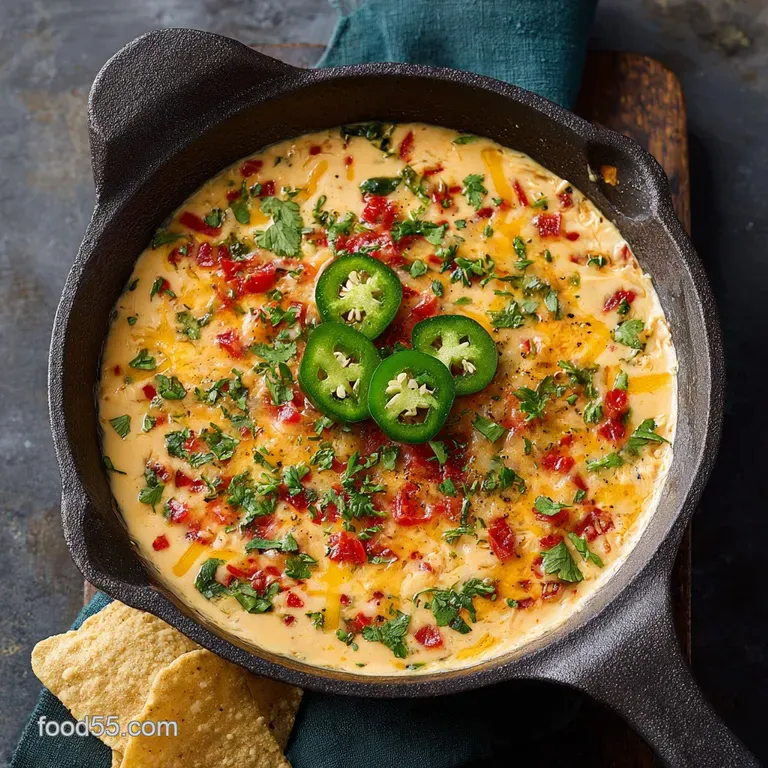
- Flavor/Texture Hook: Silky smooth, molten cheese with a savory, beefy kick and a sharp citrus finish.
- Perfect for: Game day gatherings, movie nights, or whenever you need a fast crowd pleaser.
- Recreate the Legendary Chilis Skillet Queso Right in Your Kitchen
- The Essential Specifications for This Iconic Restaurant Style Appetizer
- Identifying the Key Ingredients for a Truly Authentic Flavor Profile
- The Necessary Cooking Equipment for Achieving a Perfect Molten Texture
- Comprehensive Step by Step Instructions for a Flawless Cheesy Result
- Avoiding Potential Culinary Pitfalls with These Expert Troubleshooting Tips
- Innovative Flavor Variations to Customize Your Skillet Cheese Experience
- Strategic Advice for Storing and Reviving Your Homemade Cheese Dip
- The Best Dipping Options and Garnishes for a Festive Presentation
- Debunking Popular Myths About Making Cheese Dips
- Very High in Sodium
- Recipe FAQs
- 📝 Recipe Card
Recreate the Legendary Chilis Skillet Queso Right in Your Kitchen
You know that specific, almost hypnotic aroma that hits you the second you walk through those glass doors? It’s a mix of sizzling fajita platters and that neon orange, molten cheese dip that seems to defy the laws of physics.
I remember sitting in a booth with my friends back in college, fighting over the last broken chip in the basket just to scrape up the remaining streaks of that savory sauce. We always wondered how they got it so silky, so beefy, and so undeniably addictive.
I spent months trying to "fancy" this recipe up with aged cheddars and artisanal cheeses, only to end up with a greasy, clumpy mess that looked more like a science experiment gone wrong. It turns out the secret wasn't in the gourmet aisle, but in the nostalgia of the pantry.
By combining the right emulsifiers with a specific blend of warm spices, I finally cracked the code. This version hits all those local flavors we love, bringing that vibrant street style energy right to your stove.
We’re going for that exact balance of salty, tangy, and smoky that makes your mouth water before the skillet even hits the table. No more waiting for a table on a Friday night or dealing with soggy takeout chips.
We are making the real deal, and I promise you, it’s going to be the most requested dip in your rotation. Let's get that burner going and make some magic happen.
The Essential Specifications for This Iconic Restaurant Style Appetizer
The Chemistry of the Velvety Emulsion Melt: Processed cheese contains sodium citrate, a salt that keeps fats and proteins bonded even when subjected to high heat. This prevents the sauce from "breaking" or becoming an oily puddle, ensuring a glossy finish every single time.
The Physics of Texture
The viscosity of this dip relies heavily on the fat to liquid ratio. We use whole milk to provide enough hydration for the cheese to flow, while the thickeners in the canned chili add a "hearty" weight to the dip. This prevents it from being too thin or watery.
The Spice Bloom Effect
When you add cumin and chili powder to the warm milk, you are "blooming" the spices. This process releases fat soluble flavor compounds that would otherwise remain trapped in the dried herbs, creating a deeper, more resonant aroma.
| Method | Time | Texture | Best For |
|---|---|---|---|
| Stovetop Skillet | 10 minutes | Ultra molten, slightly charred edges | Immediate party serving |
| Slow Cooker | 1 hour | Uniformly smooth, liquid consistency | Long duration snacking |
| Microwave | 4 minutes | Quickest result, may need frequent stirring | Instant cravings |
Using a cast iron skillet for this recipe isn't just for show. The heavy metal retains heat far longer than stainless steel, keeping the cheese in its liquid state for the duration of your snack session. If you want a similar vibe to our Cowboy Queso Recipe, you can even finish it under the broiler for 60 seconds.
Identifying the Key Ingredients for a Truly Authentic Flavor Profile
| Component | Science Role | Pro Secret |
|---|---|---|
| Processed Cheese | Primary Emulsifier | Cube it small (1 inch) for a faster, more even melt without scorching. |
| Canned Beef Chili | Flavor & Body | Use "no bean" variety to maintain the classic Chili’s dipping texture. |
| Fresh Lime Juice | Acid Balance | Add at the very end to brighten the heavy fats and cut the saltiness. |
For this recipe, we are staying true to the components that provide that signature "local flavors" feel found in the best street cuisine.
- 16 oz processed cheese (Velveeta):Why this? Essential for the signature "no break" silky texture that real cheese can't replicate.
- 0.5 cup whole milk:Why this? thins the dip to the perfect plunging consistency for corn chips.
- 15 oz canned no bean beef chili:Why this? Provides the savory base and meaty depth without any chunky distractions.
- 2 tsp chili powder: Adds that earthy, sunset red hue and mild warmth.
- 1 tsp ground cumin: Essential for that "taco truck" aroma that fills the kitchen.
- 0.5 tsp smoked paprika: Introduces a subtle wood fired depth without needing a grill.
- 0.25 tsp cayenne pepper: Just enough to make the back of your throat tingle.
- 0.5 fresh lime, juiced: The secret weapon that makes the flavors pop.
- 1 tbsp fresh cilantro, chopped: Adds a burst of green and a fresh, herbal finish.
If you find yourself missing an ingredient, don't panic. You can swap the whole milk for half and half if you want an even richer mouthfeel, though it will make the dip significantly heavier. Much like the base in a Cheesy Mexican Rice Skillet recipe, the key is maintaining that creamy stability.
| Original Ingredient | Substitute | Why It Works |
|---|---|---|
| Whole Milk | Evaporated Milk | Adds even more creamy stability and a slightly toasted flavor. |
| Canned Beef Chili | Homemade Chili | Use 1.5 cups of beanless leftovers. Note: May alter the salt balance. |
| Cayenne Pepper | Red Pepper Flakes | Provides heat, though the texture will be slightly more textured. |
The Necessary Cooking Equipment for Achieving a Perfect Molten Texture
To get the most out of your Chilis Skillet Queso, your choice of vessel matters. A 10 inch cast iron skillet is the gold standard here. It mimics the restaurant's presentation and holds onto heat like a champ.
If you use a thin aluminum pan, you risk the bottom of the cheese scorching before the middle even begins to soften.
You'll also want a sturdy whisk or a silicone spatula. Since processed cheese can be a bit "sticky" as it transitions from solid to liquid, a silicone spatula allows you to scrape the corners of the pan effectively, preventing any localized burning.
Chef Tip: Freeze your block of processed cheese for 10 minutes before cubing. It makes the texture firmer and prevents the knife from sticking, giving you those clean 1 inch edges.
- 10 inch Skillet: Cast iron or heavy bottomed non stick is best.
- Whisk or Spatula: For constant movement during the melting phase.
- Citrus Juicer: To get every last drop of that half lime.
Comprehensive step-by-step Instructions for a Flawless Cheesy Result
- Prep the base. Cut your 16 oz processed cheese into 1 inch cubes. Note: Uniform sizes ensure every piece melts at the exact same rate.
- Warm the liquid. Pour 0.5 cup whole milk into your skillet over medium low heat. Cook 2 minutes until it begins to shimmer and small bubbles form at the edges.
- Incorporate the cheese. Add the cheese cubes to the shimmering milk. Note: Keep the heat low to prevent the milk from curdling.
- Whisk for silkiness. Stir continuously with your spatula until the cheese is velvety and completely free of lumps.
- Bloom the spices. Stir in 2 tsp chili powder, 1 tsp ground cumin, 0.5 tsp smoked paprika, and 0.25 tsp cayenne pepper. Stir until the aroma of cumin becomes fragrant and the dip turns deep orange.
- Add the bulk. Fold in the 15 oz canned no bean beef chili. Note: The chili is already cooked, so we are just bringing it up to temperature.
- Simmer and thicken. Cook for an additional 3 minutes, stirring occasionally. Watch for a gentle simmer where the sauce starts to look glossy and thick.
- Brighten the profile. Remove the skillet from the heat and squeeze in the juice from 0.5 fresh lime. Note: Adding acid off the heat prevents it from reacting harshly with the dairy.
- Garnish and serve. Sprinkle 1 tbsp fresh cilantro over the top. Serve immediately while the sauce is still bubbling and molten.
Avoiding Potential Culinary Pitfalls with These Expert Troubleshooting Tips

Why Your Skillet Queso Is Seizing or Grainy
The most common culprit for a grainy dip is high heat. Even though we are using processed cheese, the milk can still scorched or the proteins in the chili can tighten up if they hit a "hot spot" on the pan. Always keep your burner on medium low.
If you see the edges starting to darken or "crust" too quickly, pull it off the heat and whisk vigorously.
What If the Dip Is Too Thick?
Canned chili varies in thickness by brand. Some have more liquid than others. If your dip looks more like a paste than a pourable sauce, whisk in an extra tablespoon of milk at a time. It will thin out quickly, so go slow.
| Problem | Root Cause | Solution |
|---|---|---|
| Oily Surface | Heat was too high, causing fat separation. | Whisk in 1 tbsp of warm milk to re emulsify the sauce. |
| Dull Flavor | Needs more acid or salt. | Add an extra splash of lime juice or a pinch of salt. |
| Lumpy Texture | Cheese cubes were too large or not stirred enough. | Continue whisking over very low heat until smooth. |
Common Mistakes Checklist:
- ✓ Never skip the "no bean" rule; beans will break your chips and ruin the dip's flow.
- ✓ Resist the urge to use skim milk; the fat content is vital for that velvety mouthfeel.
- ✓ Add the lime juice after taking the skillet off the burner to keep the flavor vibrant.
- ✓ Preheat your skillet for at least 2 minutes so the cheese starts melting the second it hits the pan.
- ✓ Don't leave the dip unattended; cheese can go from perfect to scorched in 30 seconds.
Innovative Flavor Variations to Customize Your Skillet Cheese Experience
While the classic copycat is a masterpiece of its own, sometimes you want to lean into those vibrant street cuisine vibes. You can easily transform this into a "Loaded" version by adding a scoop of pico de gallo and a drizzle of sour cream right in the center before serving.
It adds a cold versus hot contrast that is absolutely stellar.
- Spicy Kick: Stir in a small can of diced green chilis or a tablespoon of pickled jalapeno juice.
- Vegetarian Style: Swap the beef chili for a plant based "no bean" chili. Most stores carry a soy based version that mimics the texture perfectly.
- The Blanco Twist: Use white processed cheese and replace the beef chili with a mixture of sautéed onions and diced poblanos for a Chilis Queso Blanco style.
If you are looking for more party inspiration, this dip pairs perfectly alongside a platter of smoky proteins, similar to the flavor profiles in a Southwest Chicken Skillet recipe.
| Option | Ingredient Adjustment | Result |
|---|---|---|
| The Firecracker | Add 1 tsp red pepper flakes | Higher heat level with a visible spice. |
| The Garden State | Top with diced tomatoes & onions | Fresher, crunchier mouthfeel. |
| The Smokey | Add 1 tsp liquid smoke | Deep, campfire inspired aroma. |
Strategic Advice for Storing and Reviving Your Homemade Cheese Dip
Storage: This dip keeps remarkably well in the fridge for up to 4 days. Store it in an airtight container once it has cooled to room temperature. You might notice it sets into a firm block that’s normal! It’s just the fats solidifying.
Freezing: I don't recommend freezing this dip. The emulsion between the milk and the processed cheese often breaks during the thawing process, resulting in a grainy, watery texture that even a whisk can't save.
Reheating: To bring it back to life, place the desired amount in a small saucepan over low heat. Add a teaspoon of milk to help it loosen up and whisk constantly. Avoid the microwave if possible, as it tends to create hot spots that can make the cheese "shatter" and become greasy.
Zero Waste Tip: If you have leftovers that you don't want to eat as a dip, use them as a sauce for tacos or drizzle over steamed broccoli. It’s also an incredible base for a quick mac and cheese just toss it with hot pasta and a little extra pasta water.
The Best Dipping Options and Garnishes for a Festive Presentation
To truly capture the restaurant experience, serve this in the skillet you cooked it in. Place the skillet on a wooden board or a heat safe trivet in the center of a large platter. Surround the skillet with thin, salty corn tortilla chips.
If you can find the "restaurant style" chips that are extra thin, they provide that satisfying "shatter" when you bite into them.
For a final touch, don't just stop at cilantro. A sprinkle of cotija cheese or a few rounds of fresh jalapeno can take the presentation from "home cook" to "street food pro." If you’re hosting a larger crowd, consider serving this alongside a spread of other quick bites like a 15Min Garlic Shrimp recipe for a full "surf and turf" appetizer vibe.
- Dippers: Warm tortilla chips, pita wedges, or even celery sticks for a crunch.
- Garnish: Extra cilantro, a dash of smoked paprika, or a swirl of salsa verde.
- Drink Pairing: A cold Mexican lager with a lime wedge or a tart hibiscus tea.
Debunking Popular Myths About Making Cheese Dips
One major misconception is that "real" cheese makes a better dip. While I love a good sharp cheddar, real cheese contains a high amount of protein that tightens up when heated, leading to a stringy or oily result.
Processed cheese is designed for melting, which is why it's the gold standard for this specific "copycat" consistency.
Another myth is that you need to use a double boiler. While a double boiler is great for delicate chocolates, the fat content in this recipe is high enough that a direct heat skillet works perfectly fine as long as you keep the temperature low and keep the mixture moving.
Finally, people often think you need to add flour or a roux to thicken the dip. The canned chili and the processed cheese provide all the thickening power you need. Adding flour will actually dull the vibrant flavors of the cumin and chili powder, making the dip taste "pasty" rather than creamy.
Trust the ingredients they know what they're doing!

Very High in Sodium
1018 mg mg of sodium per serving (44% % of daily value)
The American Heart Association recommends limiting sodium intake to no more than 2,300mg per day for most adults.
Tips to Reduce Sodium in Your Chili Cheese Dip
-
Low-Sodium Cheese-20%
Substitute Velveeta with a low-sodium cheese alternative, such as a blend of cream cheese and a reduced sodium cheddar, or a cheese specifically labeled as low-sodium. This will significantly reduce the sodium content. You can buy Velveeta that is marked 'Reduced Sodium'.
-
Low-Sodium Chili-15%
Opt for a low-sodium or no-salt added canned chili. Look for options with reduced sodium content, or make your own chili from scratch to fully control the sodium levels.
-
Unsalted Base-10%
Use unsalted or low-sodium milk to decrease the amount of sodium.
-
Spice it Up
Enhance the flavor with additional spices like garlic powder, onion powder, or oregano to compensate for the reduction in saltiness.
Recipe FAQs
What is Chili's Skillet Queso made of?
The core is processed cheese and canned no-bean beef chili. This combination provides the signature smooth texture and savory, meaty base restaurant versions are known for. It's typically seasoned heavily with cumin and chili powder.
Why did Chili's get rid of the Skillet Queso?
No official statement detailed the specific reason for its removal. Restaurant menu adjustments often stem from ingredient sourcing complexity or efforts to streamline kitchen processes. This homemade version recreates the necessary emulsification techniques for you.
Does Chili's still do Skillet Queso?
No, the original Skillet Queso is currently off the main menu. They have replaced it with other dips or appetizers, but many locations offer similar cheese dips under different names. For the exact flavor, you need a copycat recipe that mimics the ultra smooth texture.
Is Chili's bringing Skillet Queso back?
It is currently unknown if they plan a permanent return. Restaurant chains frequently test limited time offers to gauge demand before making permanent menu changes. Until then, this copycat recipe delivers the nostalgic flavor profile instantly.
How do I prevent my homemade queso from separating into oil and cheese?
Keep the heat low and use processed cheese for stability. Processed cheese contains emulsifying salts necessary to hold the fat and liquid together under heat. If you mastered controlling the texture in recipes like our Chilis Copycat Salsa recipe, apply that principle of gentle heating here.
What is the secret ingredient that brightens the heavy cheese flavor?
Fresh lime juice added off the heat is the secret weapon. Acid cuts through the richness of the fat and makes the spices pop, balancing the entire dip perfectly. Don't skip this step, even if you're making a simpler, meatless version.
How should I reheat leftover queso for the best texture?
Gently reheat on the stovetop over very low heat with an extra splash of milk. Whisk constantly until smooth; the milk helps reintroduce moisture to the solidified fats. Microwaving often causes the dip to seize up or separate quickly.
Chilis Skillet Queso In 10

Ingredients:
Instructions:
Nutrition Facts:
| Calories | 226 kcal |
|---|---|
| Protein | 10.5 g |
| Fat | 15.4 g |
| Carbs | 11.3 g |
| Fiber | 1.1 g |
| Sugar | 6.2 g |
| Sodium | 1018 mg |
