Sugar Cookies: Perfect Cut-Outs Every Time

- The Absolute Cornerstone: Why Every Baker Needs This Classic Cookie Recipe
- Mastering the Structure: The Science of No-Spread Cookies
- Professional Pantry Selection: Essential Components for Superior Dough
- Precision Baking: A Step-by-Step Guide to the Perfect Batch
- From the Test Kitchen: Troubleshooting and Advanced Techniques
- Extending the Shelf Life: Storage Solutions for Dough and Baked Biscuits
- Presentation and Pairing: Elevating the Finished Cookie
- Recipe FAQs
- 📝 Recipe Card
The Absolute Cornerstone: Why Every Baker Needs This Classic Cookie Recipe
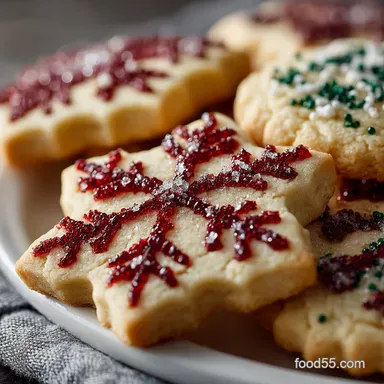
That aroma, right? It’s the quintessential scent of comfort and celebration all rolled into one. Nothing beats walking into a kitchen where fresh, buttery Sugar Cookies are cooling on the rack.
They promise tender, melt-in-your mouth perfection, and they serve as the ultimate canvas for any kind of decorating creativity you can muster.
I know what you're thinking: cut-out cookies are fussy and prone to spreading into sad little blobs. Not this recipe. This is my secret weapon, my emergency go-to because it uses pantry staples and is specifically engineered to hold its beautiful, sharp shape every single time.
It truly is the best sugar cookie recipe because it removes the guesswork.
I’ve personally messed up hundreds of batches over the years, learning the hard lessons about warm butter and rushed chilling so that you don't have to. We are going to dive deep into the real secrets the science of non-spreading, buttery, perfect Sugar Cookies from scratch.
Let’s crack on and make some baking magic happen.
Mastering the Structure: The Science of No-Spread Cookies
The Heritage of the Classic Tea Biscuit
These simple, elegant treats have been around forever, quietly evolving from basic, sturdy tea biscuits into the elaborate, decorated wonders we see today. They are foundational baking; if you can truly nail this classic recipe for Sugar Cookies , you can bake absolutely anything. Historically, they were designed to be simple carriers for tea, meaning the flavour needs to be deep and satisfying. They are delicious alongside a perfectly chilled glass of Sugared Prosecco Grapes: The Sparkling Grown-Up Garnish Recipe .
Defining the Perfect Sugar Cookie: Texture vs. Flavour
We absolutely want the best of both worlds, don't we? Unlike shortbread, which relies solely on butter for structure and is meant to be highly crumbly, the perfect Sugar Cookies should be surprisingly tender but still firm enough to handle detailed icing.
We achieve this by balancing the leavening agent and ensuring our creaming process is precise, whipping in just enough air to give them lift without compromising that rich vanilla and butter flavour.
Essential Tools for Crisp, Clean Cut-Outs
You don't need a professional kitchen, but a few key tools make the process heavenly. First, ditch the flimsy plastic cutters and invest in sharp, metal cookie cutters; they provide much cleaner edges and won't drag the cold dough.
Next,, a rolling pin with adjustable thickness guides (those little rings on the sides) is a game changer. Uniform thickness is the key to preventing half your batch of Sugar Cookies from burning while the other half is still raw.
Why Chilling the Dough is Non-Negotiable
This is honestly the biggest fail point for anyone making cut-out Sugar Cookies . When the butter warms up, it relaxes. When you put relaxed fat into a hot oven, it spreads rapidly. Chilling the dough keeps the fat molecules locked into place.
When that cold dough hits the heat, the structure sets almost instantly, guaranteeing your sharp points and perfect circles stay sharp and perfect. If you rush this step, you’ll just get blobs. I learned this the hard way years ago during a desperate holiday baking session.
The Role of Butter Temperature in Flavour Development
We are creaming the butter when it’s cool room temperature, not melted, and definitely not rock hard. This specific temperature soft enough to yield but cool enough to hold air is crucial.
That slow, controlled creaming whips in tiny air pockets, creating lift and contributing significantly to the melt-in-your mouth tenderness of these buttery Sugar Cookies .
Achieving that Tender Crumb: Flour Ratios Explained
We use standard all-purpose flour here, but here’s a tip I’ll shout from the rooftops: measure your flour by weight! Scooping flour directly from the bag compacts it, easily adding 25% too much to your recipe.
This guarantees a dense, dry, and ultimately disappointing batch of Sugar Cookies . We want a tender crumb, not a tough biscuit.
Professional Pantry Selection: Essential Components for Superior Dough
Choosing the right ingredients is truly the difference between an okay cookie and truly stand out Sugar Cookies . Don’t skimp on quality; your flavour profile depends on it.
Granulated Sugar vs. Confectioners’ Sugar: Which is Best for Shape?
We stick primarily to granulated sugar here because its crystal structure provides necessary rigidity and helps control the spread during baking. It gives the edges a nice, subtle crispness.
If you want a softer, fudgier crumb, you can replace up to half of the granulated sugar with powdered (confectioners’) sugar, but be warned: this softness comes at the expense of shape retention.
| Ingredient | Role in Sugar Cookies | Viable Substitute |
|---|---|---|
| All-Purpose Flour | Provides structure, chewiness | 1:1 gluten-free Blend (Ensure it contains xanthan gum) |
| Granulated Sugar | Crispness, controls spread | Half Powdered Sugar (For a softer crumb) |
| Unsalted Butter | Primary flavour driver, tenderness | high-quality Stick Form Vegan Butter |
| Eggs | Binding and essential structure | 1/4 cup Applesauce (Adjust flour slightly, texture will change) |
| Vanilla Extract | Essential aroma and depth | Pure Almond Extract (Use 1/2 the amount for punchier flavour) |
Vanilla Extract vs. Vanilla Bean Paste: Elevating the Aroma
Go for the real deal. Always use pure vanilla extract, or better yet, vanilla bean paste. The specks from the paste are gorgeous, and the flavour profile of your homemade Sugar Cookies will be exponentially richer and better than if you use cheap imitation vanilla.
Since there are so few ingredients, the quality of the vanilla shines through.
Sourcing Quality Dairy: The Importance of High Fat Butter
Butter is the primary flavour driver in any good shortbread or sugar cookie. I always recommend using unsalted, high-quality butter. The higher the fat content, the richer and more tender your Sugar Cookies will be.
If you’re ever wondering why Grandma’s biscuits tasted so much better, it was probably the butter she used!
Vegan Butter and Egg Substitutes: Adjusting for Tenderness
If you’re attempting a vegan version, use stick form vegan butter, not the soft tub kind. The water content is lower in the stick, which is far better for baking structure. For eggs, I find the texture changes quite a bit, but a flax egg works in smaller batches, though you might lose some of the subtle chewiness these classic Sugar Cookies are known for.
Precision Baking: A step-by-step Guide to the Perfect Batch

Creaming Properly: Incorporating Air Without Overmixing
In the bowl of your stand mixer, beat the cool, cubed butter on medium speed until creamy. Gradually add the sugar and beat for a full 3– 4 minutes until the mixture is visibly lightened, fluffy, and pale yellow. This long creaming process is not optional.
Next, add your cold eggs and vanilla, mixing on low speed only until just combined.
Chef’s Note: Once the wet ingredients are combined, switch the speed to the absolute lowest setting before adding the flour. As soon as you see the last streaks of flour disappear, stop the mixer immediately.
Overmixing activates gluten, leading to tough, chewy cookies (more like a dunking biscuit than a tender cut-out).
Rolling Consistency: Thickness Standards for Even Baking
Remove one chilled dough disc. Lightly flour your work surface and the top of the dough. Roll the dough out to an exact, even thickness of approximately 6mm (1/4 inch). I use those rolling pin guides religiously because uniformity is crucial.
If your Sugar Cookies are of uneven thickness, the thinner ones will definitely burn while the thicker ones are still raw in the middle.
The Ideal Chill Time for Maximum Shape Retention
You must chill the dough disc for a minimum of 60 minutes before rolling. However, here is the professional technique that guarantees zero spread: once you have cut out your shapes and placed them on the parchment lined baking sheets, place the entire tray into the freezer for five to ten minutes.
That blast of cold locks in the shape before the heat of the oven can attack it. This final chill makes the difference between good and phenomenal cut-out Sugar Cookies .
Temperature Control: Oven Placement and Rotation Timing
Preheat your oven to 350°F (180°C). Always bake your cookies on the middle rack for the most even heat distribution. If you are baking multiple trays at once (which I usually am), you must swap them halfway through baking move the top tray to the bottom, the bottom tray to the top, and rotate each 180 degrees.
Bake them for 10– 12 minutes. The edges should just be set, maybe showing a tiny bit of pale gold, but the centers should still look soft. This ensures your Sugar Cookies are tender and not brittle.
From the Test Kitchen: Troubleshooting and Advanced Techniques
Troubleshooting Dough Spread: The Emergency Fixes
Panic is normal when you see your precious shapes melting together! If your first test batch of Sugar Cookies spreads badly, your kitchen or dough was likely too warm.
The immediate, emergency fix is to mix 1 to 2 extra tablespoons of flour into the scrap dough (which you will re-roll) and re-chill everything immediately. It slightly compromises the texture, making them a tiny bit denser, but it will absolutely save the batch.
The Secret to Silky Royal Icing Adhesion
This is simple but essential: Your Sugar Cookies must be stone cold before any icing is applied. If there is even a tiny bit of residual warmth left inside, the icing will start to melt, bleed its colour, or become strangely grainy and dull. Plan to bake one day and decorate the next.
Achieving Uniform Colouration (Avoiding Brown Edges)
We want beautiful, uniform pale Sugar Cookies that hold a gentle colour. If the edges are browning too fast, your oven is probably running hot, or perhaps your cookies were rolled too thin. Try reducing your oven temperature by 25 degrees and baking for a minute or two longer next time.
Remember, the colour develops more after they come out of the oven.
Extending the Shelf Life: Storage Solutions for Dough and Baked Biscuits
Freezing Cut Dough vs. Freezing Baked Biscuits
I overwhelmingly prefer freezing the cut dough. It’s so convenient to have "ready-to-bake" Sugar Cookies on hand! Cut the shapes, place them snugly on a parchment lined tray, freeze until absolutely solid (about 30 minutes), and then transfer the solid shapes to a labelled zip-top freezer bag.
When the craving hits, bake them directly from frozen, adding just 2 minutes to your usual bake time.
Maintaining Freshness: Air-Tight Containers and Humidity Control
Once baked and completely decorated, store your Sugar Cookies in an airtight container at room temperature. Layer them carefully between sheets of parchment paper if stacking.
If you’ve used royal icing, remember that humidity is the enemy; it can cause that beautiful glossy icing to become sticky or dull, so keep them away from steam and open windows.
Thawing and Re-Baking Instructions
If you froze a batch of baked Sugar Cookies , they should be thawed slowly in the fridge overnight. Then, bring them up to room temperature before serving or decorating.
If they seem to taste a little stale or have lost their initial snap after being frozen and thawed, pop them onto a baking sheet and put them into a 300°F (150°C) oven for three minutes. This low heat treatment helps "re-crisp" them beautifully.
Presentation and Pairing: Elevating the Finished Cookie
You've successfully baked the perfect non-spreading, buttery Sugar Cookies . Now what?
Beyond the standard dusting of confectioners’ sugar, you can really make these shine. A simple milk glaze (just icing sugar whisked with a tiny bit of milk) gives a wonderful, quick shine, perfect for a casual snack. For detailed work, classic royal icing is required for those sharp lines, allowing you to create beautiful, memorable decorative Sugar Cookies . If you are looking for a chewier, more caramel forward profile, you might prefer trying my Rolo Cookies: The Ultimate Gooey Salted Caramel Chewy Cookie instead.
This recipe has been my reliable constant for years, simplifying what many find to be a stressful decorating process. Once you master the technique for these amazing Sugar Cookies , you’ll realize how reliable they are, delivering perfect texture and flavour every single time.
Now go grab your prettiest sprinkles and cutters and have fun!

Recipe FAQs
Why did my cut-out sugar cookies lose their shape and spread while baking?
The primary culprit is usually insufficient chilling time or butter that was too soft upon mixing. Ensure your measured flour is accurately scooped and the dough is thoroughly chilled at least 60 minutes before cutting and placing immediately into a preheated oven.
You can also try chilling the cut-out shapes again briefly before baking for maximum definition.
Can I prepare the sugar cookie dough ahead of time, and how should I store it?
Absolutely, this dough freezes beautifully. Wrap the disc tightly in plastic film and refrigerate it for up to three days, allowing it to soften slightly at room temperature before rolling.
For longer storage, freeze the wrapped dough in a resealable bag for up to three months; thaw overnight in the refrigerator before using.
My baked cookies turned out dry and crumbly. What went wrong?
This is often a result of incorporating too much flour or overmixing the dough once the flour has been added. Overmixing develops the gluten, resulting in a tougher, less tender biscuit. Measure your flour using the spoon and-level method, and mix only until the dough comes together and no streaks of dry flour remain.
How do I know when the sugar cookies are perfectly baked for decorating?
Perfectly baked sugar cookies should still appear quite pale in the center, but the very edges will have just started turning a light golden brown. Overbaking leads to crisp, brittle cookies that are difficult to decorate.
Remove them from the oven immediately once the edges are set and allow them to cool completely on the baking sheet for five minutes before moving them to a wire rack.
Can I easily adapt this recipe to be gluten-free?
Yes, you can substitute the all-purpose flour with a high-quality 1:1 gluten-free baking blend that includes xanthan gum. You might need to slightly reduce the liquid content or increase the chilling time, as GF flours tend to absorb fat and moisture differently.
Always ensure your chosen blend is formulated specifically for cut-out cookies to maintain the structural integrity.
How can I elevate the flavor profile beyond basic vanilla?
To deepen the complexity, consider swapping half the vanilla extract for pure almond extract, or adding the zest of one lemon or orange to the butter and sugar mixture. For holiday baking, incorporating a teaspoon of freshly grated nutmeg or ground cardamom yields a beautifully warm and sophisticated spiced cookie.
Always use high-quality extracts for the best flavour contribution.
What is the best way to store baked, decorated sugar cookies?
Once the royal icing or glaze is completely hardened which may take 8 to 12 hours depending on humidity store the cookies in an airtight container at room temperature. If stacking, place parchment paper between the layers to prevent condensation damage or sticking.
Decorated cookies generally stay fresh for about one week.
Classic Cut Out Sugar Cookies
Ingredients:
Instructions:
Nutrition Facts:
| Calories | 100 kcal |
|---|---|
| Protein | 1.0 g |
| Fat | 4.5 g |
| Carbs | 14.0 g |
