Mccormick Chili Recipe: Classic Comfort Style
- The Core of Comfort: Mastering the Classic McCormick Chili Flavor
- Flavor Foundation: The Science Behind This Robust Chili
- What You'll Need: Key Ingredients and Intelligent Swaps
- The Method: Step-by-Step Guide to Perfect Chili
- Expert Insights: Tips, Tricks, and Troubleshooting
- Meal Prep Ready: Storing and Freezing Your Chili
- Perfect Pairings: How to Serve and Garnish Your Chili
- Recipe FAQs
- 📝 Recipe Card
The Core of Comfort: Mastering the Classic McCormick Chili Flavor
That smell, right? The moment the chili powder and cumin hit the heat, you instantly know you’re about to achieve peak comfort food. This specific McCormick Chili Recipe delivers that perfect, nostalgic deep aroma every single time, making your kitchen feel instantly cozy.
It’s brilliant.
I’m serious, this approach to making chili is my absolute weeknight hero. It’s quick to prep, cheap to execute, and feeds a crowd without any drama, demanding only a bit of patience for the simmering part. It’s the perfect, warm antidote to a long, freezing day.
We aren't actually relying on a store-bought packet today, but we are absolutely channeling that iconic, balanced flavor profile that the classic McCormick blend perfected. Trust me, learning the layering technique is the difference between a good chili and the best chili you've ever made. Let's crack on.
Flavor Foundation: The Science Behind This Robust Chili
When I first started cooking, I just threw everything into the pot and hoped for the best; it usually tasted thin and sad. But the secret to a robust, layered McCormick Chili Recipe is treating your ingredients with respect before they meet the stock.
This recipe works because we force the flavor compounds to wake up before introducing liquid.
The Authenticity of the McCormick Spice Profile
What makes that specific packet blend so famous? It’s the perfect ratio of dried spices. We are looking for warmth and complexity, not just pure heat. That balance comes from pairing robust chili powder with earthy cumin, and crucially, adding a hint of dried oregano.
You need all three singing together to get that authentic, classic chili depth.
Why Ground Beef is the Traditional Choice for This Recipe
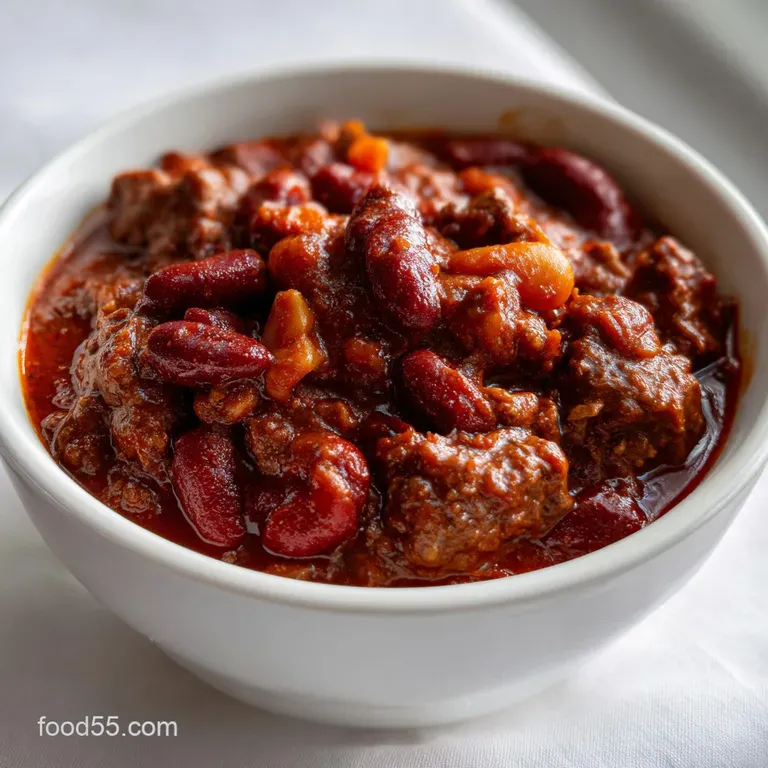
We use ground beef, specifically a slightly fattier blend like 85/15, because it provides flavor and texture that cubes just can’t replicate in this time frame. The fat renders out, carrying the spice flavors, and the smaller pieces distribute evenly throughout the thick sauce.
We’re aiming for a saucy, scoopable texture here, the kind that clings perfectly to your spoon.
Achieving Deep Flavor in Under Two Hours
While many recipes demand a five hour simmer, this McCormick Chili Recipe achieves deep flavor quickly by using strong techniques upfront. The initial 15 minutes of cooking are the most critical.
If you nail the browning and the spice blooming, the rest is just letting the pot do the work.
Maillard Reaction: Browning the Beef Correctly
Don't crowd your pan when browning the ground beef. If you do, the meat steams instead of searing, and you lose those crucial browned, caramelized edges that provide savory depth. The Maillard reaction creates hundreds of new flavor compounds, so take your time and brown the meat aggressively before you drain the fat.
Layering Aromatics: Building the Flavor Base
The best chili always starts with the holy trinity of onions, bell peppers, and garlic. Sautéing them first in oil until they are soft and translucent releases their sweet, savory oils into the pot. Wait until you smell the sweet scent of the softening onions; that’s your cue the base is ready.
The Importance of the Simmer Time for Maximum Depth
Once all the liquids are added, resist the urge to crank the heat. A hard boil evaporates liquid too quickly and can scorch the bottom. A low, slow simmer allows the starches in the beans and the fiber in the meat to soften, while the flavors slowly marry.
If you’re making this in the morning, remember that the longer the simmer, the more integrated your McCormick Chili Recipe will be.
Chef's Note: If you want a hands off approach, you can easily adapt this entire McCormick Chili Recipe Slow Cooker style. Follow the browning steps (don't skip them!), then transfer everything to the slow cooker and cook on low for 6– 8 hours.
What You'll Need: Key Ingredients and Intelligent Swaps
When stocking your pantry for this, remember quality matters, especially with dried spices. Cheap chili powder often tastes dusty, but a fresh, dark chili powder is the soul of this specific chili.
If you're using a pre-made Chili Recipe With Chili Packet , just use 1.5 times the amount of meat suggested on the package to match this recipe's bulk.
The Essential Pantry List
| Ingredient Focus | Essential Item | Intelligent Swap/Substitution |
|---|---|---|
| Aromatics | Yellow Onion | White onion or shallots (for a sweeter flavor). |
| Protein | Lean Ground Beef (85/15) | Ground turkey (add 1 extra tbsp oil) or a 50/50 mix of ground pork and beef. |
| Spices | Dark Chili Powder | Combination of paprika, ancho powder, and a dash of cayenne. |
| Liquids | Beef Stock (low sodium) | Chicken stock works perfectly well, or even water plus 1 tbsp beef bouillon paste. |
| Acidity Balance | Tomato Paste | Ketchup concentrate, but use half the amount due to higher sugar content. |
| Bulk | Kidney Beans | Pinto beans or black beans; always rinse them well! |
Selecting the Right Type of Beans
Canned beans are our friend here; they are already perfectly cooked, which saves hours. The key is rinsing them thoroughly. That thick liquid they sit in? It's starchy, cloudy, and if you add it directly, it mutes the lovely, clear flavor of the spiced broth.
If you prefer to skip the beans, this makes a wonderful Texas style chili!
The Role of Liquids: Broth vs. Water
Always use stock over water, please! Water dilutes the flavor, while low-sodium beef stock enhances the savory depth without adding undue saltiness. I sometimes substitute one cup of the stock for a dark stout or black coffee.
This gives the McCormick Chili Recipe an incredible, complex darkness that balances the sweetness of the tomatoes.
Adjusting Heat: Chili Powder Ratios and Pepper Varieties
If you want more kick, don't just add more generic chili powder that will muddy the flavor. Instead, add a pinch of cayenne pepper or a finely minced jalapeño during the aromatic stage. This keeps the core McCormick flavor profile intact while boosting the heat beautifully.
The Method: step-by-step Guide to Perfect Chili

This is the exact method I use every time. Follow these steps precisely, and you will not mess it up.
Step 1: Building the Base and Blooming the Spices
Heat your Dutch oven over medium heat and add the oil. Sauté the diced onion and bell pepper until they are soft and translucent, about seven minutes. Once they smell sweet, add the garlic and cook for sixty seconds until pungent.
Now, increase the heat slightly and add the ground beef, breaking it up completely. Cook until it's deeply browned, then drain off all the excess grease. My early attempts at this Easy Chili Recipe With Chili Packet upgrade were disastrously greasy because I skipped this step!
Step 2: Combining Liquids and Bringing to a Boil
Reduce the heat back to medium low. This is the moment for maximum flavor: Sprinkle the tomato paste and all the combined dry spices (chili powder, cumin, oregano, paprika, salt, pepper) over the meat. Stir constantly for two to three minutes.
You should hear a slight sizzle and the kitchen must smell intensely spicy and wonderful that’s the spices blooming in the fat. Add the crushed and diced tomatoes, beef stock, and brown sugar, stirring well to scrape up any browned bits (fond) from the pot bottom.
Step 3: Low and Slow Simmering for Flavor Infusion
Bring the chili just to a gentle boil, then immediately turn the heat down as low as possible. The surface should only bubble occasionally, like a thick soup sighing contentedly. Cover the pot loosely and let it simmer for forty five to sixty minutes. Stir every fifteen minutes or so to prevent sticking.
If the chili looks too thick, add a splash more stock. During the last fifteen minutes, stir in the rinsed kidney beans.
Step 4: Final Seasoning Adjustments and Taste Testing
Remove the chili from the heat and let it rest, covered, for ten to fifteen minutes. The resting time allows the starches to redistribute and the sauce to thicken beautifully. Now, give it a serious taste test. Does it need more salt? A pinch of sugar to cut the acid?
A dash of vinegar or lime juice brightens the whole pot. This simple step finalizes your amazing McCormick Chili Recipe .
Expert Insights: Tips, Tricks, and Troubleshooting
Cooking chili should be fun, but a few pitfalls can ruin an otherwise perfect batch. I learned these the hard way, so you don't have to.
How to Fix Overly Thin or Thick Chili
If your chili is too thin, simply uncover the pot, increase the heat slightly, and let it simmer rapidly for ten minutes to evaporate some liquid. If it’s too thick, add half a cup of warm water or stock until you reach the perfect consistency.
Do not add cold liquid, as it stalls the cooking process.
Avoiding Greasiness in Your Batch
This is the big one. Always drain the fat after browning the ground meat! If you forget, your final chili will have an oily sheen on top. If this happens, don't panic. Turn off the heat and let it cool completely in the fridge. The fat will solidify on the surface, making it incredibly easy to scrape right off.
The Secret Ingredient for Extra Umami
Want to know my favorite sneaky trick for deep flavor, especially in a McCormick Chili Recipe ? Add one teaspoon of Marmite, Vegemite, or soy sauce along with the tomato paste and spices. It introduces a powerful punch of savory umami that elevates the chili without anyone knowing your secret.
It’s a total game changer.
Meal Prep Ready: Storing and Freezing Your Chili
Chili is a stellar make-ahead meal, which is why it often shows up in those "Fall And Winter Crockpot Meals" roundups. The flavor intensifies overnight, making Day Two even better.
Best Practices for Freezing the McCormick Chili Recipe
Chili freezes beautifully! Cool the chili completely first this is essential for food safety and flavor retention. Portion it out into freezer safe containers or heavy duty Ziploc bags (lay flat for efficient stacking). It will keep perfectly for three to four months.
When you’re ready to reheat, thaw it overnight in the fridge and warm slowly on the stovetop. This approach makes for the Best Crock Pot Chilli Recipes on busy days.
Refrigerator Shelf Life and Reheating Safely
Stored properly in an airtight container, your leftover McCormick Chili Recipe will stay fresh for four to five days in the refrigerator. To reheat, the stovetop is always best: use low heat, stirring occasionally until warmed through, adding a splash of stock or water if it’s too thick.
Microwave reheating works, but the texture can sometimes suffer slightly.
Perfect Pairings: How to Serve and Garnish Your Chili
A bowl of hearty chili needs contrast something cool, something creamy, and something crunchy. Don't let your perfect Good Homemade Chili Recipes effort go to waste by serving it naked!
Essential Toppings for Texture and Contrast
- Creamy: A dollop of full fat sour cream or Greek yogurt cuts through the richness and heat.
- Sharp: Shredded mature cheddar cheese is non-negotiable, in my opinion, but Monterey Jack melts beautifully too.
- Freshness: Finely chopped red onion or fresh coriander (cilantro) brightens everything up.
- Crunch: Crushed tortilla chips, crispy fried onions, or even a side of warm cornbread (it's perfect for scooping!).
If you are serving this for a gathering, it pairs wonderfully with a simple side dish. We often serve it alongside something fresh like a [Summer Potluck Recipes: Travel Ready Orzo Salad with Halloumi] to provide a cool contrast. And if you need a truly comforting finish?
You absolutely cannot go wrong with [Gooey Butter Cookies: Easy St. Louis Cake Mix Recipe] for dessert. They are pure indulgence after this savory bowl. This McCormick Chili Recipe is truly a winner, every time.

Recipe FAQs
Why is my chili too runny, and how can I thicken it?
If your chili is too thin, the easiest solution is to simply remove the lid during the last 30 minutes of simmering to allow excess liquid to evaporate. Alternatively, you can create a simple slurry by mixing 1-2 tablespoons of cornstarch with an equal amount of cold water, stirring this mixture into the chili during the final 15 minutes of cooking.
How can I adjust the heat level of this classic McCormick chili?
To increase the warmth, add a pinch of cayenne pepper or a small amount of diced jalapeño (seeds removed) during the initial sautéing phase. If the chili becomes too spicy, you can temper the heat by stirring in a dollop of sour cream or a spoonful of brown sugar, which helps balance the capsaicin.
Can I substitute the ground beef with a different type of meat?
Absolutely; ground beef can be easily replaced with ground turkey, ground chicken, or a robust mixture of diced stew meat and ground pork. When using leaner options like turkey, ensure you add a tablespoon of cooking oil or bacon grease to the pot to prevent the final product from tasting dry.
How do I build a deeper, richer flavor profile using the McCormick seasoning blend?
To deepen the complexity, ensure you properly bloom the spices (the McCormick chili powder blend) by toasting them with the onions and beef for about one minute before adding the liquid.
For an additional layer of richness, stir in one teaspoon of unsweetened cocoa powder or a splash of Worcestershire sauce just before the main simmering begins.
Should I rinse canned beans before adding them to the chili?
Yes, rinsing the canned beans is highly recommended, especially kidney beans, as the liquid they are packed in contains excess sodium and starch. Giving them a quick rinse in a colander under cold water ensures the final chili is clean in flavor and not overly gummy or cloudy.
How long can I store leftover chili, and is it suitable for freezing?
Properly stored chili will last safely in an airtight container in the refrigerator for 3 to 4 days, with the flavor often improving overnight. Chili freezes exceptionally well; transfer the cooled chili to freezer safe bags or containers, leaving about an inch of headspace, and it will maintain quality for up to 6 months.
Can this classic recipe be adapted for a vegetarian or vegan diet?
Yes, this recipe adapts easily to plant based diets by substituting the beef with a quality meat substitute or simply increasing the variety of beans used. Use a combination of three different canned beans (pinto, black bean, kidney) and add diced vegetables like bell peppers, zucchini, and mushrooms for hearty bulk.
Classic Mccormick Chili Recipe

Ingredients:
Instructions:
Nutrition Facts:
| Calories | 1289 kcal |
|---|---|
| Protein | 103.3 g |
| Fat | 79.6 g |
| Carbs | 39.6 g |
