Pumpkin Fudge: No-Fuss British Spice Recipe
- Capturing Autumn: An Overview of the No-Fuss Fudge
- The Science of the Set: Why This Method Guarantees Creamy Fudge
- Gathering Your Spices and Sugars: Essential Components for Pumpkin Fudge
- The Great British Method: Step-by-Step Fudge Making
- Achieving Perfection: Troubleshooting and Expert Secrets
- Keeping Your Autumn Treat Fresh: Storage Guidelines
- Proper Pairings: How to Serve Your Homemade Sweet
- Recipe FAQs
- 📝 Recipe Card
Capturing Autumn: An Overview of the No-Fuss Fudge
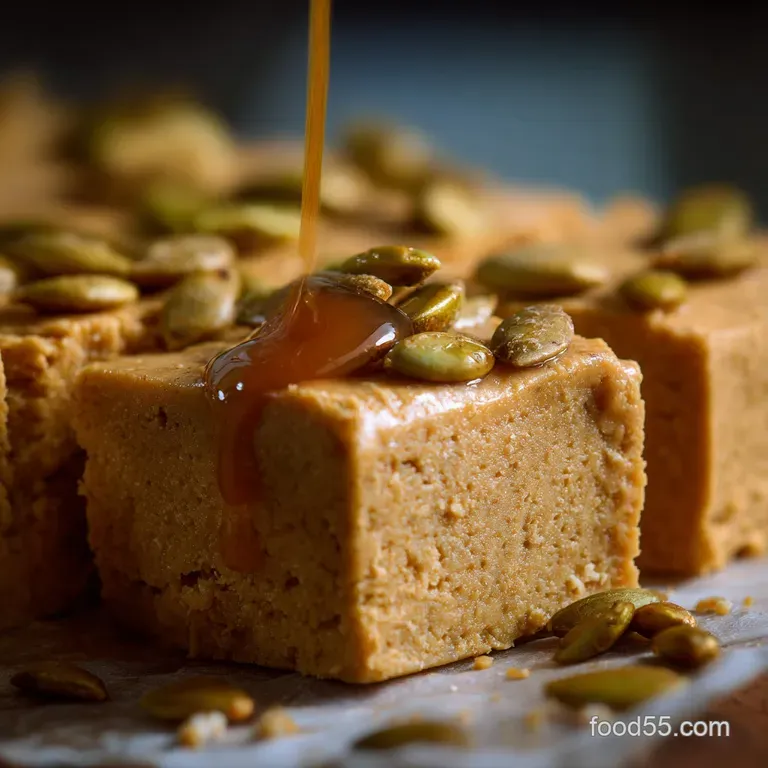
Can you smell that? It’s the deep, comforting aroma of spiced pumpkin, rich butter, and caramelized sugar, all wrapped up in one dense square. This [Pumpkin Fudge Recipe] doesn't just taste like fall; it is fall, crystallized into a perfect, creamy bite.
Forget the dry, crumbly versions you might have tried before. This homemade Pumpkin Fudge is velvety smooth, deeply spiced, and utterly decadent.
I know what you're thinking: Fudge is scary. It requires candy thermometers and patience that most of us don't have, especially after a long day. But trust me, this recipe is a total lifesaver. It’s cheap, incredibly fast once you get the boiling down, and uses pantry staples you likely already have stashed away.
It's the perfect thing to whip up when you realize you forgot to make a dessert for that autumn potluck, or maybe you just need a small, luxurious treat after tackling that complex loaf of [Moist Chocolate Chip Pumpkin Bread: The Ultra Moist Loaf Recipe].
This isn't your grandma's terrifyingly complicated fudge method. We are leaning heavily on a clever trick involving evaporated milk and marshmallow crème to stabilize the sugars and practically guarantee a silky set. Ready to skip the fuss and embrace the easiest [Pumpkin Spice Fudge] you will ever make?
Let’s crack on.
The Science of the Set: Why This Method Guarantees Creamy Fudge
The key to great fudge is controlling crystallization. We want tiny, uniform sugar crystals, which create that luxurious, smooth mouthfeel. This method works because we completely dissolve the sugar before boiling, hit a precise temperature using a thermometer, and then introduce a secret weapon: marshmallow crème.
The stabilizers in the crème prevent the sugar from forming large, grainy chunks during the vital cooling and beating stage.
The Appeal of the British Pumpkin Spice Blend
While Americans often lean heavily on just cinnamon and nutmeg, the British blend often includes strong elements of ginger and sometimes allspice. Why? It adds necessary warmth and sharpness that cuts through the extreme sweetness of the fudge.
This balance ensures the pumpkin flavor isn't just sweet; it's robust and comforting.
Why Ditch the Candy Thermometer?
Ah, the trick question! You absolutely cannot ditch the thermometer in this recipe, despite the "no-fuss" title. I once thought I was a pro and tried to judge the soft ball stage by dropping the boiling syrup into cold water. Disaster.
The mixture either turned into hard caramel or a sticky slop that never set. The fuss we ditch is the complex beating and cooling routines, but hitting 234°F (112° C) is mandatory for a safe, reliable set.
Preparation Time and Yield
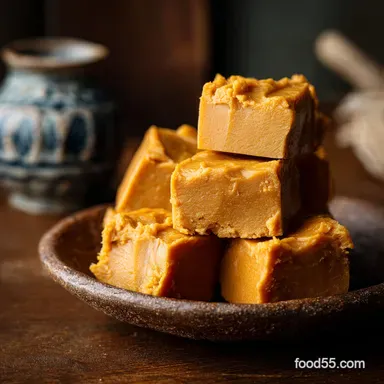
This is a fast process once the ingredients are measured out. You only need about 15 minutes of active stirring and pan lining, with a quick 10 12 minute cook time. The worst part is the waiting! This recipe yields about 36 satisfying 1 inch squares, making it perfect for sharing.
The Role of Marshmallow Crème in Texture
This sticky, fluffy ingredient is a powerhouse. It acts as an emulsifier and crystallization inhibitor. When you add it right after boiling, it incorporates air and moisture while preventing the sugar from immediately seizing and forming those large, grainy crystals.
It’s the secret shortcut to smooth fudge texture.
Understanding the Crucial First Boil
The initial boil must be a "rolling boil" meaning it continues boiling even if you try to stir it down. Before you hit this stage, stir constantly to dissolve every last sugar grain. If you skip dissolving the sugar here, your fudge will be grainy later.
Achieving a Velvety Finish Without Crystallization
Once the temperature hits 234°F, remove it from the heat immediately. You add your flavorings and the marshmallow crème, and then you beat it. Beating changes the structure, encouraging micro crystals to form. Beat until the mixture loses its glossy sheen and starts to look matte. That's the signal!
It’s ready to pour into the pan for that velvety finish.
Gathering Your Spices and Sugars: Essential Components for Pumpkin Fudge
This recipe relies on very precise measurements, especially for the dairy, so don’t try to eyeball it. Grab your scales and measuring cups!
Choosing the Right Pumpkin Puree (Not Pie Filling!)
This is my biggest warning: Do not use pumpkin pie filling. It has added sugars and stabilizers that will completely mess up the fudge chemistry. You need 100% pure canned pumpkin purée.
It provides the essential flavor and moisture without compromising the sugar-to-liquid ratio we need for setting. If you’re ever making a dessert like [Creamy Pumpkin Pie: The Silky, Spiced Best Pumpkin Pie Recipe], you know the difference in texture and sugar level is massive!
Optimizing Your Spice Ratio for Warmth
We use 1.5 teaspoons of pumpkin pie spice blend. If you like a serious punch, add a tiny pinch (1/8 tsp) of ground black pepper or cayenne. It sounds weird, but the heat enhances the warmth of the cinnamon without making the fudge spicy. Trust me on this.
Swapping Evaporated Milk for Condensed Milk (The Set Difference)
This recipe uses evaporated milk (unsweetened) combined with granulated sugar. Why? Because condensed milk (sweetened) often contains stabilizers that can make the fudge too hard or chewy. If you absolutely must substitute:
| Ingredient Used | Viable Substitute | Effect of Substitution |
|---|---|---|
| Evaporated Milk | Heavy Cream (Double Cream) | Richer flavor, may need 2-3°F higher final temp. |
| Granulated Sugar | Cane Sugar | No change needed. |
| Marshmallow Crème | Miniature Marshmallows | Needs longer whisking to fully dissolve/incorporate. |
Chef's Note: I once accidentally grabbed reduced fat evaporated milk. The fudge was soft and sticky, barely setting. Use full fat dairy —the fat content aids in the smooth crystallization process.
The Great British Method: step-by-step Fudge Making

These steps must be followed precisely. Speed matters once the mixture is cooked!
Preparing the Pan for Easy Release
Lining your 8x8 inch pan with parchment paper is non-negotiable. Make sure you leave a healthy overhang on two sides; these will act as handles later. Give the paper a quick spritz of non-stick spray or a wipe of butter. It stops any sticky overflow from clinging to the sides.
The Initial Simmer: Combining Sugars and Milk
- Combine the sugar, evaporated milk, cubed butter, and salt in your heavy bottomed saucepan.
- Heat over medium low heat, stirring constantly until the sugar is totally dissolved and the mixture is smooth, maybe 5 minutes. You shouldn't feel grit when stirring.
- Increase the heat to medium high. Once it reaches a rolling boil, clip the thermometer on. Stop stirring now!
Combining the Mixture: The Speed Factor
- Let the mixture boil undisturbed until it hits 234°F (112° C) . This is the soft ball stage.
- Remove the pan from the heat immediately.
- Add the marshmallow crème, pumpkin purée, spices, and vanilla. Don't stir yet! You want the residual heat to start melting the crème.
- Now, get ready to beat. Using an electric mixer (or just a massive arm workout with a spatula), beat vigorously for 2– 3 minutes. The mixture will transition from glossy and sticky to matte and much thicker.
Setting the Fudge Successfully (Patience is Key)
- As soon as it thickens and dulls, pour the fudge quickly into the prepared pan. Do not vigorously scrape the sides of the pot; often, tiny crystals live there, and dragging them into the smooth mixture can ruin the texture.
- Let it sit at room temperature for an hour, allowing a crust to form slightly.
- Transfer it to the fridge for at least 2 hours, or until completely firm. Once firm, lift it out using the parchment handles and slice into perfect squares.
Achieving Perfection: Troubleshooting and Expert Secrets
How to Prevent Grainy Texture in Your Fudge
Grainy fudge happens when sugar crystals start growing too large and too fast. The fix is always preventative! The biggest culprit is sugar crystals clinging to the saucepan sides. Use a damp pastry brush before the mixture boils to wash those stray granules down into the liquid.
Also, never stir the syrup after it hits the boil and before it hits 234°F.
Fixing Fudge That Won't Fully Set
If your fudge is sticky, gooey, or won't hold its shape even after chilling overnight, it means you didn't reach the target temperature. You stopped stirring too late, or your thermometer was inaccurate. The only true fix is re-cooking.
Scrape the mixture back into the saucepan, add a splash of fresh evaporated milk (maybe 1/4 cup), reheat gently until dissolved, and then cook it again, diligently watching for that 234°F mark.
Essential Tips for Melting the Chocolate Chips
Wait, we didn't use chocolate chips in the main recipe! If you're doing a variation and adding chips (perhaps for a white chocolate drizzle or mixed-in dark chocolate), make sure you stir them in after the beating stage is complete and the temperature has dropped slightly.
Adding them too early can cause scorching or mess with the final setting temperature.
Keeping Your Autumn Treat Fresh: Storage Guidelines
Optimal Short Term Storage (Room Temp vs. Fridge)
Fudge is highly concentrated sugar, meaning it keeps well. For the creamiest texture, store it at cool room temperature in an airtight container for up to 7 days. If your kitchen is warm (above 72°F), or if you want it to last longer, store it in the fridge.
Fridge fudge can last up to 3 weeks, though it might harden slightly. Let refrigerated pieces sit out for 15 minutes before serving for optimal texture.
A Guide to Freezing Fudge Blocks
But does it freeze well? You bet. [Easy Pumpkin Fudge] is actually brilliant for meal prepping dessert. Cut the block into smaller, manageable chunks (maybe 10 12 pieces each) and wrap them tightly in plastic wrap, then seal them inside a freezer safe bag. It will last beautifully for 2 3 months.
This is way faster than freezing a whole [No Bake Pumpkin Cheesecake: Quick Chill Creamy Fall Classic], honestly.
Thawing and Reviving Hardened Pieces
To thaw, simply move the wrapped fudge from the freezer to the counter and let it defrost overnight. Do not microwave it! If your refrigerated fudge is too hard, place the individual pieces in a microwave safe dish and zap them for just 5 10 seconds.
This softens the butter and brings back that lovely, chewable texture without melting the whole thing.
Proper Pairings: How to Serve Your Homemade Sweet
This rich, spiced candy pairs best with things that cut through its sweetness.
- Coffee Pairing: Serve alongside a strong espresso or a bold black coffee. The bitterness is a perfect foil for the heavy sugar content.
- The Ultimate Dessert Board: Cut the fudge into very small squares and arrange it on a fall dessert platter with tart berries, roasted nuts, and maybe a few pieces of our [Thanksgiving Desserts NonPie: Bourbon Sticky Toffee Pumpkin Pudding] for maximum autumn flair.
- Warming Cider: A small piece of this fudge alongside a mug of hot, non-alcoholic spiced cider makes the perfect fireside treat.

Recipe FAQs
Why didn't my fudge set properly, even after refrigeration?
Failure to set is often due to insufficient boiling time or temperature. Ensure you achieve a full, rolling boil for the entire 5 minutes specified in the recipe, as this evaporates enough moisture for the mixture to thicken correctly.
Extreme humidity can also hinder setting, so consider reducing the liquid slightly on very rainy days.
My fudge tastes grainy or sugary. What went wrong?
Graininess occurs when sugar crystals reform before the cooling process is complete. Before boiling, meticulously wipe down the sides of the pan with a wet pastry brush to dissolve any stray sugar crystals.
Crucially, do not stir the mixture once the boil begins until you are ready to add the marshmallow crème and flavoring.
How long will this pumpkin fudge keep, and how should I store it?
Pumpkin fudge stores wonderfully in an airtight container at room temperature for up to two weeks, assuming you keep it away from direct heat or sunlight. For a very firm texture, you may refrigerate it; however, ensure it is tightly wrapped to prevent the fudge from drying out or absorbing refrigerator odors.
Can I use fresh pumpkin puree instead of canned?
Yes, but you must first ensure it is properly drained. Canned pumpkin puree is typically much thicker than fresh homemade puree, which contains excess moisture that will prevent the fudge from setting.
Press the fresh puree firmly between layers of cheesecloth or paper towels to extract as much liquid as possible before measuring.
I am dairy-free. Can I substitute the evaporated milk?
The best dairy-free alternative is full fat canned coconut milk, which has a high enough fat content to aid in the setting process. However, be aware that this substitution may impart a subtle coconut flavor to the final product.
Ensure you use a reliable dairy-free marshmallow crème and white chocolate chips as well.
Can I freeze the pumpkin fudge for later use?
Absolutely. Once the fudge has fully set and been cut, wrap individual pieces tightly in plastic wrap, then place them in a freezer safe zip-top bag or container. To thaw, move the fudge to the refrigerator overnight, then allow it to finish reaching room temperature while still wrapped to prevent surface condensation.
Easy No Fuss Pumpkin Fudge
Ingredients:
Instructions:
Nutrition Facts:
| Calories | 110 kcal |
|---|---|
| Fat | 3 g |
| Fiber | 0 g |
