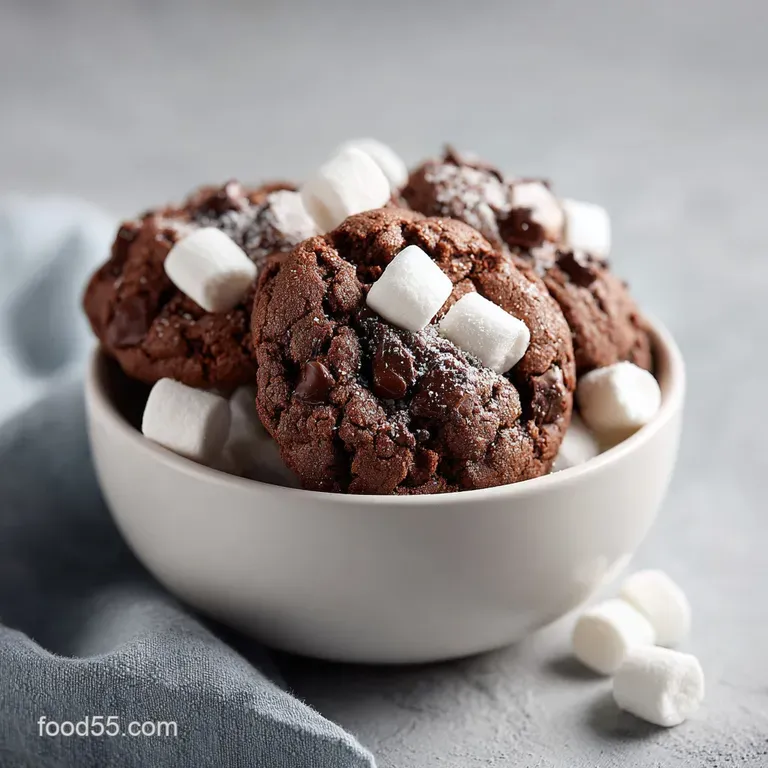
Hot Chocolate Cookies: Fudgy and Gooey
- Time: Active 15 minutes, Passive 10 minutes, Total 25 minutes
- Flavor/Texture Hook: Fudgy, velvety centers with a toasted marshmallow pull
- Perfect for: Holiday cookie swaps or a rainy Sunday afternoon
- Secrets for Ultimate Hot Chocolate Cookies
- Essential Specs for Success
- Selecting the Best Components
- The Right Kitchen Tools
- Perfecting the Preparation Steps
- Troubleshooting Your Baking Flubs
- Creative Flavor and Texture Swaps
- Proper Storage and Waste Tips
- Fun Ideas for Serving
- Recipe FAQs
- 📝 Recipe Card
Secrets for Ultimate Hot Chocolate Cookies
The first time I tried making these, my kitchen smelled like a campfire in the middle of a chocolate factory. There is something about the way Dutch process cocoa interacts with warm, melted butter that creates an aroma so deep and earthy, it almost feels like a physical hug.
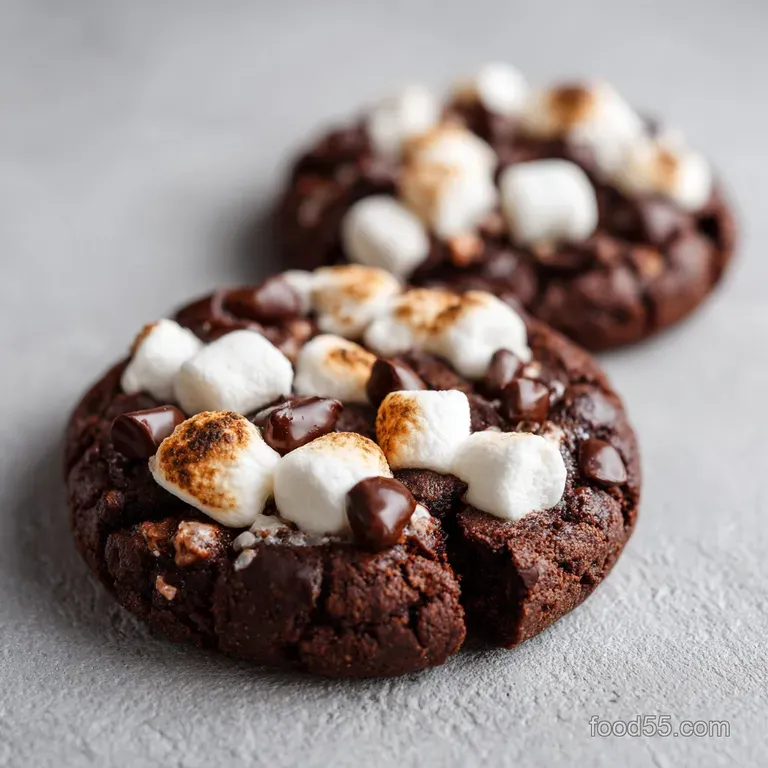
I remember standing by the oven, watching the mini marshmallows puff up and catch the light, turning from stark white to a soft, toasted gold. It was the kind of kitchen moment that makes you forget about the sink full of dishes.
We aren't just making a standard chocolate cookie and tossing some marshmallows on top. This is about capturing the soul of a winter drink in a solid, chewy form. I spent a long time figuring out why some cookies felt dry like old brownies, while others were too greasy.
The trick, I found, is all in the emulsion of the sugars and the eggs. When you beat them together until they look like shiny, wet sand, you're setting the stage for that perfect "shatter" on the outer crust while the inside stays fudgy.
Trust me, your friends are going to lose their minds when they see these. They look like they came out of a high end bakery, but the process is actually incredibly grounded and simple.
We're going to use real chocolate chunks for those molten pools of cocoa, plus a little hit of actual hot cocoa mix to give it that nostalgic, creamy sweetness we all remember from childhood. It's a total crowd pleaser that brings people together the second the tray hits the counter.
Essential Specs for Success
Cocoa Blooming: Mixing the cocoa powder directly into the hot melted butter dissolves the solids and releases aromatic compounds that remain trapped in dry powder. This ensures the chocolate flavor is integrated into every fat molecule of the cookie.
Glossy Emulsion: Beating the sugars and eggs vigorously for a full minute creates a stable structure. This process partially dissolves the sugar crystals, which leads to that coveted shiny, crackly top and a dense, chewy interior.
Marshmallow Timing: Adding the marshmallows during the last two minutes of baking prevents them from completely liquefying. This technique allows them to soften and stick to the dough while maintaining their distinct, cloud like shape.
| Method | Time | Texture | Best For |
|---|---|---|---|
| Standard Bake | 10 minutes | Soft & Fudgy | Every day snacking |
| Chilled Dough | 12 minutes | Thick & Chewy | Maximum flavor depth |
| Underbaked | 8 minutes | Molten/Gooey | Serving with a spoon |
When you're deciding how to bake these, think about who you're serving. A chilled dough (leaving it in the fridge for an hour) will result in a much thicker cookie because the fat takes longer to melt in the oven.
If you're in a rush, the standard bake still delivers that velvety middle we're after, but you might notice the cookies spread just a tiny bit more.
Selecting the Best Components
The ingredients in this recipe aren't just there for bulk; they each play a specific role in the architecture of the cookie. Using both granulated and light brown sugar is vital. The granulated sugar gives us those crisp edges, while the molasses in the brown sugar keeps the center from drying out.
I've found that using room temperature eggs is a non negotiable step because cold eggs will cause your melted butter to seize up, leading to a lumpy, uneven batter.
| Ingredient | Science Role | Pro Secret |
|---|---|---|
| Melted Butter | Provides moisture and fat | Cool it slightly so it doesn't scramble the eggs |
| Dutch Cocoa | Deep flavor and dark color | Sift it to avoid stubborn "cocoa bombs" in the dough |
| Hot Cocoa Mix | Adds creamy, malted notes | Use the stuff with milk solids for extra richness |
| Dark Choc Chunks | Creates molten pockets | Hand chop a bar for varied, irregular chocolate pools |
If you find yourself running low on Dutch process cocoa, you can technically use natural cocoa, but the cookies will be lighter in color and have a slightly sharper, more acidic bite. For the best results, I always recommend the dark, alkalized stuff. It pairs beautifully with the chocolate walnut cookies I often make during the holidays when I want a bit of a crunch alongside this fudgy texture.
For the Rich Chocolate Dough
- 225g unsalted butter: Melted and slightly cooled. Why this? Melted butter creates a denser, more fudgy texture than creamed butter.
- 150g granulated sugar: For structure and crisp edges.
- 165g light brown sugar: Packed. Why this? Adds moisture and a slight caramel undertone.
- 2 large eggs: Room temperature.
- 10ml pure vanilla extract: For aroma and depth.
- 280g all purpose flour: The structural backbone.
- 45g unsweetened Dutch process cocoa powder: For that deep, dark chocolate base.
- 56g instant hot cocoa mix: Two standard envelopes. Why this? Infuses the dough with that specific "hot chocolate" nostalgic flavor.
- 5g baking soda: To help the cookies rise and spread.
- 3g kosher salt: To balance the intense sweetness.
For the Mix ins and Topping
- 170g semi sweet chocolate chips: For consistent chocolate hits.
- 100g dark chocolate bar: Chopped into large chunks. Why this? Larger chunks create impressive "chocolate puddles" in the finished cookie.
- 75g mini marshmallows: To be added at the very end.
| Original Ingredient | Substitute | Why It Works |
|---|---|---|
| Dutch process Cocoa | Natural Cocoa Powder | More acidic flavor. Note: Cookies will be lighter and slightly tangier. |
| Light Brown Sugar | Dark Brown Sugar | Same moisture. Note: Adds a stronger molasses/toffee flavor. |
| Mini Marshmallows | Large Marshmallows | Cut into quarters. Note: These may melt faster, so watch the oven closely. |
Using high-quality chocolate makes a world of difference here. Since the cocoa powder provides the "base" flavor, the chocolate chunks provide the "peaks." If you use a cheap bar, it might not melt as smoothly, leaving you with waxy bumps instead of velvety swirls.
The Right Kitchen Tools
You don't need a professional laboratory to get these right, but a few specific tools will make your life much easier. I always reach for a heavy bottomed saucepan to melt my butter because it prevents the milk solids from browning too quickly. A sturdy silicone spatula is also your best friend here.
You'll need something with a bit of "give" to fold that thick dough without deflating the air we worked so hard to beat into the eggs.
I highly recommend using a 2 tablespoon cookie scoop. Consistency is key when you're baking 24 cookies. If some are huge and some are tiny, the small ones will turn into bricks while the big ones stay raw. Having them all the same size ensures they finish at the exact same moment. Also, don't skip the parchment paper.
Marshmallows are essentially flavored glue once they melt, and trying to pry a stuck marshmallow off a naked baking sheet is a recipe for heartbreak.
Perfecting the Preparation Steps
- Heat your oven to 350°F (175°C). Line two large baking sheets with parchment paper.
- Melt the butter in a large bowl. While it's still warm, whisk in the 45g of Dutch process cocoa powder until the mixture is dark, glossy, and smells intensely earthy. Note: This blooms the cocoa for better flavor.
- Add the granulated and light brown sugars. Whisk vigorously until no large lumps remain and the mixture looks like wet sand.
- Incorporate the eggs and vanilla. Beat the mixture for a full 60 seconds until the batter is noticeably paler and very glossy. Note: This step is crucial for the crackly top.
- Sift in the dry ingredients. Add the flour, hot cocoa mix, baking soda, and salt. Use a spatula to fold them in until just a few faint streaks of white remain.
- Add the chocolate components. Fold in the 170g of semi sweet chips and the 100g of dark chocolate chunks until they are evenly distributed through the heavy dough.
- Scoop the dough. Use a 2 tablespoon scoop to place rounded balls onto the prepared sheets, leaving 2 inches of space between them.
- Bake the first stage. Slide the sheets into the oven for 8 minutes until the edges are just set but the centers look soft.
- Add the marshmallows. Pull the tray out and quickly press 3 4 mini marshmallows into the top of each cookie.
- Finish the bake. Return to the oven for 1 to 2 minutes until the marshmallows puff up and the kitchen smells like toasted sugar.
- Cool on the sheet. Let them sit for 5 minutes to firm up before moving them to a wire rack.
Troubleshooting Your Baking Flubs
Preventing Excessive Spreading
If your cookies come out looking like thin pancakes, the most likely culprit is the butter temperature. If the butter was too hot when you mixed in the sugars, it can break down the structure of the dough.
Another common issue is over beating the dough after adding the flour, which develops too much gluten and can actually cause the cookies to collapse.
Fixing Disappearing Marshmallows
We've all been there you put the marshmallows on, and they just vanish into a sticky puddle. This usually happens if you add them too early. They only need about 90 seconds of heat to become perfectly gooey. If you're using very fresh, soft marshmallows, they might melt faster than older, slightly stale ones.
| Problem | Root Cause | Solution |
|---|---|---|
| Dry/Crumbly Texture | Too much flour or overbaked | Use the "spoon and level" method for flour; reduce bake time by 1 min |
| Burnt Bottoms | Dark baking sheets or low rack | Use light colored pans and bake on the middle rack only |
| No "Crackle" Top | Eggs weren't beaten enough | Ensure you whisk the eggs and sugar for a full minute until glossy |
One mistake I once made was trying to use "natural" marshmallows from a health food store. They didn't have the same stabilizers as the standard mini ones and they literally evaporated into the dough. Stick to the classic puff style marshmallows for that iconic look.
- ✓ Always use room temperature eggs to keep the emulsion stable.
- ✓ Sift your cocoa powder to ensure there are no bitter lumps.
- ✓ Don't over mix the flour; stop as soon as it's incorporated.
- ✓ Check your oven temperature with a separate thermometer.
- ✓ Let the cookies rest on the hot pan for 5 minutes after baking.
Creative Flavor and Texture Swaps
If you want to change things up, this dough is incredibly versatile. You could swap the dark chocolate chunks for white chocolate to create a "White Hot Chocolate" version. Or, if you're a fan of a little kick, add half a teaspoon of cinnamon and a pinch of cayenne pepper to the dry ingredients for a Mexican Hot Chocolate vibe.
I love doing this when I'm in the mood for something a bit more sophisticated.
For those who enjoy a bit of a salty sweet contrast, a sprinkle of flaky sea salt right after they come out of the oven is a total game changer. If you want a more classic feel, you might even look at my chewy chocolate chip cookies to see how I balance textures there. Sometimes I'll even mix in a handful of crushed candy canes during the holidays for a peppermint hot chocolate twist.
| Goal | Shortcut | Result |
|---|---|---|
| Faster Prep | Use a pre made brownie mix base | Fudgier, but less "cookie like" structure |
| Extra Creamy | Add 1 tbsp of malted milk powder | Adds a "malted shake" depth to the cocoa |
| Chewier Edge | Replace half the butter with shortening | Cookies stay softer for longer but lose some buttery flavor |
When scaling this recipe down, it's pretty easy to halve. Just beat one egg in a small bowl and use exactly half of it by weight (usually about 25-28g). When scaling up for a big party, don't double the salt or baking soda exactly; use about 1.5 times the amount to avoid a metallic aftertaste.
Proper Storage and Waste Tips
Storing these is simple, but there's a trick to keeping the marshmallows from getting weird. Keep them in an airtight container at room temperature for up to 4 days. If you find they're getting a bit firm, pop one in the microwave for exactly 8 seconds.
This will re melt the chocolate chunks and soften the marshmallow back to its original glory.
For long term storage, these freeze beautifully. I recommend freezing the dough balls (without the marshmallows) on a tray, then transferring them to a bag. When the craving hits, bake them from frozen, adding 2 minutes to the initial bake time, then add the marshmallows as usual.
It’s the ultimate "emergency dessert" plan.
Chef's Tip: If you have broken cookie pieces or crumbs at the bottom of the container, don't throw them away! Pulse them in a blender and use them as a crust for a cheesecake or sprinkle them over vanilla bean ice cream.
One common myth is that you need to chill this dough overnight. While it does help the flavors meld, this specific recipe was designed to be "mix and bake." Because we use melted butter and cocoa mix, the hydration happens almost instantly.
Another myth is that the marshmallows will stay white forever; they will naturally brown and "toast" as they sit on the warm cookie, which is exactly what we want.
Fun Ideas for Serving
When it comes to serving these, I like to lean into the theme. A cold glass of milk is the obvious choice, but serving them alongside a steaming mug of actual hot chocolate is a meta experience that I highly recommend. The heat from the drink makes the cookie even softer as you eat it.
If you're feeling fancy, you can even use two of these to make an ice cream sandwich with salted caramel or vanilla bean ice cream.
I once served these at a small get together where I set up a "topping bar." I put out little bowls of extra sea salt, crushed pretzels, and even a bit of caramel sauce. People loved being able to customize their warm cookies.
It's all about that cultural exchange of flavors and bringing people together over something as simple as a tray of treats. Whether it's a shared meal or just a quick snack, these cookies have a way of making the room feel a little bit brighter.
If you're looking for another decadent treat to add to your baking rotation, you might enjoy my Baileys truffles which use similar chocolate principles but in a no bake format. There is just something so satisfying about mastering a recipe that tastes like a childhood memory but feels like a grown up luxury. Enjoy the process, breathe in that cocoa aroma, and don't forget to snag a warm one for yourself before they all disappear!

Recipe FAQs
Can you put hot cocoa mix in cookies?
Yes, it adds a distinct sweetness and texture. Incorporating 56g of hot cocoa mix directly into the dry ingredients provides a milk chocolate depth that standard cocoa powder alone cannot achieve.
How to achieve the perfect glossy emulsion in cookie dough?
Beat the eggs and vanilla into the sugar mixture for one full minute. This vigorous whisking builds a stable emulsion; if you enjoyed this process here, you can see how the same principle works in our classic madeleine recipe to create a smooth, refined batter.
Is it true that I should bake these for 10 minutes straight?
No, this is a common misconception. You must bake for 8 minutes initially, remove the tray to press marshmallows into the tops, then return them for only 1 to 2 additional minutes to ensure the marshmallows toast without burning.
Are these cookies suitable for a diabetic diet?
No, these contain significant amounts of granulated sugar and hot cocoa mix. They are intended as an occasional dessert and do not align with standard diabetic nutritional requirements.
Can someone with a lactose intolerance eat these?
No, they are not dairy-free. This recipe requires 225g of unsalted butter and includes hot cocoa mix, which typically contains milk solids.
How to keep the cookies from spreading too much?
Ensure your melted butter is slightly cooled before mixing. Hot butter melts the sugar prematurely, leading to flat cookies; always verify your butter temperature matches the room temperature eggs to maintain structural integrity.
Is it a requirement to use Dutch process cocoa?
Yes, use only Dutch process for this recipe. Its neutral pH is specifically balanced with the 5g of baking soda used here to ensure the cookies rise correctly and maintain a deep, dark color.
Hot Chocolate Cookies
Ingredients:
Instructions:
Nutrition Facts:
| Calories | 247 calories |
|---|---|
| Protein | 3g |
| Fat | 12.1g |
| Carbs | 33.9g |
| Fiber | 1.8g |
| Sugar | 21.5g |
| Sodium | 113mg |
