Lemon Garlic Butter Chicken Tenders the Speedy Skillet Sensation

- The Weeknight Hero: Flavour in Under 20 Minutes
- Assembling Your Culinary A-Team: The Components
- Prepping and Searing for Maximum Flavour Depth
- Crafting the Signature Lemon Garlic Butter Pan Sauce
- Perfect Pairings and Presentation Tips
- Customizing and Troubleshooting Your Cook
- Recipe FAQs
- 📝 Recipe Card
The Weeknight Hero: Flavour in Under 20 Minutes
We all have those nights. You know the ones. You walk in the door, exhausted, and realize you have maybe 30 minutes before everyone stages a minor revolt because they’re starving. This recipe, these glorious Lemon Garlic Butter Chicken Tenders, they are the absolute antidote to chaos.
It’s quick. It’s elegant. And, honestly, it tastes like you spent way more time on it than you actually did. That’s the home cook's dream, isn't it?
Why Lemon Garlic Butter Chicken Tenders Are Your New Go and To
It’s all about the balance here. The butter provides richness, the garlic delivers that comforting, nutty depth, and the fresh lemon juice cuts through it all perfectly, leaving your palate refreshed and ready for the next bite. This isn't just a basic chicken dish.
It’s a full experience, wrapped up in a Skillet Chicken Recipe that takes less time than ordering delivery. Plus, if you skip the tiny flour dredge (making it a perfect Keto Chicken Tenders dinner), you still get phenomenal flavour because the chicken pan and sears so fast.
For busy families, having a Lean Protein Chicken Meals option that everyone actually enjoys is absolutely gold dust.
The Secret to Ultra and Tender Chicken Every Time
Here’s the big one. If you want truly tender chicken, you have to stop abusing it. First, pat those tenders completely dry before seasoning. Water is the absolute enemy of a good sear. Second, these are thin cuts of meat. They cook in like four minutes total.
I use an instant and read thermometer religiously (165°F / 74°C, no higher) because five seconds of overcooking turns them into sad, dry rubber. Don't crowd the skillet, either. Sear in batches. This is how you guarantee perfect, juicy results for your Pan and Seared Chicken Tenders.
Understanding the Essential Pan and Sauce Technique
The sauce is what truly elevates this simple dinner. It all starts with the "fond." That’s the fancy French word for the browned bits stuck to the bottom of your pan after searing the chicken. Those bits? They are pure, concentrated flavour.
We use the chicken stock to scrape them up (that’s deglazing, by the way), which incorporates them into the liquid. Then, we enrich it with cold butter. This crucial process, called mounting the sauce, is what transforms a thin stock into a beautiful, silky emulsion that clings perfectly to the chicken.
Assembling Your Culinary A-Team: The Components
Selecting the Best Quality Chicken Tenders
Chicken tenders (the tenderloin) are generally already a great starting point because they are naturally tender. But do yourself a huge favour and check them for the silver skin or tough white tendon running down the side. If it’s there, trim it off.
If you cook that little piece of connective tissue, it tightens up and makes your final dish unnecessarily chewy. A quick snip with kitchen shears works wonders, trust me.
Fresh vs. Jarred Garlic: Why the Difference Matters
Look, I know we’re going for speed here, and I use jarred garlic for some things (like huge pots of chili where it’s masked). But for this Lemon Garlic Butter Chicken Recipe, where the garlic is the co and star, you absolutely need fresh cloves.
The processed stuff has a slightly bitter, acrid undertone that really sticks out when it’s not masked by layers of spice. We are sautéing fresh garlic for just 30 to 60 seconds to capture its sweet, nutty fragrance. Jarred garlic will burn and turn bitter in that time.
Spend the 60 seconds mincing the fresh stuff. It makes all the difference.
Must and Have Kitchen Tools for a Seamless Cook
You don't need a huge arsenal, but the right tools make this a completely stress and free operation.
| Tool Name | Why It’s Essential |
|---|---|
| Heavy Skillet | Cast iron or stainless steel holds high heat for a perfect sear. |
| Tongs | For easy flipping without tearing the delicate chicken tenders. |
| Microplane/Zester | Gets the aromatic zest without the bitter white pith. |
Balancing the Holy Trinity: Lemon, Butter, and Herbs
Getting the ratio right for the Lemon Garlic Butter Chicken Tenders is critical. The lemon juice provides the bright acidity, but the zest (the fragrant yellow oil) is where the true punchy aroma lives. Don't skip the zest. I prefer thyme and parsley here.
Thyme is earthy and robust enough to stand up to the garlic, and parsley provides that necessary grassy, fresh finish. Always add the parsley right at the very end so it stays bright green.
Prepping and Searing for Maximum Flavour Depth
The Crucial Initial Seasoning and Searing Process
We use a very light flour dredge here, mostly just to help the seasoning stick, and crucially, to give the chicken a better crust and help slightly thicken the eventual sauce. Pat the chicken, then dredge, then shake off the excess like you’re trying to win a competition.
Heat your oil until it’s shimmering, then add the chicken. If the oil isn’t hot enough, the chicken will soak up the fat, and you’ll get flabby tenders instead of crisp ones.
Achieving the Perfect Golden Crust on the Tenders
Once the chicken hits the hot pan, resist the urge to peek or wiggle it for at least two minutes. It needs that solid contact time to develop the crust. You’ll know it’s ready to flip because it will release easily from the pan. If it’s stuck, it means the crust hasn't fully formed yet.
Give it another 30 seconds! Remember, we are searing the chicken until it’s just cooked through. This guarantees the juiciest Pan and Seared Chicken Tenders results.
Related Recipes Worth Trying
- Restaurant Style Chicken Fried Rice Get the Wok Hei Flavor at Home — Learn how to make authentic Restaurant Style Chicken Fried Rice with that smoky wok hei flavor This Easy Chicken Fried Rice Recipe uses high heat and cold...
- Butternut Lentil Stew Easy Creamy Coconut Squash Soup Recipe — This Butternut Lentil Stew is the perfect onepot comfort meal Its a naturally vegan Butternut Squash Stew with creamy coconut milk and warming Indian spices...
- Cilantro Lime Grilled Chicken The Zesty 30Minute Summer Recipe — Cilantro Lime Grilled Chicken is a guaranteed crowdpleaser for summer grilling This recipe features a vibrant Cilantro Lime Chicken Marinade that keeps...
Crafting the Signature Lemon Garlic Butter Pan Sauce
Deglazing the Pan: Capturing the Flavorful Fond
Remove the perfectly cooked chicken and set it aside. Immediately lower the heat to medium and low. Now, we add the first bit of butter and the minced garlic. Stir quickly (30 to 60 seconds, I mean it!) until you smell that amazing aroma.
If the garlic goes dark or brown, you’ve ruined the batch (and it will taste bitter, so start over). Pour in the chicken stock. The liquid will bubble up violently and loosen those browned bits (the fond). Scrape, scrape, scrape! This liquid is now pure flavour waiting to happen.
Emulsifying the Sauce Properly for a Rich Finish
This is the pro move that turns watery stock into a truly velvety sauce. Take the pan completely off the heat. If it’s too hot, the sauce will split into greasy components. Take your remaining cold, cubed butter and whisk it in, one cube at a time.
Whisking cold fat into hot liquid creates an emulsion it thickens the sauce without needing flour or cornstarch. You'll watch it transform from clear to opaque and wonderfully silky. Finish with the lemon juice and zest. Perfect.
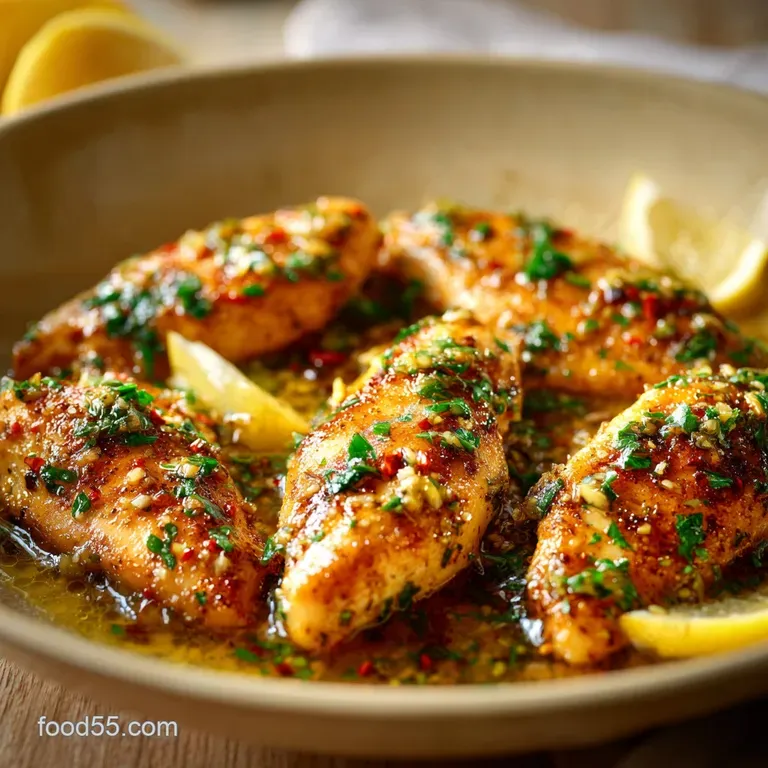
Perfect Pairings and Presentation Tips
What to Serve Alongside Your Pan and Seared Lemon Garlic Butter Chicken Tenders
You absolutely need something absorbent for this. A silky mashed potato is traditional, but I’m a huge fan of serving this over slightly crispy polenta. Or, if you’re keeping it low carb, try zucchini noodles or steamed green beans tossed with a bit of extra lemon zest.
The brightness of the Lemon Garlic Butter sauce demands a fresh green vegetable to go with it.
PRO TIP: When plating, ensure the chicken is nestled together but slightly exposed so you can spoon plenty of the rich Lemon Garlic Butter sauce right over the top. Garnish heavily with fresh parsley for color contrast.
Customizing and Troubleshooting Your Cook
Making This Dish Ahead: Storage and Reheating Best Practices
Okay, real talk: Chicken tenderloin recipes are best eaten immediately. Reheating cooked chicken tends to dry it out, no matter how good the original sauce was. If you must prep ahead, cook the chicken 80% through, then remove it. Make the complete sauce. Store the chicken and sauce separately.
When ready to serve, gently simmer the sauce, add the chicken back in, and finish cooking it gently for the last minute or two in the sauce itself. This keeps it moister than microwaving.
Quick Fixes for a Broken or Split Butter Sauce
If your beautiful sauce suddenly looks greasy, oily, or "broken" (the fat separates from the liquid), panic not! This usually happens because the pan got too hot during the emulsification process. Remove the pan from the heat immediately. Drop in a single, small ice cube, or add a teaspoon of very cold water.
Whisk vigorously. The sudden drop in temperature often helps the fat and liquid molecules re and bond, bringing the sauce back together.
Flavour Variations: Adding Spice or Substituting Herbs
Once you nail the base Lemon Garlic Butter Chicken Tenders, you can play around easily.
- Want a kick? Toss in a quarter teaspoon of red pepper flakes with the garlic. Instant warmth, which is gorgeous with the lemon.
- For extra richness, swirl in a tablespoon of finely grated Parmesan cheese right at the end of the sauce and making stage (after the butter is incorporated).
- If you're out of chicken stock, white wine (dry, like Pinot Grigio) is an incredible substitution for deglazing. Just let it simmer a minute longer to cook out the alcohol. It adds great depth to your Low Carb Chicken Dinner.

Recipe FAQs
How do I ensure these Lemon Garlic Butter Chicken Tenders get that lovely golden crust and don't end up looking a bit anaemic?
The key, old sport, is searing in batches don't overcrowd the pan, otherwise, the temperature drops and the chicken will steam instead of achieving that proper, delicious Maillard browning. Also, ensure the chicken is patted very dry before seasoning.
My beautiful butter sauce seems to have separated or gone a bit greasy, what did I muck up?
Not to worry, it’s usually a temperature issue! To create a proper, velvety emulsion, always remove the skillet from the heat before slowly whisking in the cold, cubed butter one piece at a time; this stabilizes the sauce and prevents it from breaking.
I'm cutting down on carbs; do I really need the flour dredge for these Lemon Garlic Butter Chicken Tenders?
Absolutely not; the flour is purely optional and helps slightly thicken the final sauce, so feel free to skip it for a lower carb version just note the sauce will be thinner but still spot-on for flavour.
I've only got big chicken breasts on hand, can I use those instead of tenders?
You certainly can, but you must slice the breasts horizontally into thinner cutlets (or paillards) so they match the thickness of the tenders, ensuring they cook through evenly and quickly within the required 12-minute window.
Can I make a big batch ahead of time, and how long do leftovers keep?
This dish is best served immediately, but leftovers keep perfectly well in an airtight container in the fridge for up to 3 days; to reheat, use a low oven or skillet with a splash of stock to avoid drying out the chicken.
Lemon Garlic Butter Chicken Tenders Skillet

Ingredients:
Instructions:
Nutrition Facts:
| Calories | 400 calories |
|---|---|
| Fat | 20 grams |
| Fiber | 0.5 grams |
