7 Layer Dip: Structurally Sound Recipe
- Time: Active 20 minutes, Passive 0 minutes, Total 20 minutes
- Flavor/Texture Hook: Velvety cream meets the satisfying shatter of a salty tortilla chip
- Perfect for: Game day crowds, potlucks, and busy weekend hosting
- Why This Structural Layering Works
- Analyzing the Ingredient Architecture
- The Essential Shopping List
- Necessary Tools for Assembly
- Step by Step Assembly Guide
- Pro Tips and Common Pitfalls
- Creative Ingredients to Mix Things Up
- Keeping Your Dip Fresh and Vibrant
- The Best Sides for This Dish
- Recipe FAQs
- 📝 Recipe Card
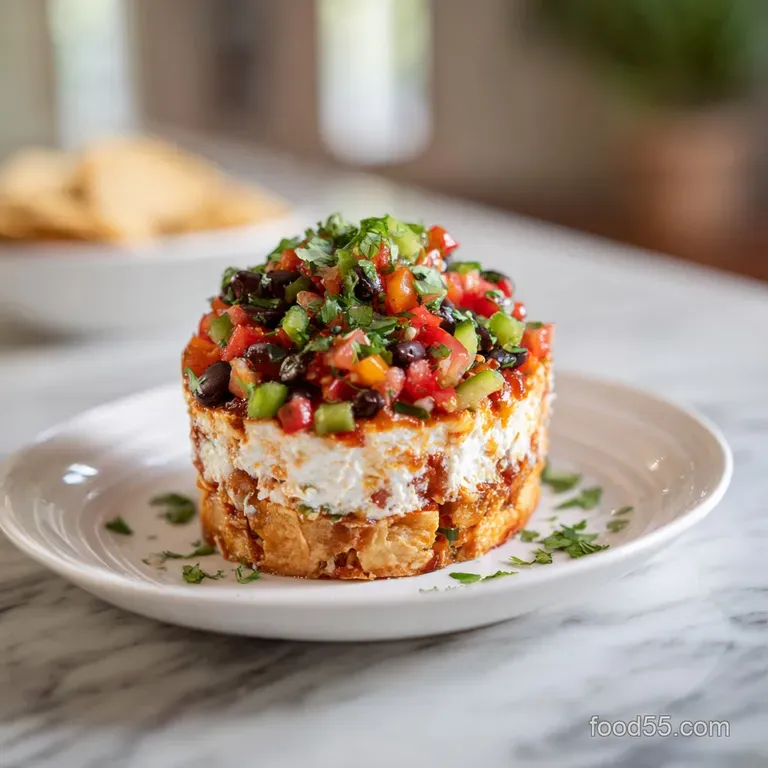
Picture this: I’m at my sister’s house warming party, balancing a paper plate, and I go in for a big scoop of what looks like a mountain of cheese. Instead of a solid bite, my chip hits a pool of greyish liquid at the bottom.
It was a total "dip disaster." I realized then that most people just toss things in a bowl without thinking about the physics of moisture. This make-ahead 7 Layer Dip with Refried Beans and Cheese is the ultimate party appetizer because it actually stays stacked.
We’ve all been there, right? You want that beautiful striped look in the glass dish, but after an hour on the counter, it looks like a landslide. I spent a few football seasons testing how to stop the "weeping" tomatoes and the sliding beans. This version is the result of those messy trials.
It’s thick, it’s punchy, and it actually tastes like the individual ingredients rather than a muddled mess.
You don't need a culinary degree to pull this off, just a little bit of strategic assembly. We’re going to whip the sour cream so it acts like glue and treat our vegetables like they’re going into a salad, not a swamp.
Let’s get into how to build a 7 Layer Dip for a Crowd with Refried Beans and Cheese that people will actually fight over.
Why This Structural Layering Works
- Density Gradient: Placing the heavy 850g of refried beans at the base creates a low center of gravity so the dip doesn't slide when scooped.
- Fat Barrier: The cream cheese and sour cream mixture acts as a hydrophobic seal, preventing moisture from the salsa and tomatoes from soaking into the beans.
- Turgor Pressure Control: Seeding the tomatoes removes the locule gel, which is 90% water, keeping the top layer crisp rather than soggy.
- Emulsion Stability: Using full fat dairy ensures the lactic acid doesn't break down the structure of the ranch seasoning, keeping the mid layer "fluffy."
| Servings | Refried Beans | Cheese Amount | Dish Size |
|---|---|---|---|
| 8 people | 425g | 115g | 20x20 cm square |
| 16 people | 850g | 225g | 23x33 cm rectangle |
| 32 people | 1.7kg | 450g | Two 23x33 cm pans |
When you're planning a party, it's easy to overbuy, but this 7 Layer Dip for a Crowd with Refried Beans and Cheese is surprisingly filling. Stick to the 16 serving guide for a standard 9x13 inch (23x33 cm) dish to ensure your layers are thick enough to see from across the room.
Analyzing the Ingredient Architecture
The secret to a 7 Layer Dip that doesn't collapse lies in the chemistry of your dairy and the prep of your produce. If you grab the wrong sour cream or skip the salsa drain, you're inviting a mess.
| Ingredient | Science Role | Pro Secret |
|---|---|---|
| Cream Cheese | Structural Binder | Soften to room temp to avoid "lumps" in the velvety layer |
| Refried Beans | Foundation | Mix with taco seasoning for salt distribution |
| Chunky Salsa | Flavor Acid | Drain in a fine mesh sieve for 10 minutes before adding |
| Sharp Cheddar | Texture Contrast | Shred your own for a better "melt in-the mouth" feel |
Before you start layering, make sure your cream cheese is truly soft. If it's cold, it won't emulsify with the sour cream, and you'll end up with little white pearls of cheese instead of a smooth, spreadable blanket.
The Essential Shopping List
- Refried Beans (850g/30 oz): Look for the traditional style; they have the best "grip" for the bottom layer.
- Taco Seasoning (1 tbsp): Why this? Concentrates the savory umami without adding extra liquid or bulk. (Substitute: Equal parts cumin and chili powder)
- Chunky Salsa (60ml/0.25 cup): Ensure it is well drained. (Substitute: Pico de gallo)
- Full Fat Sour Cream (450g/16 oz): Why this? Lower fat versions contain more water and will weep over time. (Substitute: Greek yogurt)
- Softened Cream Cheese (115g/4 oz): This provides the "body" the dip needs to stay upright. (Substitute: Mascarpone)
- Ranch Seasoning Mix (28g/1 packet): This is the secret flavor bomb for the white layer. (Substitute: Dried dill, onion powder, and garlic salt)
- Guacamole (475ml/2 cups): Use a version with a bit of lime juice to keep it green. (Substitute: Smashed avocado with salt)
- Sharp Cheddar (225g/2 cups): Freshly shredded is non negotiable for the best texture. (Substitute: Monterey Jack)
- Roma Tomatoes (1 cup diced): Why this? Roma variety has a higher flesh to seed ratio than beefsteak. (Substitute: Cherry tomatoes)
- Sliced Black Olives (0.5 cup): (Substitute: Pickled jalapeños)
- Green Onions (0.5 cup): Use both whites and greens for maximum punch. (Substitute: Chives)
If you're looking for more picnic ready ideas, our The Creamy Classic recipe is a total winner for outdoor gatherings where simplicity is key.
Necessary Tools for Assembly
You don't need fancy equipment, but a few specific items make the "stripy" look much easier to achieve. An offset spatula (the kind you use for frosting cakes) is the best tool for smoothing out the bean and cream layers without mixing them into a muddy brown color.
A fine mesh sieve is also vital for the salsa and tomatoes. Gravity is your enemy here; any liquid left in those ingredients will eventually sink to the bottom of the dish. I usually let my diced tomatoes sit in the sieve over the sink for a good 15 minutes.
It's annoying, but it's the difference between a dip and a soup.
step-by-step Assembly Guide
- Season the base. Mix the 850g of refried beans with 1 tbsp taco seasoning and the 60ml of well drained salsa in a bowl. Note: This ensures every bite has consistent spice.
- Establish the foundation. Spread the bean mixture into the bottom of a 23x33 cm glass dish. Look for an even, flat surface with no air pockets.
- Whip the cream layer. In a separate bowl, beat 450g sour cream, 115g softened cream cheese, and the 28g ranch packet. Continue until velvety and smooth.
- Seal the beans. Carefully dollop the cream mixture over the beans. Note: Use the back of a spoon to push it to the very edges to "lock" the beans down.
- Add the greenery. Spread 475ml of guacamole over the cream layer. Work quickly to prevent oxidation from the air.
- Apply the cheese blanket. Sprinkle 225g of freshly shredded cheddar evenly. Ensure the cheese covers the avocado completely to act as a second oxygen barrier.
- Prep the toppers. Seed and dice 1 cup of Roma tomatoes. Note: Press them with a paper towel to remove any hidden moisture.
- Final garnish. Scatter the tomatoes, 0.5 cup olives, and 0.5 cup green onions over the cheese. Wait for the sharp aroma of onions to hit before covering.
- Chill and set. Refrigerate for at least 1 hour. Observe the layers firming up through the side of the glass.
Chef's Tip: If your refried beans are too stiff to spread, microwave them for 30 seconds. They will loosen up enough to smooth out, then firm back up as they cool in the dish.
Pro Tips and Common Pitfalls
The biggest mistake I see with a Layer Dip for a Crowd with Refried Beans and Cheese is the "sliding layer" syndrome. This happens when the guacamole is too oily or the sour cream layer is too thin.
By mixing the sour cream with cream cheese, we create a sturdier middle that grips both the beans below and the cheese above.
Why Your Dip Is Watery
If you see a puddle at the bottom, your tomatoes or salsa were the culprits. Even if you think they look "dry," they carry a lot of internal moisture. Always salt your diced tomatoes in a colander for 5 minutes before adding them; the salt draws out the liquid through osmosis, which you can then pat away.
| Problem | Root Cause | Solution |
|---|---|---|
| Discolored Avocado | Oxidation from air exposure | Seal completely with the cheese layer so no air hits it |
| Broken Tortilla Chips | Bottom layer is too cold/stiff | Let the dip sit at room temp for 15 minutes before serving |
| Salty Overload | Too much seasoning in multiple layers | Use "no salt added" beans if your taco seasoning is salt heavy |
Common Mistakes Checklist
- ✓ Drain the salsa in a mesh sieve until the liquid stops dripping.
- ✓ Remove every single seed from the tomatoes to prevent "weeping."
- ✓ Press the green onions dry after washing so they don't introduce water.
- ✓ Use a clear glass dish so you can monitor for any moisture separation.
Try serving these alongside my Fried Green Tomatoes recipe for a Southern inspired spread that adds a fantastic crunch to the table.
Creative Ingredients to Mix Things Up
While the classic 7 Layer Dip is a crowd with refried beans and cheese staple, you can definitely play with the "personality" of the dish. I sometimes swap the cheddar for pepper jack if I know my friends like a little heat.
If you want to get really fancy, try charring some corn kernels in a dry pan until they "pop" and smell toasted, then add those to the top layer. It adds a smoky aroma that pairs perfectly with the creamy avocado.
| Method | Time | Texture | Best For |
|---|---|---|---|
| Classic | 20 mins | Thick and creamy | Traditional parties |
| Fast Track | 10 mins | Softer layers | Last minute guests |
| Smoked | 30 mins | Grassy/Earthv | Outdoor BBQs |
A Crowd with Refried Beans and Cheese loves variety. If you want a Mediterranean vibe, swap beans for hummus, sour cream for tzatziki, and cheddar for feta. It’s the same physics, just a different flavor profile.
Keeping Your Dip Fresh and Vibrant
Storing this dip is all about air management. Since we have fresh produce and avocado involved, the clock is ticking.
Storage: Keep the dip in the fridge for up to 3 days. Beyond that, the tomatoes start to lose their structure and the onions lose their "snap." Always cover the dish tightly with plastic wrap, pressing it down so it actually touches the top of the cheese and vegetables.
This prevents air from circulating.
Freezing: Honestly, don't even bother. Freezing dairy heavy dips like this is a disaster waiting to happen. The sour cream will break and become grainy, and the tomatoes will turn into mush when thawed. This is strictly a "make and eat" situation.
Zero Waste: If you have leftovers, they make an incredible filling for a breakfast burrito the next morning. Just scoop some into a tortilla with scrambled eggs. The layers melt together beautifully when heated.
The Best Sides for This Dish
You need a chip that can handle the weight of 850g of beans. Thicker, "restaurant style" white corn chips are usually the best bet. They have enough structural integrity to reach the bottom layer without snapping off and leaving a "chip graveyard" in the dish.
- Pita Chips: Great if you went with the Mediterranean variation.
- Bell Pepper Strips: A fresh, crunchy, low carb way to scoop.
- Jicama Slices: Adds a watery, crisp contrast to the heavy beans.
Remember that the dip is the star, so keep your sides simple. The goal is to bring people together around a dish that doesn't just look good on a blog but actually survives the first thirty minutes of a party. Right then, let's crack on and get layering!

Recipe FAQs
Can I make this entire 7 Layer Dip a day ahead of time?
Yes, up to 24 hours ahead. Assemble all layers except the tomatoes and green onions, covering the top layer tightly with plastic wrap pressed directly onto the cheese. Add the fresh toppings right before serving to maintain their texture.
Why is my dip turning watery or soupy at the bottom?
No, this means you skipped the crucial drainage steps. Excess moisture comes from under drained salsa or tomatoes; treat them like salad ingredients by draining them thoroughly to prevent the base layers from dissolving.
How should I prep the tomatoes to avoid liquid sinking into the dip?
Seed the tomatoes completely and salt them lightly. Remove all the gelatinous seeds and scoop out the watery interior, then let the diced flesh sit in a fine mesh sieve for at least 10 minutes to draw out residual liquid.
How do I ensure the sour cream layer stays perfectly smooth and doesn't look lumpy?
Whip the sour cream with softened cream cheese first. Ensure your cream cheese is at room temperature; this allows it to emulsify into the sour cream and ranch seasoning, creating a stable, velvety "glue" layer.
How do I keep the guacamole layer from turning brown before guests arrive?
Cover the guacamole completely with the shredded cheese layer. The cheese acts as a physical barrier against oxygen; if you enjoy making stable emulsions, see how the same concept prevents separation in our Marcella Hazan Tomato Sauce recipe.
What is the best chip choice to scoop all seven layers without breaking?
Use thick, restaurant style corn tortilla chips. Thin, flimsy chips cannot handle the density of the bean base; you need a chip with high structural integrity for a successful scoop.
Can I use low-fat or Greek yogurt instead of full fat sour cream for the middle layer?
No, stick to full fat dairy for the best structural integrity. Lower fat versions contain more water, which will seep out over time, leading to that undesirable separation you are trying to avoid in this stacked presentation.
make-ahead 7 Layer Dip

Ingredients:
Instructions:
Nutrition Facts:
| Calories | 246 kcal |
|---|---|
| Protein | 7.6 g |
| Fat | 17.8 g |
| Carbs | 13.8 g |
| Fiber | 3.4 g |
| Sugar | 2.1 g |
| Sodium | 588 mg |
