No-Bake Oreo Bars with Creamy Delight
Have you ever been at a summer picnic, the sun shining, laughter ringing in the air, and suddenly, someone pulls out a dessert that makes your heart skip a beat? for me, that one treat always seems to be no-bake oreo bars with creamy delight .
It's a sweet celebration in every bite, mixing that familiar crunchy oreo flavor with a luscious creaminess that's just chef's kiss.
Seriously, who doesn’t love a dessert that requires no baking? honestly, it feels like magic!
Recipe Overview
So, here’s the story behind these dreamy bars. this no-bake phenomenon isn’t just a modern trend; it pops up in different forms throughout dessert history.
Some say it began with the classic cheesecake a timeless favorite that evolved into what we now recognize as creamy dessert bars.
And let’s just say, this particular recipe is all about celebrating simplicity.
These bars have become a staple at parties and potlucks across the country. why? because they’re easy to whip up and perfect for all ages.
I mean, who wouldn’t want a dessert that’s as effortless as it is delicious? speaking of ease, you’ll need about 15 minutes for prep and then just let them chill for around 30 minutes.
Super simple, right? plus, they yield 12 generous bars, making them the perfect treat for gatherings without breaking the bank.
And guess what? Making these bars is easy on the wallet too! You can whip up a batch without draining your savings, and the result? A delightful dessert that looks like you’ve spent hours in the kitchen!
Key Benefits
Now let’s talk about the perks of making these beauty bars! for starters, they are surprisingly nutritious thanks to some key ingredients.
While we all know oreos aren't exactly health food, the cream cheese layer adds some creaminess while making you feel a bit fancy too! you can use low-fat cream cheese if you're looking to cut some calories.
What makes these bars stand out ? they’re a fun combination of creamy and crunchy i mean, who doesn’t love that blend? plus, they score major points when it comes to being kid-friendly ; little ones can help crush the oreos and mix things up.
Talk about fun in the kitchen!
They're not just your average dessert either. perfect for summer picnics, holiday gatherings , or even just a cozy night in, these bars can elevate any occasion.
They also make for excellent make-ahead dessert recipes . if you're planning a party, whip them up the night before and you’re golden!
And let's not forget the topping! the rich chocolate ganache is like that cherry on top, sealing the deal as one of the best easy chocolate desserts you can serve.
Your friends will wonder how you managed to pull off something so indulgent!
As you can see, no-bake oreo bars with creamy delight are so much more than just a dessert. they’re a delightful combination of textures and flavors, providing both satisfaction and smiles all around.
Speaking of deliciousness, let’s dive into the ingredients that make these bars come to life. Trust me, you’ll want to gather them all up and get ready to experience pure bliss.
Essential Ingredients Guide
Creating the perfect no-bake oreo bars with creamy delight is all about using quality ingredients. these bars are a sweet indulgence that can put smiles on faces, whether at a summer picnic or a cozy night in.
Let’s dive into what makes these bars tick and what you need to know to make them shine!
Premium Core Components
First things first, let's talk measurements. You gotta get precise if you want that perfect balance of creamy and crunchy. Here’s what you’ll need:
For the Base:
- 24 Oreo cookies, crushed (about 300g)
- 1/2 cup unsalted butter, melted (115g)
For the Filling:
- 8 oz cream cheese, softened (225g)
- 1/2 cup powdered sugar (60g)
- 1/2 teaspoon vanilla extract
- 1 cup whipped topping (like Cool Whip) (240ml)
For the Topping:
- 1 cup semi sweet chocolate chips (175g)
- 1/2 cup heavy cream (120ml)
Quality indicators: look for oreo cookies with a fresh, crunchiness to them. dusting off the pantry for expired cream cheese isn't an option, trust me.
If it’s off, you’ll end up ruining this easy no-bake recipe .
Signature Seasoning Blend
While the ingredients for the no-bake bars lean towards the sweet side, you can sprinkle in some creativity with flavors.
Combine a pinch of sea salt with the chocolate ganache to enhance its richness. you might even add a few crushed peppermint candies if you’re feeling wintery totally seasonal!
Regional Variations and Alternatives
Feel free to mix it up; you can swap the oreos for golden oreos or even other chocolate sandwich cookies.
You can really tailor the dessert to what you love or what you have on hand.
Smart Substitutions
Sometimes we don’t have everything in the kitchen. But, no worries! Here are some smart substitutions for your No-Bake Oreo Bars :
- If you can’t find cream cheese: Use Greek yogurt for a healthier twist just remember, it might not be as creamy!
- No powdered sugar? Whiz some granulated sugar in a blender to make your own.
- Vegan alternatives: Swap cream cheese and Cool Whip with vegan options, and use those vegan chocolate chips.
The beauty of these bars is that they’re versatile. It’s all about what’s easiest for you!
Kitchen Equipment Essentials
Alright, let’s get into the must have tools. You don’t need a high falutin' kitchen to whip this up, but a few essentials make it smoother:
- 9x9 inch baking pan: This is your canvas.
- Mixing bowls: Small and large will do. Just make sure they’re not ancient; your mom’s old salad bowl might be better suited for, well, salad.
- Rubber spatula: For mixing and smoothing. Don’t forget its magical power of scraping down every bit of that creamy filling!
- Double boiler or microwave safe bowl: To master your chocolate ganache topping.
Don’t underestimate these tools. They make life in the kitchen a whole lot easier!
Tips & Tricks
- Engage those chill times ! A solid half hour will set your delicious dessert right.
- Go for room temperature ingredients. It really helps everything blend nicely without lumps. We’re aiming for creamy and delicious here!
- For an easy prep method, crush your Oreos in a food processor. This saves time and gives you that perfect texture.
Variations & Serving Suggestions
Want to impress? Serve your No-Bake Oreo Bars with a drizzle of warm chocolate ganache and sprinkle some crushed Oreos on top.
You can also plate them with a side of fresh strawberries. Seriously, those reds against the creamy chocolate bars? A showstopper!
So, there you have it folks! with this essential ingredients guide , you’re all set for an awesome dessert making adventure.
It’s a fun and creative way to whip up something sweet without turning on the oven. in just a little while, you’ll be assembling those no-bake oreo bars with creamy delight like a pro.
Now let’s dig into how to actually make these bars!
Unlocking the Secrets of Professional Cooking: A Journey into Culinary Mastery
Let me start by saying, if you’re stepping into the world of cooking, you’re about to embark on a delicious adventure.
No, seriously. the right cooking methods can turn you from a kitchen novice into a culinary wiz. today, we’re diving deep into one of the most essential cooking fundamentals: professional cooking methods.
So, roll up your sleeves, and let’s whip things up!
Essential Preparation Steps
Mise en place it’s a fancy french term, but it just means “everything in its place.” picture this: you’re about to create a masterpiece, and you’ve got garlic, spices, and ingredients all laid out.
It helps keep you organized and efficient. seriously, nothing’s worse than realizing you’ve lost track of time looking for that one pesky spice!
Now here’s a genius time management tip : challenge yourself. Set a timer as you prep. Nothing lights a fire under your feet like racing against the clock!
And let's talk organization strategies. keep your workspace tidy. trust me, things get hectic fast in the kitchen. wipe down surfaces, and have a garbage bowl nearby for quick cleanups.
This way, you can focus more on cooking and less on looking for where you put down that spatula!
Oh, and for the love of all things savory , don’t skip safety! keep your knives sharp they’re safer that way.
A dull knife is just asking for trouble. always keep an eye on hot surfaces and watch out for splattering oil.
Safety first, y’all!
Step-by-step Process
Okay, let’s break it down into a simple, step-by-step process. Think of it as your cooking recipe directional and straightforward. Here’s how to master that professional edge:
Prepare your ingredients. Start with everything prepped and within reach.
Control the temperature. remember, different recipes may require specific temperatures especially those “hot spots” where things can go south quickly. many meats should reach a safe internal temperature of at least 165° f .
Timing is crucial. Use a kitchen timer. Each dish is a race against time; knowing your cooking times helps keep everything in perfect sync.
Visual cues for doneness can save your dish. For example, grilled veggies should be vibrant and slightly charred. Follow your gut feeling (and sometimes your nose) as these are often the best indicators!
Expert Techniques
Now onto some expert techniques that can really elevate your dishes. Look, professional cooking isn’t just about following the recipe; it’s about learning those critical steps that make a difference.
Want creaminess in your sauces? learn to emulsify like a pro. it’s all about whisking that oil into a base until it turns into a creamy delight.
Also, make sure you’re regularly checking for quality checkpoints. sample your food as you go. if you’re not tasting, you’re missing out on a whole world of flavor.
And, of course, everyone goesof up at some point. troubleshooting tips are king in the world of cooking, whether it’s adjusting seasoning or saving a sauce that’s too thick.
Remember, if it doesn’t taste right, don’t panic tweak it!
Success Strategies
So, what about avoiding common mistakes? first off, don’t rush the chilling time on your no-bake oreo bars with creamy delight .
The chilling part might feel boring, but trust me, it's crucial for that luscious result.
Always check for quality assurance! There isn’t a chef out there who hasn’t over salted a dish or forgotten to wash a vegetable. Just be conscientious, and you’ll be golden.
Plan for make-ahead options , especially for summer cookouts! who wants to sweat it out in the kitchen when everyone else is chilling? whip up some no-bake oreo bars with creamy delight the day before and store them in the fridge.
They’re perfect as a refreshing summer dessert you can’t go wrong with cookie crust desserts like this!
Ready to whip up your favorite no-bake treats? Stick around for the next part where we’ll dive into more easy no-bake recipes that even the kids can help with! Trust me, you won’t want to miss it!
Pro Tips & Secrets for No-Bake Oreo Bars

So you’re diving into the world of no-bake oreo bars with creamy delight ? awesome choice! trust me, they’re as delicious as they sound an absolute dream dessert .
Here are some insider tips and tricks i’ve learned along the way that’ll help take your bar game to the next level.
First off, chill, chill, chill ! i can’t stress enough how much chilling the bars will help them set perfectly, giving you those nice, clean slices later.
If you rush this part, your bars might be a gooey mess, and nobody wants that! i usually go for at least 30 to 45 minutes the longer, the better!
Now, let’s talk about the filling. make sure your cream cheese is at room temperature before mixing. it blends way easier and you won’t end up with a lumpy mess.
I learned this the hard way after having to strain my filling once. yikes!
For flavor enhancements, consider adding a splash of coffee extract to the filling if you’re feeling bold. it pairs so beautifully with the chocolate almost like a sophisticated dessert you’d find in a fancy restaurant.
Winning!
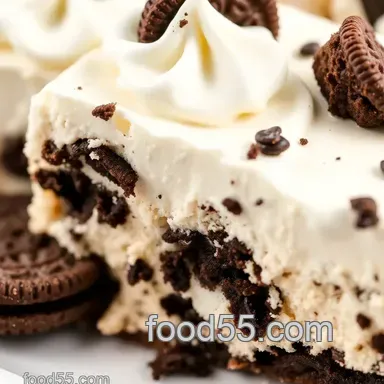
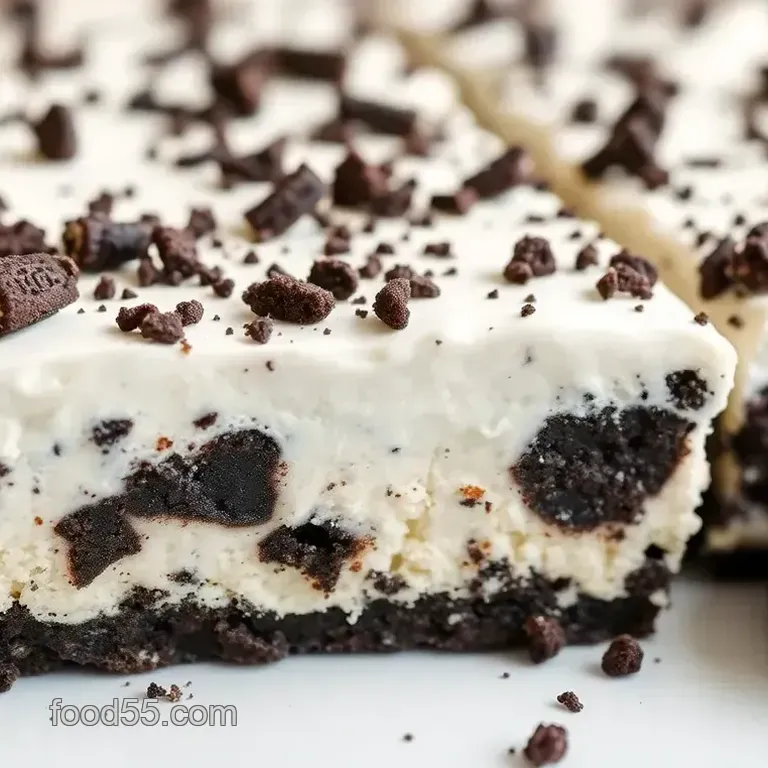
When it comes to presentation, don’t skip on the garnishes. a drizzle of chocolate ganache and a sprinkle of crushed oreos on top will make these bars look gourmet without any extra effort.
And you know what? it just feels nice to treat your dessert with a little love.
Perfect Presentation Ideas
Let’s glam up those no-bake oreo bars ! you want them to sing on your table, right? when you're plating, keep it simple but effective.
Start with a clean cut use a sharp knife and maybe run it under hot water to get those edges looking pristine.
For garnish, whipped cream is your best friend. a dollop on top is not only kid-friendly but also screams “i’m delicious!” consider pairing it with fresh berries for a pop of color.
Bright, vibrant foods always catch the eye, don’t you think?
Speaking of color, remember that contrast is key! the deep chocolate topping looks fabulous against the pale cream filling and dark crust.
It’s a treat for the eyes that’s as fun to serve as it is to eat!
Storage & make-ahead Tips
The beauty of these bars is that they’re perfect for making ahead. if you’ve got a summer picnic or a potluck coming up, whip these up a day in advance.
They keep well for about 3 to 5 days in the fridge just cover them tightly with plastic wrap or a lid, so they stay fresh.
Freezing? definitely an option! they freeze beautifully too. just slice them before freezing, then you can grab a bar whenever that sweet tooth strikes.
They stay good for about 2-3 months in there. just make sure to wrap them tightly! you know how freezers can be, right? everything gets freezer burn no thanks!
When reheating, there’s no need! These are best served chilled. You’ll want that refreshing coolness, especially in the heat of summer.
Creative Variations
Now that you’ve got the basics down, why not shake things up? make it your own! swap out the oreos for golden oreos, gingersnaps, or even a twist with your favorite chocolate cookies.
Feeling adventurous? you could throw in some peanut butter for a delightful combination.
If you’re cooking for someone with dietary restrictions, don’t sweat it! there are loads of options use vegan cream cheese or a plant based whipped topping.
Finding alternatives has never been easier. just keep an eye on your proportions, especially with the cream cheese.
The Nutrition Breakdown
So, what’s the scoop on nutrition? a bar weighs in at about 250 calories . not the lightest treat out there, but hey, they are indulgent! with 17g of fat and 25g of carbs, you might want to keep portioning in mind, especially if you're trying to keep things balanced.
These can surely be a decadent addition but remember everything in moderation.
Honestly, if you’re looking for something easy, delicious, and sure to impress, these no-bake oreo bars with creamy delight are your jam.
Layer them in pretty boxes for gifts or take them to gatherings because who doesn’t love a good oreo dessert idea ?
Finally, if you ever find yourself wondering, “Can I switch things up?” remember: the answer is yes ! Experimenting is part of the fun.
So get in that kitchen and whip up these bars! they’re the kind of treats that turn ordinary days into special occasions.
Enjoy, and happy baking oops, wait, no baking required! enjoy those easy no-bake recipes !
No Bake Oreo Bars With Creamy Delight