No-Bake Oreo Cheesecake Bars - Easy Delight
Oh my gosh, have you ever found yourself staring at a dessert menu, tempted but utterly confused? you feel like a kid in a candy store but overwhelmed by all the options.
Well, let me take you back to a sunny afternoon when i was in that exact spot. picture this: a potluck in my neighborhood with friends, laughter bouncing off the walls, and treats galore.
I whipped out my secret weapon: no-bake oreo cheesecake bars - easy delight . as my friends dove into those creamy, crunchy bars, the “ooohs” and “ahhhs” became the soundtrack of my sweet success.
Seriously, who knew that a little bit of cream cheese and some oreos could spark that much joy?
These bars aren’t just any ordinary dessert. if you love easy cheesecake recipes and crave the rich flavor of oreo dessert recipes, then buckle up.
You’re in for a treat! perfect for picnics, potlucks, or just a chill night at home, these bars are not just delicious; they’re ridiculously simple to whip up.
Trust me, if i can do it, so can you!
Recipe Overview
Let’s chat about where this glorious dessert came from. the concept of no-bake cheesecakes has been around for a while, but it really caught on in the 1980s.
Unlike traditional cakes, they’re so much easier and quicker no need to heat up an oven, which is a blessing, especially during those sweltering summer months.
And today? they’ve become a staple at gatherings and holiday parties, proving their worth as a crowd pleaser year after year.
Now, let's talk time. you’re looking at just 15 minutes of prep time and about 30 minutes of chilling .
Yep, no baking involved! so if you’re a bit of a kitchen novice, or just want to keep it easy, this recipe's for you.
Plus, it yields about 12 servings , making it budget friendly too. honestly, you can’t beat that price for such a delightful dessert.
Key Benefits
What makes these no-bake oreo cheesecake bars stand out? first off, let’s talk health. while cheesecake isn’t exactly a health food, it does pack in calcium and that super tasty cream cheese goodness.
Not to mention, they also provide that sweet tooth satisfaction we all crave from time to time.
These bars shine during special occasions! they’re ideal for summer picnics, backyard bbqs, or holiday gatherings. just imagine cutting into that chilled, creamy slice with oreos peeking out.
It’s a little layer of happiness on a hot day. and they’re definitely easier to transport than a traditional cake.
If you’re looking for delicious dessert recipes that wow without worrying about the details, this is your golden ticket.
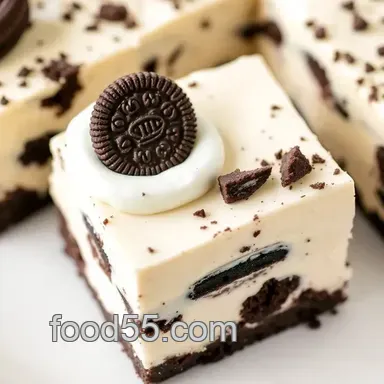
What’s more? each bite offers that perfect balance of creamy and crunchy, thanks to the oreo cookie crust . and let’s not forget about the versatility! you can twist this recipe in so many ways.
Fancy a chocolate mint version? totally doable! just grab some mint oreos. feeling nutty? swirl in some peanut butter. the options are endless!
So, let’s get down to the nuts and bolts. Are you ready to whip up some dreamy, creamy bars that’ll have your friends begging for the recipe? Then grab your clipboard because we are diving into the ingredients next!
Essential Ingredients Guide
Alright, friends! let's dive into the essentials of whipping up your next culinary masterpiece. whether you’re tackling no-bake oreo cheesecake bars - easy delight or some other treats, knowing your ingredients is half the battle.
Premium Core Components
First off, let’s chat measurements. personal preference matters, but if you’re looking for detailed measurements , it’s safe to stick to the basics: 1 cup equals approximately 240 ml in liquid and 1 cup of sugar weighs about 200g .
Just keep a kitchen scale handy for times when precision counts.
Now, you might be wondering how you can tell if your ingredients are top-notch. Quality indicators for things like cream cheese? Look for that smooth texture and a nice, creamy color though we all know it’s not about looks when it comes to cheesecake!
Storage guidelines should definitely be on your radar. for example, cream cheese lasts about 2-3 weeks in the fridge after opening.
So, make sure to check those expiration dates before diving into a recipe!
And here’s a quick tip: freshness matters, especially for dairy. Always pick the freshest ones at the store, and if you're unsure, check for a shiny, plump exterior on your ingredients.
Signature Seasoning Blend
Now, let’s jazz things up with some signature seasoning blends . for our oreo bars, you won’t need much vanilla extract is a must! but honestly? any signature cheesecake has room for its own spin! think about adding some lemon zest or a pinch of salt to make those flavors pop.
When it comes to herb selections , you might want to save those for savory dishes, but your dessert arsenal could absolutely benefit from knowing how to pair.
Even something simple like a dusting of cocoa can elevate your cheesecake bars to gourmet status!
Smart Substitutions
Life happens, and sometimes you just don’t have the right stuff in your pantry. that’s where smart substitutions come into play.
Didn’t buy any oreo cookies? no problem! any chocolate sandwich cookie will suffice as long as it’s sweet, you’re golden!
If you’re going light, there are plenty of dietary modifications you can make. Swap in reduced fat cream cheese or non-dairy options if that’s your jam.
Need an emergency replacement ? If you can't find heavy cream, try using full fat coconut milk. It’ll give you a similar texture and a hint of tropical goodness.
Oh, and keep the seasons in mind. Grab fresh berries in summer to make those no-bake cheesecake variations sing!
Kitchen Equipment Essentials
Now, let’s not forget about the tools of the trade. for kitchen equipment essentials , you absolutely need a sturdy mixing bowl and an electric mixer.
I mean, nothing beats the sound of that beat setting the rhythm for your creamy dessert bars!
But if you don’t have an electric mixer, don’t sweat it good old-fashioned whisking will work just fine, though it might take a bit longer.
Prep like a pro : Seriously, have all your ingredients measured before starting. It saves hassle and helps make the process smooth.
Storage solutions are key too. Pop your prepared cheesecake bars in an airtight container and they can stay fresh for up to a week in the fridge .
So, now that you’ve got the scoop on essential ingredients, crafting no-bake desserts like our no-bake oreo cheesecake bars will be a breeze.
Just remember that cooking is all about creativity, and making it your own!
Alright, you have the background. It’s time to get hands-on let’s jump into the step-by-step instructions!
Mastering Professional Cooking: The No-Bake Oreo Cheesecake Bars Edition
Alright, my friends, let’s dive into the world of professional cooking with a fun twist. ready to knock everyone’s socks off at your next gathering? today, we’re not just any chefs; we’re making no-bake oreo cheesecake bars - easy delight .
This is where creamy and crunchy collide, and trust me, it’s gonna be the talk of the town! let's start with the essential prep steps, shall we?
Essential Preparation Steps
Get Your Mise en Place Ready
You know what they say, “a messy kitchen is a sign of a happy cook,” but if we can avoid chaos, why not? for this recipe, crush 24 oreos for your crust and gather up your cream cheese, powdered sugar, and all that good stuff.
Not having to search for stuff mid-recipe is a game changer.
Time Management Tips
You got 15 minutes for prep, and then we’re chilling the bars for 30 minutes . dreamy, right? splitting these steps keeps the flow going.
While you’re waiting, make a snack or let your dog steal your precious kitchen time. just don’t forget about the cheesecake!
Organization Strategies
I’m a huge fan of bowls. Use them! Set up different bowls for each component. Trust me; you won’t regret having everything at your fingertips when you mix it all together.
Safety Considerations
Speaking of fingers, let’s keep them safe, people! When using knives or mixers, pay attention. Safety first, fun second!
Step-by-step Process
Alright, ready for the nitty gritty? Here’s how we’ll make these dreamy bars:
Prepare the Pan: Grab a 9x9 inch baking pan . If you’re like me and want an easy release, line it with parchment paper.
Make the Crust: Crush those Oreos and mix them with melted butter. Press firmly into the bottom of the pan. We want that crust rock solid!
Prepare the cheesecake filling: beat that 16 oz cream cheese until smooth and fluffy. you don’t want any lumps here.
Add 1 cup powdered sugar and 1 tsp vanilla . mix until it's like a creamy hug for your taste buds.
Whip the Cream: In another bowl, whip the 1 cup heavy cream until stiff peaks form. Make a big ol’ cloud of joy right there!
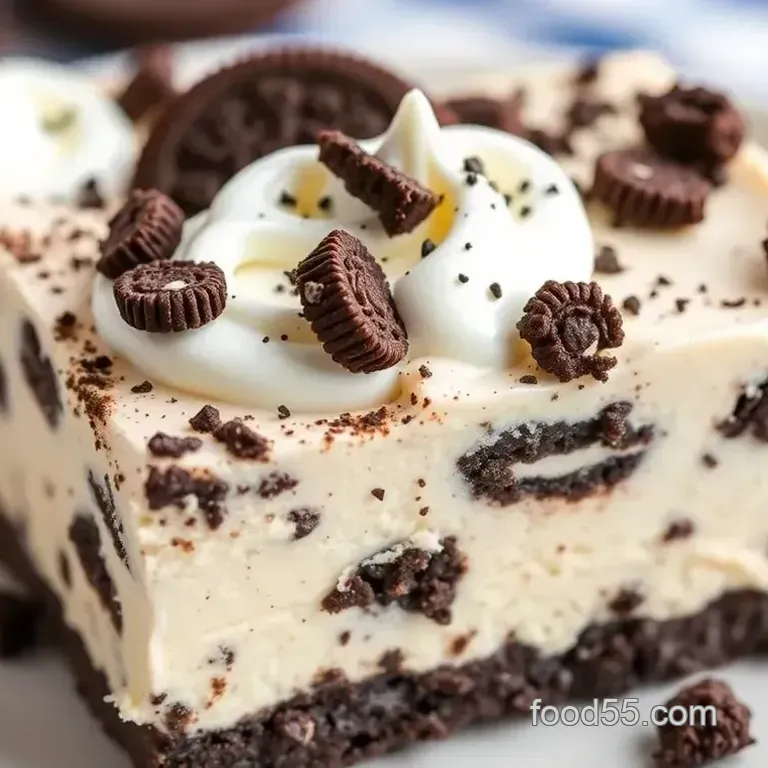
Combine Mixtures: Gently fold that whipped cream into your cheesecake mix. Then throw in 8 chopped Oreos because why not?
Assemble the Bars: Spread that luscious cheesecake filling evenly over the crust. Smooth it out with a spatula like you’re icing a cake.
Chill: Pop it in the fridge for at least 4 hours . Trust me, the longer, the better!
Slice and Serve: Take it out, remove from the pan, and cut into bars. Serve chilled, because nobody wants a warm cheesecake here!
Expert Techniques
Now, let’s get a little fancy. These expert techniques ensure you’re not just cooking; you’re creating a masterpiece!
Quality Checkpoints: After whipping the cream, if it’s not stiff, it won’t hold its shape. Single check that before folding it in!
Temperature Tidbits: If it’s too hot, your cream cheese won’t blend well. Let it soften on the counter for about 30 minutes before tackling it.
Troubleshooting Tips: If it’s too runny after chilling, don’t panic! It means you might’ve skipped the whipping stage.
Success Strategies
As we wrap this up, here are some success strategies to nail this recipe:
Common Mistakes: Don’t overmix once you combine. Treat it gently, like a first date.
Quality Assurance: Taste before chilling! Seriously, nobody will judge you.
Perfect Results Guide: Look for that clean slice when cutting. The longer you chill, the cleaner it’ll slice.
Make-ahead Options: Make these No-Bake Cheesecake Bars a day ahead. They just get better with time, like fine wine.
As you put your new professional cooking skills to the test, keep in mind that these no-bake oreo cheesecake bars aren't just a treat; they’re a conversation starter, a crowd pleaser, and quite frankly, a ticket to foodie fame at your next potluck.
Up next, we’re diving into some Additional Information you won’t want to miss. So grab those Oreos and let's whip up some magic!
Pro Tips & Secrets

Oh my gosh, let's talk about making your no-bake oreo cheesecake bars - easy delight a total hit! first off, use cold ingredients , especially your cream.
It whips up better and that fluff helps keep everything light. want to speed things up? you can crush those oreos in a food processor.
Boom! done in a flash!
Now, here’s a secret: don’t skimp on chilling time . i get it, you’re excited to dive in, but letting those bad boys chill ensures the perfect texture.
If you’re struggling to slice them cleanly, dip your knife in hot water before cutting. it’ll give you those instagram worthy slices!
Enhancing flavor is super easy too. a splash of almond extract in the cream cheese filling adds a great twist.
And remember, save a few crushed oreos to sprinkle on top before chilling. it’s all about that presentation, right?
Perfect Presentation
When it comes to plating , think creativity! you don’t want these cheesecake bars just chilling in a boring pan.
Once you slice them, place them on a colorful plate. brighten it up with fresh berries or a drizzle of chocolate sauce.
Presentation is key ; it makes each slice more tempting.
And don’t forget about color! light colored filling against that dark oreo cookie crust is visually stunning. for a little extra flair, add a sprig of mint on top or some colorful sprinkles.
Who doesn’t love a pop of color?
Storage & make-ahead
Now for the reality check. these bars are so good, they won’t last long, but if you happen to have leftovers, proper storage is crucial.
Just keep them covered in the fridge. they should stay fresh for about 5-7 days if you can resist munching on them every day!
Want to make these ahead of time for a picnic or potluck? totally doable! prepare them a day in advance and let them chill overnight.
Your future self will thank you for the delicious convenience!
Creative Variations
Let’s spice things up with some creative variations ! if you’ve got a wild side, swap in mint oreos for a minty fresh kick.
Or how about a peanut butter oreos twist? just fold in half a cup of peanut butter into the filling.
It's like a flavor explosion!
You can also take advantage of seasonal fruits. think about mixing in some strawberries or raspberries for a refreshing summery vibe.
These oreo dessert recipes are really all about your mood and the season! make it your own!
Complete Nutrition Guide
So, if you’re keeping tabs on your health, don’t worry. these bars pack a punch of flavor without excessive guilt.
With about 320 calories per serving , they are still a sweet treat, but they also have 4g of protein to help keep you satisfied.
Just a heads-up, if you’re looking for lower fat options, consider using light cream cheese or even non-dairy substitutes. and guess what? the kids love them too! they’re perfect as kid-friendly recipes for those summer bbqs or birthday parties.
Expert FAQ Solutions
Now, i can hear some of your questions already! a common one is, “what if my whipped cream doesn’t whip?” just whip it a bit longer, and ensure it’s cold .
If it ends up too runny, you can add a little powdered sugar to help stabilize it.
Another question: “Can I use this filling for something else?” Absolutely! Try it as a filling in other desserts or even in a layered cheesecake. Super versatile, right?
And if you find you want a firmer bar, just chill them a bit longer! Easy peasy.
Conclusion: look into In!
Honestly, i can’t wait for you to try these no-bake oreo cheesecake bars - easy delight ! whether it's a hot summer day or just a cozy weekend, these bars bring instant joy.
With minimal effort and some creativity, you’ve got yourself a delicious dessert recipe everyone will adore. so, grab your oreos and get ready to impress those taste buds! you got this!
No Bake Oreo Cheesecake Bars Easy Delight