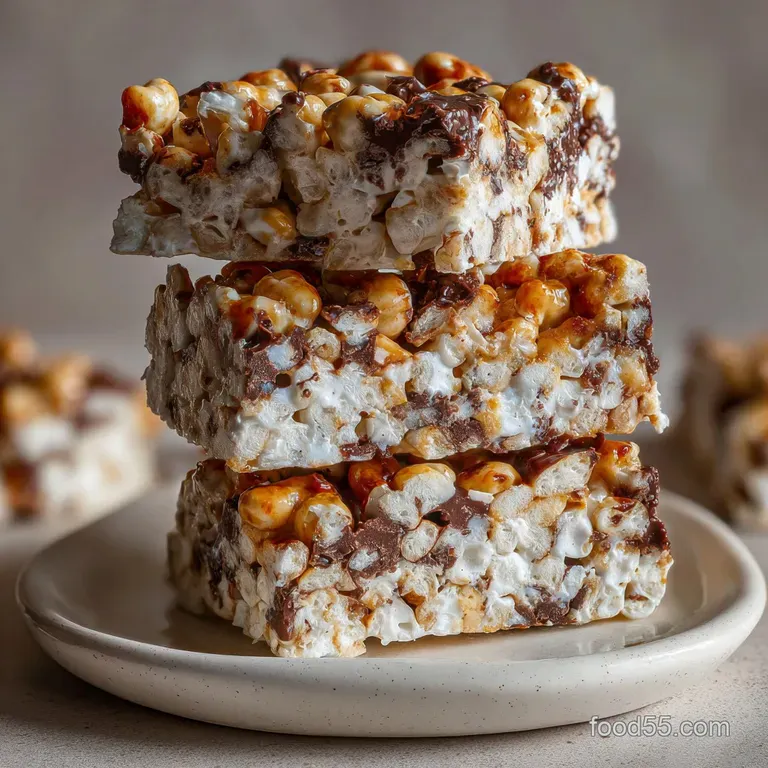
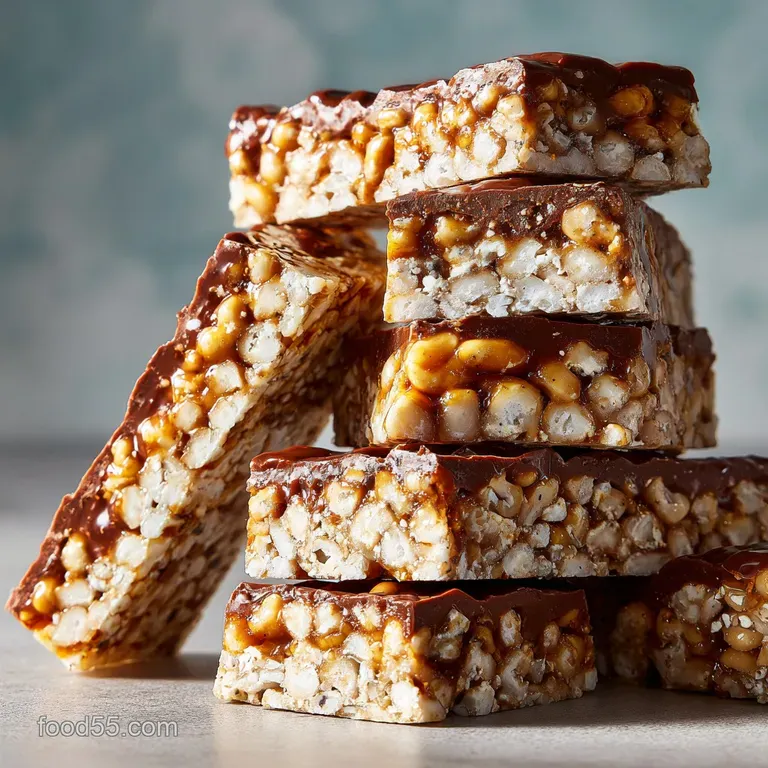
Nobake Homemade Crunch Bars Recipe
- Time: Active 10 minutes, Passive 65 minutes, Total 1 hours 15 mins
- Flavor/Texture Hook: Shatteringly crisp cereal suspended in velvety, salt kissed chocolate
- Perfect for: School lunch treats, movie nights, or beginner friendly gifting
- The Ultimate Secret To NoBake Homemade Crunch Bars
- Why This Contrast Of Sweet And Salty Works
- Essential Measurements For Consistent Homemade Snack Results
- Selecting The Best Ingredients For Maximum Crunch Factor
- The Only Tools Needed For A Pro Kitchen Setup
- Mastering The Folding Technique For Perfect Texture
- Pro Techniques For Fixing Chocolate Texture Disasters
- Simple Swaps For Various Dietary And Allergy Needs
- Best Methods For Long Term Storage And Freshness
- Creative Ways To Plate And Share These Treats
- Recipe FAQs
- 📝 Recipe Card
The Ultimate Secret To NoBake Homemade Crunch Bars
Have you ever stood in the kitchen, staring at a bag of chocolate chips, and felt that sudden, urgent need for something crunchy? I remember the first time I tried to recreate that blue wrapped childhood classic. I just melted some chocolate, threw in some rice cereal, and stuck it in the fridge. The result?
A rock hard block that nearly chipped my tooth and tasted like... well, just cold chocolate. It was a total flop, but it taught me everything about what makes a bar truly work.
The magic isn't just in the chocolate; it’s in the contrast. We’re looking for that specific "shatter" when you bite down, followed immediately by a velvety melt that coats your mouth.
It’s that hit of fine sea salt cutting through the sugar, and the way the crispy rice stays light instead of becoming a soggy mess. I’ve made these for dozens of backyard hangouts, and they disappear faster than I can plate them.
In this guide, we’re going to walk through the exact steps to get that "snap" every single time. We aren’t just mixing stuff together; we’re balancing fats and textures to create a snack that feels way more expensive than it actually is.
Trust me, once you realize how easy it is to make these better than the store-bought version, you'll never look at the candy aisle the same way again.
Why This Contrast Of Sweet And Salty Works
The success of this snack lies in the interplay between the solids and the fats, creating a structure that holds up at room temperature while staying tender enough to chew.
- Crystal Stability: The peanut butter introduces additional fats that lower the melting point of the chocolate, preventing it from becoming too brittle or chalky after cooling.
- Cereal Insulation: The air pockets within the crispy rice cereal act as tiny buffers, giving the bar its characteristic light volume and "shatter" without the dense weight of a solid chocolate block.
- Salt Amplification: Sea salt suppresses the perception of bitterness in the chocolate while heightening the nuttiness of the peanut butter, making the overall flavor profile more complex.
| Method | Prep Time | Texture Result | Best For |
|---|---|---|---|
| Fresh (From Scratch) | 45 mins | Very rich, slightly softer | Gourmet gifting |
| Shortcut (This Recipe) | 10 mins | Perfect snap, stable | Quick snacks and parties |
Choosing the shortcut method here isn't just about saving time; it's about structural reliability. Commercial chocolate chips contain stabilizers like lecithin that help the bars maintain their shape even if your kitchen gets a bit warm.
Essential Measurements For Consistent Homemade Snack Results
1. The Fat Stabilization Secret
Peanut butter is our secret weapon for texture. It contains monounsaturated fats that remain semi solid at room temperature. When mixed with the cocoa butter in the chocolate chips, it creates a hybrid fat structure.
This makes the bars easier to slice without cracking into a million pieces, which is the most common frustration for home cooks.
2. Moisture Lock Technique
Chocolate is notoriously hydrophobic, meaning it hates water. By using vanilla extract at the very end and ensuring our cereal is bone dry, we prevent the chocolate from seizing. Even a tiny drop of water can turn your velvety mixture into a gritty, unusable paste.
3. Thermal Conductivity
We melt the chocolate slowly. If the temperature exceeds 115°F, the cocoa butter can separate, leading to "bloom" those white, streaky marks you see on old candy. Keeping the heat low ensures a glossy, deep brown finish that looks like it came from a professional confectionery.
Selecting The Best Ingredients For Maximum Crunch Factor
Getting the right ingredients makes all the difference in the final snap of your bars.
- 2 cups (340g) semi sweet chocolate chips: I prefer a 60% cacao content. Why this? It balances sweetness with a deep cocoa flavor that doesn't feel cloying.
- Substitute: Dark chocolate chunks for a more bitter, sophisticated profile.
- 0.5 cup (125g) creamy peanut butter: Use a standard commercial brand (like Jif or Skippy) rather than the "natural" stir style. Why this? The stabilizers in commercial PB prevent the bars from being too oily.
- Substitute: Sunflower seed butter for a nut free version.
- 1.5 cups (40g) crispy rice cereal: Ensure the box is fresh. Why this? Stale cereal will result in a chewy, "styrofoam" texture instead of a crisp shatter.
- Substitute: Crushed pretzels for a saltier, denser crunch.
- 0.25 tsp fine sea salt: This is non negotiable for flavor balance. Why this? Fine salt dissolves quickly into the fat, ensuring every bite is seasoned.
- Substitute: Kosher salt (increase to 0.5 tsp).
- 0.5 tsp vanilla extract: Adds an aromatic lift. Why this? It rounds out the sharp edges of the cocoa and peanut flavors.
- Substitute: Almond extract for a cherry like undertone.
| Component | Science Role | Pro Secret |
|---|---|---|
| Chocolate Chips | Structure & Snap | Don't overheat or it loses its shine |
| Peanut Butter | Softness & Emulsion | Use creamy for a smoother mouthfeel |
| Rice Cereal | Aeration & Crunch | Freeze for 10 mins before adding |
Adding that quick freeze to your cereal is a game changer. It ensures that when the cereal hits the warm chocolate, it doesn't lose its structural integrity, keeping that crunch at its peak.
The Only Tools Needed For A Pro Kitchen Setup
You don't need a professional pastry kitchen to pull this off, but having the right basics will save you a headache. I’ve tried using a glass bowl that was too small once, and let’s just say my countertop ended up with more chocolate than the pan did.
- Heat proof mixing bowl: Glass or stainless steel works best.
- 8x8-inch baking pan: This size gives you the ideal thickness.
- Parchment paper: Essential for lifting the bars out easily.
- Silicone spatula: For scraping every last drop of that velvety chocolate.
- Small saucepan: To create a double boiler (the safest way to melt).
If you’re a fan of no bake treats, these tools are basically the starter kit for everything from this recipe to my Special K Bars recipe. Having a solid spatula that won't melt or bend is probably the best five bucks you'll ever spend in the kitchen.
Mastering The Folding Technique For Perfect Texture
1. The Melting Phase
Set up a double boiler by placing your bowl over a saucepan with an inch of simmering water. Add the 2 cups (340g) of semi sweet chocolate chips and 0.5 cup (125g) of creamy peanut butter. Stir constantly with your spatula until the mixture is glossy and smooth.
2. The Integration Phase
Remove the bowl from the heat immediately. Stir in the 0.25 tsp fine sea salt and 0.5 tsp vanilla extract. Note: This adds flavor depth without breaking the emulsion. Add the 1.5 cups (40g) of crispy rice cereal. Gently fold the cereal into the chocolate until every single piece is fully coated.
3. The Setting Phase
Line your 8x8 pan with parchment paper, leaving an overhang on the sides. Pour the mixture in and use the back of a spoon to press it down firmly. Note: Pressing hard ensures there are no air gaps that cause the bars to crumble. Let it sit on the counter for 10 minutes, then move to the fridge.
Chill for 1 hours until the center is completely firm to the touch.
Pro Techniques For Fixing Chocolate Texture Disasters
Preventing Seized Chocolate
If a drop of water gets into your chocolate and it turns into a dry, clumpy mess, don't panic. This is called seizing. You can sometimes save it by adding a teaspoon of neutral oil or a little more peanut butter and stirring vigorously over very low heat.
It might not be quite as snappy, but it will be salvageable for these bars.
Solving Cereal Sogginess
Nothing ruins NoBake Homemade Crunch Bars faster than soggy rice. This usually happens if the chocolate mixture is bubbling hot when you add the cereal. The heat penetrates the rice and softens it. Always let your chocolate cool for about 2 minutes off the heat before folding in the crunch.
| Problem | Root Cause | Solution |
|---|---|---|
| Bars are too soft | Not enough chilling | Leave in fridge for at least 65 mins |
| Chocolate is grainy | Overheated | Melt over indirect heat only |
| Bars crack when cutting | Too cold | Let sit at room temp for 5 mins before slicing |
For anyone who loves these "set and forget" style desserts, our How to Make recipe for magic bars follows a similar logic of layering textures for maximum impact.
Common Mistakes Checklist:
- ✓ Never melt chocolate over direct high heat; it burns in seconds.
- ✓ Ensure your mixing bowl is 100% dry before starting.
- ✓ Don't skip the parchment paper, or you'll be digging bars out with a jackhammer.
- ✓ Avoid "natural" peanut butter that separates; the oil will prevent a clean set.
- ✓ Use a sharp, warm knife for the cleanest cuts.
Simple Swaps For Various Dietary And Allergy Needs
You can easily scale this recipe down if you’re just cooking for one or two. To make a half batch, use a loaf pan instead of an 8x8 square. This keeps the bars thick and satisfying.
If you're doubling the recipe for a party, use a 9x13 pan, but keep the salt and vanilla at about 1.5x the original amount to avoid overwhelming the other flavors.
Vegan And Dairy Swaps
To make these vegan, ensure your semi sweet chips are dairy-free (many are, but check the label for "milk fat"). Swap the honey based cereals for a plain puffed rice variety. The peanut butter is naturally vegan, so no changes are needed there!
Nut Free Variation
If you have a nut allergy in the house, sunflower seed butter (SunButter) is a fantastic 1:1 replacement for peanut butter. It has a slightly earthier taste but provides the same structural fat needed for the bars to set correctly. You can also use tahini, though the flavor will be much more sophisticated and savory.
Best Methods For Long Term Storage And Freshness
These bars are surprisingly hardy. You can keep them in an airtight container at room temperature for about 3 to 4 days, but for the best "snap," I highly recommend the fridge. In the refrigerator, they’ll stay fresh for up to 2 weeks.
Just make sure to layer them with parchment paper so they don't fuse together into one giant megabar.
For long term storage, these bars are a dream for freezing. Wrap individual squares in plastic wrap and toss them into a freezer bag. They’ll last for 3 months. The best part?
You can eat them straight from the freezer for an extra hard crunch, or let them thaw for 5 minutes for that perfect melt in-your mouth texture.
Zero Waste Tip: If you have crumbs left over at the bottom of the pan or the container, don't toss them! Those little chocolatey crunchy bits are incredible as a topping for vanilla ice cream or stirred into your morning oatmeal.
Creative Ways To Plate And Share These Treats
When it's time to serve, you can really lean into the "homemade gourmet" vibe. I love cutting these into tiny 1 inch squares rather than big bars. It makes them feel like truffles and prevents people from getting overwhelmed by the richness.
The Movie Night Platter
Arrange the bars on a large wooden board alongside some salty popcorn and fresh strawberries. The acidity of the berries cuts through the fat of the peanut butter beautifully. It's a "snack board" style that brings people together and encourages everyone to graze while watching a film.
The Gourmet Garnish
If you want to impress, sprinkle a tiny bit of flaky sea salt (like Maldon) on top of the bars right before they set in the fridge. The large salt flakes provide a visual contrast and a sudden "pop" of seasoning that makes these feel like they came from a high end candy shop.
You can even drizzle a little extra melted white chocolate over the top for a beautiful striped pattern.
If you enjoy the process of layering flavors like this, you might also love trying our Flaky Classic Baklava recipe which takes the concept of "crunch" to a whole new level with honey and nuts.
- - For a Fudgy Texture
- Increase peanut butter to 3/4 cup.
- - For a Darker Snap
- Use 72% dark chocolate and omit the vanilla.
- - For a Sweet Salty Punch
- Add a layer of crushed pretzels to the bottom of the pan.
There's something so communal about a big tray of these bars. They aren't fussy or formal; they're meant to be grabbed by hand and shared with friends. The next time you hear that sizzle of a pan in the sink and you're winding down from dinner, take ten minutes to whip these up.
Future you will definitely thank you when that late night snack craving hits!

Recipe FAQs
Is it true I must use a double boiler for melting the chocolate?
No, this is a common misconception. A microwave at 50% power in short, controlled intervals is faster and safer for this recipe because the peanut butter acts as a stabilizer against scorching.
How to get the bars to set quickly?
Place the lined pan directly into the refrigerator after pressing. While they need time to firm up, keeping the ambient temperature cool prevents the fats from softening too soon; chilling for at least an hour ensures a firm snap.
How to substitute crunchy peanut butter for creamy?
Use a 1:1 ratio but expect a slightly denser final texture. Crunchy peanut butter introduces larger solid pieces which can slightly interfere with the perfectly smooth chocolate coating, though the flavor will be enhanced.
Why do my bars taste oily or greasy after setting?
This usually means the chocolate was overheated during melting. Excessive heat causes the cocoa butter to separate, leading to a greasy film on the surface; remember to pull the mixture off the heat just as the last pieces of chocolate melt.
How to achieve the perfect shatter when cutting the cooled bars?
Warm your knife blade slightly before slicing. Dip a large, sharp knife into hot water and wipe it dry between each cut; this clean, warm slice prevents the hard chocolate structure from cracking randomly across the bar.
Can I use cocoa powder instead of melting chocolate chips?
No, relying solely on cocoa powder will not work for this recipe. Cocoa powder lacks the cocoa butter fat necessary to bind the ingredients and create the desired smooth, snapping texture, unlike what is required for a recipe like our [Homemade Ground Beef recipe] which uses different binding agents.
How long can these bars be stored before losing their crunch?
They remain optimally crunchy for up to one week in the refrigerator. Storing them in an airtight container keeps out ambient moisture, which is the primary enemy of crispiness in no-bake treats.
Nobake Homemade Crunch Bars
Ingredients:
Instructions:
Nutrition Facts:
| Calories | 160 kcal |
|---|---|
| Protein | 3.0 g |
| Fat | 9.9 g |
| Carbs | 17.4 g |
| Fiber | 1.7 g |
| Sugar | 12.4 g |
| Sodium | 83 mg |
