Nobake Peanut Butter Pie: the Ultimate, Creamy Chocolate Dessert
- Achieving Velvety Perfection: Introducing the Ultimate No-Bake Peanut Butter Pie
- The Science of Set: Why This Filling is So Creamy
- Gathering Your Essentials: Ingredients for This Decadent NoBake Peanut Butter Pie
- Crafting Your Dream Dessert: Step-by-Step Assembly Guide
- Troubleshooting Your NoBake Peanut Butter Pie: Chef's Pro Tips
- Storage Solutions: How Long Does Peanut Butter Pie Last?
- Elevating the Experience: Perfect Pairings and Garnishes
- Recipe FAQs
- 📝 Recipe Card
Achieving Velvety Perfection: Introducing the Ultimate No-Bake Peanut Butter Pie
Seriously, the smell of dark chocolate and roasted peanuts swirling together is intoxicating. When you dive a fork into this dessert, it's not just rich; it’s ridiculously cold, intensely creamy, and unbelievably smooth.
This is the recipe that delivers that cloud like texture and pure nostalgia in every single slice.
The best part? There is zero actual baking involved, which means no oven heat in the summer and way less cleanup. It’s cheap, incredibly fast to assemble, and it looks like you spent hours slaving away for a fancy dinner party. This recipe is absolute dessert gold, reaching official lifesaver status.
I’ve tried so many peanut butter pies that ended up soupy, grainy, or just too heavy, but this method is the foolproof champion. Stop scrolling, grab your mixer, and let’s crack on and make the absolute ultimate NoBake Peanut Butter Pie .
The Science of Set: Why This Filling is So Creamy
Why We Skip the Oven: The Zero Effort Dessert
The magic of no-bake desserts lies in temperature, not heat. We use fat stabilization to get that perfect set. Trust me, the freezer is your friend for the crust, and the cold fridge handles the filling.
Decadence Defined: The Perfect Peanut Butter to Chocolate Ratio
This pie achieves balance by using a salty, slightly bittersweet chocolate crust to contrast the sweet, ultra creamy filling. We are going for "rich" here, but not "overwhelming." If you prefer something less intense, you might prefer a straight graham cracker crust, but that chocolate base is the soul of this pie.
Difficulty at a Glance: Time vs. Effort Breakdown (Easy)
This truly is an easy recipe. Your biggest challenge will be waiting four hours for it to set properly! We are only talking about 20 minutes of active work, followed by some serious patience.
The Role of Cream Cheese and Stabilizers (Avoiding weepiness)
We use full fat cream cheese as the anchor. It gives the filling density and tang, which cuts through the sweetness of the peanut butter. Crucially, it stabilizes the whipped cream so the pie doesn't "weep" or turn soupy once refrigerated. You need that stability, especially if you plan to keep leftovers for a few days. If you're looking for an even simpler, fluffier version that relies purely on whipped topping, you might enjoy my recipe for the Amish Peanut Butter Cream Pie: Easy No-Bake Recipe for Ultimate Comfort .
Achieving the Ultra Smooth Peanut Butter Texture
The secret to smoothness is starting with perfectly soft cream cheese. If the cream cheese is cold, it lumps up immediately and you can’t fully incorporate the peanut butter. I learned this the hard way once, resulting in a chunky pie that was frankly embarrassing.
Room temperature ingredients are non-negotiable for that velvety texture we're aiming for.
The Salt Balance: Enhancing Sweetness in the Crust
I add a tiny bit of fine sea salt to the crust and the filling. Why? Salt is the unsung hero that prevents sweetness from becoming cloying. It amplifies the roasted flavor of the peanuts and makes the chocolate taste richer.
Gathering Your Essentials: Ingredients for This Decadent NoBake Peanut Butter Pie
Crust Components: Selecting the Right Chocolate Wafer
For the crust, you want dry, crisp cookies. The classic chocolate sandwich cookie is ideal because it breaks down into a perfect fine crumb that holds its shape brilliantly. I recommend scraping out the filling if you want a firmer crust, but leaving it in adds moisture and flavor.
The Filling Foundation: Specifics on Peanut Butter Type (Creamy vs. Crunchy)
Stick to commercial, stabilized peanut butter (like Jif or Skippy) for this NoBake Peanut Butter Pie . Natural peanut butter, where the oil separates, simply won't set as reliably.
You can use smooth or crunchy based on preference, but smooth gives the truly ultimate creamy peanut butter pie experience.
Dairy Details: Choosing Whipped Topping vs. Fresh Whipped Cream
This recipe calls for whipping fresh, very cold heavy cream, which gives the filling a beautiful, light mousse like texture. However, using 4 cups of thawed whipped topping (like Cool Whip) is a fantastic, easier substitution that adds even more stability for hot days.
Smart Substitutions for Dietary Needs
| Ingredient | Viable Substitute | Notes |
|---|---|---|
| Cream Cheese | Vegan Cream Cheese Block (e.g., Miyoko’s) | Ensure it is a solid block, not a spread. |
| Chocolate Wafers | Graham Crackers or Vanilla Wafers | Great if you prefer a lighter crust base. |
| Heavy Cream | Chilled, Full Fat Coconut Cream | Scrape the solid cream from the top of a refrigerated can of coconut milk. |
| Icing Sugar | Monk fruit or Erythritol Blend | Adjust quantity to taste, as alternative sweeteners vary in intensity. |
Crafting Your Dream Dessert: step-by-step Assembly Guide
Phase I: Preparing and Pressing the Chocolate Crumb Crust
- Crumble Time: Toss your chocolate cookies and salt into a food processor and pulse until they look like super fine, uniform sand. If you don't have a processor, put them in a sealed bag and bash them with a rolling pin it’s excellent stress relief.
- Bind it Up: Drizzle in the melted butter and mix until all the crumbs are evenly moistened. The mixture should feel like damp sand and hold together when you squeeze it.
- Press Hard: Dump the mixture into your 9 inch pie dish. Use the bottom of a measuring cup to press the crumbs firmly and uniformly across the base and up the sides. The firmer the press, the better the slice.
- Initial Chill: Slide that crust into the freezer for 15 minutes. This locks the butter in place and guarantees a solid base.
Phase II: Whipping the Silky Peanut Butter Mousse Filling
- Stiff Peaks First: Pour your very cold heavy cream into a mixing bowl. Whip on medium high speed until beautiful, stiff peaks form. You want them to hold their shape when you lift the whisk. Pop this back in the fridge immediately.
- The Creamy Base: In a separate large bowl, beat the room temperature cream cheese, peanut butter, vanilla, and salt. Beat this on medium speed for at least 2 minutes until it is unbelievably light and fluffy, scraping the sides often. This is where lumps disappear!
- Sweeten Slowly: Gradually beat in the sifted powdered sugar until everything is perfectly smooth. This is your intensely peanut butter pie recipe core.
Chef's Note: Don't skip sifting the icing sugar. If you don't, you risk tiny little hard lumps of sugar throughout your otherwise perfect, silky filling.
- Fold Gently: Retrieve the stiff whipped cream. Use a rubber spatula to fold the whipped cream into the peanut butter mixture in three additions. Use gentle, slicing motions, folding from the bottom up. Stop the second you see no white streaks remaining. You are trying to keep the air in!
Phase III: The Crucial Chilling Process for Optimal Set
- Load the Crust: Spoon the whole fluffy creamy peanut butter pie mixture into the chilled crust. Use the spatula to smooth the top nicely.
- The Wait: Cover the pie loosely don't let the plastic wrap touch the surface. Refrigerate for a minimum of 4 hours. Honestly? Overnight ( 8 hours) is always best for a truly professional, clean slice.
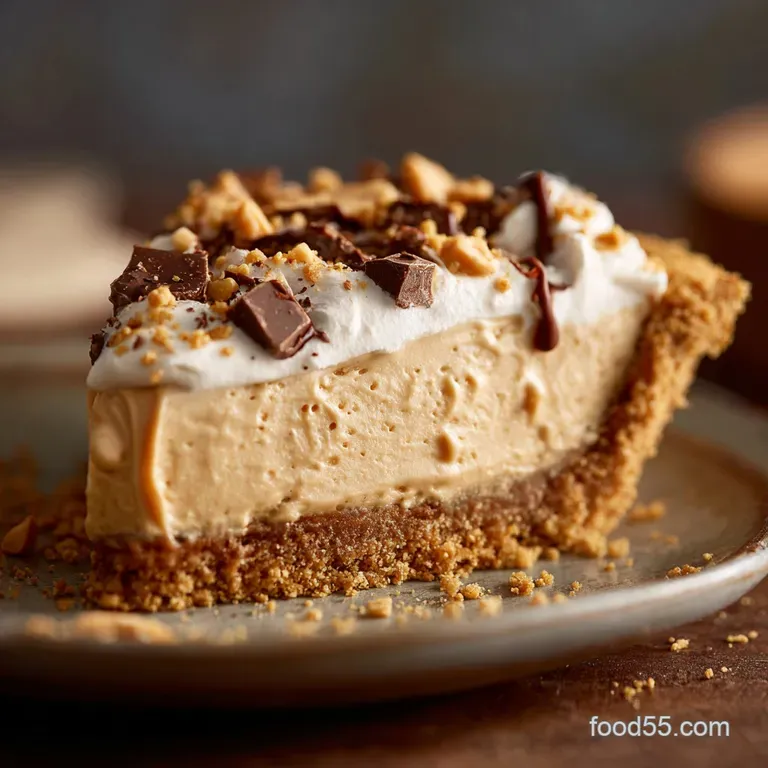
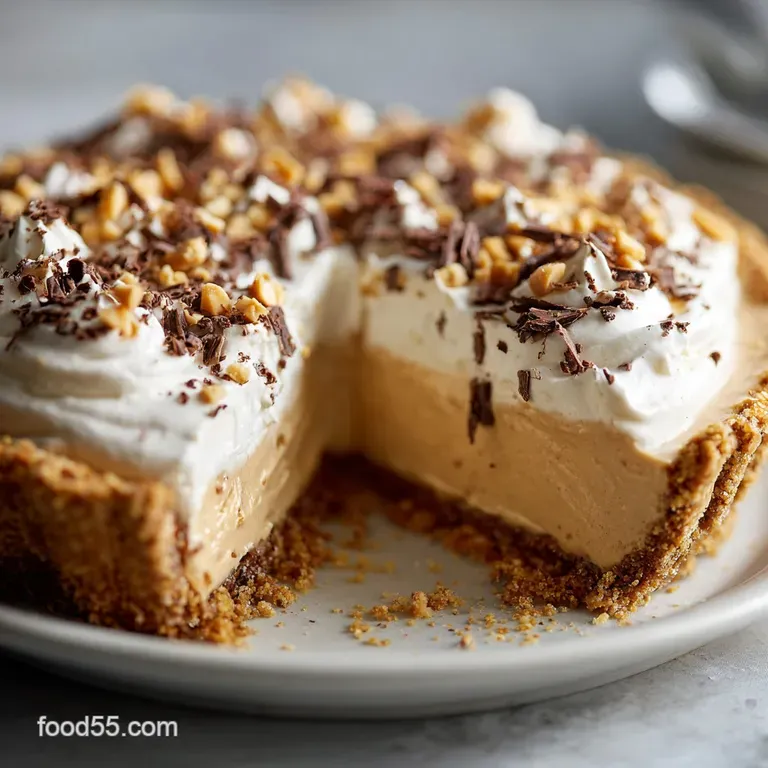
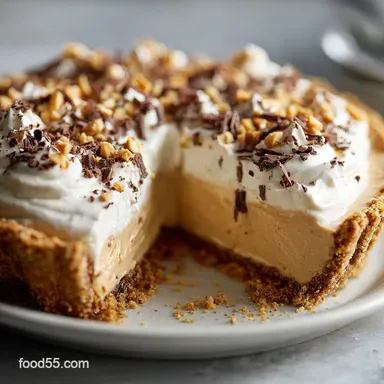
Finishing Touches: Garnishing the Set Pie
- Drizzle Magic: Just before serving, make your chocolate ganache. Drizzle it artfully over the set pie. A scattering of chopped peanuts or even mini chocolate chips is the perfect final flourish.
Troubleshooting Your NoBake Peanut Butter Pie: Chef's Pro Tips
Preventing a Runny Filling: Temperature Management is Key
If your filling is runny, you likely had warm heavy cream or you overmixed the stabilized filling, deflating the air. Always ensure the cream is ice cold, and stop folding immediately once combined.
Achieving Clean Slices Every Time
The biggest secret is temperature and tools. Use a sharp, thin bladed knife, and dip it in a tall glass of hot water between every single cut. Wipe the blade dry, slice, repeat. This keeps the filling from dragging.
How to Customize the Crust Thickness
If you prefer a thicker, sturdier crust (like a true cookie foundation), increase the cookie crumb mixture by about 50 grams (1/2 cup) and slightly increase the melted butter. If you're a flaky pie fan, check out my recipe for the Maple Pecan Pie: The Flaky, No Corn Syrup Southern Dessert Recipe .
Common Mistake: Overmixing the Whipped Topping
This is where people fail. When folding the whipped cream into the peanut butter base, use restraint. If you mix too vigorously or for too long, you flatten the air bubbles. Result? A dense, heavy filling instead of the desired light mousse.
Storage Solutions: How Long Does Peanut Butter Pie Last?
Refrigeration Best Practices
Because this quick peanut butter dessert uses dairy and needs to stay cold, always store it tightly covered in the refrigerator. It will stay wonderfully creamy and delicious for up to 4 days. If the edges start to dry out, it’s still safe, but it loses that pristine texture.
Can I Freeze Leftover Pie? (Freezing instructions)
But does it freeze well? You bet! This is one of the best desserts for freezing.
- Prep: Once fully set, wrap the entire pie (still in the pan) very tightly in cling film, followed by a layer of heavy duty foil.
- Duration: It will keep beautifully in the freezer for up to 2 months.
- Thawing: Thaw the pie overnight in the refrigerator (still wrapped). Do not thaw it at room temperature, as this encourages condensation and sogginess.
Elevating the Experience: Perfect Pairings and Garnishes
To truly enhance this decadent NoBake Peanut Butter Pie , consider how you serve it. A tiny dusting of cocoa powder or finely shaved dark chocolate adds visual appeal.
Alternatively, a tiny spoonful of high-quality jam (raspberry or blackcurrant) served alongside provides a great acidic contrast to the richness. Serve it ice-cold with a strong cup of coffee or a cold glass of milk for the ultimate comfort factor.

Recipe FAQs
Why is my peanut butter filling too soft or runny after the recommended chilling time?
This is usually due to insufficient chilling time or using softened ingredients, like cream cheese, that weren't fully cold. Ensure the pie chills for the full 6-8 hours, or ideally overnight, and measure the cream cheese and confectioners' sugar accurately, as they are key stabilizers.
Can I use a different crust besides the chocolate crumb crust?
Absolutely; a vanilla wafer or graham cracker crust is a classic complement to the intense peanut butter flavor profile. If you decide to go with a non-chocolate crust, remember to adjust the sugar and butter amounts slightly to ensure it presses and sets firmly.
What is the best way to store leftovers, and can I freeze the entire pie?
Store the pie covered tightly in the refrigerator for up to 4 days; keep it away from strong odors as the filling can absorb them easily. This pie freezes exceptionally well; wrap it tightly and freeze for up to 2 months, letting it thaw in the fridge overnight before serving.
Can I use all-natural or reduced fat peanut butter instead of the standard creamy variety?
It is highly recommended to use standard commercial creamy peanut butter (like Jif or Skippy) for the best structure and texture. Natural peanut butter tends to separate and can result in a grainy or overly greasy filling that struggles to set firmly without stabilizers.
Why does my filling look slightly oily or separated?
This often happens if you overmix the filling once the cream cheese and peanut butter are incorporated, especially if they were too warm before mixing. Over beating causes the emulsion to break, leading to separation and fat leaching, so mix only until the filling is smooth and just combined.
Can this No-Bake pie be made completely vegan or dairy-free?
Yes, substitute the dairy cream cheese with a high-quality vegan cream cheese alternative and use a non-dairy whipped topping, such as coconut cream or cashew based whip. You must also ensure your chocolate crumb base is made with vegan cookies and plant based butter to avoid any hidden dairy.
What is the trick to getting clean, beautiful slices of pie?
For perfect presentation, use a long, sharp knife and run it under very hot water before making each cut. Wipe the blade completely dry between slices to prevent the creamy filling from sticking and dragging, which results in messy edges.
Nobake Peanut Butter Pie Recipe
Ingredients:
Instructions:
Nutrition Facts:
| Calories | 600 kcal |
|---|---|
| Fat | 42 g |
| Fiber | 4 g |
