Creamy Pumpkin Pie: the Kings Ransom Recipe for Silky Thanksgiving
- Achieving the Impossible: The Ultimate Silky, Creamy Pumpkin Pie
- The Science of Silk: Why This Creamy Pumpkin Pie Never Cracks or Grains
- Essential Pantry Staples for a Flawless Custard Filling
- Master the Method: Step and by-Step Baking for Flawless Finish
- Troubleshooting Your Pie: Chef's Secrets for Avoiding Common Pumpkin Pie Pitfalls
- Preserving Perfection: Storage, Freezing, and Traveling with Pie
- The Perfect Pairing: What to Serve Alongside Your Creamy Pumpkin Pie
- Recipe FAQs
- 📝 Recipe Card
Achieving the Impossible: The Ultimate Silky, Creamy Pumpkin Pie
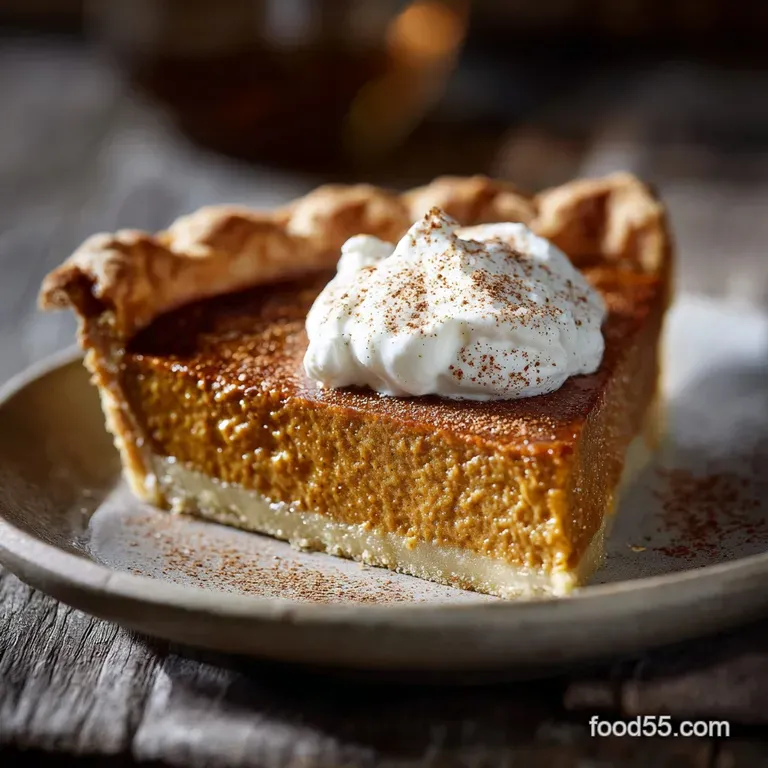
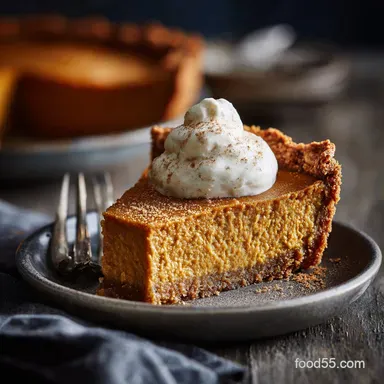
Forget those sad, dry slices of Thanksgiving past. We are not aiming for "okay" pumpkin pie; we are aiming for velvet. When this pie comes out of the oven, the entire house smells like pure, spiced autumn magic warm cinnamon, fresh nutmeg, and that deep, earthy pumpkin scent.
The finished texture is the real victory here: absolutely silky, impossibly smooth, and never, ever grainy.
I spent years making cracked, sandy and textured pies that looked tragic even when they tasted decent. This version, which borrows brilliant techniques from European custard making, is a total lifesaver.
It’s surprisingly quick to mix up, unbelievably reliable, and guaranteed to save your holiday sanity when you’re already juggling a million other dishes. Trust me, if you only make one pumpkin pie this year, make this one.
Ready to ditch the dry filling dilemma forever and finally master the best pumpkin pie recipe from scratch? Grab your fine and mesh sieve and make sure your butter is ice and cold for the crust. Let’s get to the real work of making this perfectly creamy pumpkin pie .
The Science of Silk: Why This Creamy Pumpkin Pie Never Cracks or Grains
The difference between a standard pie and this glorious, silky version comes down to a few basic kitchen science rules. We are making a delicate custard, not a baked batter, and we need to treat it with respect.
The Tyranny of Dry Pie: Why Texture Trumps Sweetness
Most home cooks load pumpkin pie with too much sugar and too many eggs. This creates a filling that is overly stiff and almost crumbly, leading to that dreaded sandy texture when you bite in. We keep the sugar balanced and prioritize fat and moisture, resulting in a rich, smooth mouthfeel.
Key Techniques for Eliminating Graininess
Graininess often happens when the pumpkin fibers or spices aren't fully integrated, or when the egg proteins cook too fast. The fix is simple: gentle whisking and incorporating room temperature ingredients.
Our real secret, though, is the mandatory straining step it removes any stubborn lumps that could ruin the texture.
What Makes This Recipe "King's Ransom" Worthy?
It’s all in the dairy blend and the slow baking. We skip standard milk entirely, opting for a mix of evaporated milk and heavy cream. This is the trick to a superior, creamy pumpkin pie filling .
The reduced water content in evaporated milk guarantees richness and prevents the custard from getting watery as it bakes.
Dairy Blends: The Secret to a Smooth Mouthfeel
Evaporated milk is crucial because it’s shelf and stable concentrated milk, which means deeper flavor and fewer volatile liquids that can cause cracks. Pairing it with heavy cream adds necessary richness and fat, making the final product feel luxurious and velvety on the tongue.
It delivers that signature creamy pumpkin pie with condensed milk texture, even though we are technically using evaporated milk for less sweetness.
Calibrating the Spice Level for Pure Pumpkin Bliss
Forget the pre and mixed spice blend lurking in the back of your cupboard. Freshly grating your nutmeg is not optional; it’s transformative. Using a high ratio of cinnamon and ginger, but dialing back the cloves, ensures the spices warm your mouth without overpowering the natural earthiness of the pumpkin.
The Critical Role of Straining the Custard
This is the one step you cannot skip if you want true silky perfection. After mixing the filling, you must pour it through a fine and mesh sieve.
Chef’s Note: Straining removes small pieces of cooked or stringy pumpkin fiber, unmixed spice clumps, and any bits of egg that started to curdle when they hit the pumpkin. It is messy, yes, but it ensures a flawless, velvety finish.
It is the number one secret to achieving the best pumpkin pie recipe from scratch .
Essential Pantry Staples for a Flawless Custard Filling
When making this creamy pumpkin pie , the quality of your ingredients truly matters. Everything should be at room temperature for the filling to emulsify beautifully.
Pumpkin Puree vs. Fresh Roasted Pumpkin: What to Use?
Honestly? Stick to 100% canned pumpkin puree (Libby’s is my preference). It has a consistent moisture content that makes baking predictable, which is huge when you’re dealing with a delicate custard.
If you must use fresh, you must blot it dry with paper towels after roasting to prevent a watery pie.
Deep Dive into Dairy: The Cream and Condensed Milk Ratio
As mentioned, evaporated milk is the unsung hero here. It acts like a concentrated base for the custard, giving it body without adding the huge amount of sugar found in true sweetened condensed milk. We keep the condensed milk texture but control the sweetness with brown sugar.
Spice Blend Breakdown: Achieving the Perfect Warmth
- Cinnamon: The foundation.
- Ginger: Must be present to provide necessary heat.
- Fresh Nutmeg: Essential for that fragrant depth. Buy whole nutmeg and grate it right over the bowl you will smell the difference immediately.
- Cloves/Allspice: Use sparingly. These spices can quickly become overpowering and taste medicinal if you use too much.
Ingredient Swaps for Dietary Needs (Dairy and Free Options)
Listen, we all have those friends with dietary restrictions. Here are my tried and true substitutions that still deliver a beautiful result.
| Original Ingredient | Acceptable Substitution | Notes |
|---|---|---|
| Evaporated Milk | Full and fat canned coconut milk | Use the thick cream from the top of the can. It adds a delicious warmth but chill the cans first. |
| Heavy Cream | Oat milk creamer or coconut cream | Avoid thin milks; you need the fat content for richness. |
| Large Eggs | Flax eggs (2 flax eggs per 1 large egg) | The texture will be slightly denser, but it will set beautifully. |
| Brown Sugar | Maple Syrup (reduce other liquids slightly) | Maple syrup gives a wonderful flavour boost, but use 3/4 the measure. |
Master the Method: Step and by-Step Baking for Flawless Finish

We’re following the step and by-step outline I provided, but let’s talk about the key sensory moments and why we do things.
Blind Baking Your Crust: The Technique to Prevent Soggy Bottoms
This step is non and negotiable for the Ultimate Silky, Deeply Spiced Homemade Treat we are aiming for. If you skip blind baking, you will have a catastrophic soggy bottom. Roll that dough thick, freeze it solid, and use pie weights.
I’ve gone into detail about this before in my [Pumpkin Pie Recipe: Ultimate Failsafe Flaky Crust, Zero Soggy Bottom] guide it’s worth mastering that step alone!
Preparing the Perfect Custard Base (The Gentle Whisk)
Whisk your eggs until they are just foamy, not fully beaten like scrambled eggs. When you add the dairy and pumpkin puree, whisk gently until everything is combined, but stop immediately when smooth. Over and whisking incorporates too much air, which can cause cracking during baking.
The Gentle Bake: Temperature Management for Crack and Free Pie
Hot oven blast followed by a lower, slower cook is the key here. The initial heat sets the crust, then we drop the temperature to 325°F (160°C). This low, slow cook gently sets the custard from the outside in.
After about 30 minutes, make sure you shield those edges, or they will turn black. Always use a baking sheet underneath the pie for insulation and easy handling.
The Essential Cooling and Setting Period
Patience, my friend. When you pull the pie out, the centre should still have that slight, wet wobble like a perfectly set Jell-O. Residual heat will finish the cooking process. Trying to slice it warm is a total disaster.
You must let it cool for an hour on the counter, then chill in the fridge for a minimum of three hours. This is when the creamy pumpkin pie truly sets.
Troubleshooting Your Pie: Chef's Secrets for Avoiding Common Pumpkin Pie Pitfalls
We all make mistakes. I once forgot to add the eggs and realized 15 minutes into the bake it was a literal soupy mess. Learn from my errors!
Solving the Soggy Crust Dilemma
Soggy crust happens when the raw filling saturates the pastry before the crust can set. Solution one: Blind bake completely. Solution two: Once blind baked, brush the bottom of the warm crust with a thin layer of egg white and bake it for one minute until glossy and set. This creates a waterproof barrier.
It’s brilliant.
How to Fix a Filling That Appears Curdled or Grainy
If your filling looks grainy before it goes in the oven, you didn't strain it properly or your eggs started cooking. Run it through the fine and mesh sieve again! If it looks curdled after baking, you simply baked it too long and too hot.
Keep that oven temp low and pull the pie out when it still has a slight centre jiggle. You were too late if you wait until there is no movement at all.
Preserving Perfection: Storage, Freezing, and Traveling with Pie
This pie is so good, you’ll want to make it ahead of time. And you absolutely can!
Best Practices for Refrigerated Storage
Because this is a custard pie, it must be refrigerated. Once cooled completely, cover the pie loosely with plastic wrap or foil. It will keep beautifully for 4 to 5 days in the fridge.
Can You Freeze Pumpkin Pie?
But does it freeze well? You bet, provided it is fully cooked and cooled. Wrap the whole pie (still in the aluminum pie plate) tightly in two layers of plastic wrap, followed by a layer of foil. Freeze for up to 1 month. Thaw it overnight in the refrigerator before serving.
Reheating and Serving Temperature Guide
I love pumpkin pie cold, straight from the fridge the filling is the firmest and creamiest that way. However, if you want a warm slice, wrap it loosely in foil and reheat in a 300°F (150°C) oven for about 15 minutes.
Just warm enough to release those spice aromas, but not long enough to risk curdling the filling.
The Perfect Pairing: What to Serve Alongside Your Creamy Pumpkin Pie
No pie is complete without the perfect accompaniment. We need textures and contrasting temperatures to truly celebrate this dessert.
Pairing Wines and Spirits with Warm Spice
For drinks, avoid anything too acidic or sharp. A creamy pumpkin pie loves something rich: a sweet sherry, a port wine, or even a glass of ice and cold milk. If you're feeling adventurous, try a splash of bourbon or spiced rum it enhances the molasses notes beautifully.
Hand and Whipped Cream vs. Meringue Topping
While meringue is fine, the classic pairing of hand and whipped cream is unbeatable. Skip the sugar when whipping and use a spoonful of maple syrup instead. It complements the deep flavor of the pie far better than plain granulated sugar.
You could also skip pumpkin and make a similar custard base for my classic [Apple Pie Recipe: Best Homemade Flaky Crust Set Filling], but that's a different story for a different day!
Savory Compliments for a Dessert Course
Serving this pie after a heavy dinner? Keep the savory palate cleanser light. A small, dry gingersnap cookie or a light cup of strongly brewed Earl Grey tea works wonders. The delicate bergamot contrasts beautifully with the warm spices without being overwhelming.

Recipe FAQs
Why did my pie filling crack during baking or cooling?
Cracking is the number one sign of overbaking, which causes the custard to set too hard and shrink as it cools rapidly. Always remove the pie from the oven when the edges are set but the center still jiggles like firm gelatin, and allow it to cool slowly on a wire rack away from drafts.
My pie wasn't silky; why did the texture turn out grainy?
A grainy texture indicates that the egg proteins coagulated improperly, often due to excessive heat or failure to strain the filling. Always ensure your recipe uses a bain marie if you are concerned about oven temperature, and rigorously strain the filling mixture through a fine mesh sieve before pouring it into the shell.
How do I know for sure when the pie is finished baking?
The pie is properly done when the outer two inches of the filling are completely set and slightly puffed, but the very center (about a one-inch circle) still has a slight, loose jiggle when gently nudged.
For precision, the internal temperature of the filling should register 175°F (80°C) near the center when checked with a thermometer.
Can I use fresh, cooked pumpkin purée instead of canned?
Yes, but fresh purée contains significantly more moisture than commercial canned varieties, which can result in a soggy or watery pie. To compensate, spread your homemade purée on a sheet tray and bake it at 350°F (175°C) for about 15 minutes to evaporate excess water before measuring it for the recipe.
Can I adapt this recipe to be dairy-free or vegan?
You can substitute the heavy cream and evaporated milk with full fat coconut cream or cashew cream, which provides similar richness. For a vegan option, replace the eggs with commercial liquid egg replacer or a mixture of cornstarch and agar agar, though note this will slightly change the density of the final custard.
What is the best way to store leftover pumpkin pie?
Because this recipe is a custard pie, it must be stored tightly covered in the refrigerator to prevent bacterial growth and maintain freshness. The pie will remain delicious for up to 3 to 4 days, though the buttery crust is optimally crisp within the first 48 hours.
Can I freeze the finished, baked pumpkin pie?
While freezing is possible, it is not recommended as the freezing and thawing process can drastically compromise the coveted silky texture of the custard, leading to slight separation or graininess.
If you must freeze it, wrap the completely cooled pie tightly in plastic wrap followed by aluminum foil, and thaw it slowly overnight in the refrigerator.
Silky Creamy Pumpkin Pie Recipe
Ingredients:
Instructions:
Nutrition Facts:
| Calories | 140 kcal |
|---|---|
| Protein | 3.0 g |
| Fat | 3.0 g |
| Carbs | 26.0 g |
