Cheesy Garlic Fingers Soft Buttery and Ready for Dipping
- Beyond Breadsticks: What Makes Cheesy Garlic Fingers Legendary?
- The Building Blocks: Everything Needed for Perfect Cheesy Garlic Fingers
- Step and by-Step: Crafting Your Ultimate Cheesy Garlic Fingers Dough and Topping
- Tips from Cape Breton Cooks for Flawless Results
- Customizing and Storing Your Masterpiece
- Recipe FAQs
- 📝 Recipe Card
Beyond Breadsticks: What Makes Cheesy Garlic Fingers Legendary?
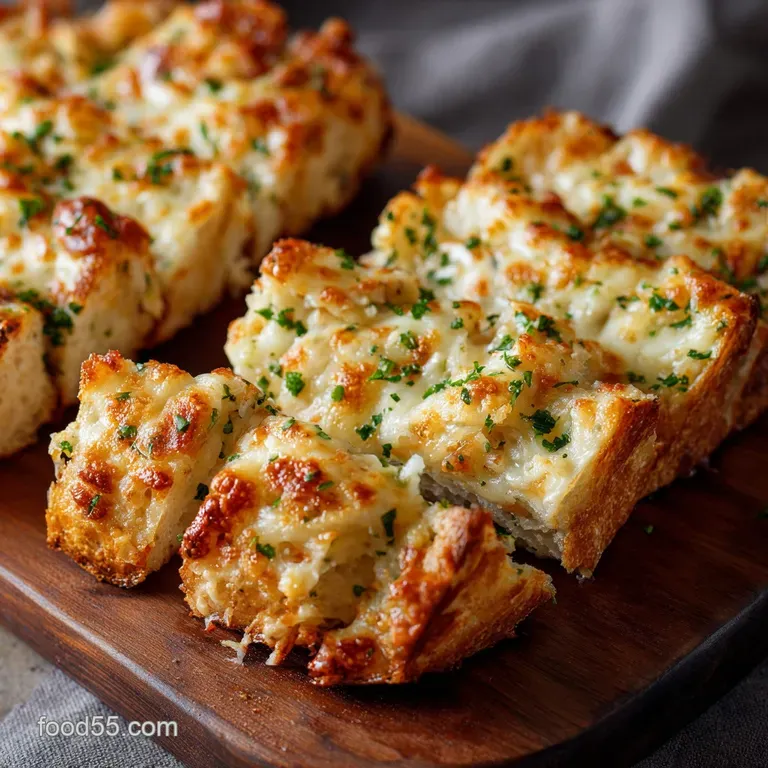
Okay, let's get one thing straight. If you think you're getting standard, dried and out, store and bought garlic bread here, you are sorely mistaken. This isn't just Garlicky Bread with Mozzarella. This is the Ultimate Cheesy Garlic Fingers .
We’re talking about a pillowy, soft, yeasted crust the kind of base that makes you swoon completely soaked in a fresh garlic butter bath, then topped with molten, stretching cheese. It's truly magnificent.
I learned to make this years ago after a trip East, and honestly, every time I serve them, people lose their minds. They are messy, they are incredibly satisfying, and they are the undisputed champion of the side dish world.
Forget boring Pain Naan Cheesy Bread ; this uses real dough, giving it that perfect chew.
Tracing the Maritime Roots of This Garlicky Delight
If you’ve spent any time in Atlantic Canada, especially Nova Scotia, you know what I’m talking about. Canadian Cheesy Garlic Fingers aren't just a side dish; they’re an institution.
They usually show up alongside a big, greasy pizza, but they deserve the spotlight all on their own. They evolved out of the region’s distinct pizza culture think thick crusts and savoury toppings.
When you order this, you aren't just ordering breadsticks; you're ordering comfort food, marinated in butter and tradition. It’s glorious.
The Essential Difference: Dough vs. Standard Crust
This is the hill I will die on: Cheesy Garlic Fingers must use a yeasted dough.
| Base Type | Texture Result | Purpose |
|---|---|---|
| Yeasted Dough | Soft, puffy, chewy interior. Resilient crust. | Our choice! Holds moisture, perfect for dipping. |
| Standard French Bread | Crunchy, dry, prone to sogginess in the center. | Fine for bruschetta, but not this. |
The simple dough we use ensures a Homemade Cheesy Bread Recipe that’s fluffy yet substantial enough to handle a generous amount of garlic butter without collapsing into a greasy mess.
If you try to do this on a thin cracker crust or a pre and made frozen Garlic Bread Pizza Texas Toast base, you lose the texture. You need that inner cloudiness.
Why the Dipping Sauce is Non and Negotiable
Okay, I know you might be tempted to just serve these with marinara. And yes, a warm marinara is fine. But if you want the authentic experience, the true Ultimate Cheesy Garlic Fingers moment, you need Donair Sauce.
The Donair is another East Coast invention, and its sauce is a thick, sweet, tangy blend made primarily from condensed milk, vinegar, and garlic. That combination of intensely savoury, salty garlic bread and the sweet, cool dipping sauce? It's magic. It completely cuts through the richness of the butter and cheese.
If you skip this, you’re missing half the point. It’s like eating pancakes without syrup. It's criminal.
The Building Blocks: Everything Needed for Perfect Cheesy Garlic Fingers
You don't need fancy ingredients for this Cheesy Garlic Fingers Recipe . We need flour, yeast, butter, and cheese. But, as always, the devil is in the details and the freshness of your garlic.
Selecting the Best Cheese Blend for Maximum Melt and Stretch
The biggest mistake I ever made was using high and moisture fresh mozzarella. It looked beautiful, but the second it hit the oven heat, it released a flood of water, turning my beautiful crust into a swamp. Lesson learned.
You absolutely must use low and moisture, pre and shredded mozzarella (or shred a block of low and moisture yourself). We aren’t aiming for sophisticated Italian flavour here; we are aiming for maximum stretch and bubble.
We throw in a bit of Parmesan because it deepens the flavour and helps create those gorgeous golden spots.
CRITICAL WARNING: Do not use fresh mozzarella, no matter how good it tastes. It will destroy the texture of your dough and give you a wet, sad finger. Stick to the low and moisture stuff. Trust me on this one.
A Guide to Mastering the Homemade Garlic Butter Spread
We are not messing around with powder here. I need four huge cloves of fresh garlic, minced up small, then steeped in melted butter. I usually add a dash of dried oregano, because that classic pizza parlour aroma is essential.
My trick? I melt the butter, stir in the garlic, and then let it sit for about ten minutes before I even touch the dough. This allows the heat of the butter to gently cook the garlic, mellowing its raw bite and infusing the fat completely. That way, when you brush it on, it’s pure, potent flavour.
This is what elevates it from standard Garlic Bread With Mozzarella to legendary status.
Essential Tools for Working with Yeasted Dough
Listen, you can do this by hand. I did it by hand for years, and it's a great workout. But if you have a stand mixer with a dough hook, now is the time to pull it out. A good six minutes in the mixer and your dough will be soft and elastic.
The other essential piece of equipment is a pastry brush. You need to get that butter right to the edges. No dry crusts allowed. And if you’re new to yeast, invest in a simple kitchen thermometer.
Knowing your water is between 105°F and 115°F is the difference between a soaring, puffy crust and a flat, dense disaster.
Related Recipes Worth Trying
- Koreanstyle Soy Garlic Chicken Wings UltraCrispy Oven or Air Fryer Recipe — Koreanstyle Soy Garlic Chicken Wings deliver restaurantquality crunch at home This sticky umamirich Ganjang recipe uses a doublecook method for shatteringly...
- Miso Garlic Butter Salmon Sticky Umami Bomb Recipe Ready in 30 Min — Miso Garlic Butter Salmon is the ultimate weeknight warrior This Easy Pescatarian Recipe features tender fillets glazed in a sticky miso garlic sauce for...
- Perfect Garlic Butter Herb Roast Beef Your ShowStopping Sunday Lunch — This Garlic Butter Herb Roast Beef is foolproof Get a juicy mediumrare centre and a crispy flavourpacked herb butter crust Perfect for a proper Sunday Lunch
Step and by-Step: Crafting Your Ultimate Cheesy Garlic Fingers Dough and Topping
Let's crack on with the hands and on work. This process isn't hard, but dough rewards patience and accuracy.
Phase 1: Kneading and Proofing the Soft Dough Base
First, prove the yeast. Warm water, sugar, yeast. Wait five to ten minutes until it looks foamy like a cappuccino. If it doesn’t foam, your yeast is dead or your water was too hot, and you need to start over. I’ve killed yeast more times than I care to admit. It happens.
When you knead the flour in, you are looking for elasticity. It should feel supple and smooth, not sticky and wet, and not tough and dry. Six to eight minutes of kneading is enough to develop the gluten. Then, let it proof.
It takes about an hour to 90 minutes, depending on how warm your kitchen is. Find the warmest spot in the house, cover that bowl, and walk away. That patience pays off with incredible texture.
Phase 2: Achieving Edge and to-Edge Coverage with Garlic Spread
Once the dough has doubled, punch the air out gently. Roll it out onto your prepared baking sheet. You want a decent thickness here, about half an inch. Use your fingers to poke and stretch it if you need to.
Now, take half of your infused garlic butter and brush it everywhere . Don’t be shy about the edges. This garlic butter is the main flavour carrier. This is what turns it into the perfect Cheesy Garlic Bread Dippers . Getting that coverage is key.
Phase 3: The Golden Bake Time for Bubbly Cheese
This is where the magic (and the anti and sogginess insurance) happens.
We are going to par and bake the crust. That means we bake the dough, buttered, but without the cheese , for 5 to 7 minutes. Why? Because it sets the dough structure. The dough puffs up slightly and firm up.
Then, when you add the heavy mozzarella and put it back in the oven, the base doesn't stand a chance of turning into raw glue.
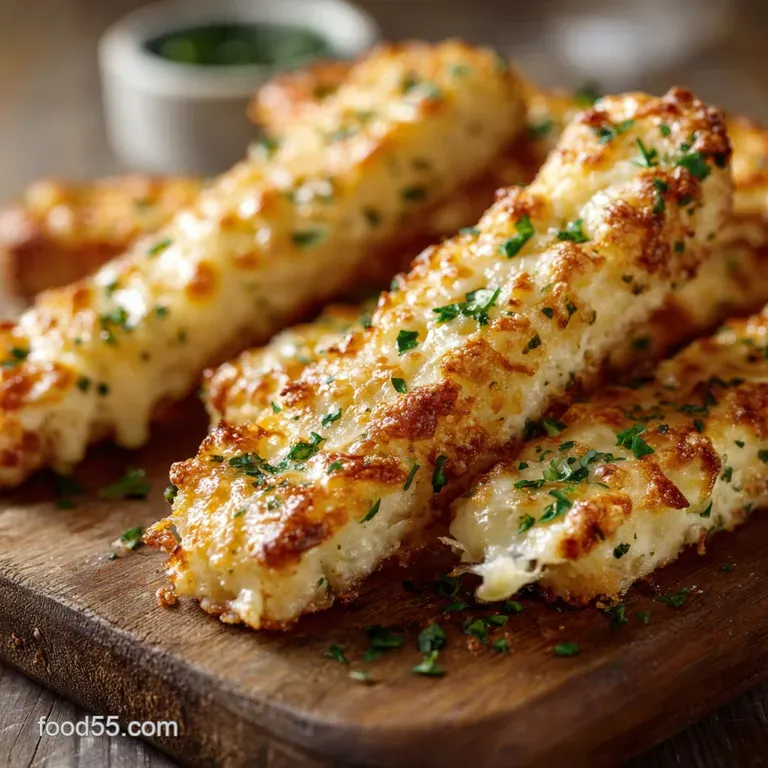
Pull it out, pile on the mozzarella and Parmesan. Bake for another 8 to 10 minutes until the cheese is blistered and bubbly. The second it comes out of the oven, brush the remaining garlic butter around the crust. That’s for shine, flavour, and aroma.
Slice them into those signature long Cheesy Garlic Bread Pull Apart strips. Done.
Tips from Cape Breton Cooks for Flawless Results
- Don’t Cheat the Knead: A properly kneaded dough creates those beautiful air pockets, resulting in a light, chewy interior. If you under and knead, the dough will be dense and won't hold the toppings well.
- Go Heavy on the Cheese: When the recipe calls for 1 1/2 cups of mozzarella, use 1 1/2 cups. Skimping on the cheese makes them less satisfying.
- Slice After Baking: Always slice the fingers after they come out of the oven. If you slice them before, the cheese tends to separate and harden in the cuts, making them tough to pull apart later.
- The Hot Oven Trick: Baking at 425°F (220°C) is key. You need that high heat to ensure the crust gets golden quickly before the garlic butter burns.
Customizing and Storing Your Masterpiece
Solving Common Dough and Cheese Melt Issues
The two most frequent panic messages I get are about dough not rising, and cheese becoming watery.
If your dough didn't rise, go back to the yeast/water temperature. Did you use warm water (105-115°F)? If the yeast didn't foam, it was likely dead. Don't waste your flour on dead yeast. If the dough is just dry and tough, you probably added too much flour during the kneading process.
If your cheese is watery, you used high and moisture cheese. There is no saving that. Just try to dab up the excess moisture with a paper towel and make a note for next time.
Serving Suggestions: Beyond the Classic Donair Sauce Pairing
Look, I insist on the Donair Sauce, but if you absolutely cannot get condensed milk (or can’t be bothered), here are some fantastic alternatives for your Garlic Bread Dippers :
- Ranch Dressing: A cold, creamy, tangy ranch is delicious against the hot garlic.
- Warmed Marinara: Classic, simple, always a crowd and pleaser.
- Garlic Aioli: If you love garlic, double down! A creamy lemon aioli is excellent.
Making Ahead: Freezing and Reheating Cheesy Garlic Fingers
These freeze beautifully! If you want to make the dough ahead, follow Stage 1 completely (kneading and the first rise). Punch the dough down, place it in a freezer bag, and freeze it.
When you're ready to bake, thaw it overnight in the fridge, then let it come to room temperature for about 30 minutes before shaping and topping.
If you have leftovers (a rare miracle, honestly), you can reheat them in a 350°F (175°C) oven for about 8 minutes. They crisp up nicely. Skip the microwave; it makes the crust rubbery.
Variations: Adding Spices or Bacon for an Extra Kick
You can absolutely jazz these up. If you're tired of the classic setup (which, how?), try one of these ideas:
- Pesto Swap: For a change, replace half of your garlic butter with basil pesto. The green colour looks amazing, and the flavour is fantastic.
- Spice it Up: Add a teaspoon of red pepper flakes into the dough and the garlic butter. Give it that spicy zing.
- Bacon and Garlic Fingers: Add crumbled, pre and cooked bacon pieces over the mozzarella layer before the final bake. Bacon makes everything better.
- The Herb Bomb: Instead of dried oregano, whisk in fresh chopped chives and parsley into your butter. It adds brightness.

Recipe FAQs
Can I make the Cheesy Garlic Fingers dough ahead of time, or freeze them?
Absolutely! You can prepare the dough through the kneading step, then place it in an oiled bowl and let it slow proof overnight in the fridge; just ensure you bring it up to room temperature for about 30 minutes before baking.
I’m worried about a soggy bottom. What is the trick to ensure my Cheesy Garlic Fingers have a perfectly crisp base?
A soggy bottom is a proper British catastrophe that must be avoided! The key is the crucial 5 7 minute par-bake step, which sets the dough before the heavy cheese and toppings are added, guaranteeing a resilient and crispy crust.
What is the traditional dipping sauce that always goes with this recipe?
If you want the true Atlantic Canadian experience, it has to be Donair Sauce a sweet, tangy, and slightly garlicky white sauce based on condensed milk and vinegar, which beautifully cuts through the richness of the cheese and butter.
Is it truly vital to use fresh garlic, or can I just use garlic powder in the butter?
While powder works in a pinch, fresh, finely minced garlic delivers that essential pungent "zing" and depth required for these Cheesy Garlic Fingers; it's definitely worth the small bit of effort for the superior flavour profile.
I don't have low-moisture mozzarella. Can I use the fresh, wet kind, or another cheese altogether?
Avoid fresh mozzarella as it releases too much water, making the dough greasy; instead, if you must substitute, opt for a blend of low-moisture Monterey Jack and mild cheddar for a similar melt and stretch.
Ultimate Cheesy Garlic Fingers Recipe

Ingredients:
Instructions:
Nutrition Facts:
| Calories | 450 kcal |
|---|---|
| Fat | 25 g |
| Fiber | 2 g |
