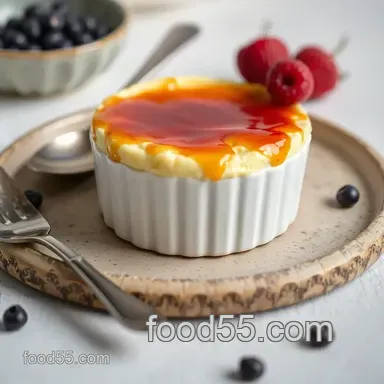
Vanilla Bean Crème Brûlée

- Time: 15 min active + 4 hours chilling
- Flavor/Texture Hook: Brittle, glassy sugar crust over a cool, rich custard
- Perfect for: An impressive dinner party dessert
Why does the restaurant version often feel so different from the ones we make at home? It usually boils down to the oven temperature and the patience given to the chilling process. There is something mesmerizing about that first snap of a spoon through the caramelized sugar.
This is the definitive recipe for an Irresistibly Creamy Crème Brûlée with Caramelized Sugar Top. We emphasize a slow, consistent bake to maintain a silky texture and avoid the tiny bubbles that can ruin the finish.
You will end up with a sophisticated dessert using only basic ingredients. It makes for a stunning conclusion to a dinner party, and the process of torching the sugar is half the fun.
Making a Classic Crème Brûlée
- The Water Bath: Hot water surrounds the ramekins, which keeps the eggs from cooking too fast and curdling. This ensures a consistent, creamy custard texture.
- Tempering: Slowly adding hot cream to the yolks prevents the eggs from scrambling. It's basically a way to warm them up without cooking them instantly.
- The Chill: Resting in the fridge for 4 hours sets the fats and proteins. This makes the custard stable enough to handle the intense heat of a torch.
| Method | Bake Time | Texture | Best For |
|---|---|---|---|
| Classic | 30 minutes | Firm but wobbles | Dinner parties |
| Fast Track | 20 minutes | Softer, looser | Casual cravings |
Right then, let's look at what we're working.
The Ingredient List
Heavy cream provides the essential fat and stability for the custard. The egg yolks handle the thickening, while a vanilla bean contributes those classic black specks and a fragrant, woody note. A bit of salt balances the sweetness.
For the topping, superfine sugar is ideal because it melts more quickly and uniformly than standard granulated sugar.
For the Custard 2 cups heavy cream Why this? Necessary for a rich, velvety base (Sub: Full fat coconut milk for a nutty, dairy-free version) 1/2 cup granulated sugar Why this? Provides sweetness during the infusion (Sub: Cane sugar) 5 large egg yolks Why this? Gives the custard its body and thickness (Sub: 4 yolks + 1 whole egg) 1 whole vanilla bean Why this? Pure, aromatic vanilla flavor (Sub: 2 tsp vanilla bean paste) 1/4 tsp fine sea salt Why this? Offsets the heavy cream (Sub: Kosher salt)
For the Topping 1/4 cup superfine sugar Why this? Melts rapidly into a thin glass shell (Sub: Regular granulated sugar, though it may clump)
Recipe Specs
This recipe yields 6 servings. The prep takes about 15 minutes, and the baking time is 30 minutes. However, you have to account for the long chill, bringing the total time to 4 hours 45 mins.
Keep your oven at 300°F (150°C). If you use a convection oven, you might want to drop the temp by 25°F to avoid over browning the edges.
Equipment Needed
Gather six 4 ounce ramekins and a 9x13 inch baking pan to act as a water bath. A fine mesh strainer is essential for achieving a smooth consistency. While a butane kitchen torch is the standard for the sugar, a broiler is a viable alternative if you are cautious.
Tip: Without a torch, set the chilled ramekins under the broiler for 1-2 minutes. Keep a close eye on them, as they can go from golden to burnt in an instant.
Bringing It Together
Phase 1: Infusing the Cream
Place the heavy cream, 1/4 cup of the granulated sugar, and the scraped vanilla bean pod and seeds into a saucepan. Heat over medium until steaming with small bubbles around the edges. Do not let it boil. Remove from heat and let it steep for 10 minutes.
You'll smell the vanilla becoming heavy and sweet.
Phase 2: Tempering the Custard
In a separate bowl, whisk the egg yolks and salt until smooth. Slowly drizzle about 1/2 cup of the warm cream into the yolks while whisking constantly. This prevents the eggs from cooking. Gradually whisk in the remaining cream until combined. Pour the mixture through a fine mesh strainer into a clean pitcher.
Phase 3: The Gentle Bake
Preheat oven to 300°F (150°C). Place 6 ramekins in the baking pan and pour the custard evenly among them. Carefully pour boiling water into the baking pan until it reaches halfway up the sides of the ramekins.
Phase 4: The Big Chill
Bake for 30–35 minutes until edges are set but center still jiggles slightly. Remove from the water bath and let them cool on the counter. Once room temperature, refrigerate for a minimum of 4 hours.
This is where the Crème Brûlée develops its characteristic chill.
Phase 5: Creating the Shattering Crust
Just before serving, sprinkle superfine sugar evenly over the top of each custard. Use a kitchen torch to melt the sugar, moving in small circles. Stop when the sugar browns and forms a hard, glassy crust.
Fixing Common Problems

Temperature is usually the culprit if your custard doesn't look right. A grainy consistency often indicates the eggs overheated, causing proteins to clump, which is exactly why a water bath is essential.
If the sugar topping remains liquid, the custard was likely still too warm or the sugar was applied too heavily.
Fixing a Grainy Texture
This occurs if the heat is excessive or the baking duration is too long. Use an oven thermometer to verify you are truly at 300°F.
Preventing a Syrupy Top
Moisture is the primary enemy of a crisp sugar crust. Make sure the custards are fully chilled and dab away any condensation with a paper towel before adding your sugar.
Removing Surface Bubbles
Air bubbles on the surface can burn unevenly. Use a toothpick to pop them or a blowtorch to quickly clear them before the final sugar coating.
| Problem | Fix |
|---|---|
| Grainy Custard | Decrease oven temp or shorten bake time |
| Liquid Sugar Top | Chill longer and use a torch for accuracy |
| Bubbles on Top | Strain mixture or pop with a toothpick |
After you have mastered these fundamentals, you can begin experimenting with different batch sizes.
Scaling the Batch
To make a half batch, use a smaller baking pan and reduce the bake time by about 20%. Whisk one egg and use half the volume to get the measurement right.
When doubling or tripling the recipe for a party, don't multiply the salt and vanilla linearly. Increase these to roughly 1.5x the original amount so the cream isn't overpowered. If your oven is too full, work in batches to ensure the ramekins don't block the heat flow.
If you're baking twice as many, drop the oven temperature to 275°F and extend the bake time by 10-15 minutes. This ensures the center is set before the outside overcooks.
Common Dessert Myths
Some people think you need a professional torch to get that signature crack. That's not true. A broiler works, provided you don't leave the room.
Another misconception is that the sugar crust stays hard forever. In reality, the moisture from the custard slowly dissolves the sugar from underneath. This is why you should only torch your Crème Brûlée right before you serve it.
Storage and Waste
Store the untorched custards in the refrigerator for a maximum of 48 hours. Place plastic wrap flush against the custard's surface to stop a skin from developing. Avoid freezing them, as ice crystals will destroy the emulsion and create a grainy texture.
Instead of discarding the vanilla bean pod after scraping out the seeds, place the exhausted pod in a jar of granulated sugar. After one week, you will have vanilla-infused sugar, which is perfect for baking.
Perfect Complements
This dessert is very rich, so it pairs best with something acidic or fresh. Fresh raspberries or sliced strawberries add a sharp contrast to the heavy cream. A sprig of mint adds a nice pop of color.
For a drink, a glass of chilled Sauternes or a light Moscato matches the sweetness of the caramelized sugar. If you prefer coffee, a simple espresso cuts through the fat of the custard perfectly.
Changing the Flavors
Feel free to swap the vanilla for other flavors. For a seasonal variation, steep a cinnamon stick or orange zest in the cream during Phase 1. If you're feeling daring, try this savory Crème Brûlée with herbs as a sophisticated appetizer.
For a different style of finish, this creamy Crème Brûlée with caramel top is another excellent choice. Alternatively, you can place a thin layer of jam at the bottom of the ramekin before pouring in the custard for a fruity surprise.
To make your dinner party prep easier, prepare the custards the day before. This ensures you only have to torch the sugar while your guests are chatting. This homemade creme brulee with a caramelized sugar crust always makes the occasion feel special.
Trust me, once your guests experience that first satisfying "crack" of the sugar, you'll want to serve this every time you host. It's a classic for a reason, and getting that perfectly silky custard texture is well worth the wait. Enjoy your Crème Brûlée!
Recipe FAQs
Why did my custard curdle during baking?
This happens when the eggs cook too quickly. Temper the yolks by slowly drizzling in warm cream to prevent them from scrambling.
How to caramelize the top without a kitchen torch?
Place the ramekins under a broiler for a few minutes. Keep a close eye on them to ensure the sugar doesn't burn.
Is it true that I can freeze the custards for later?
No, and here's why. Ice crystals break the emulsion, which leaves you with a grainy mess.
When should I torch the sugar crust?
Apply the heat immediately before serving. Doing this too early allows moisture to soften the sugar, ruining the glassy snap.
Can I use vanilla extract instead of a bean?
Use a high-quality extract for a similar flavor profile. If you enjoyed the aromatic depth of the vanilla here, you might like the citrus notes in our Christmas Pudding.
Which signs indicate the custard is done?
Look for edges that are set while the center still jiggles slightly. Remove them from the oven immediately to avoid overcooking.
Do I really need a water bath for these?
No, this is a common misconception. The water bath regulates the heat to ensure the custard stays smooth and doesn't crack.
What stops a skin from forming on top?
Place plastic wrap in direct contact with the custard while it chills. This creates a seal that prevents air from reaching the cream.
Crème Brûlée for 6 Servings