Baked or Air Fried Sesame Chicken: the Ultimate Crispy Fakeaway
- Stop Ordering Takeout: The Ultimate Crispy 'Fakeaway' Sesame Chicken
- Achieving Maximum Crispness: The Science Behind This Recipe
- Key Ingredients for the Best Baked or Air Fried Sesame Chicken
- Step-by-Step Guide to Crispy 'Fakeaway' Sesame Chicken
- Troubleshooting and Expert Tips for Perfect Sesame Chicken
- How to Store, Reheat, and Freeze Leftover Baked or Air Fried Sesame Chicken
- What to Serve with Sesame Chicken (The Ultimate Pairings)
- Recipe FAQs
- 📝 Recipe Card
Stop Ordering Takeout: The Ultimate Crispy 'Fakeaway' Sesame Chicken
Seriously, few things beat that initial crunch followed by a huge hit of sticky, sweet, and profoundly savory sesame glaze. The aroma of toasted sesame oil and caramelized sugar filling your kitchen is the ultimate Friday night welcome, making you instantly forget about those pricey takeout menus.
The problem with ordering in? That crispy coating turns into a sad, soggy mess during delivery, and deep fried dishes leave you feeling heavy and sluggish afterwards. This baked or air-fried version is a total lifesaver, delivering the exact texture you crave in half the time, making this a certified Winner Winner Chicken Dinner.
: Frugal Meals, Easy Air Fryer Recipes.
I’ve spent years refining this method, learning all the little tricks like why resting the coating is crucial and now I’m handing the keys to the crispy kingdom over to you.
Ditch the guilt, grab your apron, and let’s make the best Baked or air-fried Sesame Chicken you’ve ever tasted.
Achieving Maximum Crispness: The Science Behind This Recipe
Decoding the Sesame Chicken Classic: What Makes This Version Better?
This recipe’s genius lies in using the power of hot air whether from your oven or your air fryer combined with a very specific coating blend. We aren’t just breading; we are building a shell.
This method ensures every single piece stays crunchy, even after it’s tossed in that glossy, sticky glaze.
We want maximum flavor without the fat. By using high heat, we rapidly cook the chicken while simultaneously creating a super crispy exterior. You get all the textural satisfaction of deep frying but with a fraction of the oil, keeping this firmly in the Paleo Meal Prep friendly category.
Nutritional Face Off: Deep Fried vs. Baked or air-fried
Deep fried chicken absorbs a huge amount of oil, obviously, which drastically increases the caloric and saturated fat content. When we bake or air-fry, we use only a light spritz of neutral oil. This gives us the necessary fat to encourage browning (the Maillard reaction) without soaking the protein.
This swap doesn't just lighten the dish; it makes the texture better. The crust retains its structure under the sauce longer because it hasn’t been saturated with hot oil beforehand.
Equipment Check: Choosing Your Method (Oven vs. Air Fryer)
If you own an air fryer, please use it. The highly concentrated, rapidly circulating heat is tailor made for achieving that glorious, golden brown crust, making this one of my favorite Air Fryer Recipes Easy to execute.
If you’re sticking to the oven, that’s totally fine! Just make sure you are using a wire rack. This is non-negotiable for crispy results because it lifts the chicken off the baking sheet, letting air hit the bottom and preventing steam build-up.
The Double Coating Secret (Flour vs. Cornstarch Ratios)
The key to the crunch is the 2:1 cornstarch to flour ratio, plus the secret weapon: baking powder. Cornstarch (maize flour) crisps up much harder and faster than standard flour. The little bit of all-purpose flour helps the coating stick to the wet marinade, forming a shaggy, beautiful surface.
The baking powder is what gives the coating its lift and lightness, imitating the aeration achieved when deep frying. Do not skip the baking powder ; it makes a dramatic difference in texture.
Why the Air Fryer Excels at Golden Brown Results
The air fryer is basically a miniature, super powered convection oven. It forces air over the surface of the chicken at high speed, promoting incredible browning and creating that beautiful, uniform golden color in under 20 minutes.
This focused heat distribution means you use less spray oil, and the cooking is faster and more forgiving than trying to manage a large, crowded baking sheet in the oven.
Balancing the Flavor Profile: Sweet, Tangy, and Umami Notes
The sesame chicken glaze requires careful balancing to avoid tasting like straight sugar syrup. We rely heavily on low-sodium soy sauce (umami), rice vinegar (tang), and fresh aromatics (garlic and ginger) to create depth.
Using both honey/maple syrup and brown sugar adds complexity to the sweetness. If you want a similar savory sweet profile in another dish, you should definitely check out my Teriyaki Chicken: Sticky, Sweet Savory Thighs Recipe , as that recipe uses a similar concept for glaze building.
Key Ingredients for the Best Baked or air-fried Sesame Chicken
Selecting and Preparing the Protein for Maximum Tenderness
I insist on using boneless, skinless chicken thighs for this recipe. They stay incredibly juicy, even when cooked at high heat, unlike chicken breast, which can dry out easily. They also handle the marinating and subsequent coating much better.
| Ingredient | Why I Use It | Viable Substitute |
|---|---|---|
| Chicken Thighs | Juiciness, flavor retention. | Pressed Extra Firm Tofu (vegetarian) or boneless Chicken Breast (cook faster). |
| Cornstarch | Maximum exterior crunch. | Potato starch or arrowroot powder. |
| Low-Sodium Soy Sauce | Salty umami base. | Tamari (for gluten-free) or Coconut Aminos (for Paleo Recipes Easy). |
| Honey | Sticky sweetness and color. | Maple syrup or agave nectar. |
| Rice Vinegar | Necessary tang/acidity. | Apple cider vinegar (use slightly less). |
Essential Components of the Sticky, Glossy Sesame Glaze
The goal here is glossiness, which means we must utilize the power of a cornstarch slurry. Without it, the sauce remains thin and runny, sliding right off our perfectly crispy crust. We want that beautiful thick coating that clings to every nook and cranny.
> Chef’s Note: Always use toasted sesame oil, and crucially, only add it after you remove the sauce from the heat. Heat destroys the delicate nutty flavor of the oil, so adding it last ensures maximum aroma and depth.
gluten-free and Dietary Swaps for This Dish
This dish is incredibly adaptable for dietary restrictions. If you need to go gluten-free, swap standard soy sauce for Tamari. For the coating, you can easily use rice flour or a gluten-free all-purpose blend instead of the standard wheat flour.
If you’re attempting a Paleo version, swap the standard sugars for maple syrup and use coconut aminos for the soy sauce. Just remember that coconut aminos are less salty, so you may need to adjust with a tiny pinch of sea salt.
Fresh Aromatics vs. Dried Powder: What Works Best?
For the marinade and the sauce, always use fresh ginger and garlic . There is no comparison in flavor. Dried powder tastes flat and dusty in comparison to the bright, sharp kick of freshly grated ginger and minced garlic.
I keep little knobs of ginger in my freezer and grate them directly into the marinade, skin and all. It saves peeling time and makes adding those incredible, essential flavors lightning fast.
step-by-step Guide to Crispy 'Fakeaway' Sesame Chicken

Stage 1: The Coating and Prep Method
First things first: pat the chicken dry! Excess surface moisture is the enemy of crispiness. Marinate the chicken quickly we are just building flavor here, not tenderizing for hours.
When mixing the dry coating, remember that crucial cornstarch/baking powder blend. Shake the chicken thoroughly until it looks completely dry and shaggy, like tiny little popcorn pieces. Resting the coated chicken for 10- 15 minutes is non-negotiable.
This resting period allows the liquid in the chicken to hydrate the coating, essentially gluing it to the surface before it cooks.
Stage 2: Oven Baking vs. Air Frying Timelines and Temperature
Preheat everything! A hot start is essential for crisping up the coating before the interior overcooks. Use the wire rack, spray generously with oil, and arrange the pieces so they don’t touch. Overcrowding equals steaming, and steaming equals soggy chicken.
If you are using the air fryer, you will get the fastest results. Cook for 8 minutes, then flip them, and spray them again. Those second 7- 10 minutes finish the cooking beautifully.
If you are baking, the lower, slower heat (425°F/220°C) requires about 22- 25 minutes total, with a necessary flip halfway through.
Stage 3: Building the Perfect Balanced Sesame Glaze
While the chicken is cooking, build the sauce. Combine all sauce ingredients except the toasted sesame oil and the cornstarch slurry. Bring it to a simmer, allowing the brown sugar to fully dissolve.
Once simmering, reduce the heat to low, give your cornstarch slurry a final quick whisk, and pour it in slowly while stirring rapidly. This prevents clumping. Cook for about 60 to 90 seconds. You’ll watch it transform into a thick, glossy, syrupy texture right before your eyes.
Stage 4: Tossing and Finishing with Toasted Seeds
Remove the sauce from the heat and stir in the toasted sesame oil. Now, the final, most important step: Tossing. Only toss the crispy chicken pieces with about three quarters of the sauce immediately before serving.
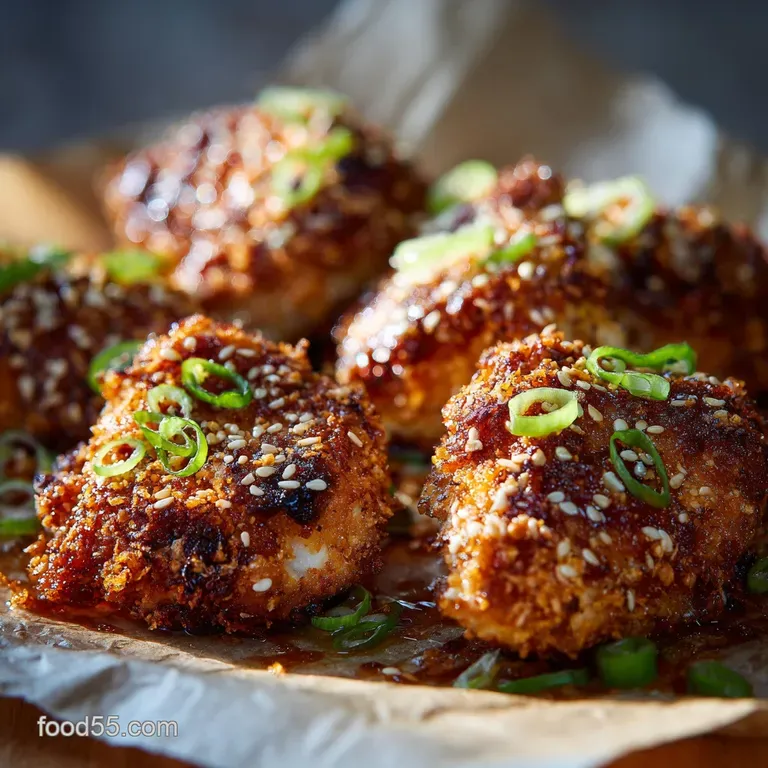
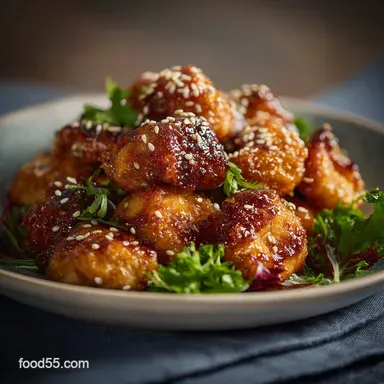
Toss quickly using tongs, ensuring every piece is coated but minimizing the time the sauce has to soften the crust. Serve immediately, drizzled with the remaining sauce, and scattered liberally with those fragrant toasted sesame seeds and bright green spring onions.
Troubleshooting and Expert Tips for Perfect Sesame Chicken
Avoiding the 'Soggy Sesame' Mistake
The number one mistake people make is tossing the chicken in the sauce and then letting it sit for five minutes before serving. The moment the hot, crispy coating meets the warm, sticky sauce, the timer starts. Serve within 60 seconds of tossing for maximum crunch.
The Importance of Working in Batches (For Air Frying)
If your air fryer basket looks even slightly crowded, stop what you are doing. Cook in batches! It’s better to have two perfect batches of crispy chicken than one large batch of steamed, sad chicken. Keep the first batch warm on a wire rack in a low oven (around 200°F / 95°C) while the second batch cooks.
Adjusting the Sauce Thickness and Sweetness
If your sauce comes out too thin, simply mix up a small extra slurry (1 tsp cornstarch with 2 tsp cold water) and stir it into the simmering sauce. If it’s too thick, add a splash of water or stock.
If it tastes too sweet, a teaspoon of extra rice vinegar will cut through the sugar beautifully and brighten the flavor.
How to Store, Reheat, and Freeze Leftover Baked or air-fried Sesame Chicken
Best Practices for Meal Prepping This Dish
This is a fantastic dish for air-fried Food meal prep, but you must keep the sauce and the chicken separate until the moment of serving. Cook the chicken completely, let it cool, and store it in an airtight container. Store the sauce separately in a jar in the fridge.
When ready to eat, reheat the chicken until crispy again, and then heat the sauce separately before tossing.
Keeping the Crispness in the Reheating Process
Do not microwave leftovers! The only way to revive that crust is dry, high heat. Reheat the plain, sauceless chicken in the air fryer at 350°F (175°C) for about 4– 6 minutes, or in a 400°F (200°C) oven for 6– 8 minutes.
Once hot and crispy, toss with the reheated sauce and serve.
Freezing Cooked Sesame Chicken Safely
If you’ve cooked a big batch, you can absolutely freeze the cooked, unsauced sesame chicken pieces. Flash freeze the cooked pieces on a sheet tray until solid, then transfer them to a freezer bag or container. This prevents them from clumping together. It will last safely for about 2 months.
Reheat directly from frozen using the air fryer method outlined above, increasing the cook time slightly (maybe 8– 10 minutes total).
What to Serve with Sesame Chicken (The Ultimate Pairings)
Sesame chicken needs a clean, subtle accompaniment to balance the richness of the glaze.
- Jasmine or Brown Rice: A classic, simple base that absorbs the extra sauce beautifully.
- Steamed Greens: I love lightly steaming some broccoli or bok choy and tossing it with just a touch of salt and perhaps a splash of that glorious toasted sesame oil.
- Light Salad: A simple salad of shredded cabbage and carrots with a bright, ginger lime vinaigrette adds necessary acidity and crunch.

Recipe FAQs
Why isn't my chicken crispy when baking or air frying?
Ensure the chicken pieces are lightly dredged in cornstarch or tapioca starch before cooking; this starch layer is essential for achieving a crunchy exterior without deep frying. Also, overcrowding the pan or air fryer basket traps moisture and steams the chicken, so cook in small batches if necessary.
How do I prevent the chicken breast from drying out during cooking?
Chicken breast is prone to drying, so the primary step is to avoid overcooking; aim for an internal temperature of 165°F (74°C) and remove the chicken promptly when it reaches this mark.
Cutting the pieces uniformly also ensures they all finish cooking at the same time, preventing smaller pieces from becoming tough and dry.
What is the best method for thickening the sesame sauce if it seems too watery?
The standard culinary technique involves using a cornstarch slurry, which is a mixture of equal parts cornstarch and cold water. Whisk the slurry into the simmering sauce, and allow the sauce to boil gently for one full minute to properly activate the cornstarch’s thickening power.
Can I use different proteins, like tofu or shrimp, instead of chicken?
Absolutely. Extra firm tofu works exceptionally well; ensure you press it thoroughly to remove excess water, then cube and dredge it in cornstarch before cooking for 15-20 minutes. Shrimp is also delicious but requires a much shorter cook time (about 5-8 minutes total) to prevent it from becoming rubbery.
Can I prepare or freeze this dish ahead of time?
You can certainly prep the sesame sauce 2-3 days in advance and keep it refrigerated until needed. However, only cook the chicken right before serving, as the crispy coating softens very quickly once it is coated in the warm sauce, and freezing the assembled dish is not recommended.
What is the benefit of air frying versus baking this recipe?
The air fryer generally yields a superior level of crispiness in less time due to its concentrated, high speed forced convection cooking. While baking is ideal for large batches, air frying is better for small portions and provides a texture much closer to traditional deep fried sesame chicken.
My sesame seeds burned when I added them to the sauce. What went wrong?
Sesame seeds can burn quickly because of their low moisture content, especially if they are added directly to a simmering sauce and cooked for a long period. To avoid this, stir them into the sauce only during the last minute of cooking, or simply sprinkle them over the finished chicken as a garnish.
Baked Or air-fried Sesame Chicken Fakeaway
Ingredients:
Instructions:
Nutrition Facts:
| Calories | 376 kcal |
|---|---|
| Protein | 29.0 g |
| Fat | 13.0 g |
| Carbs | 35.0 g |
