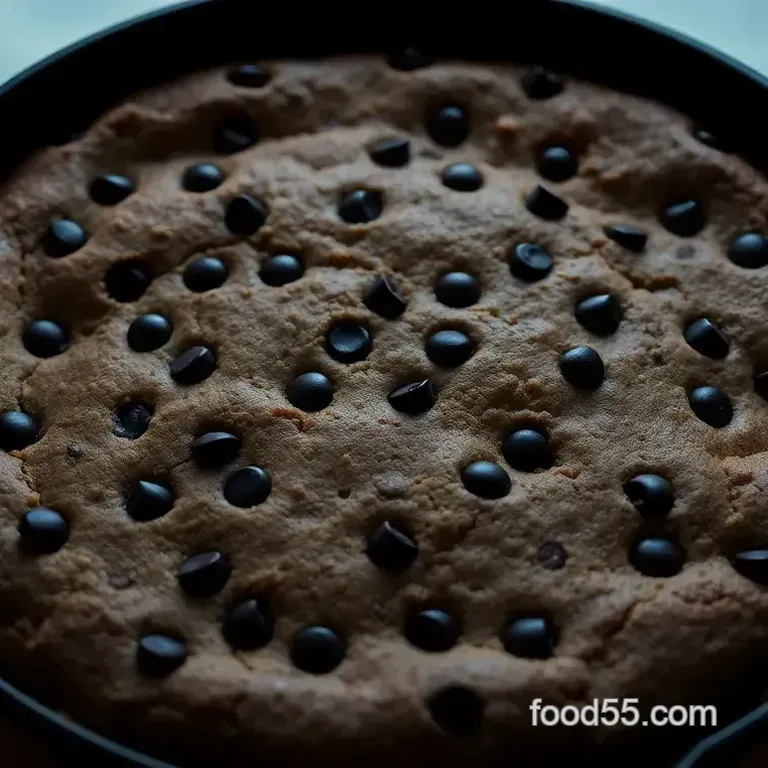
Dutch Oven Chocolate Chip Cookie Skillet
Cooking Up Comfort: The Joy of Dutch Oven Desserts
A Sweet Anecdote
Oh my gosh, i remember the first time i made dutch oven desserts ! it was a rainy saturday, and i was curled up on the couch, scrolling through a bunch of recipes.
Suddenly, i stumbled upon a dutch oven chocolate chip cookie skillet. the pictures alone had my mouth watering! so there i was, mixing up butter, sugar, and flour in the kitchen, like i was trying to bring back my childhood table at grandma's house.
The aroma layered through my tiny apartment, and i was on cloud nine. there’s just something about warm, gooey cookies that pulls at your heartstrings, right?
Recipe Rundown
The dutch oven has been a beloved kitchen companion for generations. its origins trace back to 18th-century europe, where it was prized for its ability to cook food evenly.
Fast forward, and you’ll find it’s still winning hearts everywhere, especially in the realm of oven dessert recipes . nowadays, these lovable pots are taking center stage in modern kitchens.
They're perfect for an intimate gathering or even a little self care night. just imagine yourself, a cozy throw, and a big spoon all diving into a bubbling cookie skillet!
Now, if you're wondering about the effort involved, here's the good news: this recipe is a solid easy . we’re talking about 15 minutes of prep time, followed by 30 minutes of baking.
In less than an hour, you’ll have a warm dessert that serves up 6-8 generous portions. your wallet won’t take a hit either.
Most ingredients are pantry staples, making this not just comforting but also affordable. pair that with the smile on everyone’s face when they dig in, and you’ve got a win-win on your hands!
Why You’ll Love It
Let’s break down the goodness that comes from this dutch oven chocolate chip cookie skillet. first off, we know cookies are a classic comfort food.
But this one? it goes above and beyond. the health benefits aren’t overwhelming since it’s still a treat, but baking at home means you get to control the ingredients.
Swap for whole wheat flour or nuts if you’re feeling fancy!
And let’s talk occasions. this dessert is perfect for family game nights, outdoor campfires, or just a treat yourself kind of day.
You might just want to serve it at a gathering; nothing says “i’m a great host” quite like a warm cookie skillet with melting ice cream on top! plus, it’s sooo much easier than baking individual cookies no more scooping dough for hours on end.
But, if we’re being real here, what makes this dutch oven dessert stand out from others? it’s the gooey center contrasted with crispy edges that gets people raving.
You know the feeling when you share food? it's like an instant happiness generator. plus, you can throw in any candy or chocolate mix-ins your heart desires!
What’s Next?
So, are you sold on making this delightful cookie skillet? I hope so! Now let’s dive into what you’ll need to whip up this dreamy dessert.
Stay tuned for the ingredient list and get ready to bring the comfort of a dutch oven dessert to your kitchen.
Believe me, after one bite, you'll be grasping that spoon with the determination of a professional cookie monster!
Essential Ingredients Guide: The Foundations of Flavor
Let’s talk about the building blocks of amazing meals! when you’re whipping up something good, it helps to have a solid handle on your ingredients.
This isn’t just about knowing what to throw together it's about making sure your kitchen always has premium core components ready to go.
Buckle up, foodies, because we’re diving into the details!
Premium Core Components
First up, measurements . We’ve got to be clear, right? Here’s a neat way to keep track:
- 1 cup (240 ml) = How much sugar or flour you'll need.
- And if you’re feeling fancy or follow metric like a pro, you're looking at 225g of butter or 280g of flour.
Next up, the quality indicators . you want butter that’s soft, not melted like when you leave it out too long because you forgot.
Eggs? check for freshness by giving them a water test (if they sink, cute and fresh; if they float, toss that bad boy).
Keep your spices in a cool, dark place. they lose potency faster than a high school crush!
Storage guidelines? let’s make life easier. most spices will hang out in your cabinet for a couple of years, but oils need a cool spot away from light to avoid getting rancid.
Trust me, rancid oil isn’t anyone’s friend.
Signature Seasoning Blend
Now, let’s sprinkle in some magic: signature seasonings ! A pinch of cinnamon + a dash of nutmeg works wonders in your Dutch oven desserts seriously, think about that Cinnamon Roll Bread Pudding for a moment!
When you think of herb selections , think fresh. basil , rosemary , and plain old dried oregano? each has its charm.
And if you're trying to shake things up, different regions have their own little twists. ever tried an italian seasoning blend versus a classic bbq rub? game changer.
Smart Substitutions
Now, we all have those moments when we’re missing an ingredient, right? Don’t panic! Here’s a couple of common alternatives you can whip out:
- Out of eggs? A mashed banana or a bit of applesauce can save the day (fun fact: it works great in oven dessert recipes too).
- No baking soda? Baking powder can do the trick, it'll just take a bit more.
And let’s not forget seasonal goodies! When fruits are in bloom, swap some of your recipe's dry ingredients for fresh ones. Think apples in the fall or peaches in the summer.
Kitchen Equipment Essentials
Alright, let’s chat kitchen gear ! you’re going to need some must haves if you want to make dutch oven dessert recipes sing.
A 5-quart dutch oven ? absolutely crucial. it’s like your best friend for both casseroles and those warm dessert moments.
But hey, don’t sweat it if you don’t have one yet. You can mimic the setup with a heavy skillet while you save up. Just make sure it's oven safe!
If you’re into fancy tech, a good thermometer is handy keeps you from guessing if your desserts are done. And for storing ingredients? Try recovering those old glass jars; they make great containers and keep your pantry looking sharp!
Time to Get Cooking!
Alright, folks! now that you’re loaded up with your essential ingredients and kitchen tools, it's the perfect time to bring all that knowledge to life with some delectable dishes like that gooey dutch oven chocolate chip cookie skillet!
it’s all about bringing your family and friends together over some delicious dutch oven desserts .
Remember, dessert isn’t just to end a meal; it’s a way to create memories! so, grab your ingredients and let’s bake something extraordinary!
Mastering Professional Cooking: Steps to Culinary Success
So, you’re on the journey to becoming a pro in the kitchen? awesome! today, we're diving into the professional cooking methods that will take your game to the next level.
We're talking about everything from getting organized to nailing the timing. let’s roll up our sleeves and cook!
Essential Preparation Steps: Prepping Like a Boss
First thing's first mise en place . it’s a fancy term, but it’s simply about getting your ingredients sorted and ready before you start cooking.
Trust me, when you’re in the thick of it, you don’t want to be scrambling for that vanilla extract. measure everything out, chop your veggies, and line up your spices.
You'll feel like a rockstar, and that’s a vibe we all want.
Time management is huge , especially when you're whipping up those scrumptious dutch oven desserts . set a timer to keep tabs on your cooking.
If a recipe says bake for 30 minutes at 350° f , don't just guess set a timer! your oven isn’t just a box that makes things hot; it needs your attention.
Organization is key too. Use bowls to separate ingredients and clean as you go. Messy kitchens can turn a culinary adventure into a chaotic nightmare. Don’t let that happen!
And of course, safety first ! always keep a watchful eye on what you're heating up, especially with those dutch oven recipes cast iron.
Burns are no fun, my friend. use gloves when handling hot pots and always keep a fire extinguisher nearby safety is sexy!
step-by-step Process: The Cooking Playbook
Alright, let's break down the cooking process into clear steps.
- Preheat the Oven: Make sure you’re ready to rock by preheating your oven to 350° F .
- Mix It Up: Start with your wet ingredients, then add in your dry ones. This mixing part? Do it right! A few minutes of creaming will make for a fluffier end product.
- Temperature Control Points: Keep an eye on that oven! If you find your cookies starting to brown on top after 20 minutes , you might need to lower the heat slightly.
- Visual Cues for Doneness: Look for that golden brown color and a slight jiggle in the center. It should look like it still wants to hug you!
Expert Techniques: Taking It Up a Notch
Now we’re getting to the nitty gritty. Ever heard about professional chefs using special techniques? Here’s a couple:
- Quality Checkpoints: Always taste your batter before baking. You can adjust sweetness or add a dash more salt to perfect it!
- Troubleshooting Tips: If something looks off, like your cookies spreading too much, try chilling the dough before baking. A simple fix can save the day!
Success Strategies: Avoid the Kitchen Fails
Here’s the kicker what common mistakes can trip you up?
One notable trend is overmixing. Remember, don’t overdo it when adding flour! The more you mix, the tougher your cookies could end up.
Quality assurance tips: Check expiry dates on your ingredients. Old baking powder equals flat cookies, and trust me, nobody wants that.
And if you're planning ahead, think about make-ahead options. Freeze that cookie dough ! You can scoop it into balls and pop them in the fridge for future bake nights.
Wrapping It All Up
To sum it up, mastering professional cooking is all about preparation, timing, and a pinch of creativity. whether you're whipping up an easy cinnamon roll bread pudding or trying out dutch oven dessert recipes , have fun with it! don’t stress if it doesn't come out perfect the first time.
Cooking is about experimentation and joy.
Next up, we’ll dive into some additional information like how to take your dutch oven desserts further to impress your friends or any juicy tips on gourmet cooking at home.
So stick with me, and let’s keep this culinary journey rolling!
Delicious Tips and Tricks for Your Dutch Oven Chocolate Chip Cookie Skillet
Oh my gosh, if you’re diving into the world of Dutch oven desserts , you're in for a real treat! Whether you’re whipping up a warm Cinnamon Roll Bread Pudding or a classic cookie skillet, the possibilities are endless!
Let’s chat about some pro tips, perfect presentation techniques, and how to store these goodies to keep them fresh!
Pro Tips & Secrets
First off, one big secret i’ve learned in my baking journey don’t overmix ! when you’re combining your flour and wet ingredients, just mix until you see that flour disappear.
That's the key to keeping your cookies tender and oh-so-soft!
For time saving techniques , consider prepping your cookie dough a day in advance. just keep it in the fridge, and when you're ready to bake, pop it in the dutch oven.
Simple as pie! and if you want to kick up the flavor, try adding a pinch of sea salt on top before baking.
It brings out the chocolate and takes your dessert to the next level!
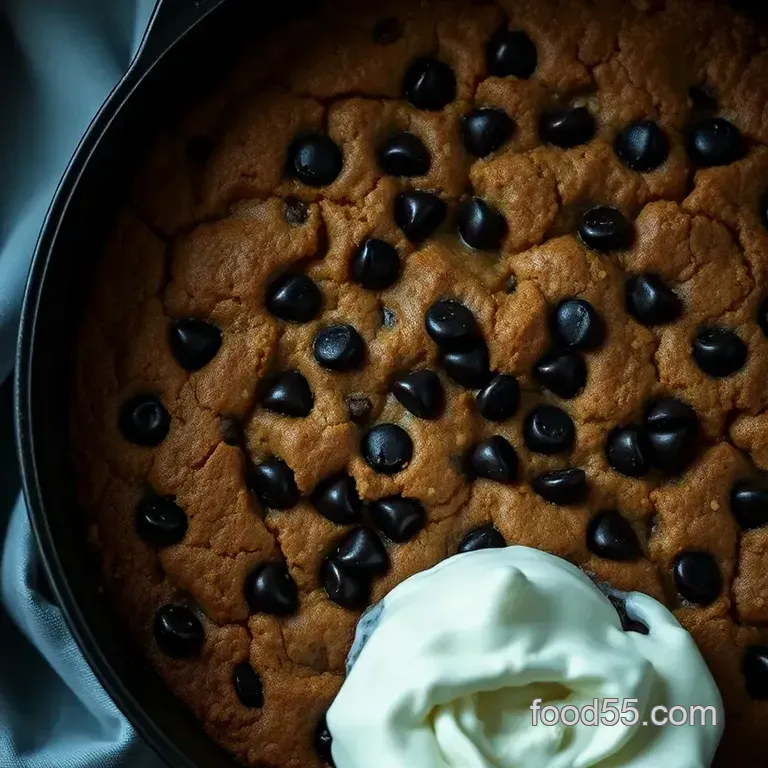
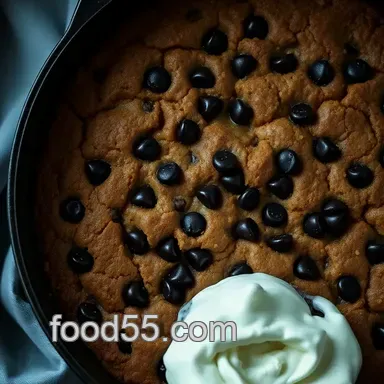
Perfect Presentation
Now, onto the eye candy! ever heard the saying, "we eat with our eyes"? well, it’s true! a beautifully plated dessert will wow your friends.
For the perfect presentation , scoop that warm cookie skillet into a big, rustic bowl, top it with a scoop of vanilla ice cream, and drizzle some chocolate sauce over it.
Throw on a sprinkle of crushed nuts or fresh berries for that color pop.
Speaking of colors, mixing dark chocolate chips with bright raspberries or strawberries looks fantastic! It’s all about making it pleasing to the eye while being totally delectable.
Storage & make-ahead
You might be wondering about the best way to store this delightful dutch oven recipe . store any leftovers in an airtight container for up to 3 days at room temperature.
If you’re thinking of preserving this dessert for longer, you can pop it in the fridge for about a week, but let’s be honest, i doubt it’ll last that long!
For reheating , simply pop your cookie skillet back in the oven for about 10 minutes at 350° f ( 175° c) , or you can microwave it for about 30 seconds.
Just don’t blame me if you find yourself sneaking spoonfuls right out of the dutch oven!
Creative Variations
Get creative with your dutch oven dessert ! want a nutty kick? toss in some walnuts or pecans . how about a seasonal twist? add some pumpkin spice for that fall vibe or coconut flakes for a tropical touch.
You can even whip up a gluten-free option by swapping in a 1:1 gluten-free baking mix easy peasy!
And let’s not forget the regional variations. Depending on where you're from, why not add a local favorite like peanut butter chips or even some toffee bits ? Trust me, your dessert will have all your friends talking!
Complete Nutrition Guide
Now, i gotta mention the nutrition side of things. one serving of this dutch oven dessert is about 350 calories , packing in flavor while still being a relatively guilt free indulgence.
It has a smidge of protein (3g) and, like any sweet treat, a good dose of sugar. just remember, it’s all about enjoying these treats in moderation.
If you’re watching your dietary needs, keep in mind you can adjust the sugar levels or use substitutes to make it more aligned with your health goals.
Portion guidance is crucial maybe cut those slices a little smaller when serving up to avoid the “just one more bite” temptation!
Sweet Conclusions
So there you have it a guide to rocking your dutch oven chocolate chip cookie skillet ! with the tips and tricks i’ve shared, you’re more than equipped to create a dessert that doesn't just taste incredible, but also looks inviting and feels like a warm hug from grandma.
Whether it's for a family gathering or just a cozy night in, this dessert is bound to impress. so, roll up those sleeves and get baking! you’re going to love how easy and fun oven desserts can be.
Happy baking, my friend!🍪
Frequently Asked Questions
What are some of the best dutch oven desserts I can try besides this cookie skillet?
There are so many delightful options! Some popular dutch oven desserts include fruit cobblers, brownies, and even bread puddings. Each offers a warm, comforting experience, perfect for sharing by the fire or on a rainy day.
Can I make these dutch oven desserts ahead of time?
Absolutely! You can prepare the cookie dough in advance and store it in the fridge for up to 24 hours. Just let it come to room temperature before baking, and you can have that freshly baked smell in no time!
What’s the best way to store leftovers from my dutch oven dessert?
To keep your dessert fresh, store it in an airtight container at room temperature for up to 3 days. If you need to keep it longer, you can freeze individual portions wrapped in plastic wrap and then in a freezer safe bag for up to 3 months.
Can I use a smaller dutch oven for this recipe?
Definitely! Just remember to adjust the baking time. A smaller dutch oven may take slightly less time, so keep an eye on it to ensure you achieve that ooey gooey texture without overbaking.
What are some tasty variations I can add to my dutch oven cookie skillet?
Get creative! You can mix in chopped nuts, dried fruits, or even a swirl of peanut butter for added flair. For a chocoholic twist, try using different types of chocolate chips, or even crushed cookies for a cookies and-cream vibe!
How can I make sure my dutch oven dessert doesn’t stick?
To prevent sticking, it’s a good idea to line the bottom of your dutch oven with parchment paper before adding the cookie dough. Additionally, greasing the sides with butter or a cooking spray can help ensure that your delicious dessert comes out easily.
Dutch Oven Chocolate Chip Cookie Skillet
Ingredients:
Instructions:
Nutrition Facts:
| Calories | 350 |
|---|---|
| Fat | 19g |
| Fiber | 1g |
