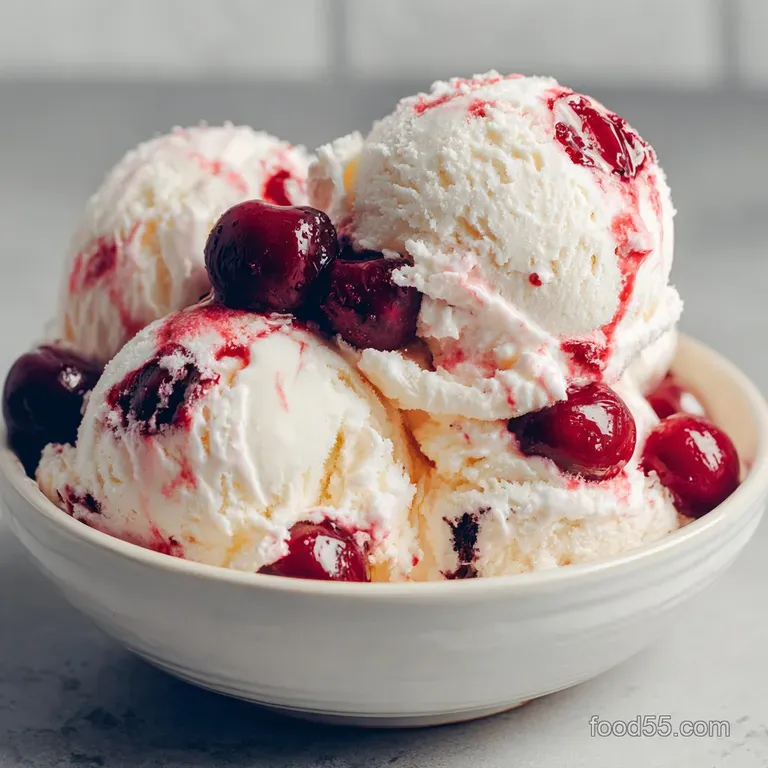
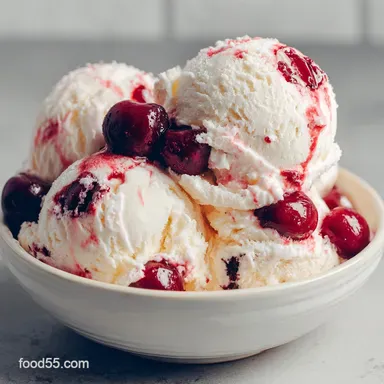
Ice Cream in a Bag Recipe: Silky Vanilla Finish

- Time: Active 10 minutes, Passive 5 minutes, Total 15 minutes
- Flavor/Texture Hook: Silky vanilla base with a frosty, soft serve finish
- Perfect for: Hot summer afternoons, kitchen science experiments, and quick cravings
- Joyful Easy Ice Cream in a Bag Recipe
- Physics of the Rapid Freeze
- Analysis of Key Chilling Components
- Ingredient Deep Dive and Swaps
- Essential Gear for Shaking Success
- Master the Shaking Process Method
- Fixing Common Shaking Texture Issues
- Tasty Variations and Custom Mixes
- Proper Storage and Zero Waste
- Creative Toppings for Shared Meals
- Shaking Method Truths vs Myths
- Recipe FAQs
- 📝 Recipe Card
Joyful Easy Ice Cream in a Bag Recipe
The rhythmic slap slap slap of plastic against palms and the sight of frosty condensation blooming across a freezer bag always takes me back to my first successful kitchen experiment.
I remember the skepticism I felt, clutching a bag of ice that felt like it was trying to freeze my fingers solid, only to peek inside and find actual, velvety ice cream. It felt like magic then, and honestly, even as a seasoned home cook, that transformation from liquid to solid through sheer kinetic energy still feels a bit like a culinary miracle.
We’ve all been there the craving for something sweet hits on a Tuesday night, but the thought of digging out the heavy churner or waiting six hours for a freeze and stir seems like too much work. This ice cream in a bag recipe is the solution that turns your kitchen into a playground.
It’s about more than just the end result; it’s about the shared laughter as you pass the bag around because your hands got too cold, and the sheer joy of eating something you quite literally shook into existence.
Right then, we are going to master this technique so you get a smooth, silky result every single time. Forget the grainy, salty mess that often plagues beginner attempts. We’re focusing on the right ratios and a few little tricks I’ve learned after many frozen knuckles and popped bags.
Trust me on this, once you nail the salt to ice ratio, you’ll never look at a bag of rock salt the same way again.
Physics of the Rapid Freeze
The magic behind this bag recipe isn't actually magic; it's a beautiful bit of chemistry that happens right in your hands. Understanding the "why" helps you troubleshoot on the fly and ensures your base doesn't stay liquid forever.
- Freezing Point Depression: Adding rock salt to ice forces the ice to melt at a much lower temperature than usual. This creates a super cooled brine that absorbs heat from your cream mixture far more efficiently than plain ice ever could.
- Kinetic Aeration: Constant shaking incorporates tiny air bubbles into the thickening liquid. This prevents the formation of large, jagged ice crystals, resulting in a velvety texture rather than a hard block of ice.
- Thermal Transfer: The thin plastic of the bag allows for rapid heat exchange between the warm cream and the freezing brine. It’s a much faster conductor than a thick plastic tub in a standard freezer.
| Method | Time | Texture | Best For |
|---|---|---|---|
| Bag Shaking | 10 minutes | Soft serve / Silky | Instant cravings and kids |
| Hand Churning | 45 minutes | Dense / Rich | Small batches without bags |
| Electric Machine | 30 minutes | Professional / Smooth | Large parties or stiff peaks |
Choosing the right method depends on your patience. While an electric machine is great, it lacks the tactile connection of the bag method. If you’ve ever tried our Mint Ice Cream recipe, you know that a custard base is wonderful, but for pure speed and simplicity, the bag technique wins every single time.
Analysis of Key Chilling Components
The success of this recipe hinges on the quality of your base and the intensity of your cooling agent. Using the right ingredients ensures the fat doesn't separate and the sweetness stays balanced even when frozen.
| Ingredient | Science Role | Pro Secret |
|---|---|---|
| Half and half | Fat Emulsion | Use full fat for a silkier mouthfeel |
| Rock Salt | Freezing Catalyst | Larger crystals melt ice slower and colder |
| Granulated Sugar | Texture Softener | Lowers the freezing point of the cream |
Each component plays a part in the delicate dance of crystallization. For example, the pinch of sea salt doesn't make the ice cream salty; it actually acts as a flavor enhancer that makes the vanilla notes sing. It's the same principle we use in our Homemade Caramels recipe to balance the heavy sweetness.
Ingredient Deep Dive and Swaps
To make this ice cream in a bag recipe, you’ll need a few basics from the pantry. I always recommend using the highest quality vanilla you can find, as there’s nowhere for the flavor to hide in such a simple base.
- 1 cup half and half (240ml): Why this? Provides the ideal balance of milk fat for a creamy yet light texture.
- Substitute: 1/2 cup heavy cream mixed with 1/2 cup whole milk.
- 2 tablespoons granulated white sugar (25g): Why this? Dissolves quickly and keeps the ice crystals small and manageable.
- Substitute: Maple syrup (slightly more floral, makes the texture softer).
- 1/2 teaspoon pure vanilla extract: Why this? Essential for that classic, nostalgic "ice cream truck" flavor profile.
- Substitute: Vanilla bean paste for those beautiful black specks.
- 1 pinch fine sea salt: Why this? Sharpens the sweetness and rounds out the dairy richness.
- Substitute: Table salt (use a tiny bit less).
- 3 cups ice (approx 700g): Why this? Provides the thermal mass needed to absorb the heat from the cream.
- 1/3 cup rock salt (approx 80g): Why this? Specifically designed to lower the freezing point of ice effectively.
- Substitute: Kosher salt (you will need about 1/2 cup as it is less dense).
Essential Gear for Shaking Success
You don't need fancy gadgets, but the quality of your bags is non negotiable. I once used a generic, thin sandwich bag and ended up with vanilla scented salt water all over my kitchen floor. Don't make that mistake!
- Small Freezer Bag (Quart size): This holds your cream mixture. Use the "freezer" grade bags as they have thicker walls and a more secure seal.
- Large Freezer Bag (Gallon size): This acts as your cooling chamber for the ice and salt.
- Winter Gloves or a Thick Towel: The bag will reach temperatures well below freezing. Protecting your hands isn't just for comfort; it allows you to shake harder and longer.
- Measuring Cups and Spoons: Precision matters when you're balancing the sugar to fat ratio.
Master the Shaking Process Method
Success is all in the wrist. You want a consistent, vigorous motion to ensure the cream at the center of the bag gets as much contact with the cold edges as possible.
- Combine the base. Pour 1 cup half and half, 2 tablespoons sugar, 1/2 teaspoon vanilla, and a pinch of salt into the small freezer bag. Note: Squeeze as much air out as possible before sealing to prevent the bag from popping.
- Double check the seal. Ensure the small bag is completely airtight. Note: I often place this bag inside a second small bag just for insurance against leaks.
- Prepare the reactor. Fill the large gallon bag with 3 cups of ice and 1/3 cup of rock salt.
- Insert the cream. Place the sealed small bag into the large bag and nestle it deeply into the ice.
- Seal the outer bag. Again, remove excess air so you have room to shake the contents around.
- Start the shake. Put on your gloves and shake the bags vigorously for 7 to 10 minutes. Cook 10 mins until the liquid transforms into a firm, scoopable solid.
- Check for doneness. Squeeze the small bag through the large one. If it feels like soft serve, you're ready.
- Rinse the small bag. This is the most important step! Remove the small bag and rinse it under cold running water. Note: This removes the salt brine from the outside so it doesn't drip into your fresh ice cream when you open it.
- Serve immediately. Squeeze the ice cream into a bowl or eat it straight from the bag with a spoon.
Fixing Common Shaking Texture Issues
Sometimes things don't go perfectly, and you're left with a bag of cold milk instead of a frozen treat. Usually, the culprit is the temperature of your brine or the duration of your shaking.
Why Your Ice Cream Stays Liquid
If after 10 minutes your mixture is still sloshing around, your brine isn't cold enough. This usually happens if you didn't use enough rock salt or if your ice was already half melted when you started. The salt must actively be melting the ice to create that super cooled environment.
| Problem | Root Cause | Solution |
|---|---|---|
| Salty Ice Cream | Leaking bag or no rinsing | Double bag the cream; rinse the seal before opening |
| Chunky Ice Crystals | Shaking too slowly | Increase the intensity of your shaking to break up crystals |
| Liquid Center | Not enough salt/ice | Add 2 more tbsp of salt and shake for 3 more minutes |
If you find the texture is still too soft, you can try adding more ice and a fresh handful of salt to the outer bag. Sometimes the ice melts too quickly if the room is warm, which dilutes the salt concentration.
Common Mistakes Checklist
- ✓ Using "Light" or "Fat Free" milk (the lack of fat makes it icy and hard rather than creamy).
- ✓ Forgetting to squeeze the air out (air pockets act as insulation and slow down the freezing).
- ✓ Using table salt instead of rock salt without adjusting the volume (you need more table salt to get the same effect).
- ✓ Giving up too early (the last 2 minutes of shaking are where the most significant thickening happens).
- ✓ Not wearing gloves (painful hands lead to lazy shaking, which ruins the texture).
Tasty Variations and Custom Mixes
Once you've mastered the basic vanilla, the world is your oyster. You can treat this bag recipe as a canvas for all your favorite flavors. Just remember that adding heavy mix ins might increase the shaking time slightly.
If you are feeling adventurous, you might even try a version inspired by our Red Bean Ice Cream recipe by swirling in some sweetened azuki paste at the very end. The contrast of the earthy beans with the sweet vanilla is spectacular.
- Chocolate Chip: Add 1 tablespoon of mini chocolate chips to the small bag before shaking.
- Strawberry Swirl: Mash two fresh strawberries and mix them into the cream base.
- Cookies and Cream: Crush one Oreo and add the pieces halfway through the shaking process.
- dairy-free: Swap the half and half for full fat coconut milk (the kind from a can). Note: This adds a distinct tropical flavor and a slightly heavier mouthfeel.
Proper Storage and Zero Waste
Let's be honest, this ice cream is best enjoyed the second it's ready. Because we aren't using stabilizers like commercial brands, it can get quite hard if left in a standard freezer for too long.
Storage: If you have leftovers (rare, I know!), transfer them to an airtight container. It will keep for up to 3 days. To serve, let it sit on the counter for 5 minutes to soften back to a scoopable consistency.
Zero Waste Tip: Don't just dump that salty water down the drain! If you have a brick patio or a driveway with stubborn weeds growing in the cracks, that leftover brine is an excellent natural weed killer.
Just be careful not to pour it on your actual garden, as the salt will prevent anything from growing there for a long time. You can also use the leftover ice to chill drinks in a cooler just make sure none of the salt gets into the actual beverages.
Creative Toppings for Shared Meals
Part of the charm of this dish is the presentation. Since it has a soft serve texture, it pairs beautifully with crunchy or gooey elements that provide a contrast in mouthfeel.
I love serving this alongside a warm batch of Cinnamon Roll Bites recipe. The heat from the bites starts to melt the ice cream, creating a sort of vanilla glaze that is absolutely decadent. It’s the kind of dessert that encourages everyone to dig in with multiple spoons.
| Servings | Half and Half | Ice Amount | Shake Time |
|---|---|---|---|
| 1 Person | 1/2 cup | 2 cups | 6-8 mins |
| 2 People | 1 cup | 3 cups | 10 mins |
| 4 People | 2 cups (2 bags) | 6 cups | 12 mins |
Shaking Method Truths vs Myths
There are a lot of misconceptions about this method, mostly because it's often taught as a simple school project. But the culinary science is sound if you treat it with respect.
"You can use any kind of salt for the same result." This is a half truth. While chemically any salt will lower the freezing point, the grain size of rock salt is much better for this specific application.
Fine table salt dissolves too quickly and can actually cause the ice to melt too fast, meaning your brine warms up before the cream is fully frozen.
"The more you shake, the harder it gets." Actually, there is a limit. Once the cream reaches its freezing point, extra shaking won't make it "harder," it will just eventually turn the fat into butter if you are using high fat cream. This is a fun fact we explore in our Homemade Butter recipe, but for ice cream, you want to stop as soon as it holds its shape.
This ice cream in a bag recipe is truly a testament to the fact that great food doesn't always require a fancy kitchen. It’s about the science, the movement, and the connection we feel when we make something from scratch with our own two hands.
So, grab some bags, find a friend to help with the shaking, and enjoy the simplest, frostiest treat you’ve ever made.

Recipe FAQs
How to make your own ice cream in a bag?
Combine ingredients in a small bag, seal tightly, and place into a larger bag filled with ice and rock salt. Shake vigorously for 7 to 10 minutes until the mixture solidifies into a soft serve consistency. Remember to rinse the small bag before opening to wash off the salt brine.
How much milk do you need for ice cream in a bag?
Use 1 cup of half and half (or whole milk/cream equivalent). Half and half provides the best fat content for a creamy, non-icy texture without requiring stabilizers. Using skim milk will result in a much harder, icier final product.
What salt works best for ice cream in a bag?
Rock salt is highly recommended for the best results. Rock salt melts ice at a much lower temperature than table salt, which creates a colder brine necessary for rapid freezing. You will need about 1/3 cup of rock salt for the standard 1-cup recipe.
What is the recipe that Cub Scouts use to make ice cream in a bag?
The standard basic recipe uses 1 cup of half and half, 2 tablespoons of sugar, vanilla, and a pinch of salt. This simple ratio is ideal for teaching basic freezing point depression science. If you enjoyed mastering the kinetic energy required here, see how the same principle of rapid cooling transfers to techniques used in our Pecan Pie Recipe: The Classic Gooey Filling (No Soggy Bottoms!).
Can I substitute heavy cream for half and half?
Yes, but you must adjust the volume to maintain the right fat ratio. If you substitute heavy cream, you should mix 1/2 cup of cream with 1/2 cup of whole milk to match the fat content of the standard 1 cup of half and half, otherwise, the result will be too rich and may turn into butter if shaken too
long.
Why does my ice cream taste salty?
No, this is a common error caused by contamination from the outer bag. The small bag containing the cream must be thoroughly rinsed under cold water after shaking but before opening it. Any salt brine clinging to the exterior will seep into your sweet treat.
How long should I shake the bags to ensure it freezes?
Shake vigorously for 7 to 10 minutes consistently. The final 2 minutes are the most crucial for achieving that soft serve texture; do not stop shaking early. Ensure your hands are protected so you can maintain a high intensity shaking motion throughout the required duration.
Ice Cream In A Bag Recipe
Ingredients:
Instructions:
Nutrition Facts:
| Calories | 208 kcal |
|---|---|
| Protein | 3.8g |
| Fat | 13.9g |
| Carbs | 17.8g |
| Fiber | 0g |
| Sugar | 17.6g |
| Sodium | 128mg |
