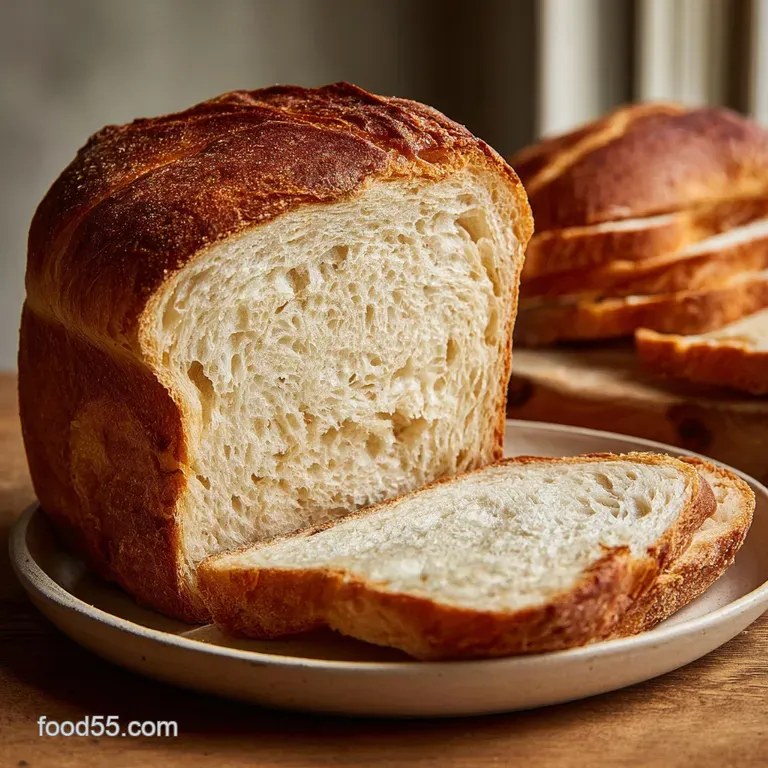
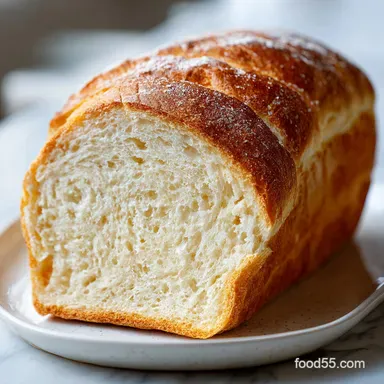
The Best Soft Sourdough Sandwich Bread
- Time: Active 45 mins, Passive 9 hours 15 mins, Total 10 hours
- Flavor/Texture Hook: Silky, buttery interior with a golden, shatter thin crust and subtle floral sweetness
- Perfect for: Everyday school lunches, ultimate French toast, or beginner sourdough bakers wanting a softer result
- Achieving The Best Soft Sourdough Sandwich Bread
- The Chemistry of Enriched Crumb
- Bread Metrics and Timing Details
- Ingredient Science and Smart Swaps
- Tools for a Perfect Rise
- Shaping and Baking Your Loaf
- Troubleshooting Common Baking Hurdles
- Customizing Your Sandwich Loaf
- Debunking Sourdough Myths
- Storing for Long Lasting Softness
- Plating and Serving Your Bread
- Recipe FAQs
- 📝 Recipe Card
Achieving The Best Soft Sourdough Sandwich Bread
The kitchen at dawn has a specific, quiet magic, especially when the air is thick with the scent of toasted honey and warm yeast. I remember the very first time I pulled a loaf of The Best Soft Sourdough Sandwich Bread from the oven; I was so used to those jaw breaking, rustic boules that I almost didn't believe sourdough could be this tender.
It was a complete revelation, smelling less like a vinegar factory and more like a high end French patisserie.
We have all been there trying to make a "healthy" sourdough sandwich only to have the crust tear the roof of our mouths. That’s why I obsessed over this specific recipe. I wanted the gut friendly benefits of wild yeast but with the squish factor of those classic white loaves we loved as kids.
This recipe is the bridge between those two worlds, providing a sturdy yet velvety structure that holds up to heavy fillings without being a struggle to chew.
Trust me on this: once you see that golden dome rise over the edge of your tin, you will never go back to the plastic wrapped stuff. We aren't just making bread here; we are creating a kitchen staple that brings everyone to the table.
Let's crack on with the secrets of enrichment that make this the only sandwich loaf you'll ever need.
The Chemistry of Enriched Crumb
Lipid Interference: Adding 50g of softened butter coats the flour's proteins, which physically slows down the formation of long, tough gluten strands. This results in a shorter, more tender crumb structure that feels soft to the bite rather than chewy.
Hygroscopic Moisture Retention: The 40g of honey acts as a natural humectant, meaning it literally pulls moisture from the air and holds it within the bread's starch network. This is the primary reason this loaf stays fresh on the counter for three days while leaner sourdough goes stale in hours.
Enzymatic Tenderization: Using 200g of whole milk introduces lactose and milk fats that interfere with starch recrystallization. This process, known as anti staling, keeps the bread’s interior from turning into a dry, crumbly mess as it cools.
Enrichment and Crumb Softness
When we talk about "enrichment," we are essentially talking about adding fats and sugars to a standard flour water salt mix. In this recipe, the milk and butter work together to create a luxurious mouthfeel. It’s a similar logic to what makes a Soft and Fluffy recipe so pliable compared to a crunchy baguette.
Honey for Better Moisture
Honey isn't just here for flavor; it’s a functional powerhouse. Unlike granulated sugar, honey contains fructose which bonds more tightly with water molecules. This keeps your slices from drying out during the toasting process, ensuring the center stays moist while the outside gets that perfect golden glow.
| Cooking Method | Total Time | Crust Texture | Best For |
|---|---|---|---|
| Standard Oven | 40 mins | Even, golden, thin | Classic sandwich slices |
| Dutch Oven | 45 mins | Slightly thicker, crispy | Hearty toast and jam |
| Stovetop (Steam) | 55 mins | Pale, extremely soft | Kids' crustless sandwiches |
If you choose the stovetop steaming method, you'll need a very deep pot with a rack to keep the bread tin above the water. It’s an old school trick that produces a loaf almost like a giant steamed bun, though most of us prefer the traditional oven bake for that beautiful Maillard reaction on the crust.
Bread Metrics and Timing Details
Success with sourdough depends on understanding that your starter is a living thing. For this recipe, we are using 100g of active starter at its peak. If your kitchen is cold, that 9 hour fermentation might stretch to 11. If it's a humid summer afternoon, it might be ready in 7. Always watch the dough, not the clock.
| Component | Science Role | Pro Secret |
|---|---|---|
| Active Starter | Leavening & acidity | Use it right when it bubbles and smells fruity, not sour. |
| Whole Milk | Fat & sugar source | Scald and cool it first to denature enzymes that can weaken gluten. |
| Bread Flour | Protein structure | High protein (12%+) is non negotiable for the height of this loaf. |
| Softened Butter | Texture softener | Massage it in at the end to keep the gluten network strong. |
The milk provides the base for that velvety texture we are after. While you can use water, the protein in the milk helps the bread rise taller and more evenly. It’s the difference between a "workhorse" loaf and a "masterpiece" loaf that feels like a cloud in your hands.
Ingredient Science and Smart Swaps
To get the best results, stick to the 500g of bread flour. All purpose flour can work in a pinch, but you might find the loaf lacks the structural integrity to stand tall. The honey can be swapped for maple syrup, but you’ll lose a bit of that characteristic floral aroma that makes this recipe so special.
- 100g active sourdough starter: Substitutable with 1/2 tsp instant yeast + 50g flour/50g water Why this? Provides the rise and complex, tangy depth.
- 50g warm water: Substitutable with extra milk Why this? Hydrates the flour to begin gluten development.
- 500g bread flour: Substitutable with All Purpose flour Why this? High protein ensures the bread doesn't collapse.
- 200g whole milk: Substitutable with oat milk Why this? Adds fat for a tender, soft crumb.
- 50g unsalted butter: Substitutable with coconut oil Why this? Shortens gluten strands for a "squishy" feel.
- 40g honey: Substitutable with agave nectar Why this? Keeps the bread moist and adds sweetness.
- 10g fine sea salt: Substitutable with table salt Why this? Regulates fermentation and enhances all flavors.
| Original Ingredient | Substitute | Why It Works |
|---|---|---|
| Whole Milk (200g) | Full fat Coconut Milk | Similar fat content. Note: Adds a slight tropical nutty flavor. |
| Unsalted Butter (50g) | Vegan Butter Blocks | Mimics the fat solids for a similar crumb softness. |
| Honey (40g) | Maple Syrup | Both are humectants. Note: Maple makes the crust darken faster. |
Using maple syrup instead of honey will give you a slightly more "autumnal" scent, which is lovely if you're planning on using the loaf for a Classic Turkey Club recipe. Just keep an eye on the oven, as maple sugar caramelizes at a slightly lower temperature than honey.
Tools for a Perfect Rise
You don't need a professional bakery setup, but a standard 9x5 inch (23x13 cm) loaf pan is essential. I prefer heavy duty aluminized steel because it conducts heat more evenly than glass.
A digital scale is also your best friend here measuring flour by the cup is the fastest way to end up with a dry, heavy brick.
Chef's Tip: Freeze your butter for 10 minutes before you plan to mix. Then, grate it into the dough using a cheese grater. This ensures it incorporates perfectly and evenly without you having to overwork the dough.
Another trick I've learned is to use a spray bottle filled with water. Spritzing the top of the dough right before it goes into the oven helps the crust stay flexible for the first 10 minutes of baking.
This allows the loaf to expand fully (the "oven spring") before the crust sets, preventing those ugly side blowouts.
Shaping and Baking Your Loaf

- Whisk the 100g starter with 50g warm water and 200g milk until milky. Note: This ensures the leaven is evenly distributed.
- Add the 500g bread flour, 40g honey, and 10g salt to the bowl.
- Mix by hand or mixer until no dry flour remains.
- Incorporate the 50g softened butter by pinching it into the dough. Note: It will feel messy at first, but keep going.
- Rest the dough for 30 minutes to allow the flour to fully hydrate.
- Perform four sets of "stretch and folds" every 30 minutes until the dough is smooth and elastic.
- Bulk ferment at room temperature for 4 to 6 hours until doubled in size and jiggly.
- Degas gently and roll into a tight cylinder to fit your greased loaf pan.
- Proof for another 2 to 3 hours until the dough rises 1 inch above the rim.
- Bake at 190°C (375°F) for 40 minutes until the top is deep mahogany and sounds hollow.
Feeding the Sourdough Starter
Make sure your starter has been fed 4 to 6 hours before you start. It should be at its absolute peak bubbling aggressively and smelling like sweet yeast. If it has started to fall back down the jar, the acid levels might be too high, which can lead to a gummy texture in enriched breads.
Perfecting the Loaf Shape
When you shape the cylinder, pull the dough towards you on the counter to create tension on the "skin." This tension is what allows the bread to rise upward rather than spreading outward. Think of it like a balloon; the tighter the skin, the better it holds its shape.
Troubleshooting Common Baking Hurdles
One mistake I once made was rushing the final proof. If the dough hasn't cleared the rim of the pan before it hits the heat, it won't have the momentum to create that beautiful domed top. You'll end up with a flat, dense square rather than a proud sandwich loaf.
Why Your Bread Is Dense
If your loaf feels like a lead weight, it's usually a fermentation issue. Sourdough takes time, especially with the added weight of milk and butter. If your kitchen is below 20°C, your "9 hour" recipe might actually need 12 hours.
Use your oven with just the light on as a DIY proofing box if your house is chilly.
| Problem | Root Cause | Solution |
|---|---|---|
| Gummy Interior | Sliced while still hot | Wait at least 2 hours for starches to set completely. |
| Flying Crust | Underproofed dough | Let the final rise go longer until the dough is very fragile. |
| Sour Overtones | Overfermented starter | Use starter exactly at its peak before it turns acidic. |
Common Mistakes Checklist
- ✓ Never slice the bread while it is steaming; the residual heat is still "cooking" the center.
- ✓ Don't skip the butter softening step; cold butter won't emulsify into the dough properly.
- ✓ Avoid using "old" starter that has been in the fridge for a week without a fresh feed.
- ✓ Ensure your oven is fully preheated for 30 minutes to provide that initial heat kick.
- ✓ Use a kitchen scale; 500g of flour can vary by nearly half a cup depending on how you scoop it.
Customizing Your Sandwich Loaf
If you want a more rustic feel, you can substitute 100g of the bread flour for whole wheat or rye flour. This will add a nutty depth but will also make the loaf slightly denser. You might need to add an extra 10g of water since whole grains are thirstier.
For those who love a bit of crunch, try brushing the top with an egg wash and sprinkling on rolled oats or poppy seeds before baking. It makes the loaf look like it came straight from a boutique bakery. If you're looking for something more roll shaped, you can actually use this exact dough to make Homemade Kaiser Rolls recipe, though the texture will be much softer than the traditional crunchy version.
1. Scaling for a Crowd
Scaling Down (1/2 Loaf): If you are baking for one, use a small 6 inch pan. Reduce the baking time by about 10 minutes. For the egg wash (if using), beat one egg and use only half to avoid a soggy top.
Scaling Up (2-3 Loaves): This is the way to go for meal prep. Double the ingredients exactly, but keep the salt at 1.8x the original amount (around 18g) to prevent it from slowing the fermentation too much.
Work the dough in a large stand mixer if you have one, as 1kg of flour is a workout for the arms!
| Servings | Starter | Flour | Milk | Pan Size |
|---|---|---|---|---|
| 15 Slices (1 Loaf) | 100g | 500g | 200g | 9x5 inch |
| 30 Slices (2 Loaves) | 200g | 1000g | 400g | Two 9x5 inch |
| 45 Slices (3 Loaves) | 300g | 1500g | 600g | Three 9x5 inch |
When baking multiple loaves, ensure there is at least two inches of space between the pans in the oven. If the oven is overcrowded, the air won't circulate, and you'll end up with "pale shoulders" sides of the bread that aren't fully baked or browned.
Debunking Sourdough Myths
A common misconception is that sourdough must always be "sour." In reality, by using a young, active starter and enriching the dough with honey and milk, you can neutralize the sharp acetic acid. This results in a creamy, mellow flavor that is much better suited for a PB&J than a standard fermented boule.
Another myth is that you can't use metal bowls or spoons with sourdough. While long term storage in reactive metal (like aluminum) isn't great, using a stainless steel mixing bowl or a stand mixer is perfectly fine. The modern sourdough "rules" are often more about tradition than actual chemistry.
Storing for Long Lasting Softness
Once the bread has cooled completely, store it in a reusable linen bag or a bread box. Avoid the refrigerator at all costs; the cold temperature actually accelerates the staling process through a phenomenon called starch retrogradation. On the counter, this loaf will stay "squishy" for about 3 to 4 days.
For long term storage, slice the entire loaf and freeze it in a sealed bag with parchment paper between the slices. You can pop a frozen slice directly into the toaster, and it will taste as if it were baked that morning.
Zero Waste Tip: If you find yourself with the "heels" of the loaf that no one wants to eat, don't toss them! Dice them up, toss with a little melted butter and garlic salt, and bake at 180°C for 10 minutes.
You’ll have the best sourdough croutons of your life for your next salad.
Plating and Serving Your Bread
There is nothing quite like a thick slice of this bread toasted with a generous smear of salted butter. Because of the honey in the dough, it browns beautifully, creating a caramelized exterior that contrasts with the soft middle. Honestly, don't even bother with low-fat spreads here; the bread deserves the real deal.
For a special brunch, use 2 day old slices for French toast. The enriched structure is sturdy enough to soak up an egg custard without falling apart, resulting in a center that tastes like bread pudding.
It’s the ultimate way to bring people together over a shared meal, which is really what baking is all about anyway. Whether it’s a simple ham sandwich or an elaborate avocado toast, this bread makes everything feel a bit more intentional and a lot more delicious.

Recipe FAQs
Is using whole milk essential for this soft sourdough loaf?
Yes, milk is crucial for the texture. The fats and lactose in whole milk interfere with starch recrystallization, acting as a tenderizer that keeps the interior from drying out quickly.
How to know when the final proof is complete before baking?
Gently poke the dough with a wet finger. If the indentation slowly springs back but doesn't fully disappear, it is ready for the oven; if it springs back immediately, give it another 30 minutes.
Why does my enriched sourdough taste barely tangy instead of sour?
False. Sourdough bread does not have to be intensely sour. The fats from the butter and milk, combined with the sweetness of the honey, effectively mask the sharp acetic acid, resulting in a much milder flavor profile.
How to incorporate the softened butter without deflating the dough?
Pinch the softened butter into the dough after the initial mix and before the first set of stretch and folds. Work it in gently until it disappears, leveraging the time between folds to let the gluten recover.
Can I substitute the honey with regular granulated sugar?
No, substitution changes the moisture profile significantly. Honey acts as a humectant, actively drawing moisture into the loaf; granulated sugar is less effective at this, leading to a slightly drier final product.
How long should I let the loaf cool before slicing to prevent gumminess?
Wait a minimum of two hours after removing the loaf from the pan. Slicing while hot traps steam inside, which compromises the internal starch structure, making the crumb gummy and sticky.
What is the best technique for making sure the loaf rises tall and straight?
Create significant surface tension when shaping the final cylinder. Pulling the dough tight across the counter creates a strong exterior "skin" that forces the loaf to expand vertically in the oven during the initial spring.
Soft Sourdough Sandwich Loaf
Ingredients:
Instructions:
Nutrition Facts:
| Calories | 174 kcal |
|---|---|
| Protein | 5.1 g |
| Fat | 3.7 g |
| Carbs | 30.0 g |
| Fiber | 1.0 g |
| Sugar | 2.8 g |
| Sodium | 258 mg |
