Strawberry Earthquake Cake
Have you ever thought about how a cake can literally have its own “earthquake”? it sounds kinda wild, right? but trust me when i say this strawberry earthquake cake is unlike any ordinary cake you’ve come across.
With layers of fluffy strawberry goodness and a creamy surprise in the middle, this recipe is a delightful indulgence. it's perfect for a casual gathering or a sweet treat after dinner, and the best part? you can whip it up in about 70 minutes!
So, what makes this cake so special? for starters, it's a snap to put together just a quick mix here and there, and you’re ready to bake.
The difficulty level is right in the middle; even if you’re a novice, you won’t feel like you need a culinary degree to nail it.
It’s approachable and, let’s be honest, who doesn’t appreciate a delightful dessert that wows your friends and family without making you feel like you’re in a high stakes baking competition?
Diving into the history behind this earthquake cake , it’s almost as fascinating as the cake itself! the backstory of earthquake cake originates from a time when bakers were delighting in creativity and experiments.
The cake symbolizes a bit of fun, chaos, and surprise much like an actual earthquake, where the top layer cracks and creates an unexpected, yet charming, appearance.
This rustic look adds to the cake’s appeal, giving it a homemade vibe that’s comforting and welcoming.
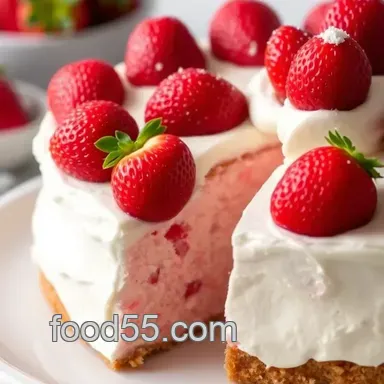
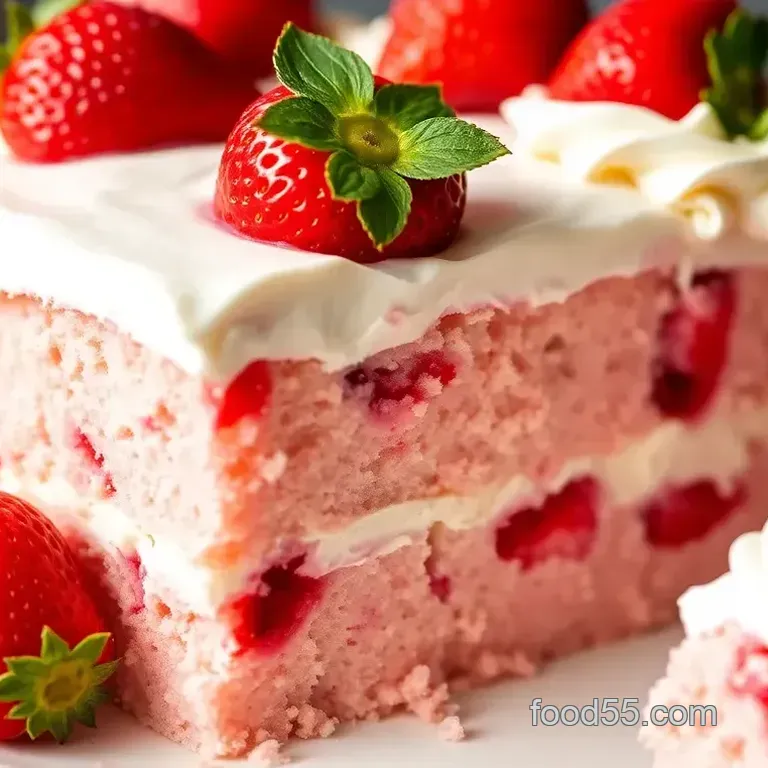
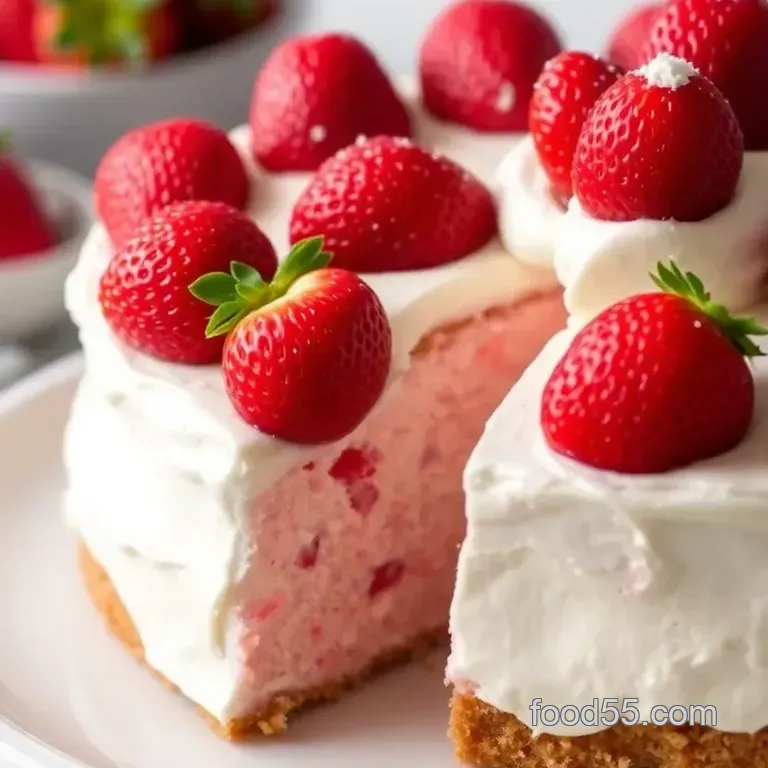
Your new favorite strawberry earthquake cake isn’t just a cake; it’s an experience. picture this: fluffy strawberry layers, a creamy cream cheese filling, and all that topped off with sweet coconut and optional crunchy nuts.
Honestly, how can you go wrong with that? the layers of flavor hit just right not overly sweet, perfectly moist, and with a hint of tartness from fresh strawberries.
Plus, you can make it your own by switching up some ingredients or toppings. i once made it with a hint of lemon zest, and wow, it added such a refreshing twist!
Now, let's chat about those textures and flavors. you don’t need to be a pro to create a show stopping dessert.
This cake is all about using simple techniques like mixing and layering, so even if you mess up here and there it’s all good! i might've forgotten to grease the pan once (whoops!), and while the cake was a bit stubborn during unmolding, it still tasted divine.
So, no pressure!
From a health perspective, the nutritional value of our strawberry earthquake cake isn't too shabby either. you're getting in fiber from those strawberries, along with a decent dose of energy caffeine boost, anyone?
It’s comfort food at its finest, but definitely worth keeping in moderation if you’re watching your intake.
Just remember, balance is key!
Before we dive into the nitty gritty of the recipe (you can almost smell it baking now, can’t you?), let's get this straight:
- Total preparation time is about 20 minutes.
- Throw it in the oven for around 50 minutes, so you’re looking at a total time of about 70 minutes!
- It serves 12, so the whole family can enjoy or you can keep some slices all to yourself. I won’t judge.
There’s something really heartwarming about baking after some kitchen mishaps, and maybe a few burnt edges here and there, i can assure you that this strawberry earthquake cake is a quick and accessible dessert that feels special, making even the most ordinary family dinner feel like a celebration.
Alright, enough chit chat; let’s get into the ingredients! you’re going to love making this masterpiece.
Perfect Ingredients Selection
When it comes to whipping up the strawberry earthquake cake , i can't stress enough how the right ingredients can elevate your baking game.
Let’s break it down, step by step, because i want you to nail it without the fuss you know those baking days when you just want a little joy without all the stress? i’ve been there!
Premium Core Ingredients
Let’s start off with our premium core ingredients. This is where the magic begins.
1 box (15.25 oz) strawberry cake mix : choose a brand that lists real strawberries or natural flavors within its ingredients.
Trust me, this little decision can turn your cake from bland to grand. i’ve had a gooey cake disaster when i skimped on this never again!
1 cup water : Just your average H2O, but making sure it’s at room temperature can help blend the cake mix better!
1/2 cup vegetable oil : light canola oil works too. i find that it keeps the cake moist and helps it rise.
If you use olive oil, you might end up with a different flavor profile, but hey, it could be an adventure.
Just saying.
3 large eggs : Check for freshness! A quick float test can help here. If they sink, they’re good; if they float, it's time to part ways.
1 cup crushed strawberries, fresh or frozen (thawed) : so, quick story: i once used totally overripe strawberries, and all i ended up tasting was the over sweetness.
No bueno. fresh or well thawed frozen, please!
Signature Seasoning Blend
Now, onto the magic potion for flavor our seasoning blend.
8 oz cream cheese, softened : a must! i often forget this part and rush, only to have lumps in the mixture.
Don’t skip the softening step, or you’ll have a bumpy ride ahead.
1/2 cup powdered sugar : Choose a brand without any weird additives. This sugar will give your cream cheese layer the sweetness it needs without that gritty texture.
1 large egg : Same deal as above freshness matters!
1 teaspoon vanilla extract : Go for pure extract if you can find it. It adds a depth that the imitation stuff just can't match. Trust me here, it makes a difference.
Smart Substitutions
Sometimes, life throws a curveball (or a missing ingredient!). Here’s where you can get clever.
Plant based swap : If you’re looking for a vegan version, replace the eggs with flax eggs (1 tbsp flaxseed meal with 2.5 tbsp water equals one egg).
Almond flour instead of nuts : I realized this one day when I was out of walnuts works like a charm! Adds a different flavor but still crunchy.
Fruit variations : No strawberries? No problem! You can use blueberries or raspberries. Just be sure to adjust your sugar levels, especially with tart fruit.
Kitchen Equipment Essentials
Now, let's chat about the tools of the trade your kitchen warriors!
Mixing bowls : Essential! I always grab my trusty glass bowls; they're like the unsung heroes of my kitchen.
Electric mixer : I prefer using a handheld one. But if you’ve got a stand mixer, go for it! Get that cream cheese fluffy what joy!
Spatula : I use one more often than not for scraping the bowls. When I forget it, blending becomes a nightmare.
9x13 inch baking pan : the gold standard for cakes! if you don’t have one, try using a slightly larger pan.
Just keep an eye on the baking time, as it might bake faster.
Pro Ingredient Tips
Alright, let’s get down to my personal favorites and little secrets that’ll save you some heartache because we’ve all had those kitchen re-dos, right?
Buy seasonal : Fresh strawberries in summer are like treasures, bursting with flavor! When they're at their best, that’s when you want to bake.
Storing ingredients : Keep your cream cheese in the fridge until you’re ready to use it, and your cake mix seals tightly so it stays fresh imagine waiting to bake and finding outdated crumbs in the box!
Budget friendly : When strawberries are on sale, stock up! You can freeze them for later. Freeze them in a single layer before transferring them into a bag that way, they won’t stick together.
Thinking about it, all these ingredients and tips are bumping up to the real deal the baking of the strawberry earthquake cake! so sit tight, grab your apron, and let’s dive into the instructions that’ll see you through the sweet chaos that is cake making.
Trust me, satisfaction guaranteed.
Expert Cooking Method
Okay, friends! today we’re diving into a super fun and surprisingly delicious dessert strawberry earthquake cake ! this recipe is a splendid blend of sweet strawberries, creamy layers, and, oh, that magical earthquake effect that cracks the top while baking.
It’s an ultimate crowd pleaser for any gathering. so, let’s roll up our sleeves and bake something wonderful together!
Essential Preparation Steps
First up, let’s get our ducks in a row or as the old brit saying goes, get our ducks in a line ! this means we start with a little mise en place .
Gather your ingredients: you’ll need a box of strawberry cake mix, some water, oil, eggs, crushed strawberries, cream cheese, and more for the topping.
Trust me, it makes the process smoother than a freshly baked cake.
Now, about prep techniques you’ll want everything measured out before the oven starts its magic. take your cream cheese out to soften while you prep.
Nothing worse than trying to mix cold cream cheese, trust me. oh, and if you’re using frozen strawberries, make sure they’re thawed and drained no one wants a soggy cake!
Then, timing management is the name of the game! preheat your oven to 350°f (or 175°c for my friends across the pond).
This ensures that your cake gets that perfect rise. and don't forget to grease your 9x13 inch pan! i’ve forgotten once, and, oh boy, that was a messy clean-up.
Organization tips : Keep your workspace tidy. The fewer distractions, the easier it is to enjoy the process. It's all about the zen moment of baking!
Professional Cooking Method
Alright, let’s get into the nitty gritty of the baking process.
Mixing the cake : start by combining the strawberry cake mix, water, vegetable oil, and three large eggs in a large mixing bowl.
Beat it on medium speed for about two minutes . look for a smooth, lump free batter this is key for a moist cake.
Cream cheese layer : in a different bowl, blend the softened cream cheese, powdered sugar, one egg, and a hint of vanilla.
Whisk it till it's creamy no lumps allowed! if you’re using an electric mixer, you’ll feel like a pro.
Layering : here’s where it gets interesting. pour half the strawberry batter into our greased pan. then, drop spoonfuls of the cream cheese mixture on top of the batter, kind of like spooning in surprises! top it off with the other half of the strawberry batter.
Coconut and Nuts : Sprinkle the shredded coconut (and nuts if you're feeling nutty) generously over everything. This is where the earthquake magic happens.
Bake time : slide it into your preheated oven for 45-50 minutes . here’s a fun tip: the top might crack a bit this is supposed to happen, and it looks beautiful! when you insert a toothpick, it should come out clean this is your success indicator .
Expert Techniques
Let’s talk about some pro tips . when you’re mixing the cake batter, blending helps incorporate air, resulting in a fluffier cake.
For the cream cheese layer, don't rush it! get it blended thoroughly; lumpy cream cheese can ruin your overall texture.
Precision points : keep a close eye during the last few minutes of baking. ovens can be notorious for different temperatures, so don’t wander too far! err on the side of caution, and test with a toothpick as that can help prevent a dry cake.
Quality checks : after it’s out of the oven, let it cool in the pan for about 20 minutes before you slice.
This helps it set and makes for cleaner squares. you don't want to rush and end up with a crumbly mess!
Success Strategies
Now, let’s tackle some potential pitfalls. If you find your cake isn’t rising as expected, check your baking powder yep, these little guys do expire!
To ensure quality, always taste your batter oops, i meant to say, ensure everything is well combined! it’s totally okay to have a little fun during the process.
If the cake isn’t quite to your liking, perhaps an extra layer of fresh fruit or a drizzle of homemade whipped cream might be the answer to your prayers.
Finally, for that perfect result, remember patience is key. Give the cake a bit of time to cool completely before digging in trust me, you don’t want to scorch your taste buds on a molten strawberry delight!
Feeling ready to tackle this cake? Great! Next, we'll dive into some additional information to help elevate your baking game even further with some fun variations and serving suggestions!
Game Changing Tips
Professional Insights
Let me tell you, this strawberry earthquake cake is one of those layered beauties that honestly blew my mind when i first tried it! one of the best tips i've picked up over the years is using room temperature eggs.
It really does make a difference in the mixing process, contributing to that lovely, airy cake texture. trust me, you want every bit of fluffiness possible!
Expert Techniques
When making the cream cheese layer, use a stand mixer if you have one. it takes all the elbow grease out of the equation and gives you that creamy bliss with no lumps! also, you can mix in a pinch of salt to the cream cheese mixture; it enhances the flavors beautifully.
Kitchen Wisdom
Here’s a little nugget of wisdom: if you ever find yourself with too much batter, you can make cupcake versions with the leftover.
What a lovely treat for later! just fill your cupcake liners about two-thirds full and watch them rise while baking.
Success Guarantees
Want to ensure that your cake doesn’t turn out like a sad pudding? make sure to follow the baking times closely.
Every oven is different. if the top is still wobbly at the end of the suggested baking time, give it a few extra minutes but keep an eye out for that golden brown top.
Perfect Presentation
Plating Techniques
Now, presentation is everything, isn’t it? For this decadent cake, use a large platter and arrange the pieces with a light hand, almost as though you’re displaying treasures.
Garnish Ideas
A sprinkle of powdered sugar on top right before serving can make the cake shimmer like something from a dessert fairy tale.
And don’t forget to add fresh sliced strawberries on top; they add that perfect pop of color.
Serving Suggestions
This cake is fabulous for summer picnics or birthday bashes. serve it at room temperature, and watch your loved ones devour it! you can even place a dollop of homemade whipped cream on the side to take it to the next level.
Visual Appeal Tips
Here’s my favorite way to add that wow factor : layer slices on a rustic wooden board for a more country vibe. It gives it a homey feel that I absolutely adore.
Storage and make-ahead
Storage Guidelines
This cake keeps well in the fridge for about 3-4 days if properly stored in an airtight container. You want to keep it from drying out because nobody likes a sad, crusty cake!
Preservation Methods
If you're looking to keep it longer, consider freezing it without the toppings. wrap your slices in plastic wrap, then foil, and toss them in the freezer.
You can keep it for up to 3 months.
Reheating Instructions
To reheat, gently warm individual slices in the microwave for about 15-20 seconds. You just want it warm enough to make it irresistible!
Freshness Tips
Once it’s cooled, make sure to cover it tightly to preserve its fresh essence. No one wants stale cake ruining their experience.
Creative Variations
Flavor Adaptations
Feeling adventurous? Try mixing in some lemon zest into the batter for a lovely citrus undertone. It creates a beautiful balance alongside the strawberries.
Dietary Modifications
For those who are gluten-free, there are plenty of gluten-free strawberry cake mix options. Just make sure to check the package specifics.
Seasonal Twists
This cake is amazing as-is, but did you know you can make a fall version by swapping strawberries for diced apples? Think of the spices cinnamon, nutmeg. Heaven!
Regional Variations
Speaking of regional variations, how about a Southern twist ? Incorporate some sweet tea in place of the water in your cake mix. It’ll add that beloved Southern sweetness!
Complete Nutrition Guide
Detailed Breakdown
Each slice holds about 280 calories , which isn't too indulgent considering how delightful it is.
Health Benefits
Strawberries are a fantastic source of vitamin C, and fresh fruit can help you feel a bit better about indulging in that cream cheese layer.
Dietary Information
Per serving, you're looking at about 14g of fat and 3g of protein, which is rather balanced for dessert!
Portion Guidance
Cut the cake into 12 generous slices ; it's a great way to share. Trust me, your friends will thank you!
Expert FAQ Solutions
Common Concerns
“Will it really taste good if I use frozen strawberries?” Yes! Just make sure they're thawed and not swimming in moisture.
Expert Answers
“Can I replace the cream cheese?” Absolutely! You could use mascarpone or even Greek yogurt for a lighter version.
Troubleshooting Guide
If your cake sinks in the middle, it might need a bit more baking time. Remember, patience is key!
Success Tips
The magic number for this cake is to enjoy the journey. Don't stress; embrace the chaos of mixing it’ll turn out deliciously, trust me.
All in all, make this Strawberry Earthquake Cake your next go-to for gatherings. It's comforting, fun to make, and sure to impress! Don’t forget to share your success stories I'd love to hear how yours turns out! Happy baking!
Strawberry Earthquake Cake