The Best Chili Recipe with Smoky Depth
- Time: Active 20 mins, Passive 1 hours 30 mins, Total 1 hours 50 mins
- Flavor/Texture Hook: Deeply smoky, velvety, and fork tender beef
- Perfect for: Sunday game days or feeding a hungry crowd on a budget
- That One Rainy Tuesday My Kitchen Smelled Like Victory
- The Chemistry of Deep Flavor and Beefy Success
- Critical Checkpoints for Your Perfect Pot of Chili
- Sourcing the Elements for a Legendary Bowl of Red
- The Essential Tools for a Low and Slow Simmer
- Building the Ultimate Layers of Smoke and Heat
- Troubleshooting Your Way to a Flawless Finish
- Tailoring Your Bowl to Every Dietary Preference
- Preservation Tactics and Next Day Gains
- Storage Guidelines for Longevity
- Storage Guidelines for Longevity
- Elevating Your Meal with the Ultimate Topping Bar
- High in Sodium
- Best Chili Recipe FAQs
- 📝 Recipe Card
That One Rainy Tuesday My Kitchen Smelled Like Victory
I still remember the first time I tried to make "the best" chili for a group of friends. I followed a generic back of-the can recipe, threw everything in at once, and ended up with a pot of watery, greyish meat and mushy beans. It was humiliating.
My friends were polite, but we ended up ordering pizza while the "chili" sat untouched. That failure sent me on a three year obsession to understand what makes a bowl of red truly legendary.
What I discovered is that great chili isn't about a secret ingredient; it's about a series of small, intentional techniques that build a foundation of flavor. It's the sizzle of the bacon fat rendering out, the way the spices transform from dusty powders into fragrant oils, and the patience to let the liquid reduce until it's thick enough to coat a spoon.
This recipe is my pride and joy the one that finally won the neighborhood cook off and the one my family begs for the second the temperature drops below 15°C.
We are going to treat this beef with respect. We aren't just boiling it in tomato juice; we are braising it in a fortified liquid of bone broth, soy sauce, and cocoa. Trust me, you'll never go back to the basic version again. It's rich, it's hearty, and it has a velvety finish that most home versions lack.
Let's get into the kitchen and build something we're actually proud to serve.
The Chemistry of Deep Flavor and Beefy Success
Getting the best chili recipe right requires more than just heat; it requires an understanding of how proteins and spices interact under pressure and time. We are essentially performing a slow motion flavor extraction.
- Maillard Reaction: Searing the 80/20 ground beef creates complex sugars and savory compounds on the surface of the meat. This isn't just "browning" it's the creation of thousands of new flavor molecules that don't exist in raw or boiled meat.
- Lipid Soluble Extraction: Many of the flavor compounds in chili powder and cumin are fat soluble, not water soluble. By "blooming" them in the rendered bacon fat before adding the liquid, we unlock a depth of spice that would otherwise remain muted.
- Enzymatic Tenderization: The acidity from the crushed tomatoes and the long simmer time work together to break down the connective tissues in the ground beef. This prevents that "grainy" or "mealy" texture often found in quick cook recipes.
- Umami Synergism: Combining the glutamate in the tomatoes with the inosinates in the beef and the soy sauce creates a flavor explosion. These ingredients work together to make the beef taste "meatier" than it actually is.
Done ness and Texture Checkpoints
| Thickness of Meat Layer | Internal Temp (Simmer) | Rest Time | Visual/Sensory Cue |
|---|---|---|---|
| 2-3 cm (Initial sear) | 71°C | N/A | Deep mahogany crust on bottom |
| Pot Depth (Simmering) | 88°C - 93°C | 10 mins | Small, lazy bubbles only |
| Final Consistency | N/A | 15 mins | Liquid coats back of a spoon |
Getting that simmer right is the difference between a tender bite and a rubbery one. If the pot is boiling aggressively, the meat fibers will tighten and squeeze out all their moisture, leaving you with dry pellets of beef. We want a gentle, "smiling" simmer where the bubbles just barely break the surface.
Critical Checkpoints for Your Perfect Pot of Chili
This isn't a "set it and forget it" situation until the final hour. The first 20 minutes are where the character of the dish is formed. We use a high fat to lean ratio because fat carries flavor; if you use 90/10 beef, the chili will feel thin and one dimensional in your mouth.
Chef's Tip: Freeze your bacon for 10 minutes before dicing. It makes it infinitely easier to get those tiny, uniform cubes that melt into the base of the sauce.
| Component | Science Role | Pro Secret |
|---|---|---|
| 80/20 Ground Beef | Fat provides mouthfeel and carries spice aromatics. | Don't break it up too small; leave some chunks for texture. |
| Unsweetened Cocoa | Adds bitterness to balance the acidity of tomatoes. | It deepens the color to a rich, dark mahogany. |
| Beef Bone Broth | Provides gelatin for a velvety, thick sauce. | Use high-quality broth to avoid a salty, tinny aftertaste. |
| Soy Sauce | Acts as an umami booster without adding "soy" flavor. | It replaces part of the salt for a more complex savory profile. |
One mistake I see all the time is people skipping the bacon. Please, don't do that. The smoky rendered fat from those four strips is the canvas we’re painting on. It adds a background note of woodsmoke that makes people ask, "What is that flavor?" without being able to quite put their finger on it.
Sourcing the Elements for a Legendary Bowl of Red
We need to be specific with our ingredients here. This isn't just a list; it's a blueprint. For a truly authentic experience, you might even consider looking at a Texas Style Homemade Chili Recipe if you want to see how the pros handle whole dried chilies, but our ground version here is designed for maximum flavor with accessible pantry staples.
- 2 lbs ground beef (80/20 lean to fat ratio): Why this? The fat is essential for a velvety sauce and moist meat.
- Substitute: Ground turkey (add 1 tbsp extra oil to compensate for leanness).
- 4 strips thick cut bacon, finely diced: Why this? Provides the smoky fat base for blooming spices.
- Substitute: 2 tbsp smoked olive oil or pancetta.
- 1 tbsp neutral oil: Why this? High smoke point for the initial sear.
- Substitute: Lard or avocado oil.
- 1 large yellow onion, finely diced: Why this? Provides sweetness and body as it breaks down.
- Substitute: White onion or 2 large shallots.
- 1 red bell pepper, diced: Why this? Adds a subtle fruitiness to balance the heat.
- Substitute: Poblano pepper for more earthiness.
- 4 cloves garlic, minced: Why this? Essential aromatic base.
- Substitute: 1 tsp garlic powder (add during spice bloom).
- 3 tbsp dark chili powder: Why this? The primary flavor driver; look for "dark" for more depth.
- Substitute: Ancho chili powder.
- 1 tbsp smoked paprika: Why this? Mimics the flavor of slow smoked peppers.
- Substitute: Liquid smoke (3 drops) + regular paprika.
- 2 tsp ground cumin: Why this? Provides the "earthy" backbone of the chili.
- Substitute: Whole cumin seeds, toasted and ground.
- 1 tsp dried oregano: Why this? Adds a necessary herbal high note.
- Substitute: Mexican oregano (preferred if you can find it).
- 1/2 tsp cayenne pepper: Why this? Controllable heat level.
- Substitute: Red pepper flakes or diced jalapeño.
- 1 tbsp unsweetened cocoa powder: Why this? Adds "bottom" notes and richness to the sauce.
- Substitute: 1 square of 80% dark chocolate.
- 28 oz crushed tomatoes: Why this? Creates the thick, saucy texture.
- Substitute: Diced tomatoes (pulse in blender for 2 seconds).
- 15 oz tomato sauce: Why this? Smooths out the texture of the crushed tomatoes.
- Substitute: Tomato paste (2 tbsp) mixed with 1 cup water.
- 1 cup beef bone broth: Why this? Adds body and collagen for mouthfeel.
- Substitute: Beef bouillon or vegetable stock.
- 1 tbsp worcestershire sauce: Why this? Vinegar and anchovy notes for complexity.
- Substitute: Balsamic vinegar (1 tsp).
- 1 tbsp soy sauce: Why this? The secret umami bomb.
- Substitute: Tamari or liquid aminos.
- 30 oz canned kidney beans, rinsed and drained: Why this? Standard hearty filler.
- Substitute: Black beans or pinto beans.
- 0.5 tsp salt & 0.5 tsp black pepper: Why this? Final seasoning adjustments.
The Essential Tools for a Low and Slow Simmer
You don't need a thousand dollar kitchen to make the best chili recipe, but you do need a heavy bottom. If your pot is too thin, the tomato sugars will scorched on the bottom, ruining the entire batch with a bitter, burnt aftertaste.
- Large Dutch Oven: A 5-6 liter enameled cast iron pot is the gold standard. It holds heat evenly and prevents hot spots. If you don't have one, any heavy bottomed stockpot will do.
- Wooden Spoon: Sturdy enough to scrape the "fond" (those brown bits) off the bottom of the pot.
- Fine Mesh Strainer: Essential for rinsing the kidney beans. Canned bean liquid is full of excess salt and starch that can make your chili murky and overly salty.
- Sharp Chef's Knife: For getting that onion and bacon diced small enough to melt into the sauce.
If you find yourself making sauces frequently, mastering a Homemade Stir Fry recipe will help you understand how to balance these savory and salty liquids in a hot pan. The mechanics of deglazing are almost identical here.
Building the Ultimate Layers of Smoke and Heat
- Render the bacon. Place the 4 strips of diced bacon in a cold Dutch oven. Turn heat to medium and cook until the bacon is crispy and fat has fully rendered. Note: Starting in a cold pan allows the fat to melt out before the meat burns.
- Sear the beef. Remove bacon bits with a slotted spoon, leaving the fat. Add 2 lbs ground beef. Cook over medium high heat until deeply browned and crispy on the edges. Note: Do not crowd the pan; sear in two batches if necessary to avoid steaming the meat.
- Sauté the aromatics. Lower heat to medium. Add 1 diced yellow onion and 1 diced red bell pepper to the beef fat. Cook 5-7 mins until the onion is translucent and soft.
- Bloom the spices. Stir in 4 minced garlic cloves, 3 tbsp chili powder, 1 tbsp smoked paprika, 2 tsp cumin, 1 tsp oregano, 1/2 tsp cayenne, and 1 tbsp cocoa powder. Cook for 60-90 seconds until the kitchen smells intensely fragrant. Note: This "toasts" the spices, waking up their essential oils.
- Deglaze the pan. Pour in 1 cup beef bone broth. Use your wooden spoon to scrape every single brown bit off the bottom of the pot. This is where the flavor lives.
- Build the sauce. Stir in 28 oz crushed tomatoes, 15 oz tomato sauce, 1 tbsp worcestershire sauce, and 1 tbsp soy sauce. Add the crispy bacon bits back in.
- Simmer low. Bring the mixture to a very gentle simmer. Cover partially and cook for 1 hour. Note: Partially covering allows some moisture to escape, thickening the sauce naturally.
- Add the beans. Stir in 30 oz rinsed kidney beans. Simmer for an additional 20-30 mins until the beans are heated through and the chili is thick and glossy.
- Final seasoning. Taste the chili. Add 0.5 tsp salt and 0.5 tsp black pepper. Adjust only at the end as the flavors concentrate during the simmer.
- The Rest. Turn off the heat and let the pot sit for 10-15 mins before serving. This allows the proteins to relax and the flavors to fully marry.
Troubleshooting Your Way to a Flawless Finish
Even with the best chili recipe, things can go sideways. The most common issue is usually related to texture either it's a soup or it's a dry brick.
Why Your Chili is Watery and Thin
If your chili looks more like a soup than a thick stew, you likely didn't let enough moisture evaporate. Some tomatoes are more watery than others. Don't panic; just take the lid off and turn the heat up slightly for 15 minutes. The reduction will concentrate the flavors.
You can also mash a handful of the kidney beans against the side of the pot; the released starch acts as a natural thickener.
Why Your Meat Feels Dry or Grainy
This usually happens if the beef was boiled rather than seared, or if the simmer was too aggressive. Ground beef can actually dry out if cooked at a hard boil for too long. Ensure you are using 80/20 beef; the fat provides the lubrication needed to keep the meat feeling tender.
| Problem | Root Cause | Solution |
|---|---|---|
| Bitter Aftertaste | Spices or garlic burned during the bloom phase. | Add a teaspoon of brown sugar to balance the bitterness. |
| Too Much Grease | Beef fat didn't emulsify into the sauce. | Skim the top with a wide spoon or lay a paper towel on the surface. |
| Overly Salty | Reduction concentrated the salt in the broth/soy sauce. | Add a peeled, halved potato for 20 mins (it absorbs salt) then remove it. |
Common Mistakes Checklist
- ✓ Never skip the "bloom" - raw spices in liquid taste like dust; toasted spices in fat taste like heaven.
- ✓ Don't drain the beef fat entirely - leave at least 2 tablespoons in the pot for the onions to cook in.
- ✓ Avoid pre shredded cheese for topping - it's coated in potato starch and won't melt into that silky pool we want.
- ✓ Always rinse your beans - the liquid in the can is metallic and ruins the sauce's clarity.
- ✓ Patience is an ingredient - if you eat it 5 minutes after adding the tomatoes, it will taste like "meat and tomatoes," not chili.
Tailoring Your Bowl to Every Dietary Preference
Scaling this recipe is fairly straightforward because it’s a "one pot" wonder. If you're cooking for a massive party, don't just double everything blindly.
Cooking for 16 (2x): Use a massive stockpot. Keep the salt and cayenne at 1.5x initially and adjust at the end. You don't need to double the oil; the beef will provide plenty of fat. Increase the simmer time by 20 minutes to account for the larger mass of cold ingredients.
Cooking for 4 (1/2x): Use a smaller 3 liter pot. The liquid will evaporate faster in a smaller pot, so keep the lid on more tightly. Check the consistency at the 45 minute mark.
Quick Decision Guide
- If you want a "Texas Style" version, omit the kidney beans entirely and double the amount of beef.
- If you want it extra spicy, add 2 diced jalapeños (with seeds) during the onion sauté.
- If you want a smoky shortcut, add a tablespoon of adobo sauce from a can of chipotle peppers.
If you really enjoy that smoky, sweet heat, you might love experimenting with a Honey Chipotle Sauce recipe as a base for your next batch of wings or even as a drizzle over this chili.
Preservation Tactics and Next Day Gains
Storing chili is where the real magic happens. As the mixture cools, the starch from the beans and the gelatin from the bone broth form a matrix that traps the spice oils. This is why chili always tastes better on day two.
In the Fridge: Transfer the cooled chili to airtight containers. It will stay fresh and delicious for up to 4 days. When reheating, you may need to add a splash of water or broth, as it will thicken significantly in the cold.
In the Freezer: This is a fantastic meal prep dish. It freezes beautifully for up to 3 months. I like to freeze it in individual portions (large muffin tins or small freezer bags) so I can grab one for lunch. Thaw in the fridge overnight before reheating on the stove.
Zero Waste Tip: If you have just a small amount of leftover chili, don't toss it. Use it as a topper for baked potatoes, or mix it into mac and cheese for a "chili mac" that will change your life. You can even use the leftover sauce as a base for an incredible Garlic Chili Sauce Recipe if you want to add some serious umami to your morning eggs.
Storage Guidelines for Longevity
| Method | Duration | Best For |
|---|---|---|
| Fridge | 4 Days | Weekly meal prep and next day flavor peaks. |
| Freezer | 3 Months | Long term storage; use freezer safe bags with air squeezed out. |
| Reheat | 5-10 Mins | Medium heat on stovetop; add 2 tbsp water to loosen. |
Storage Guidelines for Longevity
Chili is surprisingly resilient, but it does have its limits.
- Searing does not "seal in juices." The reason we sear the beef is for the Maillard reaction creating flavor. The moisture loss actually increases slightly when you sear, but the trade off in flavor is worth it.
- The "Secret Ingredient" Myth. People will tell you that you need peanut butter, beer, or coffee to make a good chili. While those can be fun additions, they are masks for poor technique. If you bloom your spices and use a high-quality broth, you don't need gimmicks.
- Beans or No Beans? The "authentic" Texas debate is mostly regional pride. In a home setting, beans provide fiber and texture that make the meal more balanced. Neither way is "wrong" it's just a matter of what you're craving.
Elevating Your Meal with the Ultimate Topping Bar
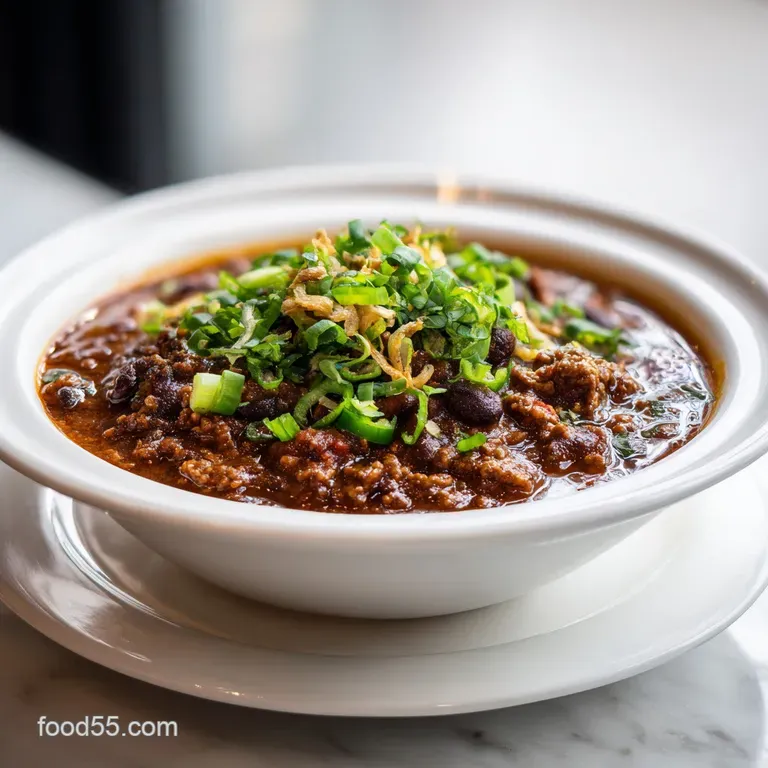
Serving the best chili recipe is an interactive experience. I like to set out a "build your own" station so everyone can customize their bowl.
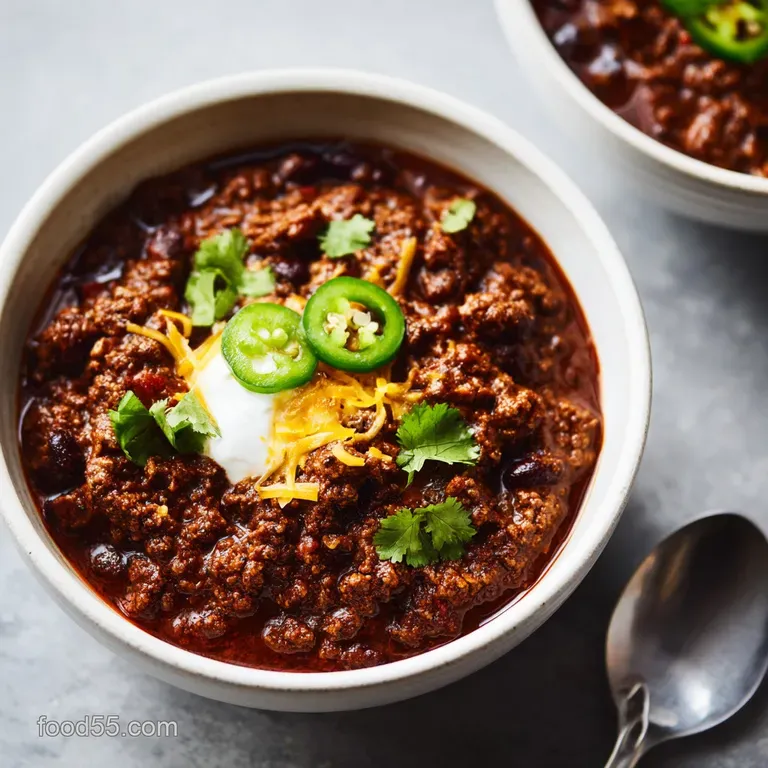
- The "Loaded" Garnish: Cold sour cream, sharp cheddar cheese (grated fresh!), and thinly sliced green onions. The contrast between the hot, spicy chili and the cold, fatty toppings is essential.
- The Crunch: Don't just go for crackers. Try Fritos or crushed tortilla chips. If you're feeling fancy, some pickled jalapeños add a bright acidity that cuts through the richness of the beef.
- Best Sides: Honey cornbread is the classic partner, but a simple white rice or even a piece of crusty sourdough is perfect for mopping up every last drop of that velvety sauce.
Ultimately, this dish is about connection. It's the pot you bring to the neighbor whose car broke down, or the meal you share with friends while watching a movie. It’s hearty, honest, and made with just enough care to make people feel special. Go grab your Dutch oven and let's make some magic happen.

High in Sodium
1085 mg mg of sodium per serving (47% of daily value)
The American Heart Association recommends limiting sodium intake to no more than 2,300mg per day for most adults. Ideally, most adults should aim for no more than 1,500mg per day.
Tips to Reduce Sodium in Your Chili
-
Low-Sodium Broth-30%
Swap regular beef bone broth with a low-sodium or no-salt added version. This can significantly reduce the overall sodium content of your chili.
-
Reduce Bacon-25%
Bacon is a significant source of sodium. Try using 2 strips instead of 4, or opt for a low-sodium bacon alternative to lower the sodium content without sacrificing flavor entirely.
-
No-Salt Added Tomatoes-20%
Choose no-salt added crushed tomatoes and tomato sauce. These are readily available and will dramatically reduce the sodium in the recipe.
-
Low Sodium Beans-20%
Opt for low-sodium canned kidney beans or cook dried kidney beans from scratch. If using canned beans, rinse them thoroughly under running water for at least 1 minute to remove excess sodium.
-
Omit Added Salt-20%
Eliminate the 1/2 tsp of added salt completely. With the other flavorful ingredients, you likely won't miss it. Taste and adjust seasoning with salt free alternatives after cooking.
-
Reduce or Replace Sauces-20%
Worcestershire sauce and Soy sauce are high in sodium. Use a low-sodium soy sauce alternative, reduce the amount of worcestershire sauce to 1/2 tbsp, or replace them with balsamic vinegar (1/2 tbsp) for depth of flavor.
-
Flavor Boost
Experiment with fresh herbs and spices to enhance the flavor without adding sodium. Consider adding fresh cilantro, parsley, or a bay leaf during cooking.
Best Chili Recipe FAQs
What is the secret to really good chili?
Blooming spices in rendered fat. Most recipes add dry spices to liquid, which mutes their flavor; toasting them in hot bacon fat first unlocks essential oils for deep, complex flavor.
What's the secret ingredient to add to chili?
Unsweetened cocoa powder. This ingredient is not for chocolate flavor; it adds bitterness that perfectly balances the acidity of the tomatoes, deepening the sauce's color and richness.
What can you put in chili to make it taste really good?
Use beef bone broth instead of water. Bone broth contains natural gelatin which breaks down during the long simmer, giving the final sauce a velvety, silky mouthfeel that water cannot replicate.
What are common chili mistakes?
Boiling instead of simmering gently. A hard, rolling boil tightens the meat fibers and forces moisture out, resulting in dry, grainy meat; you need a low, lazy simmer (88°C-93°C).
How do I make my chili thicker without adding flour?
Mash some of the beans against the pot's side. The starch released from the ruptured kidney beans acts as a natural thickener, binding the sauce while you wait for the liquid to reduce naturally.
Is it true that chili tastes better the next day?
Yes, this is absolutely true. As the chili cools, starches and gelatin set up around the flavor compounds, creating a more cohesive and deeply flavored final product.
Can I substitute ground beef for chicken in this recipe?
No, you must adjust the fat ratio if substituting poultry. Chicken is too lean; if you use it, you must add extra oil or rendered bacon fat because fat carries the majority of the flavor aromatics in this recipe.
The Best Chili Recipe
Ingredients:
Instructions:
Nutrition Facts:
| Calories | 412 calories |
|---|---|
| Protein | 33.6 g |
| Fat | 18.2 g |
| Carbs | 29.4 g |
| Fiber | 9.2 g |
| Sugar | 7.1 g |
| Sodium | 1085 mg |
