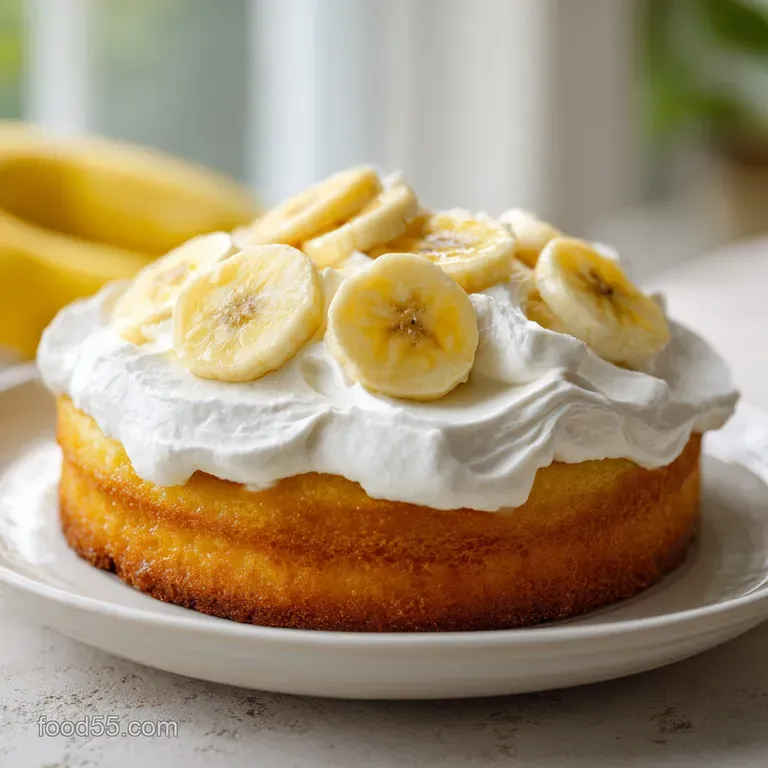
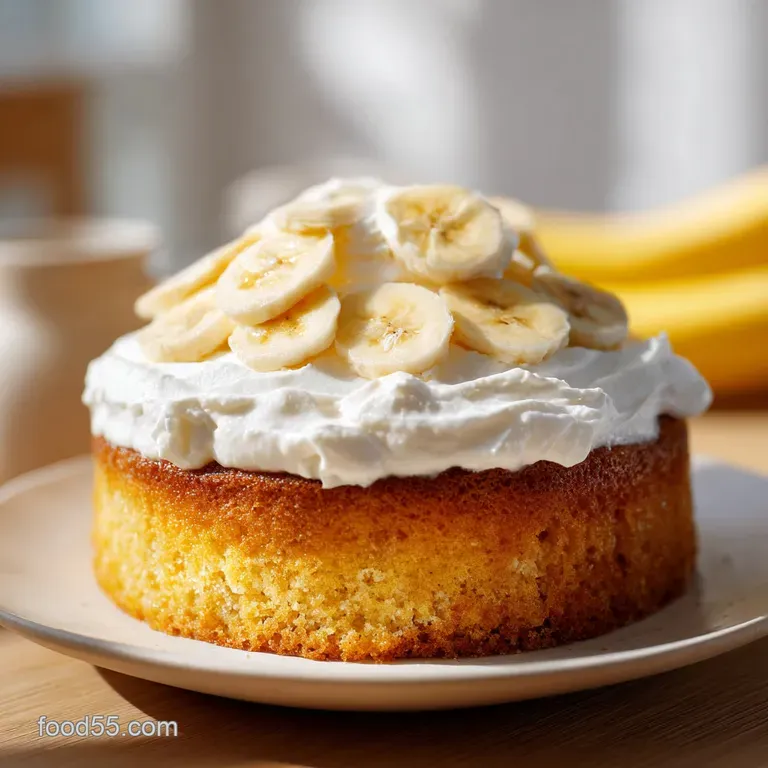
Banana Pudding Poke Cake: Velvety and Rich
- Time:15 minutes active + 4 hours 30 mins chilling = Total 4 hours 45 mins
- Flavor/Texture Hook: Velvety pudding layers with a buttery, spongy crumb
- Perfect for: Family reunions, potlucks, or any time you need a crowd pleaser
The smell of toasted vanilla and melted butter always takes me back to my aunt's kitchen during the Fourth of July. She had this old-fashioned pudding that was just okay, but it always felt a bit too "gloppy" for my taste.
I wanted something that had the soul of a pudding but the structure of a cake, something you could actually slice into clean pieces and share around a big wooden table.
That's how I stumbled into making this Banana Pudding Poke Cake. The first time I tried it, I actually poked the holes too deep and almost hit the bottom of the pan, but the result was a dessert so moist it practically melted.
It's the ultimate contrast: you've got the buttery density of the yellow cake, the silky ooze of the pudding soak, and the airy, cloud like finish of the yogurt cream.
You can expect a treat that feels indulgent but isn't overly heavy. It's a bit of a cheat since we use a mix, but the additions of Greek yogurt and real bananas make it feel like you spent all day in the kitchen.
Trust me on this, the chilling time is non negotiable, but the payoff is a velvety slice that brings everyone together.
Banana Pudding Poke Cake
The beauty of this recipe is how it balances different textures. Most desserts are either creamy or cakey, but this one decides to be both. By using a yellow cake base, we create a neutral, buttery canvas that lets the banana flavor really sing.
If you're looking for something that feels a bit more traditional, you might think of a trifle, but the poke method is faster. It ensures that the pudding doesn't just sit on top; it becomes part of the cake's DNA.
Honestly, don't even bother with low-fat cake mixes here, as the fat content is what keeps the cake from turning into a sponge of mush when we pour the liquid over it.
Right then, let's get into why this specific combination of ingredients creates such a consistent result every time. It's all about how the liquids interact with the crumb of the cake.
The Trick Behind the Texture
Instead of a standard layer cake, we're using the "poke" method to create internal reservoirs for the flavor. This prevents the cake from becoming a soggy mess on the outside while staying moist on the inside.
- The Sponge Effect: The holes create vertical channels that pull the pudding mixture down via gravity, ensuring no dry spots remain.
- Fat Barrier: Using melted butter in the cake mix creates a tighter crumb that resists collapsing under the weight of the pudding.
- Tension Control: The Greek yogurt in the topping provides a structural anchor, preventing the whipped cream from deflating over time.
- Cold Set: The 4 hour chill allows the starches in the pudding mix to fully hydrate and "lock" the moisture into the cake.
When you're comparing this to a traditional pudding, the difference is all in the delivery. A standard pudding is a bowl of cream, but this is a structured dessert.
| Feature | Fresh from Scratch Base | Cake Mix Shortcut | Impact |
|---|---|---|---|
| Prep Time | 30-40 minutes | 10-15 minutes | Much faster cleanup |
| Texture | Fine, tender crumb | Sturdier, springier | Better for absorbing liquid |
| Consistency | Varies by flour type | Highly predictable | Consistent results every time |
I usually stick with the mix for this specific recipe because the stabilizers in the mix actually help the cake hold up against the soak. If you're craving a more traditional crumb, you can check out my [Pound Cake recipe](https://food55.com/recipes/classic-__COMPOUND_2__-pound cake-recipe/) for a different kind of buttery experience.
Component Analysis
Understanding the role of each ingredient helps you avoid the common mistakes that lead to a collapsed cake or a runny topping.
| Ingredient | Science Role | Pro Secret |
|---|---|---|
| Yellow Cake Mix | Structural Base | Use a brand with a high fat content for a richer taste |
| Instant Pudding | Thickening Agent | Whisk until completely smooth to avoid "beads" of powder |
| Greek Yogurt | Stabilizer | Use full fat for a velvetier mouthfeel and better peak hold |
| Heavy Cream | Aeration | Keep the bowl and beaters chilled for maximum volume |
Shopping List Breakdown
Gather everything before you start. It's much easier to manage the "poke" phase when you aren't hunting for the condensed milk while the cake is cooling.
- 1 box (15.25 oz) yellow cake mix Why this? Provides a consistent, buttery structure
- 3 large eggs Why this? Essential for lift and binding
- 1 cup unsweetened almond milk Why this? Lighter than dairy, lets banana shine
- 1/2 cup melted unsalted butter Why this? Adds richness and a tighter crumb
- 1 tsp vanilla extract Why this? Enhances the yellow cake's aroma
- 1 package (3.4 oz) instant banana pudding mix Why this? Sets quickly without needing heat
- 2 cups skim milk Why this? Thins the pudding for better penetration
- 1/2 cup sweetened condensed milk Why this? Adds a deep, caramelized sweetness
- 2 large ripe bananas Why this? Natural sweetness and fresh texture
- 1 cup chilled heavy whipping cream Why this? Creates the airy, cloud like topping
- 1/2 cup plain Greek yogurt Why this? Prevents the cream from weeping
- 2 tbsp powdered sugar Why this? Sweetens the topping without adding grit
- 12 Nilla Wafers Why this? Classic buttery crunch for contrast
Ingredient Swaps
| Original Ingredient | Substitute | Why It Works |
|---|---|---|
| Almond Milk | Soy Milk | Similar protein content; Note: Slightly nuttier flavor |
| Skim Milk | Whole Milk | Richer taste; Note: Pudding may be slightly thicker |
| Greek Yogurt | Mascarpone | Extremely velvety; Note: Much richer and heavier |
| Yellow Cake Mix | White Cake Mix | Lighter color; Note: Less buttery flavor profile |
If you're skipping the store-bought wafers, you can easily make your own [Vanilla Wafer cookies](https://food55.com/recipes/grandmas best-homemade vanilla-wafer cookies/) for a truly homemade touch.
Equipment Needed
You don't need a professional kitchen for this, but a few specific tools make the process seamless.
- 9x13 inch baking pan (Metal or glass)
- Electric hand mixer or stand mixer (such as KitchenAid)
- Wooden spoon (for poking the holes)
- Whisk
- Chilled mixing bowl (for the cream)
- Rubber spatula
How to Make It
Let's crack on. Follow these steps closely, especially the timing of the "poke," as that's where most people go wrong.
Phase 1: Baking the Foundation
- Preheat your oven to 350°F (175°C) and grease your 9x13 inch baking pan thoroughly. Note: Use butter or a non stick spray to ensure clean slices later.
- Combine the yellow cake mix, eggs, almond milk, melted butter, and vanilla extract in a large bowl. Mix until just combined. Stop as soon as the streaks of flour disappear to avoid a tough cake.
- Pour the batter into the pan and bake for 28-32 minutes until a toothpick inserted in the center comes out clean and the edges start to pull away from the pan.
Phase 2: The Precision Poke & Soak
- Remove the cake from the oven. While it's still warm, use the end of a wooden spoon to poke holes approximately 1 inch apart across the entire surface. Note: Don't go all the way to the bottom, but make sure the holes are deep enough to hold liquid.
- In a separate bowl, whisk together the instant banana pudding mix, skim milk, and sweetened condensed milk until completely smooth.
- Slowly pour the pudding mixture over the warm cake. Watch the liquid fill the holes and spread it evenly toward the edges.
Phase 3: The Chilled Assembly
- Slice your ripe bananas into thin rounds and distribute them evenly across the top. Press them gently into the cake so they stay put.
- In a chilled bowl, beat the heavy whipping cream, Greek yogurt, and powdered sugar. Beat until stiff peaks form, meaning the cream stands straight up when you lift the whisk.
- Spread the cream evenly over the banana layer using a spatula.
- Crush the Nilla Wafers by hand and sprinkle them over the topping for that final buttery crunch.
- Refrigerate the cake for at least 4 hours. This is critical for the pudding to set and the flavors to meld.
Pro Tips & Pitfalls
I've made the mistake of rushing the cooling process, and trust me, it results in a "pudding soup" rather than a cake. The balance of temperature is everything here.
Chef's Note: If you want a deeper banana flavor, mash half of one banana into the pudding soak before pouring it over the cake. It adds an extra layer of fruitiness that tastes like a professional bakery treat.
Another trick is to freeze your mixing bowl for 10 minutes before whipping the cream. Cold fat molecules hold air bubbles better, which gives you that velvety, stable topping that won't collapse the moment it hits the table.
Avoiding Common Issues
Troubleshooting Common Issues
| Issue | Solution |
|---|---|
| Why Your Cake Is Too Soggy | This usually happens if you poke the holes too close together or if you didn't let the cake chill for the full 4 hours. The structure needs time to stabilize. |
| Why Your Topping Is Runny | If the heavy cream wasn't chilled or you forgot the Greek yogurt, the peaks won't hold. The yogurt acts as a stabilizer, similar to how gelatin works in a mousse. |
| Why Your Bananas Turned Brown | Bananas oxidize quickly. To prevent this, ensure the whipped cream topping is spread immediately after placing the banana slices to seal them away from the air. |
Common Mistakes Checklist
- ✓ Did you grease the pan? (Crucial for clean slices)
- ✓ Are the holes 1 inch apart? (Prevents structural collapse)
- ✓ Is the cream topping stiff? (Ensures it doesn't melt)
- ✓ Did you chill for 4+ hours? (Sets the pudding)
Adjusting the Yield
Depending on the crowd, you might need to change the size of the cake. Just remember that baking times change when the volume changes.
For a Smaller Batch
If you're using an 8x8 inch square pan, cut the ingredients in half. Since you can't have half an egg, beat one egg in a small bowl and use approximately 2 tablespoons of it. Reduce the baking time by about 20%, checking at 20 minutes.
For a Larger Crowd
If you're doubling the recipe for two 9x13 pans, don't double the salt or vanilla exactly - go for about 1.5x to avoid an overpowering taste. Work in batches for the whipped cream, as overloading a mixer can lead to uneven aeration.
If baking two cakes at once, lower the oven temp to 325°F (160°C) and extend the time by 5-10 minutes to ensure even heat distribution.
| If you want... | Do this... | Result |
|---|---|---|
| A denser cake | Use 2 eggs instead of 3 | More "pudding like" feel |
| A lighter topping | Fold in 1/2 cup folded marshmallows | More airy and sweet |
| More banana punch | Add 1 tsp banana extract | Intense aroma |
Dispelling Common Beliefs
There are a few things people get wrong about poke cakes that can ruin the experience. Let's clear those up.
"You must use homemade pudding for a better taste." Actually, for a poke cake, instant pudding is superior. It contains modified cornstarch that hydrates and sets quickly at cold temperatures, which is exactly what you need to keep the cake from becoming a mushy mess.
"The more holes you poke, the better the flavor." Too many holes destroy the structural integrity of the cake. If you poke it like a pincushion, the cake will collapse under the weight of the topping. Stick to the 1 inch spacing rule.
"Fresh bananas should be blended into the cake batter." Don't do this. Adding mashed bananas to the yellow cake mix changes the chemistry, making it more like a banana bread. The "cake" part of this recipe should be a classic vanilla butter base to contrast with the banana soak.
Storage Guidelines
Because of the dairy and fresh fruit, this cake needs to stay cold.
Fridge Storage: Keep the cake in an airtight container or tightly covered with plastic wrap in the refrigerator. It will stay fresh and velvety for up to 4 days. In fact, it often tastes better on day two as the pudding fully permeates the crumb.
Freezer Tips: I don't recommend freezing the fully assembled cake because the whipped cream and fresh bananas won't hold their texture. However, you can freeze the baked, unfrosted cake for up to 3 months. Thaw it completely before poking and adding the pudding.
Zero Waste: If you have leftover banana peels, don't toss them! You can freeze them to make a banana peel tea or use them in a compost bin. If you have leftover whipped cream, fold it into your morning oatmeal for a treat.
How to Serve and Enjoy
To get those picture perfect slices, use a sharp knife dipped in hot water and wiped clean between every cut. This prevents the cream from smearing across the layers.
For a more decadent experience, serve a slice with a dollop of extra whipped cream and a drizzle of salted caramel. The saltiness cuts through the sugar of the condensed milk and makes the banana flavor pop.
This is a fantastic dish for shared meals where you can put the whole pan in the middle of the table and let people dig in.
If you're serving this at a party, keep it in the fridge until the very last moment. The contrast between the chilled, silky pudding and the room temperature air makes it incredibly refreshing. It's a simple way to bring people together over a dessert that feels like a warm hug.
Recipe FAQs
What kind of pudding is best for a poke cake?
Use instant banana pudding mix. It sets quickly and creates a smooth, creamy layer that absorbs perfectly into the sponge.
Can you use pudding instead of Jell-O in a poke cake?
Yes, pudding is a delicious alternative. It transforms the cake from a light, fruity dessert into a rich, creamy treat.
What are the common mistakes when making poke cake?
Poking holes too close together or skipping the chill time. Both errors result in a soggy texture that lacks structural integrity.
Is it true you must let the cake cool completely before adding pudding?
No, this is a common misconception. Pour the pudding over the cake while it is still warm so the mixture penetrates the crumb deeply.
How to prevent the sliced bananas from turning brown?
Spread the whipped cream topping over the bananas immediately. This creates a protective seal that prevents oxidation.
Can I freeze the fully assembled cake?
No, do not freeze the finished dessert. The fresh bananas and whipped cream will break down, ruining the texture.
Why is my whipped cream topping runny?
The heavy cream wasn't chilled or the Greek yogurt was omitted. The yogurt stabilizes the peaks; if you enjoy these creamy textures, see how we achieve a similar richness in our homemade banana pudding.
Banana Pudding Poke Cake

