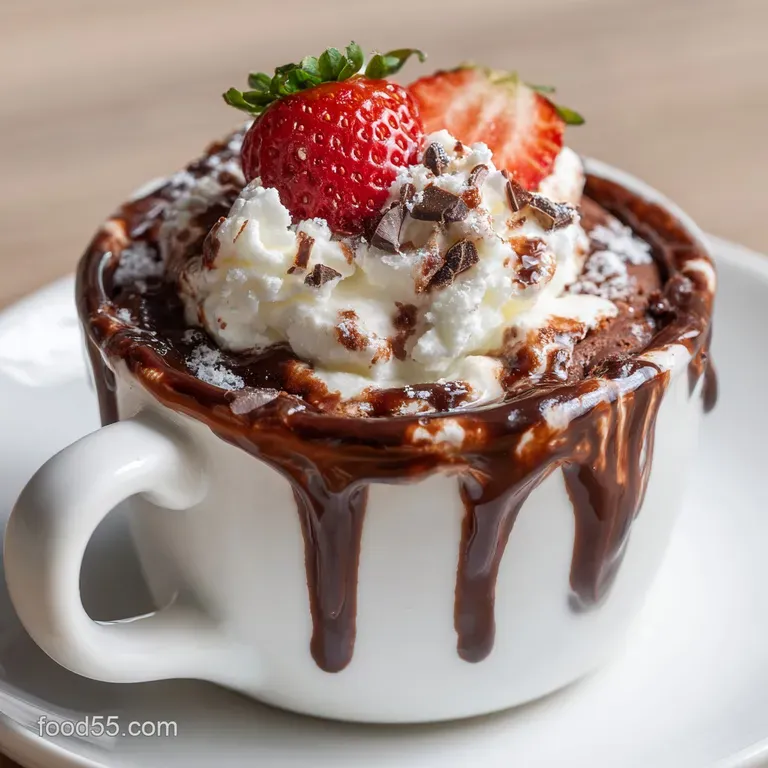
Mugs52 Chocolate Mug Cake: Molten Center
- Time: Active 2 minutes, Passive 1 minute, Total 3 minutes
- Flavor/Texture Hook: Velvety crumb with a molten chocolate center
- Perfect for: Solo comfort sessions or quick weeknight dessert cravings
- Mastering the Mugs52 Maker Collection Recipe with Chocolate Mug Cake
- The Molecular Physics of Microwaved Steam Pockets
- Vital Statistics for Your Single Serving Treat
- Choosing the Right Elements for Deep Flavor
- Tools Required for the Perfect Microwave Bake
- Step by Step Guide to Fudgy Success
- Fixes for Common Microwave Baking Obstacles
- Creative Ways to Personalize Your Chocolate Mug
- Keeping Your Dessert Fresh and Ready to Eat
- Perfect Pairings to Bring People Together
- Recipe FAQs
- 📝 Recipe Card
Mastering the Mugs52 Maker Collection Recipe with Chocolate Mug Cake
Picture this: It is 10:30 PM, the house is finally quiet, and that deep, nagging craving for something warm and cocoa heavy hits. I used to reach for a bag of chocolate chips and call it a day, but then I discovered this specific method.
The first time I tried it, the aroma of blooming Dutch processed cocoa filled my kitchen in seconds, smelling like a high end bakery rather than a microwave experiment.
Indulge in the Mugs52 Maker Collection Recipe with Chocolate Mug Cake, a standout single serving treat. I remember my first few attempts at mug cakes were... let's just say, disappointing. They were either dry sponges or weirdly rubbery "cake ish" things that felt like chewing on a pencil eraser.
This version changed everything for me because it skips the egg entirely, focusing instead on moisture and steam. Trust me, once you see that velvety batter turn into a rich, steaming cake in under 60 seconds, you'll never go back to those boxed mixes.
We've all been there, hovering over the microwave door, watching the batter rise like a volcano and praying it doesn't spill over the rim. It is a bit of a kitchen thrill, isn't it? But the real magic happens when you pull it out and realize the center isn't just cooked; it is a molten, silky pool of chocolate.
It’s brilliant how a few pantry staples can come together to create something that feels this intentional and sophisticated.
The Molecular Physics of Microwaved Steam Pockets
The Steam Pocket Secret: Adding a tablespoon of water or coffee to the top of the batter creates a localized steam zone that prevents the surface from drying out while the microwave energy cooks the center. This mechanism ensures the starches gelatinize without the proteins becoming tough and rubbery.
| Method | Time | Texture | Best For |
|---|---|---|---|
| Mug Cake | 3 minutes | Fudgy & Moist | Immediate cravings |
| Oven Bake | 35 minutes | Airy & Structured | Feeding a crowd |
| Lava Cake | 20 minutes | Liquid Center | Dinner parties |
This comparison highlights why the microwave method is a total win for solo snacking. While an oven baked cake provides that classic crumb, the mug cake excels at providing that dense, fudgy satisfaction in a fraction of the time. If you’re looking for something with a bit more structure for a formal event, you might prefer a Pound Cake Recipe which offers that traditional butter rich crumb we all love.
Vital Statistics for Your Single Serving Treat
When you're working with such small quantities, precision is your best friend. A single tablespoon too much flour and you've got a brick; a tablespoon too little and you've got soup.
I’ve found that using a standard 12 ounce mug is the "sweet spot" to prevent overflows while allowing the heat to circulate properly.
Chef's Tip: Grate a tiny bit of cold butter over the top of the batter right before microwaving. It melts into the crumb, creating a richer mouthfeel that mimics a slow baked cake.
Another trick I swear by is blooming the cocoa. If you use hot coffee instead of water for that final tablespoon, it wakes up the chocolate solids, making the flavor feel much more "grown up" and intense. It’s a small step that makes a massive difference in the final result.
| Ingredient | Science Role | Pro Secret |
|---|---|---|
| Dutch Cocoa | Flavor & Acidity | Sift it to avoid bitter clumps in the center |
| Baking Powder | Leavening | Ensure it is fresh for a dramatic, airy rise |
| Neutral Oil | Moisture | Avocado oil keeps it silky even after cooling |
Choosing the Right Elements for Deep Flavor
The beauty of this recipe lies in its simplicity, but that means every ingredient has to pull its weight. I always reach for Dutch processed cocoa powder here. It’s treated with alkali, which makes it darker and less acidic, resulting in a smoother, more "chocolatey" chocolate flavor.
If you only have natural cocoa (like Hershey’s), it still works, but the cake might be a bit tangier and lighter in color.
- 4 tbsp all purpose flour: Why this? Provides the structural framework for the cake's crumb.
- Substitute: Oat flour (adds a nutty flavor and denser texture).
- 2 tbsp granulated sugar: Why this? Sweetens and helps the edges caramelize slightly.
- Substitute: Brown sugar (adds a hint of molasses and moisture).
- 2 tbsp Dutch processed cocoa: Why this? Delivers the intense, dark chocolate base.
- Substitute: Cacao powder (slightly more bitter but higher in antioxidants).
- 1/4 tsp baking powder: Why this? The engine that makes the cake rise.
- Substitute: 1/8 tsp baking soda plus a drop of lemon juice.
- 1 pinch sea salt: Why this? Cuts the sweetness and enhances the cocoa notes.
- Substitute: Table salt (use slightly less as it's finer).
- 3 tbsp whole milk: Why this? Adds fat and liquid for a tender crumb.
- Substitute: Unsweetened almond milk (works perfectly for a dairy-free version).
- 1 tbsp neutral oil: Why this? Keeps the cake moist; oil stays liquid at room temp.
- Substitute: Melted coconut oil (adds a faint tropical aroma).
- 1/4 tsp vanilla extract: Why this? Rounds out the flavors and adds aromatic depth.
- Substitute: Almond extract (use sparingly, it's very strong!).
- 1 tbsp water or coffee: Why this? Creates the "steam pocket" for a moist center.
- Substitute: Whole milk (for a richer, less "molten" finish).
- 1 tbsp chocolate chips: Why this? Creates pockets of melted, gooey joy.
- Substitute: Chopped dark chocolate bar (higher cocoa butter content).
For those who really want to lean into the indulgence, you could even try making a Death By Chocolate recipe and using a spoonful of it as a filling inside this mug cake. It’s a bit over the-top, but isn't that what dessert is for?
Tools Required for the Perfect Microwave Bake
You don't need much, which is why I love this for dorm rooms or quick office snacks. However, the mug itself is a piece of equipment. Avoid those tall, narrow "chimney" mugs. The heat won't reach the center evenly, leaving you with a burnt top and raw bottom.
A wide, standard coffee mug or a small ceramic ramekin is the way to go.
Right then, let's talk about the whisk. If you don't have a mini whisk, a fork works just fine, but you have to be aggressive. You want to see a smooth, glossy batter with no streaks of white flour hiding at the bottom of the mug.
I've made that mistake before, and biting into a pocket of dry flour is a quick way to ruin the mood.
| Original Ingredient | Substitute | Why It Works |
|---|---|---|
| Granulated Sugar | Maple Syrup (1.5 tbsp) | Adds a woody sweetness. Note: Reduce milk by 1 tsp to balance liquid. |
| Neutral Oil | Applesauce (1 tbsp) | Reduces fat content. Note: Resulting texture will be more "spongy" and less fudgy. |
| Whole Milk | Sour Cream (2 tbsp) | Creates a tangier, thicker batter. Note: Resulting cake is much denser. |
step-by-step Guide to Fudgy Success
- Whisk dry components. Combine 4 tbsp flour, 2 tbsp sugar, 2 tbsp cocoa powder, 1/4 tsp baking powder, and a pinch of salt directly in your mug. Note: Using the mug for mixing saves on washing up!
- Eliminate clumps. Use a fork to break up any large cocoa lumps until the mixture looks like fine sand.
- Incorporate wet ingredients. Stir in 3 tbsp milk, 1 tbsp oil, and 1/4 tsp vanilla extract.
- Emulsify the batter. Mix vigorously until the batter is glossy and smooth. Note: Don't forget to scrape the bottom "corners" of the mug.
- Add texture. Fold in 1 tbsp chocolate chips.
- Create the steam pocket. Gently pour 1 tbsp of water or brewed coffee directly over the top of the batter. Do not stir it in.
- Microwave on high. Cook for 1 minute (based on a 1000W microwave) until the top looks set but slightly shiny.
- The Essential Rest. Let the mug sit in the microwave for 1 minute before touching. Note: Carryover heat finishes the cooking process gently.
- Check for doneness. The edges should be pulling away slightly from the mug while the center remains tender.
- Garnish and enjoy. Dust with powdered sugar or a scoop of ice cream while it's still warm.
Fixes for Common Microwave Baking Obstacles
Microwaves are notoriously fickle. One person's 60 seconds is another person's 45. If your cake comes out looking like a dry sponge, you likely overcooked it by just 10 seconds. It’s better to pull it out when it looks a little "under" because that carryover heat is powerful.
But what about the sogginess? If the top is wet and the bottom is solid, your microwave might have a "cold spot." Make sure your mug is placed on the edge of the rotating plate, not the dead center. This helps the waves hit the mug from different angles.
Why Your Chocolate Mug Cake is Rubbery
This is usually the result of over mixing once the flour is added, which develops too much gluten. It can also happen if you use an egg; in such a small volume, the egg proteins toughen up very quickly under microwave radiation.
| Problem | Root Cause | Solution |
|---|---|---|
| Overflowing Mug | Mug too small or too much baking powder | Use at least a 12oz mug and level your measuring spoons. |
| Dry/Bready Texture | Overcooked or too much flour | Reduce cook time by 10s and "spoon and level" your flour. |
| Gooey Raw Center | Low microwave wattage | Add 15 seconds to the cook time in 5 second intervals. |
Common Mistakes Checklist ✓ Never skip the 1 minute rest period (it sets the crumb). ✓ Don't stir the water/coffee into the batter; let it sit on top. ✓ Use Dutch processed cocoa for that specific dark, rich profile.
✓ Avoid using a mug with very thick walls as it absorbs too much heat. ✓ Ensure your baking powder isn't expired, or the cake will be a dense puck.
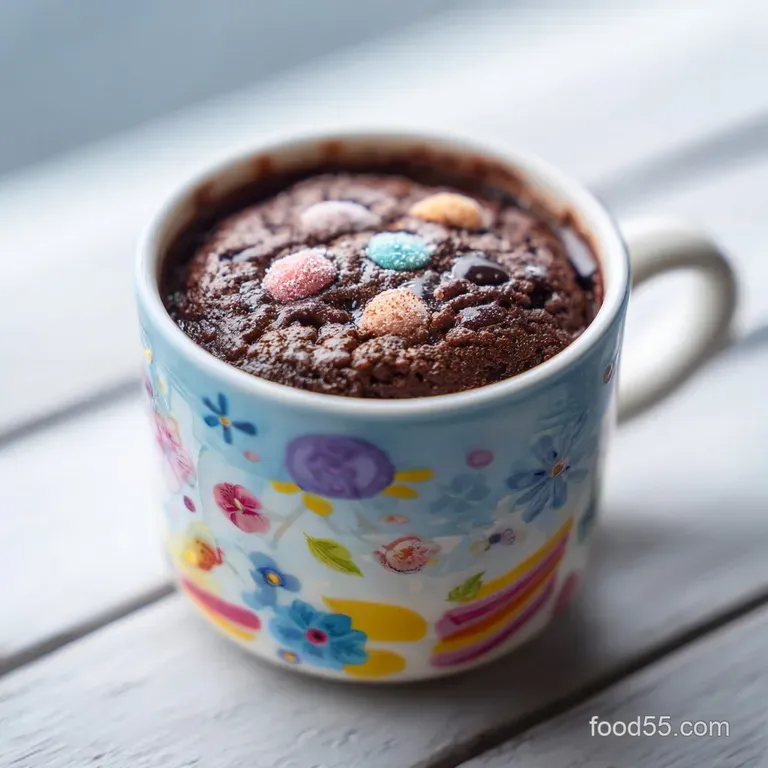
Creative Ways to Personalize Your Chocolate Mug
The "base" recipe is fantastic, but half the fun is tweaking it to match your mood. If I'm feeling like I need a bit of a pick me-up, I'll swap the water for a shot of espresso. The caffeine is a bonus, but the way coffee amplifies the chocolate is the real win.
It's like the difference between a standard candy bar and a gourmet truffle.
Can I make this a Salted Caramel Mug Cake?
Absolutely! Simply press a soft caramel candy into the center of the batter before you add the water on top. As it microwaves, the caramel melts into a molten core. Finish with an extra pinch of flaky sea salt on top once it's done.
What if I want a gluten-free version?
I've tested this with a 1:1 gluten-free flour blend (the kind with xanthan gum), and it works surprisingly well. The texture is slightly grittier, but the chocolate is so intense you hardly notice. Just be careful not to overcook it, as GF flours tend to dry out faster.
| Style | Adjustment | Result |
|---|---|---|
| Nutty Burst | Add 1 tbsp peanut butter to the center | A gooey, salty sweet surprise core. |
| Mexican Choco | Add 1/4 tsp cinnamon and a pinch of cayenne | A warm, spiced kick that lingers. |
| Black Forest | Add 2 chopped maraschino cherries | A fruity, tart contrast to the rich cocoa. |
Keeping Your Dessert Fresh and Ready to Eat
Honestly, mug cakes are meant to be eaten immediately. The physics of microwave cooking means that as they cool, they tend to toughen up. If you leave it for an hour, it won't be that velvety delight you started with.
However, if you find yourself unable to finish it, cover the mug with plastic wrap to keep the moisture in.
- Fridge: Store for up to 24 hours. To reheat, add a teaspoon of water on top and microwave for 10-15 seconds.
- Freezer: I wouldn't recommend freezing the cooked cake, but you can mix the dry ingredients in bulk!
- Zero Waste Tip: If you have leftover coffee from the morning, freeze it in ice cube trays. Pop one cube on top of your batter instead of the tablespoon of water for a "Mocha Steam" effect. It’s a great way to use up that last bit of the pot!
Perfect Pairings to Bring People Together
Even though this is a single serving recipe, I love making these when a friend stops by. It’s so much more personal than opening a bag of cookies. We can each customize our own mug she might want walnuts, I might want extra sea salt and in three minutes, we're both sitting on the sofa with warm mugs in hand.
A cold splash of heavy cream poured directly over the warm cake is my absolute favorite way to serve this. The contrast between the hot, fudgy cake and the silky, cold cream is incredible. If you're feeling fancy, a dollop of whipped cream and some fresh raspberries adds a brightness that cuts through the richness.
It’s all about creating that moment of joy, whether you're sharing it or just treating yourself after a long day. Trust me, you deserve the good cocoa tonight!

Recipe FAQs
Can you use hot chocolate powder instead of cocoa powder in mug cakes?
No, use pure cocoa powder for best results. Hot chocolate mix contains sugar and often dairy solids, which changes the balance of leavening agents and liquid needed.
How much cocoa powder do you put in a mug cake?
Use 2 level tablespoons of Dutch processed cocoa powder. This ratio provides a rich flavor without making the texture too dry or sandy in a single serving recipe.
How do you avoid a rubbery mug cake?
Cook it slightly underdone and do not use an egg. Microwaves rapidly toughen proteins; by skipping eggs and relying on liquid for steam, you maintain a fudgy texture.
How to do a chocolate mug cake?
Whisk dry ingredients (flour, cocoa, sugar, baking powder, salt) directly in the mug. Then, stir in the wet components (milk, oil, vanilla) until just combined, add chips, and top with 1 tablespoon of water before microwaving for 60-75 seconds.
Is it true that the microwave cooking time should always be the same?
No, cooking time varies significantly based on microwave wattage. Always start with 60 seconds on high power for a 1000W unit, but be prepared to add 5-10 second increments if the center is still liquid.
Can I substitute the milk with a dairy-free alternative in this recipe?
Yes, almond milk or oat milk works perfectly as a 1:1 substitute. The fat content in whole milk contributes to richness, but plant based milks provide sufficient moisture for the quick bake.
What is the purpose of pouring water on top of the batter right before cooking?
That water creates a crucial steam pocket for moisture retention. This localized steam cooks the surface gently, preventing the top layer from drying out into a hard crust while the inside finishes setting.
Chocolate Mug Cake Recipe
Ingredients:
Instructions:
Nutrition Facts:
| Calories | 471 kcal |
|---|---|
| Protein | 8.4 g |
| Fat | 22.4 g |
| Carbs | 69.4 g |
| Fiber | 6.2 g |
| Sugar | 38.5 g |
| Sodium | 285 mg |
