Jiffy Corn Casserole: the Ultimate Cheesy, Creamy Pudding Side Dish
- The Ultimate Creamy "Cheesy Rider" Jiffy Corn Casserole
- Essential Components: Ingredients and Smart Substitutions
- Method Mastery: Baking the Perfect Jiffy Corn Casserole
- The Science of Comfort: Why This Jiffy Corn Casserole Recipe Is Superior
- Expert Chef’s Tips and Common Troubleshooting Mistakes
- Practical Guide: Storage, Freezing, and Reheating
- The Perfect Pairing: Serving Suggestions for Your Corn Casserole
- Recipe FAQs
- 📝 Recipe Card
The Ultimate Creamy "Cheesy Rider" Jiffy Corn Casserole
What Makes This Version a Showstopper?
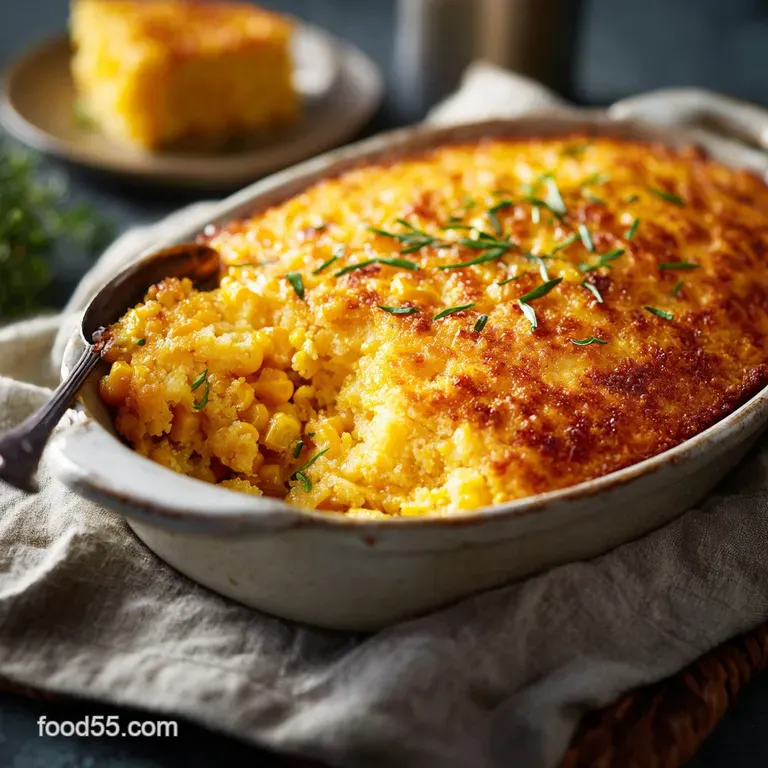
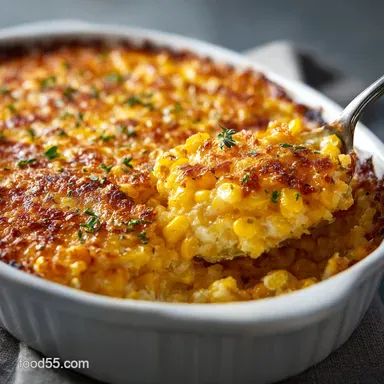
Can you smell that? It's the most comforting aroma known to man, a mix of sweet corn, melting butter, and toasted cheese crust that signals immediate happiness. This isn't some dry, crumbly cornbread situation; this is thick, velvety, and unbelievably fudgy, almost like a corn pudding.
You get those bursts of fresh kernel texture set against the lush, creamy base, and honestly, it’s perfection every time.
This Jiffy corn casserole recipe is a genuine lifesaver for busy weeknights or high pressure holiday cooking. It uses canned ingredients and a boxed mix, so it’s quick, cheap, and requires almost zero technical skill.
If you can stir things in a bowl, you can absolutely nail this side dish, freeing up critical oven space for big roasts or maybe my incredible [Southern Sweet Potato Casserole with Crunchy Pecan for Holidays]. We love a low-effort, high impact recipe, don't we?
We are taking the classic base Jiffy mix, corn, eggs and tweaking the dairy and fat ratios just enough to guarantee superior results. Trust me, I've made all the mistakes, ending up with dry hockey pucks or watery slop.
This version, which I affectionately call the "Cheesy Rider" because of its luscious texture, is the one you need, so let's crack on with the good stuff.
The Simple History of the Jiffy Mix Side Dish
The genius of Jiffy mix lies in its convenience, hitting shelves way back in the 1930s. Folks quickly realized this handy little blue box wasn't just for muffins; it made a brilliant base for quick casseroles and easy sides.
The corn casserole itself really cemented its place in American holiday spreads in the latter half of the 20th century. It’s an easy, reliable tradition that delivers comfort without fuss.
Prep Time and Cook Time At-a-Glance
This is a true dump and stir meal, requiring only the gentlest touch before it hits the oven.
| Stage | Time (Estimate) |
|---|---|
| Prep Time (Active Mixing) | 10 minutes |
| Cook Time (Bake) | 45– 50 minutes |
| Rest Time (Essential) | 10 minutes |
Essential Components: Ingredients and Smart Substitutions
The beauty of the Jiffy Corn Casserole is its brevity, but every ingredient plays a vital role in achieving that creamy density. Don't skip the sour cream it provides the necessary tang and serious moisture.
| Ingredient | Role | Viable Substitution |
|---|---|---|
| Sour Cream | Moisture, Tang, Creaminess | Plain full fat Greek yogurt (or crème fraîche) |
| Butter | Richness, Structure | Neutral oil (like sunflower or canola), though flavor suffers |
| Jiffy Mix | Base, Leavening | A blend of cornmeal, flour, baking powder, and sugar |
| Cheese | Flavor, Browning | Pepper Jack for spice, or Monterey Jack for stretchiness |
Selecting the Right Canned Corn (Creamed vs. Drained)
You absolutely need both types of corn for this recipe to work its magic. The creamed corn is the secret weapon for moisture; it basically acts as a thick, sweet binder and replaces the need for extra milk. The canned whole kernel corn, however, must be thoroughly drained. Why?
Because we want those delightful textural pops of corn without adding excess liquid that guarantees a soggy final product.
Dairy Matters: Sour Cream vs. Greek Yogurt
This is a hill I will happily die on: always use full fat dairy here. The sour cream is responsible for the incredible velvety texture and that subtle, necessary tang that prevents the casserole from tasting too sweet. If you are totally out, full fat Greek yogurt is the best substitute.
It has the necessary density and protein structure, but make sure it’s not the sweetened variety!
Cheese Choices: Which Shredded Blend Melts Best?
Sharp cheddar is my go-to because it gives a nice, savory punch that balances the corn’s sweetness beautifully. Always grate your own cheese if possible. The pre-shredded stuff contains anti caking agents that stop it from melting properly, which is just tragic.
Monterey Jack is also brilliant if you want something stretchier and milder.
gluten-free Swaps for the Corn Muffin Mix
I know, I know, the whole point is the Jiffy mix, but life happens! If you need a gluten-free Jiffy Corn Casserole, you can definitely replicate the dry ingredients. Mix together 1 cup gluten-free cornmeal, 1 cup GF all-purpose flour blend (with xanthan gum), 1/4 cup sugar, 1 tablespoon baking powder, and 1/2 teaspoon salt.
The texture will be slightly different less "fluffy" but the core flavor will still be there.
Method Mastery: Baking the Perfect Jiffy Corn Casserole
Prepping the Pan and Preheat Fundamentals
First things first: crank that oven up to 375°F (190°C). Then, make sure your 8x8 baking dish is greased thoroughly; a ceramic dish works best for even heat distribution. A small trick: melt your half cup of butter right now and set it aside.
We need it melted, but if it's scalding hot, it will scramble your eggs when you mix it in. Don't skip this cooling step.
Mixing the Wet and Dry Components (Avoiding over mixing)
This is the most critical stage. In one large bowl, whisk together the melted (but cooled!) butter, sour cream, and lightly beaten eggs. Stir in both the creamed and drained whole kernel corn. Now, gently sprinkle the Jiffy mix and your seasoning over the top. Use a rubber spatula to fold everything together.
You must stop mixing the instant you see no dry flour streaks. Overmixing develops the gluten in the Jiffy mix, turning your fluffy pudding into a tough, rubbery brick.
The Ideal Baking Temperature and Timing
We bake this at a slightly higher temperature (375°F) than most custards to ensure the exterior browns beautifully while the inside cooks through. For a standard 8x8 pan, 45 to 50 minutes is usually spot on.
If you are using a wider, shallower 9x13 pan for a crowd, your baking time will drop to about 35– 40 minutes.
The Essential Cooling Period Before Serving
Patience is required right at the end. When the top is golden and the center no longer looks visibly liquid, pull it out. Immediately slicing into it will result in a messy, sloppy heap. Allow it to rest for a full 10 minutes on a wire rack.
This lets the structure set up and guarantees clean slices of glorious corn casserole.
The Science of Comfort: Why This Jiffy Corn Casserole Recipe Is Superior

Achieving the Velvety Texture (The role of sour cream and butter)
The key to this casserole being superior is the fat. Fat carries flavor, but more importantly here, it shortens gluten strands. By combining melted butter and full fat sour cream, we introduce massive amounts of richness and moisture which inhibit gluten development, even if you stir a tiny bit too much.
The resulting texture is dense, almost cake like, but incredibly creamy.
The Perfect Sweet and Salty Ratio
Jiffy mix is naturally quite sweet, and so is creamed corn. Adding a generous pinch of salt and the savory hit from the cheddar cheese is absolutely essential to stop this from tasting like pure dessert. It creates that irresistible sweet and savory complexity that keeps people coming back for seconds.
The Essential Maillard Reaction (Browning the top)
We achieve that lovely golden brown crust by sprinkling the remaining cheese on top for the last few minutes of baking. The combination of the cheese fat and the slight amount of sugar from the corn mix ensures a gorgeous, deeply caramelized color.
That brown crust adds a crucial nutty flavor that's the Maillard reaction doing its delicious work!
Expert Chef’s Tips and Common Troubleshooting Mistakes
Preventing a Dry or Crumbly Casserole
The number one culprit for dryness is insufficient fat or over baking. If your edges look dark golden brown before the center is set, cover the casserole loosely with foil immediately. This traps steam and ensures the inside finishes cooking without burning the top or drying out the edges.
I learned this the hard way when I left a batch in the oven while chasing my dog.
How to Know When It’s Truly Done (The Wiggle Test)
Don't trust the color alone. Gently nudge the pan. If the center still wobbles like Jell-O, it needs more time. If it just gives a very slight, dense jiggle, it’s probably ready.
A wooden skewer inserted in the center should come out mostly clean, maybe with a few moist, sticky crumbs clinging to it not wet batter.
Boosting Flavor with Optional Toppings (E.g., jalapeños or chives)
If you're serving this alongside a big meal, you might want to add a layer of complexity.
Chef's Note: For a punchy side dish perfect for BBQ, fold in one small can of drained, diced green chiles and half a cup of shredded Pepper Jack cheese. It’s an easy, exciting upgrade that requires no extra prep time.
Practical Guide: Storage, Freezing, and Reheating
This is an excellent make-ahead side, which is why it features prominently on my guide to the [Southern Thanksgiving Menu: Nanas Classic Cornbread Dressing Recipe].
Storage: Allow the casserole to cool completely, then cover the pan tightly with plastic wrap or transfer slices to an airtight container. It keeps beautifully in the refrigerator for up to 4 days.
Freezing: Yes, it freezes well! If baking ahead, stop baking about 10 minutes short of the required time. Cool completely, cover tightly with foil (double wrap is best), and freeze for up to 2 months. Thaw overnight in the fridge.
Reheating: To reheat from the fridge, cover with foil and bake at 350°F (175°C) for 15– 20 minutes until heated through.
For frozen casserole, bake covered at 350°F for about 40– 50 minutes until hot in the center, removing the foil for the last 10 minutes to crisp the top.
The Perfect Pairing: Serving Suggestions for Your Corn Casserole
This Jiffy Corn Casserole is hearty and sweet, so it needs robust partners. Think heavy roasts, barbecue, or anything saucy!
- BBQ Companion: Serve this right alongside slow smoked ribs or pulled pork. The creaminess soaks up the tangy barbecue sauce beautifully.
- Holiday Plate: It is mandatory for Thanksgiving. It pairs incredibly well with turkey and savory gravy.
- Easy Weeknight: Need a quick main? Serve huge spoonfuls topped with chili or even better, check out my recipe for a full-on hearty [Cornbread Casserole: The Easiest Hearty Beef and Bean Recipe]. That’s how you turn a side into a proper meal!

Recipe FAQs
Why is my Jiffy Corn Casserole dry and crumbly?
Dryness is usually caused by overmixing the batter or overbaking the casserole. Ensure you mix the ingredients only until they are just combined, as excessive stirring develops gluten and leads to a tougher texture.
Additionally, check for doneness exactly at the prescribed time, as overcooking quickly evaporates the essential moisture provided by the cream and sour cream.
Can I assemble the casserole ahead of time and bake it later?
Yes, this casserole is excellent for making ahead, but requires a small adjustment. Assemble all the wet ingredients (creams, eggs, cheese, corn) and refrigerate them overnight. It is crucial to stir in the Jiffy corn bread mix just before baking, as allowing the leavening agents to soak in the liquid for too long can result in a less fluffy texture.
What are the best savory additions or mix-ins for this recipe?
This casserole accepts savory mix-ins wonderfully to transition it from a side dish to a light meal. Fantastic additions include 1/2 cup of cooked, crumbled bacon, a 4 oz can of drained mild green chilies, or 1/4 cup of diced jalapeños for a touch of heat.
Incorporate these additions into the wet mixture before adding the corn bread mix to ensure even distribution.
Can I use milk instead of sour cream to reduce the fat content?
While you can use whole milk, note that sour cream provides necessary acidity and fat, which is what guarantees a supremely moist and tender crumb. If substituting, use a mix of whole milk and perhaps a tablespoon of lemon juice or vinegar to help replicate the beneficial acidic reaction needed for a perfect rise.
The final product, however, may be slightly less rich.
How do I know when the Jiffy Corn Casserole is fully cooked?
The casserole is done when the edges are set, lightly golden brown, and have pulled slightly away from the pan's sides. A toothpick or wooden skewer inserted into the center should come out mostly clean, perhaps with a few moist crumbs attached.
Avoid waiting until the toothpick is completely dry, as this indicates the casserole is already verging on overcooked.
Can this recipe be made gluten-free?
Yes, you can easily adapt this by replacing the standard Jiffy corn bread mix with a dedicated gluten-free cornbread mix, such as those offered by King Arthur or Krusteaz. Ensure that all other ingredients, including any added creamed corn or stock, are certified gluten-free to maintain safety for dietary restrictions.
The texture may be slightly denser, but the flavor remains excellent.
How should I store leftover casserole, and can I freeze it?
Leftovers should be cooled completely, covered tightly, and stored in the refrigerator for up to four days. While technically freezable, the texture may become slightly grainy or spongy upon thawing and reheating.
If freezing, wrap individual portions tightly in plastic wrap and foil, and reheat them directly from frozen in the oven or microwave for the best textural results.
Creamy Cheesy Jiffy Corn Casserole
Ingredients:
Instructions:
Nutrition Facts:
| Calories | 141 kcal |
|---|---|
| Protein | 0.9 g |
| Fat | 5.9 g |
| Carbs | 23.5 g |
