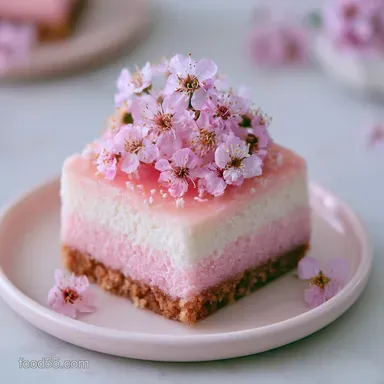
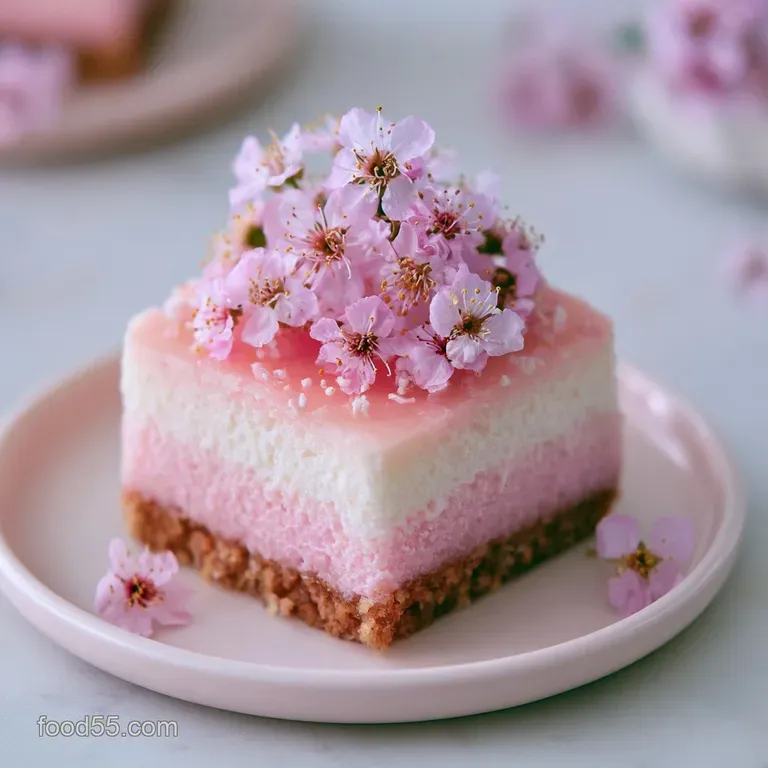
Mini Floral Ombre Cake: Silky and Velvety
- Time: 45 min active + 30 min bake + 1 hour 30 mins chilling = Total 3 hours 15 mins
- Flavor/Texture Hook: Velvety vanilla crumb with a silky, cloud like frosting
- Perfect for: Bridal showers, baby showers, or high tea parties
- Mini Floral Ombre Cake Guide
- The Gradient Story
- Why the Colors Pop
- The Component Breakdown
- The Building Blocks
- The Tool Kit
- Step-by-Step Instructions
- Common Mistakes & Troubleshooting
- Creative Flavor Tweaks
- Adjusting Your Batch Size
- Cake Myths Debunked
- Freshness and Saving
- Serving and Presentation
- Recipe FAQs
- 📝 Recipe Card
Mini Floral Ombre Cake Guide
The smell of warm vanilla and toasted butter is still hanging in my kitchen, but the real magic is on my counter. I remember the first time I tried a gradient look, and it looked more like a muddy accident than a sunset.
I had used liquid food coloring, which thinned out my batter and made the colors bleed into each other, leaving me with a cake that looked like it had been rained on.
But then I switched to concentrated gels and a specific mixing order, and everything changed. Watching a single drop of deep magenta swirl into a snowy white batter is honestly one of the most satisfying things you can do in a kitchen.
It's not just about the sugar, it's about the visual thrill of seeing those distinct layers come together.
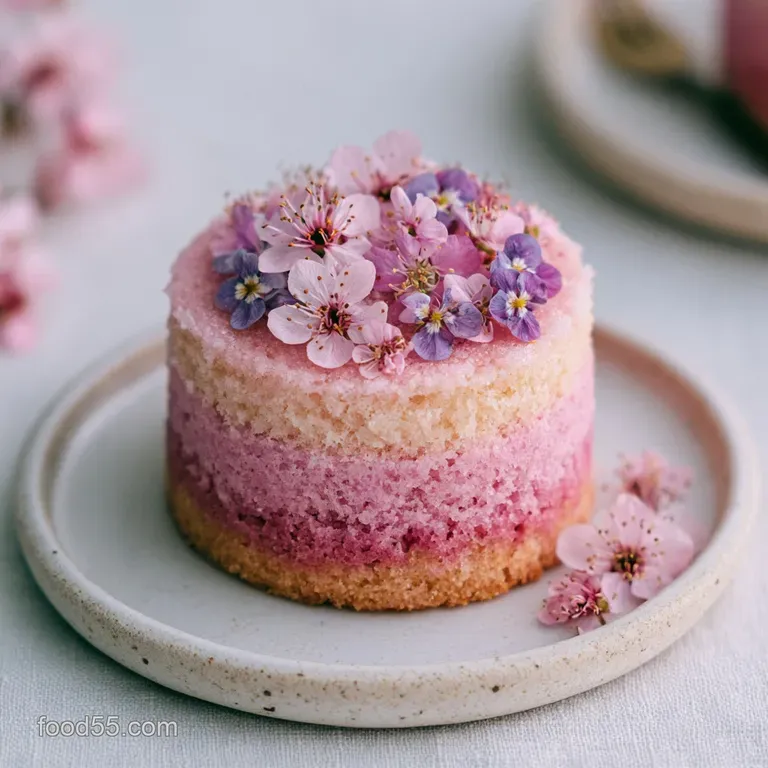
This mini floral ombre cake is designed for those who want a showstopper without the stress of a giant multi tier project. We're focusing on small, individual portions that allow for precise decorating and a gorgeous, seamless transition of color.
Trust me, your guests will spend more time taking photos of these than actually eating them.
The Gradient Story
I once hosted a garden party where I wanted the desserts to mirror the peonies blooming outside. I spent hours trying to get the frosting to transition from a deep rose to a pale blush. The mistake I made back then was adding the color to the frosting all at once.
I ended up with three separate cakes of three different colors, rather than one cake with a smooth fade.
The secret, as I found out, is in the dilution. You don't just pick three colors, you pick one color and vary the intensity. It's like watercolor painting but with butter and sugar. When you see that velvety transition from a saturated base to a whisper of color at the top, you know the technique worked.
Now, I always tell my friends to treat the frosting like a science experiment. Start with your darkest shade and slowly "wash" it out. It's a lot more forgiving when you're working with mini cakes because the surface area is smaller, meaning you can fix a smudge without ruining the whole aesthetic.
Why the Colors Pop
- Gel Concentration: Gel colors have less water than liquid drops, so they don't break the batter's emulsion or cause the colors to bleed.
- Reverse Creaming: Mixing butter into the dry ingredients coats the flour in fat, which prevents too much gluten from forming and keeps the crumb tender.
- Cold Buttercream: Keeping the frosting slightly cool prevents the colors from migrating into each other while you're smoothing the sides.
- Sifted Sugar: Removing lumps from the powdered sugar ensures the frosting is silky, which allows the ombre blend to look seamless.
| Method | Time | Texture | Best For |
|---|---|---|---|
| Oven | 30 mins | Golden crust, airy | Traditional fluff |
| Stovetop (Steam) | 45 mins | Moist, pale | Dense, pudding like |
The Component Breakdown
The key to a stable mini floral ombre cake is the balance of fats and sugars. If the cake is too moist, the frosting will slide. If it's too dry, it'll crumble when you try to pipe the flowers. For a similar density in a larger format, you might enjoy a Classic Pound Cake recipe, which uses a similar butter heavy base.
| Ingredient | Science Role | Pro Secret |
|---|---|---|
| All purpose Flour | Provides structural framework | Measure by weight to avoid "packing" the cup |
| Baking Powder | Creates lift through CO2 bubbles | Use aluminum free to avoid a metallic aftertaste |
| Unsalted Butter | Adds richness and tenderness | Soften to 65°F (18°C) for the most stable emulsion |
| Powdered Sugar | Stabilizes the buttercream | Sift twice for a velvety finish |
The Building Blocks
For the Cake Base:
- 280 g all purpose flourWhy this? Balanced protein for structure and tenderness
- 300 g granulated sugarWhy this? Provides sweetness and moisture
- 12 g baking powderWhy this? Essential for that airy, mini cake lift
- 3 g saltWhy this? Cuts through the sugar for a balanced flavor
- 170 g unsalted butter, softenedWhy this? Creates a rich, velvety mouthfeel
- 3 large eggsWhy this? Binds the ingredients and adds structure
- 240 ml whole milkWhy this? Adds moisture and a tender crumb
- 10 ml vanilla extractWhy this? Classic aroma and depth
For the Ombre Buttercream:
- 450 g unsalted butter, softenedWhy this? The base for a stable, pipeable frosting
- 720 g powdered sugar, siftedWhy this? Gives the frosting its body and sweetness
- 45 ml heavy creamWhy this? Adjusts the consistency for smooth spreading
- 5 ml vanilla extractWhy this? Complements the cake flavor
- 1 g saltWhy this? Prevents the buttercream from being cloying
Suggested Substitutes:
| Original Ingredient | Substitute | Why It Works |
|---|---|---|
| All purpose Flour | Cake Flour | Lower protein. Note: Results in an even softer, more fragile crumb |
| Whole Milk | Buttermilk | Adds tang. Note: You'll need a pinch more baking powder to react with the acid |
| Heavy Cream | Full fat Coconut Milk | Similar fat content. Note: Adds a slight coconut flavor to the frosting |
The Tool Kit
You don't need a professional bakery, but a few specific tools make the ombre cake decorating technique much easier. I highly recommend a small offset spatula for smoothing the sides. If you don't have one, a butter knife can work, but it's a bit more clunky.
I also use a piping bag with a petal tip for the floral finish. If you're not into piping, you can use fresh, organic edible flowers. Just make sure they're thoroughly dried before placing them on the buttercream, or they'll bleed into your beautiful gradient.
Finally, a stand mixer such as KitchenAid is a lifesaver for the buttercream. Beating 450g of butter by hand is a workout nobody wants during a party prep. If you only have a hand mixer, just work in smaller batches to avoid overloading the motor.
Step-by-step Instructions
- Preheat your oven to 350°F (175°C). Grease your mini pans thoroughly and line the bottoms with parchment paper. Note: Parchment is non negotiable for mini cakes to prevent sticking.
- Whisk together flour, sugar, baking powder, and salt in a large bowl until well combined.
- Beat in the softened butter until the mixture looks like coarse sand. Wait until you see no large lumps of butter before moving on.
- Add eggs one by one, then pour in the milk and vanilla, beating on medium speed until the batter is smooth and pale.
- Split the batter evenly into three separate bowls. Note: Using a kitchen scale here ensures your layers are identical in height.
- Add 3-4 drops of gel color to the first bowl, 1-2 drops to the second, and a tiny drop to the third. Stir gently with a spatula to avoid over mixing.
- Pour the batter into the pans and bake 30 mins until a toothpick comes out clean and the tops spring back.
- Let the cakes cool completely before frosting. Note: Frosting a warm cake is the fastest way to turn your ombre into a melted puddle.
- Beat the frosting butter until creamy, then gradually add powdered sugar, cream, vanilla, and salt.
- Divide the frosting into three bowls and repeat the coloring process used for the batter.
- Pipe the darkest shade at the bottom, the medium in the middle, and the lightest on top. Smooth the edges with a spatula to blend the colors together.
Common Mistakes & Troubleshooting
The biggest headache with a mini floral ombre cake is usually the "color bleed." This happens when the frosting is too soft or the colors are too diluted. If your colors are running, it's likely because you used liquid coloring or your butter was too warm.
Another common issue is air bubbles in the buttercream. This happens when you beat the frosting on high speed for too long. To fix this, take a spatula and "push" the air bubbles against the side of the bowl, or let the frosting sit for 15 minutes to settle.
Why Your Colors Bleed
If the shades of your ombre are merging into a blur, the frosting likely lacks stability. This often occurs if the cake wasn't fully chilled or the butter was over beaten.
| Problem | Root Cause | Solution |
|---|---|---|
| Bleeding Colors | Too much liquid/warm butter | Use gel colors and chill cake 30 mins |
| Air Bubbles | Over beating frosting | Stir by hand for the last 2 minutes |
| Cake Sink | Opening oven too early | Don't open door until 25 mins in |
Avoiding the "Mushroom Top"
Sometimes mini cakes dome too much, making the ombre layers lean. To prevent this, don't over fill your pans and ensure your baking powder is fresh. According to King Arthur Baking, properly measuring leavening agents is the first step to a flat, professional top.
The Precision Checklist:
- ✓ Oven preheated exactly to 350°F (175°C).
- ✓ Batter divided into 3 equal weights.
- ✓ Cakes cooled for at least 2 hours.
- ✓ Powdered sugar sifted twice.
- ✓ Gel colors used instead of liquid.
Creative Flavor Tweaks
While vanilla is the classic canvas for a floral ombre cake, you can easily shift the profile. For a richer, more decadent feel, you can swap some of the milk for sour cream. This adds a slight tang that balances the sweetness of the buttercream.
If you're serving this as part of a larger dessert spread, it pairs brilliantly with a silky mint custard ice cream. The coolness of the mint cuts through the richness of the butter heavy cake.
For a Zesty Twist
Add the zest of one lemon to the dry ingredients. The acidity brightens the cake, and if you use a yellow to white ombre, it feels incredibly cohesive.
For a Richer Profile
Replace 50g of the granulated sugar with brown sugar. This creates a deeper, caramel like undertone that works well with darker floral colors like deep purple or burgundy.
For a dairy-free Option
You can use a high-quality vegan butter stick and almond milk. Note: The structure may be slightly softer, so I suggest chilling the cakes in the freezer for 20 minutes before frosting.
Adjusting Your Batch Size
If you're making these for a small intimate gathering, you can halve the recipe. For the eggs, beat one egg in a small bowl and use only half of it. Use 4 inch mini pans and reduce the bake time by about 20%, checking them at 20-24 minutes.
When scaling up for a big event, don't just multiply the salt and baking powder by four. I've found that increasing salt and leavening to only 1.5x or 2x usually works better to avoid a chemical taste. Work in batches if your mixer can't handle the volume, as over crowding the bowl leads to uneven mixing.
If you're baking double batches, lower the oven temperature to 325°F (160°C) and extend the time by 5-10 minutes. This ensures the centers bake through without the edges burning, which is a common risk when the oven is full of pans.
Decision Shortcut:
- If you want a subtle look, use 1 drop of color in the lightest shade.
- If you want a velvet texture, sift your powdered sugar twice.
- If you want a floral pop, use freeze dried flower petals.
Cake Myths Debunked
You might hear that you need to "cream" butter and sugar for 5 minutes to get a good rise. In this recipe, we use reverse creaming (butter into flour), so that's not necessary. The lift comes from the baking powder and the air incorporated during the egg beating phase.
Another myth is that room temperature eggs are just a suggestion. In a butter based cake, cold eggs can cause the batter to curdle, which leads to a dense, uneven crumb. Always warm your eggs in a bowl of warm water for 5 minutes if you forgot to take them out of the fridge.
Freshness and Saving
Store your finished cakes in an airtight container in the fridge for up to 4 days. Because of the high butter content in the frosting, they'll stay moist, but the cake can firm up.
I always suggest letting them sit at room temperature for 30 minutes before serving so the buttercream becomes velvety again.
For long term storage, these cakes freeze surprisingly well. Freeze the unfrosted layers wrapped in plastic wrap for up to 3 months. Once thawed, frost them as usual. I don't recommend freezing the fully decorated cakes, as the moisture can cause the ombre colors to bleed.
To avoid waste, any leftover buttercream can be frozen in small dollops on a baking sheet. Once frozen, toss them into a freezer bag. You can use these "frosting pearls" later to top cupcakes or a small batch of brownies.
Serving and Presentation
The final touch for your mini floral ombre cake is the artistry. When piping your flowers, start from the center and work your way out. Use a small amount of pressure for the petals to keep them delicate and airy.
For a modern look, place each mini cake on a small gold doily or a piece of parchment paper. If you're serving them at a party, arrange them in a gradient line on a white platter to emphasize the ombre effect.
Finally, serve these with a light tea or a crisp prosecco. The bubbles in the drink cleanse the palate between bites of the rich buttercream, making every mouthful feel as fresh as the first. It's a visually stunning dessert that brings a bit of contemporary art to the table.
Recipe FAQs
Are there any allergens I should be aware of?
Yes, it contains common allergens. This recipe uses wheat flour, eggs, and dairy products including milk, butter, and heavy cream.
How to achieve the ombre color gradient?
Split the batter into three separate bowls. Add 3-4 drops of gel color to the first, 1-2 drops to the second, and a tiny drop to the third bowl.
Is it true that liquid food coloring is best for ombre cakes?
No, this is a common misconception. Gel colors are superior because liquid coloring can dilute the batter and cause the colors to bleed.
How to remove air bubbles from the buttercream?
Push the air bubbles against the side of the bowl with a spatula. Alternatively, let the frosting sit for 15 minutes to settle before piping.
Can I use a different fat instead of butter for the frosting?
No, stick to unsalted butter. The stability of butter is essential for floral piping; if you prefer a different creamy treat, try these mini cheesecake shooters.
Why did my mini cakes stick to the pan?
You likely skipped the parchment paper. Thoroughly grease the mini pans and line the bottoms with parchment to ensure the cakes release cleanly.
What temperature should the oven be for these mini cakes?
Set your oven to 350°F (175°C). This temperature ensures the mini cakes bake evenly without drying out.
Mini Floral Ombre Cake