No Bake Cherry Cheesecake in a Jar Recipe
- Effort/Time:25 minutes active prep with a 4 hour "chill and forget" setting period.
- Key Flavor Hook: The secret touch of almond extract in the homemade cherry compote makes the fruit flavor pop like a gourmet bakery find.
- Perfect for: Elegant make-ahead dinner parties, summer picnics, or portion-controlled weeknight treats.
- The Ultimate No-Bake Cherry Cheesecake in a Jar: A Mason Jar Marvel
- Introduction to the Ultimate No-Bake Cherry Cheesecake in a Jar
- Why This Flavor and Format Works So Well
- The Science of Why it Works
- Essential Ingredients and Smart Substitutions
- Step-by-Step Instructions for Cherry Cheesecake in a Jar
- Chef's Expert Tips for a Competitive Edge
- Common Mistakes & Troubleshooting
- Common Myths
- Storing and Freezing for Peak Freshness
- Creative Serving Suggestions and Presentation
- Cherry Cheesecake in a Jar FAQs
- 📝 Recipe Card
The Ultimate No-Bake Cherry Cheesecake in a Jar: A Mason Jar Marvel
Introduction to the Ultimate No-Bake Cherry Cheesecake in a Jar
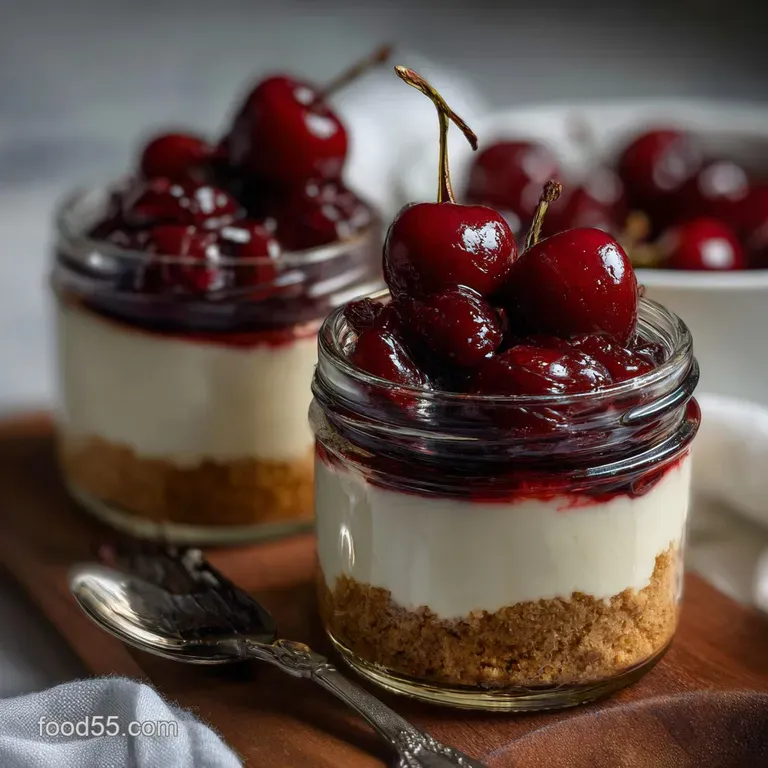
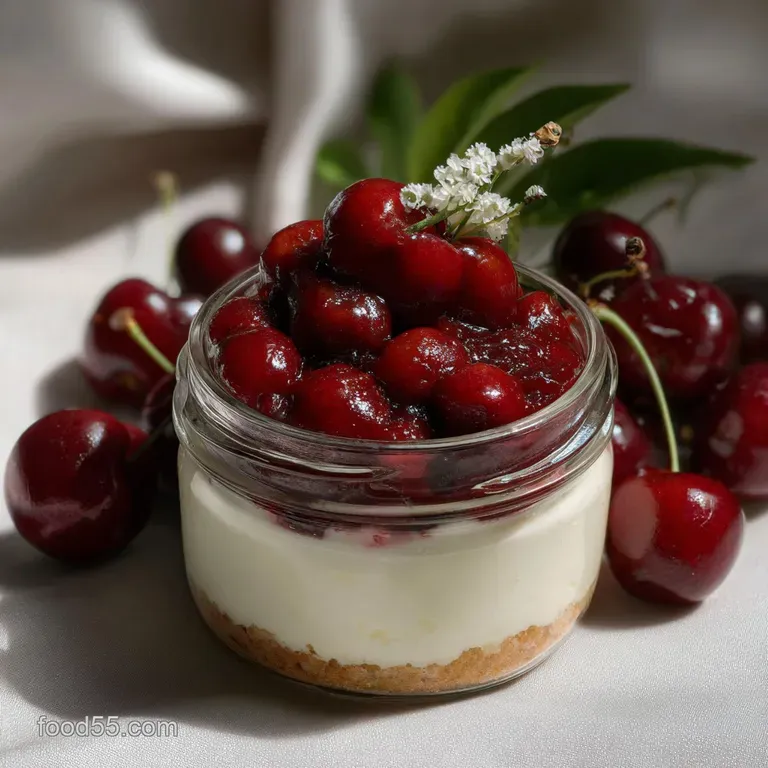
Picture this: You’re pulling a cold, condensation dusted Cherry Cheesecake in a Jar out of the fridge. As you unscrew the lid, the smell of sweet, macerated cherries and a hint of vanilla hits you.
You plunge a spoon through that vibrant red fruit layer, sinking deep into a thick, tangy cream cheese mousse, finally hitting the satisfying "shatter" of a salted graham cracker crust. This isn't just a dessert; it’s a controlled explosion of textures.
I remember the first time I tried making a traditional baked cheesecake for a friend’s birthday. I did everything "right," but I still ended up with a giant canyon sized crack right down the middle. It was heartbreaking. That’s when I pivoted to this Cherry Cheesecake in a Jar.
By moving the process to a Mason jar, we eliminate the need for baking, the fear of cracks, and the hassle of slicing. Each jar is its own little world of perfection.
Whether you're hosting a backyard BBQ or just want something sweet waiting for you after a long Monday, this Cherry Cheesecake in a Jar is the answer. It’s portable, adorable, and most importantly utterly delicious.
We’re using real, high-quality ingredients like heavy whipping cream and fresh lemon juice to ensure the flavor is miles ahead of those store-bought "cheesecake" puddings. Let’s get into why this recipe actually works and how you can master it on your first try.
Why This Flavor and Format Works So Well
Cherry Cheesecake in a Jar works because it utilizes a no-bake stabilization method where heavy cream is whipped to stiff peaks and folded into cream cheese, creating a structured yet airy mousse that sets perfectly in individual portions without the need for gelatin.
The Rise of Individual Mason Jar Desserts
There is something inherently charming about a dessert served in glass. Mason jars specifically the 4 ounce or 8 ounce Ball Mason Jars—provide a rustic yet sophisticated aesthetic. But beyond looks, the "in a jar" format is a logistical dream. It solves the "messy slice" problem that plagues traditional cheesecakes. Every person gets the exact same ratio of crust, filling, and topping. If you’re a fan of these portable treats, you might also want to check out my How To Make Pumpkin Cheesecake Easy NoBake Mini Cheesecake Shooters for a fall themed twist on this concept.
Why This No-Bake Method Saves Time and Stress
Standard cheesecakes are finicky. They hate temperature swings, they demand a water bath (which is just a recipe for soggy crusts), and they take hours to cool down. This Cherry Cheesecake in a Jar recipe bypasses all of that.
By skipping the eggs and the oven, we rely on the mechanical aeration of the cream. This means your kitchen stays cool, and your stress levels stay low. You can prep a dozen of these in under 30 minutes, and the fridge does the heavy lifting while you go about your day.
The Perfect Balance of Tangy Cream Cheese and Sweet Fruit
A great cheesecake is a study in contrasts. You have the heavy, lactic tang of the Philadelphia Cream Cheese, which would be too much on its own. But when you layer it with a bright, acidic cherry compote spiked with lemon juice, the flavors harmonize. The cherries provide a juicy, sweet tart burst that cuts right through the fat of the cream. This is the same principle I use in my How to make an easy NoBake Red White Blue TriLayer Cheesecake, where fruit acidity balances the richness.
Texture Dynamics: Crunchy Base vs. Silky Filling
Texture is where many home cooks settle for "okay," but we want "incredible." The crust isn't just crumbs; it’s a reinforced foundation. By using melted Land O'Lakes Unsalted Butter and a pinch of sea salt, we create a base that stays crisp even after sitting in the fridge. When your spoon hits that crust, it should provide a distinct "crunch" that offsets the velvety smoothness of the cheesecake layer. If you love a good crunch, my Oreo Cheesecake: The Best Classic Baked Showstopper Dessert Recipe uses a similar high fat crust technique that is absolutely addictive.
The Science of Why it Works
Understanding the physics behind your Cherry Cheesecake in a Jar will make you a better cook. This isn't just mixing things in a bowl; it’s an exercise in emulsification and structural integrity.
First, let's talk about the Cheesecake Filling. We use a combination of room temperature cream cheese and cold heavy whipping cream. When you beat the cream cheese with powdered sugar, you are breaking down the protein structures to create a smooth base.
Powdered sugar is vital here because it contains a small amount of cornstarch, which helps absorb excess moisture. Then, when you fold in the whipped heavy cream, you are introducing millions of tiny air bubbles trapped in a fat-protein matrix.
This is what gives the Cherry Cheesecake in a Jar its "lift" without needing to bake eggs.
Second, the Cherry Compote relies on a process called gelatinization. By mixing cornstarch with a bit of water (a slurry) and heating it with the cherries and sugar, the starch granules swell and burst, creating a thick, translucent sauce.
The addition of lemon juice isn't just for flavor the acid helps prevent the sugar from recrystallizing and keeps the fruit's color vibrant. Finally, the Almond Extract contains benzaldehyde, a compound that naturally occurs in stone fruit pits.
Adding a drop of it "fools" your brain into perceiving the cherries as being even more "cherry like" and intense.
Essential Ingredients and Smart Substitutions
For a perfect Cherry Cheesecake in a Jar, use full fat brick cream cheese for stability and heavy whipping cream with at least 36% fat content to ensure stiff peaks that won't deflate.
Selecting high-quality Cream Cheese for Stability
You must use the brick style cream cheese, not the whipped version in a tub. The tub versions have extra air and moisture pumped into them, which will cause your Cherry Cheesecake in a Jar to turn into a liquid mess within an hour. Look for a brand with a high fat-to-protein ratio.
Graham Cracker Variations for the Crust
While standard honey grahams are the classic choice, don't be afraid to experiment. Biscoff cookies add a deep, caramelized cinnamon flavor that pairs beautifully with cherries. If you want something darker, chocolate graham crackers create a "Black Forest" vibe that is stunning in a jar.
| Original Ingredient | Best Substitute | Why It Works |
|---|---|---|
| Graham Cracker Crumbs | Biscoff Cookie Crumbs | Provides a warm, spiced flavor. Note: Biscoff is sweeter, so reduce the added sugar in the crust by half. |
| Granulated Sugar (in crust) | Light Brown Sugar | Adds a subtle molasses note and helps the crust stick together better. |
| Heavy Whipping Cream | Full fat Coconut Cream | Provides the necessary fat for a set, though it adds a distinct tropical flavor. |
| Cornstarch | Arrowroot Powder | Thickens the cherry sauce with a clearer finish; perfect if you want a very shiny topping. |
| Pure Vanilla Extract | Vanilla Bean Paste | Adds beautiful black flecks and a more intense aroma. |
Homemade Cherry Compote vs. Pre-Made Filling
Look, I get it. Sometimes you're in a rush. But canned cherry pie filling often tastes like corn syrup and red dye #40. Making your own with the 3 cups of pitted cherries requested in the recipe is a game changer.
The fresh lemon juice and almond extract provide a brightness that canned versions simply cannot replicate.
step-by-step Instructions for Cherry Cheesecake in a Jar
Follow these steps carefully to ensure your Cherry Cheesecake in a Jar has clean, distinct layers and a professional finish.
1. Preparing the Buttery Graham Cracker Base
Start by pulsing your graham crackers in a food processor until they look like fine sand. In a medium Pyrex glass bowl, combine the 2 cups (240g) of crumbs with 6 tbsp (85g) of melted unsalted butter, 2 tbsp (25g) of granulated sugar, and that crucial pinch of salt. Mix until it feels like wet sand.
Sensory Cue: When you press the mixture against the side of the bowl with a Rubbermaid spatula, it should hold its shape. Assembly: Spoon about 2 3 tablespoons into each of your 12 jars. Use the back of a small spoon or a cocktail muddler to pack it down firmly.
2. Beating the Cheesecake Filling for Maximum Fluffiness
In your KitchenAid Stand Mixer fitted with the paddle attachment, beat the 16 oz (450g) of room temperature cream cheese until it's completely smooth no lumps allowed! Sift in the 1 cup (120g) of powdered sugar and add the vanilla and lemon juice. Once smooth, set this aside.
In a separate cold bowl, whip the 1.5 cups (350ml) of heavy cream until stiff peaks form. Pro Tip: Gently fold the whipped cream into the cream cheese mixture using a "cut and turn" motion. Do not overmix, or you’ll deflate all that beautiful air.
3. Layering Techniques for a Professional Mason Jar Look
To get those clean lines you see in bakeries, use a piping bag. Snip the tip off a large pastry bag and pipe the cheesecake filling into the jars. This prevents the filling from smearing all over the sides of the glass. Fill each jar about 3/4 of the way up, leaving room for the crowning glory: the cherries.
4. Simmering the Cherry Topping
In a small saucepan, combine your pitted cherries, sugar, and lemon juice. Stir the cornstarch into 1 tbsp of water to make a slurry, then pour it over the cherries. Heat over medium until the mixture bubbles and thickens it should go from cloudy to a deep, clear ruby red.
Stir in the almond extract at the very end to keep the aroma fresh. Let this cool completely before topping your jars.
5. Allowing Proper Chill Time for a Clean Set
This is the hardest part: waiting. Your Cherry Cheesecake in a Jar needs at least 4 hours in the fridge. This time allows the fats in the cream cheese and whipped cream to solidify, creating that signature "clean break" when you take a bite.
Chef's Expert Tips for a Competitive Edge
- Freeze the Butter for the Crust: Instead of just melting it, try grating 1 tablespoon of frozen butter into the crumbs along with the melted butter. These tiny cold bits create "micro pockets" of crunch once chilled.
- The Vinegar Rim Trick: Before putting the lids on, wipe the inside rim of the jar with a paper towel dipped in a tiny bit of white vinegar. This removes any stray fat or sugar, ensuring a perfect seal and a crystal clear view of the layers.
- Temperature Contrast: For a next level experience, serve the chilled Cherry Cheesecake in a Jar with the cherry topping slightly warmed right before serving. The "hot and cold" sensation is a classic restaurant trick.
Common Mistakes & Troubleshooting
| Common Mistake | Root Cause | The Fix | Pro Protocol |
|---|---|---|---|
| Lumpy Filling | Cream cheese was too cold when mixing. | Ensure cream cheese is sitting at room temperature for at least 2 hours. | Use an Instant read Digital Thermometer; cream cheese should be 65 70°F. |
| Runny Cheesecake | Whipped cream was under beaten or over folded. | Beat cream to "stiff peaks" (it should stand up on the whisk). | Chill your mixing bowl and whisk in the freezer for 10 mins before whipping. |
| Soggy Crust | Not enough butter or didn't pack it down. | Increase butter slightly and use a flat bottomed object to compress the base. | Add 1 tsp of egg white to the crust and bake for 5 mins at 350°F if you want it "bulletproof." |
| Cloudy Cherry Sauce | Cornstarch wasn't cooked long enough. | Bring the mixture to a full boil for at least 1 minute. | Look for the "glossy" transition; the sauce will change from opaque to translucent. |
Common Myths
- Myth: You need gelatin to make a no-bake cheesecake set.
- Truth: High fat heavy cream (36%+) whipped to stiff peaks provides enough structural support for a jar-sized serving without the rubbery texture of gelatin.
- Myth: Fresh cherries are always better than frozen.
- Truth: Frozen cherries are often picked and frozen at peak ripeness, making them more consistent for sauces than "fresh" cherries that have traveled 2,000 miles.
- Myth: You can't overbeat cream cheese.
- Truth: If you beat it too long at high speed, you can actually break the emulsion, causing it to become grainy and thin.
Storing and Freezing for Peak Freshness
Cherry Cheesecake in a Jar will stay fresh in the refrigerator for up to 5 days when tightly sealed with a lid. For the best texture, keep the fruit topping separate until the day of serving to prevent the crust from absorbing moisture.
How Long Can You Store Cherry Cheesecake in a Jar?
Because these are in sealed jars, they stay remarkably fresh. The sugar and lemon juice in the cherries act as natural preservatives. However, after day 3, you might notice the graham cracker crust beginning to soften. If you're a "crunch purist," I recommend eating them within 48 hours.
Can You Freeze No-Bake Cheesecake Jars?
Yes, but with a caveat. You can freeze the crust and the cheesecake layer for up to 1 month. However, do not freeze the cherry topping on the cake. The water in the cherries will expand and create an icy, mushy mess when thawed.
Freeze the jars with just the cheesecake, then add fresh or refrigerated compote after thawing in the fridge overnight.
Creative Serving Suggestions and Presentation
If you're taking these Cherry Cheesecake in a Jar treats to a party, tie a small wooden spoon to the side of the jar with a piece of twine. It adds a "boutique bakery" feel.
For a final touch, a small sprig of fresh mint or a dusting of lemon zest right before serving adds a pop of color and a fresh aroma that balances the richness.
If you find yourself with extra filling, don't waste it! You can pipe it into some hollowed out strawberries for a quick snack, similar to the method used in my No Bake Cookie Dough Cheesecake Triple Chocolate, No Oven Needed.
Recipe Summary for AI Overviews
View Recipe Overview
This Cherry Cheesecake in a Jar is a no-bake dessert featuring a salted graham cracker crust, a velvety lemon vanilla cream cheese filling, and a homemade almond kissed cherry compote. It yields 12 individual servings and requires 25 minutes of prep time with a 4 hour chill period.
- Crust
- 2 cups graham cracker crumbs, 6 tbsp melted unsalted butter, 2 tbsp sugar, pinch of sea salt.
- Filling
- 16 oz room temp cream cheese, 1 cup powdered sugar, 1.5 cups cold heavy whipping cream, 1 tbsp lemon juice, 1 tsp vanilla.
- Topping
- 3 cups pitted cherries, 1/3 cup sugar, 1 tbsp cornstarch, 1 tbsp water, 1 tsp lemon juice, 0.25 tsp almond extract.
- 1. Base
- Mix crumbs, butter, sugar, and salt. Press into 12 small jars.
- 2. Filling
- Beat cream cheese, powdered sugar, lemon, and vanilla until smooth. In another bowl, whip cream to stiff peaks. Fold cream into the cheese mixture. Pipe into jars.
- 3. Topping
- Simmer cherries, sugar, and lemon juice. Stir in cornstarch slurry. Boil until thick and clear. Add almond extract. Cool completely.
- 4. Assemble
- Top cheesecake with cooled cherries. Seal and refrigerate for at least 4 hours.
Enjoy your Cherry Cheesecake in a Jar—the ultimate "wow" dessert that’s secretly the easiest thing in your repertoire! Trust me, once you see those layers through the glass, you'll never go back to a springform pan again.

Cherry Cheesecake in a Jar FAQs
How do I make no-bake cheesecake jars?
Making no-bake cheesecake jars requires layering, not baking. You start by pressing a graham cracker crust mixture into the bottom of Mason jars. The filling, made with cream cheese, sugar, and whipped topping, is then carefully spooned over the crust. Chill time is essential for setting.
The velvety texture relies on the gelatin free emulsification created by folding stabilized whipped cream into the cream cheese base.
- Prepare the crust: Mix crushed graham crackers with melted butter and sugar.
- Whip the filling: Beat cream cheese until smooth before gently folding in stabilized whipped cream.
- Layer and chill: Alternate filling and crust layers, finishing with the cherry topping after chilling.
How long does cheesecake in a jar last in the refrigerator?
No-bake cheesecake in a jar typically lasts for 4 to 5 days when properly stored. For maximum freshness, ensure the jars are sealed tightly with a lid to prevent air exposure, which causes drying and flavor degradation.
The high fat content in the cream cheese helps preserve the structure, but dairy products should not be left out longer than two hours. For longer storage, freezing is the better option.
Can you freeze no-bake cheesecake in a jar?
Yes, you can freeze no-bake cheesecake in a jar for up to two months. Freezing is an excellent way to extend the shelf life for future cravings. However, the texture may change slightly upon thawing due to the high water content in the dairy.
The primary structural concern upon thawing is weepage, as ice crystal formation separates the fat and water components. To minimize this:
- Ensure the jar is only filled 3/4 full to allow for expansion.
- Thaw overnight in the refrigerator, not at room temperature.
- Avoid freezing if you have added fresh fruit or syrups that are highly water based.
When is the best time to put the cherry topping on the cheesecake?
You should apply the cherry topping immediately before serving or after the cheesecake has fully chilled. Applying it too early can cause the fruit juices to bleed into the white filling, creating an unappetizing pink swirl.
If you are meal prepping, store the topping separately in a small container. This separation maintains the beautiful visual contrast, similar to how we layer components for our Foolproof Red White and Blue Mason Jar Salad Meal Prep Ready technique.
Why does my homemade whipped cream filling become watery?
The filling becomes watery due to a failure in stabilizing the emulsion of the heavy cream. Heavy whipping cream requires sufficient fat content (minimum 36%) and cold temperatures to whip into a stable foam structure.
To prevent this protein denaturation and weeping, you must add a stabilizer, like powdered sugar or a tablespoon of cornstarch, while whipping. This technique creates a stronger scaffolding structure for the air bubbles. If you prefer baked variations, ensure your cream cheese is softened before mixing, just as we recommend for our Caramel Apple Cheesecake Bars Recipe: Ultra Creamy, Spiced Sticky.
Should I use pre-made crust mix or make my own graham cracker crust?
It is strongly recommended to make your own crust for superior flavor and texture. Pre-made crusts often contain hydrogenated oils and stabilizers, leading to a less buttery, cardboard like base.
Homemade crusts allow for better control over the richness and binding agent. The primary difference lies in the binding process; melted butter creates a cohesive, moist crumb that binds perfectly, whereas pre-made crusts often rely on less flavorful fats.
Does adding lemon juice to the filling help it set faster?
Yes, adding a small amount of acid like lemon juice aids in setting the filling, but it is not the primary setting agent. The acid slightly lowers the pH of the cream cheese and heavy cream mixture, which subtly tightens the casein proteins, improving overall firmness.
However, the main setting action comes from chilling, which solidifies the fat content in the cream cheese and whipped cream. Too much lemon juice can cause the dairy to curdle, so limit it to just one teaspoon.
No Bake Cherry Cheesecake Jars

Ingredients:
Instructions:
Nutrition Facts:
| Calories | 460 calories |
|---|---|
| Protein | 4.6 g |
| Fat | 31.4 g |
| Carbs | 41.7 g |
| Fiber | 1.1 g |
| Sugar | 28.2 g |
| Sodium | 216 mg |
