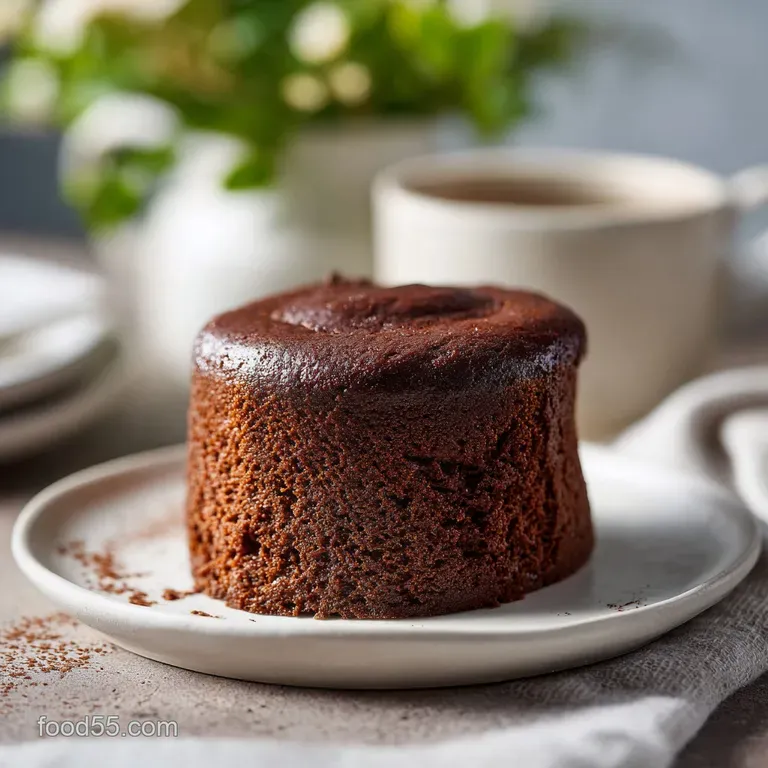
Perfect Chocolate Cake: Ultra Moist and Fudgy
- Time: Active 20 minutes, Passive 35 minutes, Total 55 minutes
- Flavor/Texture Hook: Intensely fudgy with a silk smooth ganache finish
- Perfect for: Milestone birthdays, dinner parties, or serious chocolate cravings
- Why This Perfect Chocolate Cake Outshines Every Other Recipe
- Exploring The Science Behind This Incredibly Moist Crumb
- Component Analysis Of The Main Ingredients
- Essential Components For Crafting The Best Homemade Cake
- The Right Kitchen Gear For A Flawless Bake
- Mastering Each Phase Of The Perfect Chocolate Cake
- How To Solve Typical Problems During The Baking Process
- Simple Ways To Adapt This Recipe For Different Needs
- Debunking Old School Baking Rumors
- Smart Tips For Proper Storage And Reducing Food Waste
- Professional Ideas For Styling And Serving Your Masterpiece
- Recipe FAQs
- 📝 Recipe Card
Why This Perfect Chocolate Cake Outshines Every Other Recipe
You know that specific kitchen smell? Not just "baking," but the deep, almost earthy aroma of hot coffee hitting high-quality cocoa powder. It's a scent that fills the corners of the house and tells everyone that something special is happening.
I remember the first time I tried this specific method - I was skeptical about the thin, watery batter. I thought I'd messed up the ratios and was ready to toss it, but then it came out of the oven with a dome so supple and a crumb so moist it didn't even need frosting.
We've all suffered through those dry, sponge like cakes that require a gallon of milk just to swallow. This is the opposite of that. It's the kind of cake that makes you close your eyes when you take a bite because the texture is just that velvety.
Whether you're making this for a big family gathering or just because it's a Tuesday and you deserve a win, this recipe is designed to be your new old faithful.
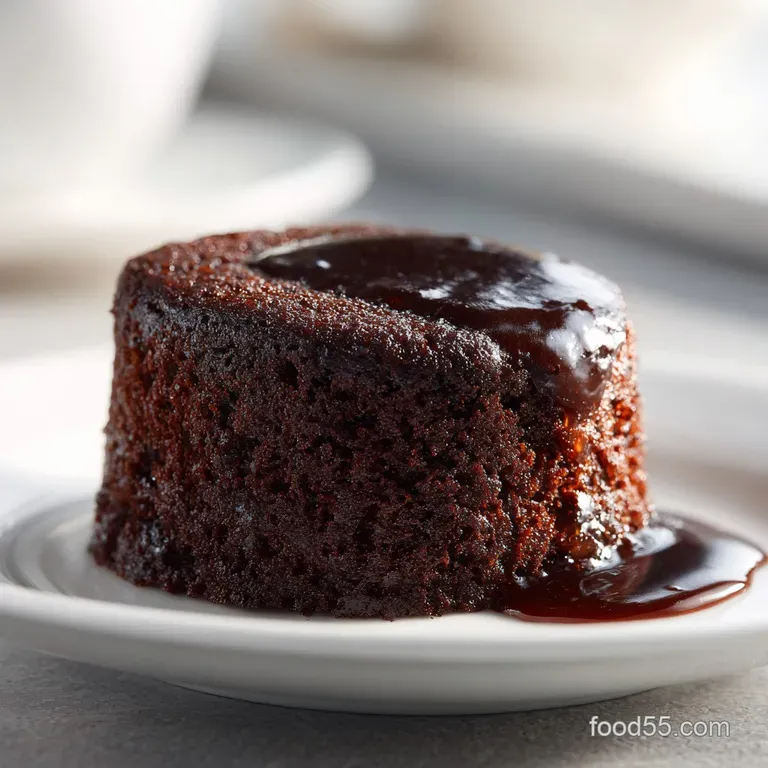
The beauty here lies in the contrast between the dark, slightly bitter cocoa and the rich, semisweet ganache. We're moving away from those overly sweet, gritty buttercreams and leaning into something much more sophisticated.
It's a shared meal experience that brings people together, sparking that genuine connection we all crave around a dinner table. Trust me, once you see how that ink black batter transforms into a light yet fudgy masterpiece, you'll never go back to a box mix again.
Exploring The Science Behind This Incredibly Moist Crumb
The secret to this texture isn't luck, it's chemistry working in your favor. By understanding how these specific ingredients interact, we can ensure a consistent bake every single time without the guesswork.
- The Bloom: Hot coffee dissolves the cocoa solids and "blooms" the flavor, releasing aromatic compounds that stay trapped in cold liquids.
- Acid Activation: The lactic acid in full fat buttermilk reacts instantly with the baking soda to create carbon dioxide, ensuring a lift that stays light despite the heavy cocoa.
- Fat Hybridization: Using neutral oil instead of butter ensures the cake remains soft even when cold, as oil stays liquid at room temperature while butter solidifies.
- Hygroscopic Action: The high sugar content doesn't just add sweetness, it actually bonds with water molecules to keep the crumb from drying out during the bake.
| Method | Total Time | Texture Outcome | Best Usage |
|---|---|---|---|
| Standard Layers | 55 minutes | Velvety and tall | Traditional birthdays |
| Bundt Pan | 1 hours 5 mins | Dense and crusty | Casual tea time |
| Individual Cupcakes | 40 minutes | Light and airy | Large parties |
When choosing your method, consider the occasion. A classic layer cake offers the best frosting to cake ratio, whereas a Bundt version provides those lovely crispy edges that pair so well with a morning coffee. If you're looking for something slightly different but equally decadent, you might enjoy the rich profile of a Traditional German Chocolate recipe which uses a similar base but a very different topping.
Component Analysis Of The Main Ingredients
| Ingredient | Science Role | Pro Secret |
|---|---|---|
| Dutch process Cocoa | Low acidity, deep color | Sift it twice to avoid "cocoa bombs" in the crumb |
| Full fat Buttermilk | Tenderizes gluten strands | Must be room temp to emulsify correctly |
| Hot Brewed Coffee | Dissolves cocoa fat | Use a dark roast to mimic extra chocolate depth |
| Vanilla Bean Paste | Aromatic complexity | Paste provides those tiny, beautiful bean specks |
Essential Components For Crafting The Best Homemade Cake
Having your ingredients prepped and at the right temperature is half the battle won. Don't sub out the full fat buttermilk for skim - we need that fat for the mouthfeel.
- 2 cups all purpose flour (Substitute: 1:1 gluten-free baking flour) Why this? Provides the structural framework for the rise.
- 2 cups granulated sugar (Substitute: Cane sugar) Why this? Crucial for moisture retention and crumb tenderness.
- 3/4 cup unsweetened Dutch process cocoa powder (Substitute: Natural cocoa + 1/4 tsp baking soda) Why this? Offers a darker color and smoother flavor.
- 2 tsp baking soda (Substitute: 6 tsp baking powder) Why this? Reacts with buttermilk for an immediate lift.
- 1 tsp baking powder (Substitute: 1/4 tsp baking soda + 1/2 tsp cream of tartar) Why this? Provides the secondary rise in the oven.
- 1 tsp kosher salt (Substitute: 1/2 tsp table salt) Why this? Balances the sweetness and enhances chocolate notes.
- 2 large eggs (Substitute: 1/2 cup unsweetened applesauce) Why this? Binds the fats and liquids together.
- 1 cup full fat buttermilk (Substitute: 1 cup milk + 1 tbsp lemon juice) Why this? Tenderizes the crumb through acidity.
- 1/2 cup neutral oil (canola or grapeseed) (Substitute: Melted coconut oil) Why this? Guarantees a moist texture even after refrigeration.
- 2 tsp vanilla bean paste (Substitute: 2 tsp vanilla extract) Why this? Adds a potent, floral vanilla aroma.
- 1 cup hot brewed coffee (Substitute: 1 cup boiling water) Why this? Blooms the cocoa and intensifies the flavor.
- 12 oz semisweet chocolate (60% cacao) (Substitute: Milk chocolate for a sweeter finish) Why this? The base for a rich, stable ganache.
- 1 cup heavy whipping cream (Substitute: Full fat coconut milk) Why this? Creates a silky, pourable frosting.
- 2 tbsp unsalted butter (Substitute: Margarine) Why this? Adds a professional gloss to the ganache.
The Right Kitchen Gear For A Flawless Bake
You don't need a professional bakery setup, but a few specific tools make the process much smoother. I personally swear by a kitchen scale for the flour, though the cup measurements here are tested and true.
- Two 9 inch round cake pans
- Parchment paper (Non negotiable for easy release)
- Large mixing bowls
- Whisk and silicone spatula
- Small saucepan (for the ganache)
- Wire cooling rack
Mastering Each Phase Of The Perfect Chocolate Cake
1. The Dry Foundation
Preheat your oven to 350°F (180°C). Grease your pans and line the bottoms with parchment. Sift together the 2 cups flour, 2 cups sugar, 3/4 cup cocoa, 2 tsp baking soda, 1 tsp baking powder, and 1 tsp salt.
Note: Sifting ensures no lumps of soda or cocoa ruin the texture.
2. Emulsifying The Base
In a separate bowl, whisk the 2 eggs, 1 cup buttermilk, 1/2 cup oil, and 2 tsp vanilla bean paste until completely combined. Add the wet ingredients to the dry mix and whisk until the batter is thick and dark.
3. The Coffee Bloom
Slowly pour in the 1 cup hot brewed coffee while whisking gently. The batter will be very thin, but don't panic. Whisk until the liquid is fully incorporated and glossy.
4. The Precision Bake
Divide the batter evenly between the two pans. Bake for 30 to 35 minutes until a toothpick comes out with just a few moist crumbs. Note: Overbaking is the enemy of moisture, so start checking at 30 minutes.
5. Proper Cooling
Let the cakes cool in the pans for 10 minutes, then run a knife around the edges. Invert them onto a wire rack and peel off the parchment until the surface is cool to the touch.
6. Crafting The Ganache
Place the 12 oz chopped chocolate in a heat proof bowl. Heat 1 cup heavy cream and 2 tbsp butter in a saucepan until it just begins to simmer. Pour the hot cream over the chocolate and let it sit for 5 minutes.
7. The Silk Finish
Whisk the chocolate and cream starting from the center until the mixture is velvety and uniform. Let it cool at room temperature until it reaches a spreadable consistency.
8. Final Assembly
Place one cake layer on a stand. Spread a thick layer of ganache over the top, then place the second layer on. Cover the top and sides with the remaining ganache until the cake is fully enrobed.
How To Solve Typical Problems During The Baking Process
Why Your Cake Sunk In The Middle
This usually happens if the oven door was opened too early or if the baking soda was expired. When the structure hasn't set, the rush of cool air causes the carbon dioxide bubbles to collapse.
Tunneling And Large Holes
If you see large "tunnels" in your cake, you likely overmixed the batter after adding the flour. This develops too much gluten, which traps large air pockets that expand and then leave holes.
| Problem | Root Cause | Solution |
|---|---|---|
| Dry, crumbly texture | Overbaking or too much flour | Use a scale; check doneness 5 mins early |
| Cake stuck to pan | No parchment used | Always line the base with parchment paper |
| Greasy finish | Improper emulsion | Ensure eggs and buttermilk are room temp |
Common Mistakes Checklist
- ✓ Always use Dutch process cocoa for that specific dark color and mild flavor.
- ✓ Never skip the parchment paper; this cake is very moist and tends to stick.
- ✓ Use hot coffee, not lukewarm, to properly bloom the cocoa solids.
- ✓ Tap the pans firmly on the counter before baking to release large air bubbles.
- ✓ Wait for the cakes to be completely cold before applying the ganache.
Simple Ways To Adapt This Recipe For Different Needs
If you need to scale this down for a small date night, you can halve the recipe easily. Use 1 large egg and an 8 inch pan, reducing the bake time by about 5 minutes. For a massive celebration, doubling the recipe works well, but I recommend baking in batches.
When doubling, only increase the salt and spices to 1.5x the original amount to avoid an overpowering chemical taste.
If you find yourself with an abundance of chocolate and want to try a different texture altogether, this Death By Chocolate recipe is a fantastic way to use up extra cocoa and cream for a stovetop treat.
| Component | Fast Shortcut | Classic Method | Flavor Impact |
|---|---|---|---|
| Frosting | store-bought tub | Homemade Ganache | Classic is much richer |
| Coffee | Instant coffee granules | Freshly brewed espresso | Fresh brew is more aromatic |
| Buttermilk | Milk + Vinegar | Real Full fat Buttermilk | Real buttermilk is creamier |
Debunking Old School Baking Rumors
One of the biggest myths is that you must sift every single dry ingredient multiple times. While sifting the cocoa and leaveners is vital because they clump, sifting all purpose flour for a rustic cake like this isn't strictly necessary if you whisk it well.
Another common misconception is that "boiling" coffee will cook the eggs in the batter. Because we add the coffee last to a large volume of room temperature ingredients, the temperature drops instantly, safely blooming the cocoa without scrambling your eggs.
Smart Tips For Proper Storage And Reducing Food Waste
Keep this cake in an airtight container at room temperature for up to 3 days. Because of the oil and buttermilk, it stays moist longer than butter based cakes. If you need to store it longer, it actually freezes beautifully. Wrap individual slices in plastic wrap and then foil; they will last for up to 2 months.
Thaw at room temperature for an hour before eating.
If you have scraps from leveling the cake tops, don't toss them! Crumble the leftover cake and mix it with a spoonful of leftover ganache to make quick cake truffles. You can also toast the crumbs in the oven and use them as a "chocolate soil" topping for ice cream or pudding.
Professional Ideas For Styling And Serving Your Masterpiece
For a true bistro style presentation, serve a thick slice with a dollop of unsweetened whipped cream to cut through the richness. If you want to go the extra mile, a few fresh raspberries or a sprig of mint adds a bright pop of color against the dark chocolate.
Another favorite of mine is the "Affogato Style." Place a small slice of the cake in a shallow bowl, top it with a scoop of vanilla bean ice cream, and pour a fresh shot of hot espresso over the top. The way the ice cream melts into the ganache and the warm cake is absolutely sublime.
It turns a simple dessert into a multi sensory experience that your guests won't forget anytime soon. After all, the best meals are the ones that foster those deep, joyful connections.

Recipe FAQs
What is the secret to moist chocolate cake?
Use oil instead of butter and add hot liquid. Oil remains liquid at cooler temperatures, ensuring a softer crumb even when the cake is chilled. The hot liquid, like coffee, "blooms" the cocoa, intensifying flavor while the thin batter ensures less overmixing.
What are the 7 rules for baking perfect cake?
Accuracy, temperature, mixing, blooming, leavener freshness, cooling, and correct final bake time. Precisely measure flour, ensure ingredients are at room temperature, activate cocoa with hot liquid, use fresh baking soda/powder, cool slowly, and never overbake. Mastering these core concepts is key, much like understanding the fat ratios for structure in a Classic Pound Cake recipe.
What is the secret ingredient to a moist cake?
Buttermilk or yogurt for acid and hot coffee for bloom. The acid in buttermilk reacts with baking soda to create a tender rise, while the coffee deepens the chocolate flavor substantially without making the cake taste like coffee.
What is the secret to a perfect cake?
Perfecting the emulsion and avoiding overmixing the final batter. A stable emulsion prevents separation, leading to an even crumb, and stopping mixing right after streaks disappear ensures minimal gluten development. If you enjoyed mastering the controlled mixing here, apply that precision to techniques like folding in cream cheese for a Cookie Dough Cheesecake recipe.
Is it true I must use Dutch process cocoa for the darkest color?
Yes, for the darkest, mildest flavor. Natural cocoa is highly acidic and reacts strongly with baking soda, creating a lighter, reddish cake. Dutch process cocoa is neutralized, yielding that deep, ink-black color we are aiming for.
How do I prevent my layers from sticking to the pan?
Grease the pans thoroughly, then line the bottoms with parchment paper. After greasing, trace the pan bottom onto parchment, cut it out, and place it inside; this simple step guarantees an effortless release every time.
How to ensure the ganache sets correctly and isn't too runny?
Use the correct ratio of cream to chocolate and allow sufficient cooling time. Pouring hot cream over high-quality chocolate creates an emulsion; let it sit undisturbed for five minutes before whisking slowly. If it remains too thin after cooling on the counter, briefly chill it, just as you would when preparing the filling for How to Make Mastro's Butter Cake recipe.
Perfect Chocolate Cake Recipe
Ingredients:
Instructions:
Nutrition Facts:
| Calories | 557 kcal |
|---|---|
| Protein | 6.9 g |
| Fat | 30.1 g |
| Carbs | 68.3 g |
| Fiber | 3.2 g |
| Sugar | 44.6 g |
| Sodium | 415 mg |
