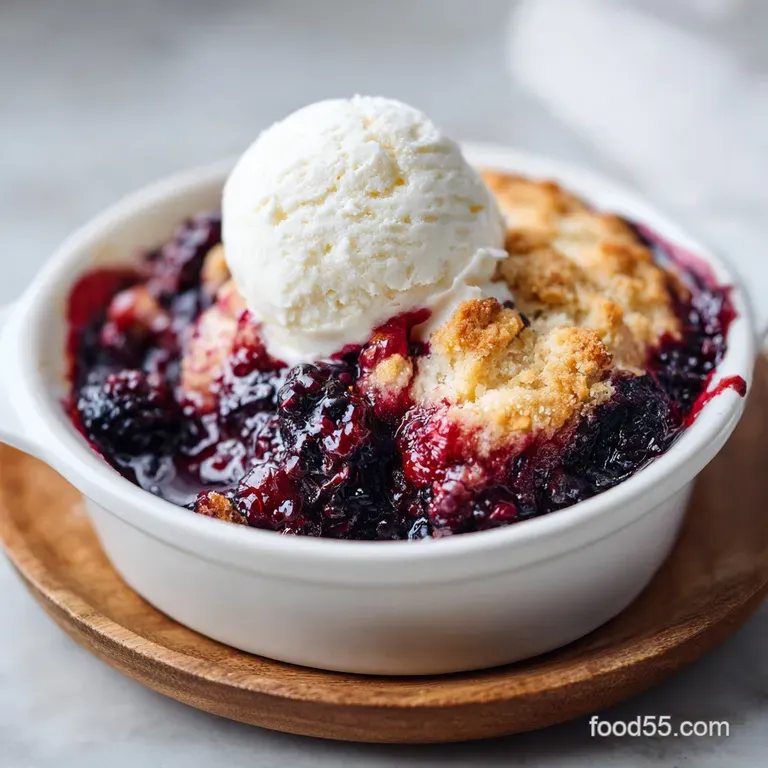
Southern Blackberry Cobbler: Fluffy Biscuit Crust
- Time: Active 20 minutes, Passive 45 minutes, Total 65 minutes
- Flavor/Texture Hook: A shattering turbinado sugar crust over a velvety, tart sweet berry filling.
- Perfect for: Seasonal summer gatherings, Sunday family dinners, or a cozy evening comfort dessert.
- The Rich Cultural Legacy of Southern Blackberry Cobbler
- The Science of the "Sugar Cap" and Boiling Water Crust
- Precise Measurements for the Ultimate Blackberry Cobbler Experience
- Selecting the Best Seasonal Berries and Pantry Staples
- Essential Kitchen Tools for a Flawless Fruit Bake
- Mastering the Sequential Stages of the Perfect Cobbler
- Professional Strategies for Avoiding Common Baking Pitfalls
- Inspired Flavor Variations for the Modern Home Baker
- Preservation Techniques for Keeping Your Cobbler Vibrant
- Sophisticated Garnish Strategies for a Perfectly Balanced Dessert
- Recipe FAQs
- 📝 Recipe Card
The Rich Cultural Legacy of Southern Blackberry Cobbler
Imagine standing at the edge of a wild thicket in late July, the air thick with the scent of sun warmed earth and overripe fruit. Your fingers are stained a deep, telltale indigo, and you’ve managed to dodge a few thorns just to reach that one cluster of berries that looks like polished obsidian.
This isn't just about picking fruit; it's a rite of passage. In many parts of the South, the arrival of blackberries signals a time for "cobbling" together what the land provides. The term itself likely comes from the "cobbled" appearance of the dough dropped onto the fruit, resembling an old stone street.
It was a humble dessert, born from necessity and a lack of fancy pastry tools, yet it has survived centuries because the combination of tart fruit and sweet dough is essentially flawless.
When I first started making this, I used to get caught up in trying to make a perfect pie crust, but the beauty of a Blackberry Cobbler lies in its rustic imperfection. It’s supposed to be a little messy.
It’s supposed to have juices that bubble over the side of the ceramic dish, staining the golden crust with streaks of vibrant violet. Growing up, the smell of cinnamon and sugar wafting through the house was a signal that the day was ending on a high note.
We didn't need a holiday to justify it; the fact that the berries were ripe was reason enough. This dish celebrates the changing seasons and the local ingredients that make summer feel like summer.
In my kitchen, this recipe is a tribute to those long afternoons and the simple joy of seasonal produce. We focus on sustainability by using berries at their peak or even frozen ones harvested during the height of the season to ensure the flavor is concentrated and real.
There’s something deeply satisfying about watching a pile of raw berries transform into a molten, jammy treasure under a canopy of sweet, short dough. It’s a presentation of nature’s best work, accented by just enough sugar and spice to make it sing.
The Science of the "Sugar Cap" and Boiling Water Crust
The magic of this specific version of a Blackberry Cobbler lies in the interaction between heat and leavening. You might notice we use both whole milk and a splash of boiling water. This isn't a mistake.
The boiling water serves a dual purpose: it begins to hydrate the flour instantly and provides a thermal jumpstart to the baking powder. This results in a topping that is lighter than a standard biscuit but sturdier than a cake.
It creates a "dumpling hybrid" texture that stays tender on the inside while the outside remains resilient against the steam of the fruit.
Then there is the "Sugar Cap" technique. By sprinkling a generous layer of turbinado sugar over the dough right before it hits the oven, we aren't just adding sweetness. Turbinado has a higher moisture content and larger crystals than granulated sugar.
As the cobbler bakes for 45 minutes, these crystals don't fully melt into the dough. Instead, they fuse together to form a crystalline lattice a literal cap that provides a satisfying "shatter" when you press your spoon into it.
This crust acts as a barrier, trapping the steam from the berries beneath it, which helps cook the underside of the dough to a soft, pillowy finish.
| Servings | Blackberry Quantity | Flour Amount | Recommended Pan Size |
|---|---|---|---|
| 4 People | 3 cups (375g) | 3/4 cup (95g) | 8x4 inch Loaf Pan |
| 8 People | 6 cups (750g) | 1.5 cups (190g) | 9x9 inch Square Dish |
| 12 People | 9 cups (1.1kg) | 2.25 cups (285g) | 9x13 inch Casserole |
This table helps you scale the recipe depending on how many berry hungry guests you have at your table. It ensures the fruit to dough ratio stays consistent so no one ends up with a bowl of just juice or just bread.
Precise Measurements for the Ultimate Blackberry Cobbler Experience
Accuracy is the friend of every home baker, especially when dealing with the hydration levels of a fruit dessert. If you add too much liquid to the berries, you end up with soup; too little, and the filling becomes gummy.
Using the 6 cups of blackberries specified in the schema ensures that the 2 tablespoons of cornstarch have exactly enough juice to thicken into a velvety syrup. We want that syrup to be thick enough to coat a spoon but fluid enough to pool slightly at the bottom of the bowl.
The ratio of fat to flour in the topping is equally critical. We use 6 tablespoons of unsalted butter for 1.5 cups of flour. This "shortness" is what gives the crust its flaky, tender crumb. If you were to use more butter, the dough might slump into the fruit; less, and it becomes tough and bready.
By keeping the butter cold and cubed, we ensure that small pockets of fat remain in the dough, which expand and create air gaps as they hit the 375°F (190°C) oven air.
| Ingredient | Science Role | Pro Secret |
|---|---|---|
| Cornstarch | Thickening Agent | Macerate for 15 minutes to prevent starchy clumps. |
| Boiling Water | Leavening Catalyst | Activates baking powder immediately for maximum lift. |
| Lemon Juice | pH Balancer | Brightens the berry flavor and helps set the pectin. |
| Turbinado Sugar | Structural Texture | Creates the "shatter" effect on the top crust. |
Understanding these components helps you navigate the process with confidence. Every ingredient has a job to do, from the structural integrity provided by the all purpose flour to the flavor boosting properties of a half teaspoon of ground cinnamon.
Selecting the Best Seasonal Berries and Pantry Staples
When shopping for this recipe, the quality of your fruit is the most important factor. If you are picking them yourself, look for berries that are plump and matte super shiny berries can sometimes be a bit tart. If you can't find fresh, don't worry. Frozen blackberries work beautifully here and are often frozen at their peak of ripeness. They may release a bit more juice, but our cornstarch ratio is robust enough to handle it. If you're interested in other berry variations, you might find inspiration in my Apple Blackberry Crumble recipe, which uses a different topping technique entirely.
- 6 cups blackberries (approx. 750g): Fresh is preferred for the best texture, but frozen is a reliable year round backup. Why this? High pectin content helps create a natural, jammy consistency.
- 3/4 cup granulated sugar (150g): Used for macerating the fruit. Why this? It draws out the juices to bloom the cornstarch.
- 2 tablespoons cornstarch: The primary thickener for the filling.
- 1 tablespoon lemon juice: Cuts through the sugar and adds a bright top note.
- 1/2 teaspoon ground cinnamon: Adds warmth and depth to the dark fruit.
- 1.5 cups all purpose flour (190g): The base of our "short" dough.
- 1.5 teaspoons baking powder: The lifting agent for a fluffy topping.
- 1/2 teaspoon salt: Essential for balancing the sweetness.
- 6 tablespoons unsalted butter (85g): Must be cold and cubed to create flakes.
- 1/2 cup whole milk (120ml): Provides richness and moisture to the dough.
- 1/4 cup boiling water (60ml): The "secret" for activating the leavening.
- 2 tablespoons turbinado sugar: For that signature crunchy finish.
If you find yourself with an abundance of berries after making this cobbler, I highly recommend looking at my homemade blackberry jam recipe to preserve that summer flavor even longer. It’s a great way to use up the "seconds" or berries that might be a bit too soft for the cobbler.
Essential Kitchen Tools for a Flawless Fruit Bake
While cobbler is a rustic dish, having the right equipment makes the process much smoother. A 9x9 inch ceramic or glass baking dish is the gold standard for this recipe. Ceramic holds heat evenly and looks beautiful when brought directly to the table, while glass allows you to see the "lava" of the berry juices bubbling at the bottom, which is a key indicator of doneness.
Avoid using a metal cake pan if possible, as it can sometimes react with the acidity of the berries and create a slight metallic aftertaste.
You will also need a large mixing bowl and a pastry cutter (or two forks). The goal is to incorporate the butter into the flour without melting it with the heat of your hands. A pastry cutter allows you to work quickly and efficiently.
For the "Sugar Cap," a simple tablespoon works for even distribution, but if you want to be precise, a small fine mesh sieve can help dust the turbinado sugar more uniformly. Finally,, don't forget a cooling rack.
Letting the cobbler sit for at least 15 minutes after baking is vital for the juices to set properly.
| Fresh Berries | Frozen Berries | Impact on Outcome |
|---|---|---|
| Texture | Firm and distinct | Slightly softer berries |
| Juiciness | Controlled release | More liquid released initially |
| Prep Time | Requires washing/drying | Use straight from the freezer |
Using frozen berries is a fantastic shortcut, but keep in mind they might require an extra 5 minutes of bake time to ensure the center is piping hot. The flavor remains just as vibrant, making this an accessible year round treat.
Mastering the Sequential Stages of the Perfect Cobbler
- Preheat and Prep. Set your oven to 375°F (190°C). In your 9x9 inch baking dish, combine the 6 cups of blackberries with 3/4 cup granulated sugar, 2 tablespoons cornstarch, 1 tablespoon lemon juice, and 1/2 teaspoon cinnamon. Note: Macerating for 15 minutes allows the sugar to draw out enough moisture to dissolve the cornstarch completely.
- Whisk Dry Ingredients. In a separate large bowl, combine the 1.5 cups flour, 1.5 teaspoons baking powder, and 1/2 teaspoon salt. Ensure there are no large lumps of leavening.
- Cut in the Butter. Add the 6 tablespoons of cold, cubed butter. Use a pastry cutter until the mixture looks like coarse sand with pea sized lumps. These lumps are your "flavor pockets" that create a flaky texture.
- Hydrate the Dough. Pour in the 1/2 cup whole milk and the 1/4 cup boiling water. Stir with a spatula until just combined. Note: Overmixing at this stage will develop too much gluten, making the crust tough instead of tender.
- Assemble the Topping. Drop spoonfuls of the dough over the macerated berries. Leave gaps between the scoops to allow steam to escape and juices to bubble through.
- Apply the Sugar Cap. Evenly sprinkle the 2 tablespoons of turbinado sugar over the dough. This creates the signature mahogany crunch.
- Bake for Success. Place the dish in the oven for 45 minutes. Bake until the juices are thick and bubbling vigorously and the topping has turned a deep, golden brown.
- The Rest Period. Remove from the oven and let it sit on a cooling rack for at least 15 minutes. This is the hardest part, but it allows the starch to fully set the fruit syrup.
Chef's Note: If you notice the crust is browning too quickly at the 30 minute mark, loosely tent the dish with aluminum foil. This allows the berries to keep cooking without burning the sugar cap.
Professional Strategies for Avoiding Common Baking Pitfalls
One of the most frequent issues with any fruit cobbler is the "runny filling" syndrome. If you pull the dish out too early, the cornstarch hasn't reached its full thickening potential, which occurs at the boiling point. You really need to see those juices "heaving" and bubbling in the center of the pan.
If the berries are only bubbling at the edges, give it another 5-10 minutes.
Another common mistake is using butter that is too soft. If the butter is already at room temperature when it hits the flour, it will emulsify into the dough like a cookie, rather than staying in distinct pieces. This results in a heavy, greasy topping rather than the light, shattering crust we’re aiming for.
Always keep your butter in the fridge until the very second you are ready to cut it into the dry ingredients.
Why Your Cobbler is Runny
A runny filling is usually the result of underbaking or old cornstarch. Cornstarch loses its potency over time, so check your expiration dates. Plus,, if you skipped the maceration step, the starch may not have had enough liquid to "activate" before the heat of the oven set the top crust.
| Problem | Root Cause | Solution |
|---|---|---|
| Gummy Filling | Too much cornstarch | Measure starch level; don't heap the tablespoon. |
| Tough Crust | Overmixing the dough | Stir only until flour streaks disappear. |
| Soggy Bottom | Low oven temperature | Ensure oven is fully preheated to 375°F. |
Common Mistakes Checklist
- ✓ Pat fresh berries dry after washing to avoid adding excess water to the filling.
- ✓ Use boiling water, not just hot tap water, to ensure the baking powder reacts correctly.
- ✓ Don't spread the dough into a solid sheet; those "cobbled" gaps are essential for ventilation.
- ✓ Let the cobbler rest! Cutting into it immediately will result in a messy, liquidy plate.
- ✓ Use a high-quality ceramic dish that provides even heat distribution.
Inspired Flavor Variations for the Modern Home Baker
While the classic Southern Blackberry Cobbler is hard to beat, there are ways to put your own spin on it. A popular choice is the "Shortcut Version," which involves using a pre made mix. While I always advocate for the from scratch method, sometimes life happens.
The Shortcut: Blackberry Cobbler with Bisquick
If you are in a rush, you can substitute the flour, baking powder, and salt with 1.5 cups of Bisquick mix. You’ll still want to use the cold butter and boiling water technique to maintain that specific texture, but the mix saves you the step of measuring out the individual leavening agents.
The result is a slightly saltier topping that pairs quite well with very sweet berries.
The Aromatic Twist: Ginger & Lime
For a more modern, vibrant profile, try swapping the lemon juice for lime juice and adding 1 tablespoon of freshly grated ginger to the berry mixture. The heat of the ginger provides a beautiful contrast to the deep, dark sweetness of the blackberries.
It turns a traditional dessert into something that feels a bit more "presentation ready" for a dinner party.
- If you want a crunchier crust: Increase the turbinado sugar to 3 tablespoons and add a pinch of flaky sea salt on top.
- If you want a richer filling: Stir in 1 teaspoon of vanilla paste or a splash of bourbon into the berries during maceration.
- If you want it vegan: Use a high-quality vegan butter block (cold) and unsweetened almond or soy milk.
Preservation Techniques for Keeping Your Cobbler Vibrant
Cobbler is best enjoyed warm, shortly after it has had its 15 minute rest. However, if you have leftovers, they can be stored in the refrigerator for up to 4 days. Keep the dish covered with plastic wrap or transfer to an airtight container.
Be aware that the "Sugar Cap" will lose its signature crunch over time as it absorbs moisture from the fruit. To revive it, reheat individual portions in the oven at 350°F (180°C) for about 10 minutes rather than using the microwave, which will make the topping gummy.
For long term storage, you can freeze the baked cobbler for up to 3 months. Let it cool completely, wrap it tightly in a double layer of foil, and freeze. To reheat from frozen, bake it at 350°F (180°C) for 20-25 minutes until the center is hot.
Regarding zero waste: if you have leftover berry juice at the bottom of the pan but no more crust, don't throw it out! That syrup is essentially a quick blackberry compote. Swirl it into your morning yogurt or drizzle it over oatmeal for a sustainable and delicious breakfast.
Sophisticated Garnish Strategies for a Perfectly Balanced Dessert
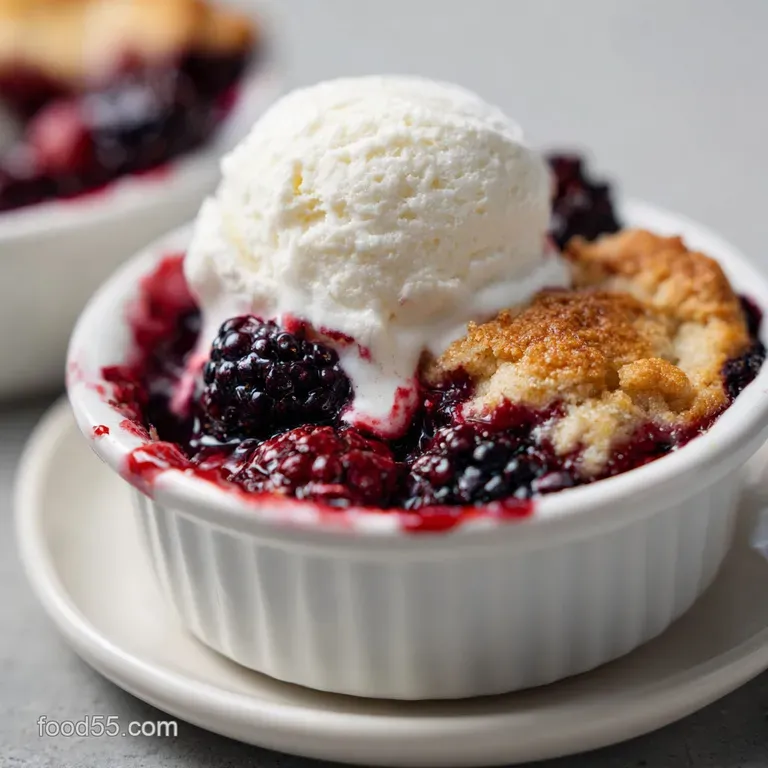
The final presentation of your Blackberry Cobbler is where you can really show off your appreciation for color balance. The deep purple of the berries is striking, and you want to choose garnishes that highlight rather than hide it. The classic choice is, of course, high fat vanilla bean ice cream.
The stark white of the cream melting into the dark purple syrup creates a beautiful marbled effect that is visually stunning.
- 1. Fresh Mint Leaves
- Add 3-4 small, vibrant green leaves just before serving to provide a pop of contrast against the dark fruit.
- 2. Lemon Zest
- A bright yellow sprinkle of fresh zest over the golden crust adds a citrus aroma and a fleck of color that ties back to the lemon juice in the filling.
- 3. Fresh Berries
- Save a handful of raw blackberries to scatter over the top after baking. The matte black of the fresh fruit provides a nice texture contrast to the jammy, cooked berries beneath.
Whether you're serving this at a summer potluck or as a quiet Tuesday night treat, these small touches make the dish feel special. The goal is to celebrate the local ingredients and the simple, honest flavors of the season. Enjoy every "shattering" bite!

Recipe FAQs
What are common cobbler topping mistakes?
Avoid spreading the dough into a solid sheet. Leaving gaps between your spoonfuls of dough is critical because it allows steam to escape, which keeps the crust from turning soggy.
Also, ensure you use boiling water as specified, as this is essential to properly activate the baking powder for the correct lift.
What's the difference between blackberry cobbler and crumble?
Cobbler uses a soft, biscuit like drop dough, while crumbles use a granular, buttery oat topping. If you enjoyed the shattering sugar crust technique used on our cobblers, you will find that a crumble lacks that same pillowy, airy interior texture.
How much blackberries do I need for a cobbler?
Use exactly 6 cups of blackberries. This amount balances perfectly with the cornstarch and sugar ratios to ensure the juices thicken into a syrup rather than remaining runny.
Is blackberry cobbler better warm or cold?
Warm is generally preferred for the best texture. Serving it warm highlights the contrast between the bubbling fruit filling and the crisp, buttery topping, though it must rest after baking to allow the juices to set properly.
Is it true I must spread the dough evenly across the berries for a smoother crust?
No, this is a common misconception. You should drop the dough in uneven spoonfuls specifically to create gaps, as these ventilation points are necessary for the steam to release and the crust to cook through without becoming dense.
How to ensure my cobbler crust doesn't turn out gummy?
Incorporate the cold, cubed butter into the flour until you see pea-sized crumbs. These small pockets of fat create steam pockets as they melt, resulting in a light, flaky texture rather than a heavy or doughy one.
How to prep the berries so they don't leak too much liquid?
Pat your fresh berries dry after washing before tossing them with the sugar and cornstarch. Allowing the mixture to sit for 15 minutes before baking is also vital, as it blooms the starch and ensures the fruit juices thicken into a jammy consistency in the oven.
Southern Blackberry Cobbler

Ingredients:
Instructions:
Nutrition Facts:
| Calories | 304 kcal |
|---|---|
| Protein | 4.3 g |
| Fat | 9.8 g |
| Carbs | 51.6 g |
| Fiber | 5.0 g |
| Sugar | 31.4 g |
| Sodium | 231 mg |
