Red White Blue Ice Cream Cake: Failure-Proof
- Time: 45 min active + 6 hours chilling
- Flavor/Texture Hook: Velvety cream cheese meets fluffy, frozen berry layers
- Perfect for: 4th of July parties or family cookouts
The smell of cocoa and vanilla fills the kitchen as the red velvet base finishes baking. There is something about that scent, combined with the anticipation of a cold dessert, that just feels like summer. I remember the first time I tried to layer ice cream without a stabilizer, and it was a disaster.
The cake slid right off the ice cream, and the whole thing looked like a melted puddle within ten minutes of hitting the table.
Now, I use a stabilized cream cheese layer. It acts like a glue that holds the red and blue layers in place. You get those clean, sharp lines when you slice into it, and the texture is silky rather than icy.
It’s the kind of dessert that brings people together, sparking conversations while everyone fights over the biggest slice.
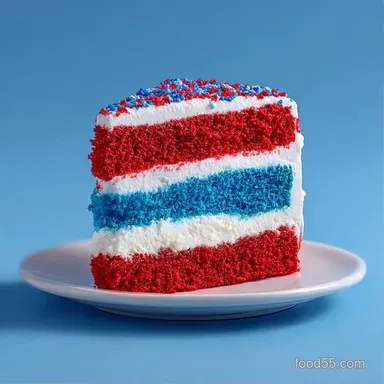
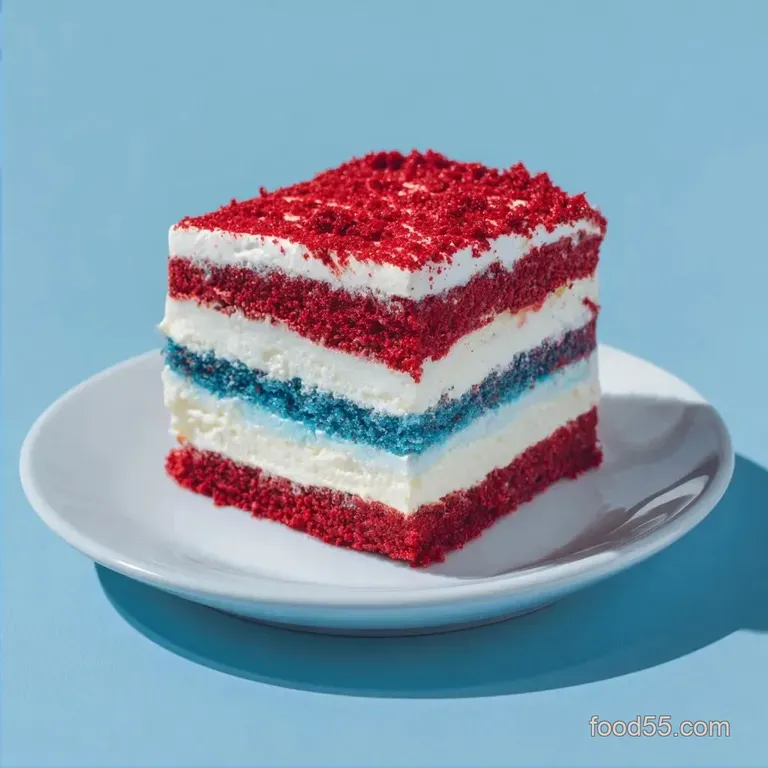
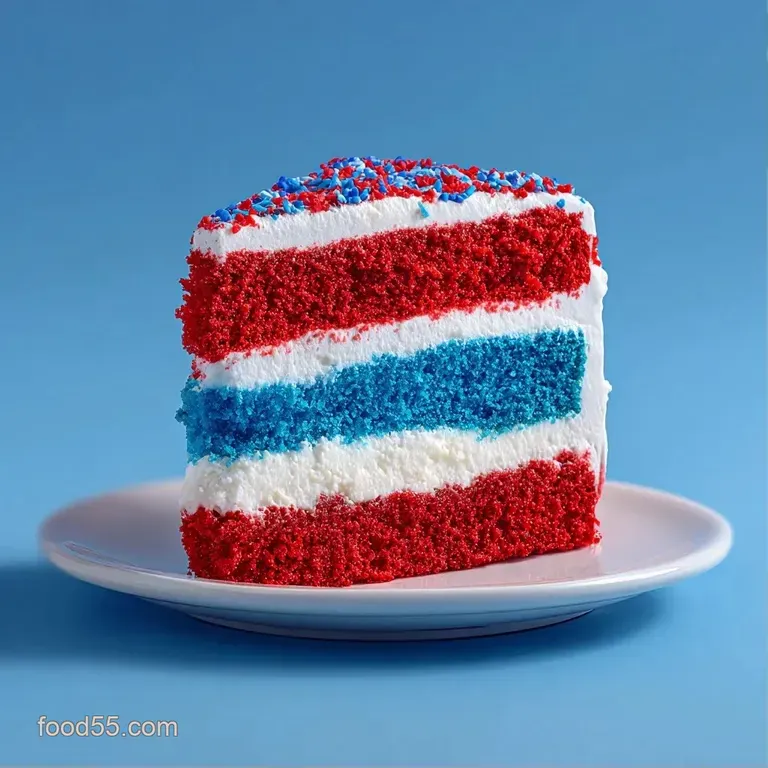
This Red White Blue Ice Cream Cake is all about the contrast. You have the dense, cocoa tinged cake on the bottom, a cloud like white center, and a refreshing, frozen berry finish. It isn't about being fancy, it's about that shared joy of a cold treat on a hot afternoon.
Red White Blue Ice Cream Cake
The secret to this dish is the temperature. If your ice cream is too hard, you'll tear the layers. If it's too soft, they'll bleed into each other. You want that "soft serve" consistency where it's pliable but still holds its shape.
I've found that folding in a bit of whipped cream into the ice cream layers makes them easier to spread. It creates a lighter, more aerated texture that blends better with the cream cheese center. Trust me on this, don't just scoop and smear.
Folding in that extra cream makes the whole thing feel more like a professional dessert and less like a frozen block.
But what about the colors? To keep the red, white, and blue distinct, you have to freeze each layer just enough to set before adding the next. If you rush it, you end up with a purple mess. Patience is the only way to get those crisp lines.
Why the Layers Stay Put
- Fat Binding: The cream cheese and heavy cream create a dense fat matrix that prevents the ice cream from melting too quickly.
- Temperature Shock: Freezing the cake base for 20 minutes creates a cold foundation that stops the first layer of ice cream from melting on contact.
- Aeration: Folding whipped cream into the ice cream reduces the density, allowing the layers to bond without needing heavy pressure from a spatula.
- Stabilization: Powdered sugar doesn't just sweeten the white layer, it helps thicken the cream cheese for a firmer structure.
| Method | Time | Texture | Best For |
|---|---|---|---|
| Scratch Cake | 90 mins | Dense/Moist | Special Occasions |
| Cake Mix | 45 mins | Light/Spongy | Quick Gatherings |
| No Bake Base | 20 mins | Chewy/Fudgy | Maximum Speed |
Component Analysis
| Ingredient | Science Role | Pro Secret |
|---|---|---|
| Cream Cheese | Structural Glue | Use full fat for maximum stability |
| Heavy Cream | Texture Modifier | Keep it ice cold until the second you whip it |
| Red Velvet Mix | Flavor Base | Add a pinch of salt to cut the sugar |
| Powdered Sugar | Stabilizer | Sift it to avoid tiny white lumps |
The Ingredient List
- 432g Red Velvet cake mix Why this? Consistent texture and deep red color
- 240ml Water
- 115g Vegetable oil
- 3 large Eggs
- 473ml Blue Moon or Vanilla ice cream (dyed blue) Why this? Provides the vibrant blue contrast
- 60ml Heavy cream (for blue layer)
- 225g Cream cheese, softened Why this? Creates the structural white center
- 100g Powdered sugar
- 240ml Heavy whipping cream, cold
- 5ml Vanilla extract
- 473ml Strawberry or Raspberry ice cream Why this? Natural red hue and tart flavor
- 60ml Heavy cream (for red layer)
Substitution Ideas
| Original Ingredient | Substitute | Why It Works |
|---|---|---|
| Vegetable Oil | Melted Butter | Richer flavor. Note: Makes the cake slightly denser |
| Red Velvet Mix | Homemade Cocoa Cake | More control over sugar. Note: Requires red food gel |
| Strawberry Ice Cream | Raspberry Sorbet | Tangier taste. Note: Less stable, may melt faster |
Right then, before we start, make sure your cream cheese is truly softened. If you see lumps in your white layer, the whole aesthetic is gone. According to King Arthur Baking, room temperature ingredients emulsify better, which is exactly what we need for that velvety center.
The Assembly Process
- Preheat oven to 350°F (175°C). Grease a 9 inch springform pan and line the bottom with parchment paper.
- Mix red velvet cake mix, water, vegetable oil, and eggs until smooth. Pour into the pan and bake for 25 minutes until a toothpick comes out clean.
- Allow the cake to cool completely, then place it in the freezer for 20 minutes to set the base.
- Beat softened cream cheese and powdered sugar until smooth. Slowly stream in vanilla extract and heavy cream, whipping on high until stiff peaks form.
- Slightly soften the blue ice cream. Fold in 60ml of whipped heavy cream and spread evenly over the frozen red cake base using an offset spatula.
- Pour the stabilized cream cheese mixture over the blue layer and smooth the top until perfectly flat.
- Slightly soften the strawberry or raspberry ice cream. Fold in the remaining 60ml of whipped heavy cream and spread as the final top layer.
- Freeze for at least 6 hours before serving to ensure structural integrity.
Chef's Note: When spreading the ice cream, use a warm metal spatula. Dip it in hot water and wipe it dry between strokes. This lets the tool glide over the ice cream without dragging the layer underneath.
Avoiding Common Blunders
Troubleshooting Common Issues
| Issue | Solution |
|---|---|
| Why Your Layers Bleed | If the ice cream is too warm, it will soak into the cake or mix with the cream cheese. You want the ice cream to be the consistency of thick frosting. |
| Why the Center is Lumpy | Lumps happen when the cream cheese isn't warm enough or the powdered sugar isn't sifted. |
| Why the Slices Crumble | This usually happens if you cut the cake while it's too cold or if the base didn't set. Let the cake sit on the counter for 5-10 minutes before slicing. Use a knife dipped in hot water for each cut. |
Success Checklist
- ✓ Cream cheese is room temperature before mixing
- ✓ Cake base is completely chilled before first layer
- ✓ Ice cream is folded with whipped cream for spreadability
- ✓ Knife is heated between every single slice
Customizing Your Dessert
If you want a different flavor profile, try using a blueberry ice cream for the blue layer and a cherry ice cream for the red. It gives the dessert a more "forest berry" vibe. For those who love a bit more texture, you could press some crushed cookies into the bottom of the red velvet base. If you're in the mood for something a bit crunchier, my NoBake Homemade Crunch Bars are a great companion treat for a dessert table.
For a dairy-free version, use a coconut based cream cheese substitute and cashew based ice creams. The structure will be slightly different, so I recommend freezing the cake for 8 hours instead of 6 to ensure the plant based fats have fully set.
Adjusting the Size
Scaling Down (Half Batch) Use a 6 inch springform pan. Reduce the baking time by about 20%, as a smaller cake cooks faster. For the eggs, beat one egg in a bowl and use half of the liquid.
Scaling Up (Double Batch) You'll need two 9 inch pans. Don't double the salt or vanilla exactly; use 1.5x the amount to avoid an overpowering taste. Work in batches when whipping the cream so you don't overflow your mixer bowl.
Dessert Myths
Myth: You must use a professional ice cream maker for the layers. Truth: Not at all. high-quality store-bought ice cream works perfectly here. The folding technique with heavy cream provides all the texture adjustment you need.
Myth: Red velvet is just chocolate cake with food coloring. Truth: While similar, traditional red velvet uses a reaction between cocoa, vinegar, and buttermilk to create a specific crumb and tang. The cake mix simplifies this, but the flavor profile remains distinct from a standard chocolate cake.
Storage and Waste Tips
Keep this cake in the freezer in an airtight container or wrapped tightly in plastic wrap. It will stay fresh and velvety for up to 2 months. If you keep it in the fridge, it will turn into a soft, mousse like dessert within a few hours, which is actually great if you prefer a spoon dessert over a slice.
To avoid waste, if you have leftover red velvet cake scraps from leveling the top, crumble them up. Mix the crumbs with a bit of melted butter and sugar, then toast them in the oven for 5 minutes. Use these "cake sprinkles" to garnish the top of the cake for added texture.
Plating and Serving
For the best look, slice the cake into thin wedges. Use a hot knife to get those sharp, contrasting lines. I like to serve this on a white platter to make the colors pop. If you're putting together a larger spread, this cake fits perfectly alongside a New Years Eve Charcuterie Board or any party platter with fresh berries.
Top each slice with a single fresh raspberry and a blueberry for a natural touch. A small dollop of whipped cream on the side helps balance the richness of the cream cheese. Serve it immediately from the freezer to ensure the layers stay distinct and the colors stay bold.
Recipe FAQs
How to make the red velvet cake base?
Preheat oven to 350°F (175°C). Mix red velvet cake mix, water, vegetable oil, and eggs until smooth, then bake in a greased 9 inch springform pan for 25 minutes.
Why are my ice cream layers bleeding into each other?
The ice cream is too warm. To prevent it from soaking into the cake or mixing with the cream cheese, ensure the ice cream has the consistency of thick frosting before spreading.
How long can I store this cake in the freezer?
Up to 2 months. Keep the cake in an airtight container or wrap it tightly in plastic wrap to maintain its velvety texture.
Why is the cream cheese layer lumpy?
The cream cheese was not soft enough. Ensure your cream cheese is fully softened and the powdered sugar is sifted before beating the mixture.
How to prevent the slices from crumbling when serving?
Let the cake sit on the counter for 5-10 minutes. Dip your knife in hot water before each cut to ensure clean, sharp edges through the frozen layers.
Is it true that the cake can be served after only one hour of freezing?
No, this is a common misconception. You must freeze the cake for at least 6 hours to ensure the structural integrity of the layers.
What is the best way to serve this cake for a holiday dinner?
Pair it with a refreshing drink. Since this is a rich dessert, it pairs perfectly with a classic mint julep to balance the sweetness.
Red White Blue Ice Cream Cake