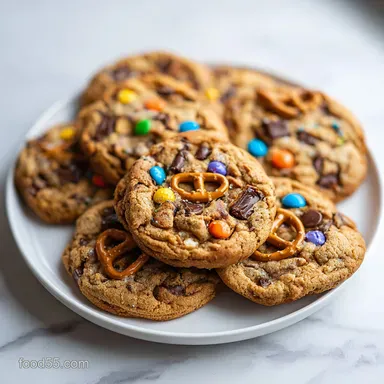
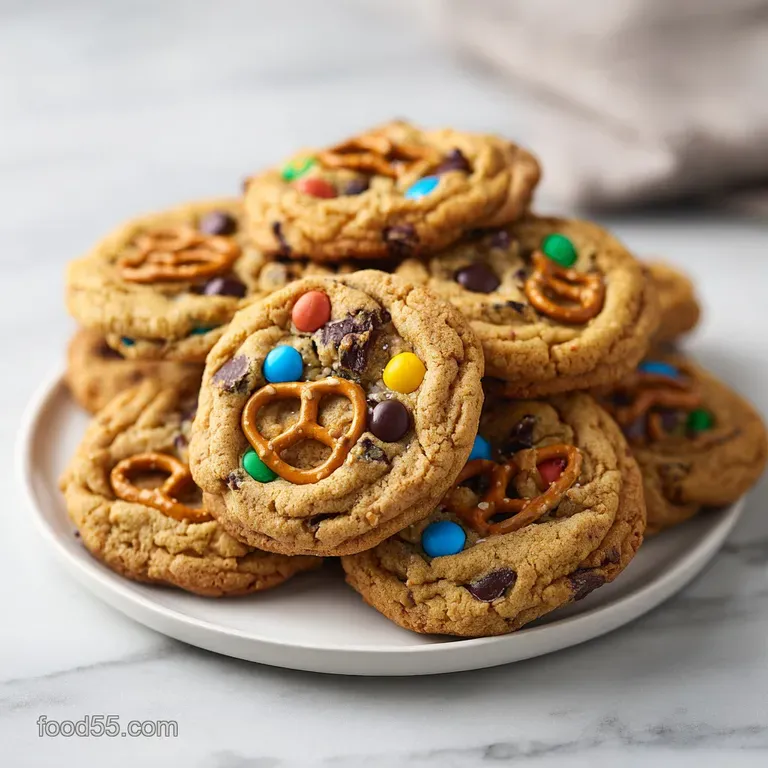
Brown Butter Kitchen Sink Cookies: Salty and Sweet
- Time:15 minutes active + 30 minutes chilling = Total 62 minutes
- Flavor/Texture Hook: Shatter crisp potato chips meeting velvety melted chocolate
- Perfect for: Late night cravings or sharing with a group of friends
- The Ultimate Kitchen Sink Cookies
- Why This Dough Actually Works
- Choosing Your Batch Size
- Ingredient Role Analysis
- The Pantry Essentials
- Tools for the Job
- Steps to Cookie Heaven
- Fixing Common Cookie Fails
- Troubleshooting Common Issues
- Customizing Your Mix Ins
- Debunking Cookie Myths
- Keeping Cookies Fresh
- Tasty Pairings and Sides
- Recipe FAQs
- 📝 Recipe Card
The Ultimate Kitchen Sink Cookies
That first smell hits you the second the butter starts to foam in the pan. It's not just melted butter, it's this deep, toasted, hazelnut like aroma that fills every corner of the kitchen.
I remember making these for a group of friends during a rainy weekend when we had absolutely nothing "proper" in the pantry, just half a bag of pretzels and some leftover potato chips.
We just threw it all in, and the look on their faces when they realized the saltiness of the chips actually made the chocolate taste richer was honestly the highlight of my month.
These cookies aren't about being dainty or precise. They're about that chaotic, wonderful feeling of a shared meal where nobody is counting calories and everyone wants a second one. When you pull them out of the oven, the house smells like a high end bakery mixed with a snack aisle, and that's exactly why they work.
You've got the chew, the crunch, and that hit of salt that keeps you coming back.
You can expect a cookie that's thick, slightly underbaked in the middle for that fudgy feel, and loaded with textures. We're talking about the shatter of a pretzel, the gooey pull of a caramel, and the silky melt of semi sweet chocolate.
Trust me on this, don't be tempted to skip the chilling step, or you'll end up with one giant pancake on your baking sheet.
Why This Dough Actually Works
I spent a lot of time wondering why some "everything" cookies just taste like a mess and others taste like a masterpiece. It comes down to a few basic things that happen in the pan and the fridge.
The Nutty Base: Browning the butter removes water and toasts the milk solids, which adds a layer of complexity that regular melted butter just can't touch. This provides a savory backbone that supports the heavy amount of sugar.
Structure Support: By chilling the dough for 30 minutes, we solidify the fats. This ensures the cookies hold their shape and don't spread too thin under the weight of the peanuts and chips.
Salt Balance: The combination of sea salt in the dough and the salted mix ins creates a contrast. This prevents the sugar from becoming cloying and makes the chocolate pop.
Moisture Control: Using brown sugar adds molasses, which keeps the center velvety while the edges get that golden, crisp finish.
Choosing Your Batch Size
Since these are usually for a crowd, you might need more than a dozen. Here is a quick guide on how to adjust the recipe based on how many people you're feeding.
| Servings | Ingredient Adjustments | Pan Size | Cook Time |
|---|---|---|---|
| 15 cookies | Standard (as listed) | 2 Large Sheets | 10-12 mins |
| 30 cookies | Double all ingredients | 4 Large Sheets | 10-12 mins |
| 45 cookies | Triple all ingredients | 6 Large Sheets | 11-13 mins |
Right then, once you've decided on your batch size, you need to understand what each ingredient is actually doing. It's not just about throwing things in the sink, it's about balance.
Ingredient Role Analysis
I've found that if you swap out the wrong thing, the whole texture falls apart. Here is the breakdown of why we use these specific components.
| Ingredient | Science Role | Pro Secret |
|---|---|---|
| Browned Butter | Flavor Base | Cool it slightly before mixing to avoid melting the sugar too fast |
| Brown Sugar | Texture & Color | Pack it tight for a denser, chewier cookie center |
| Baking Soda | Lift & Spread | Sift it with flour to avoid those bitter little clumps |
| Sea Salt | Flavor Enhancer | Use a flaky variety on top after baking for an extra punch |
The Pantry Essentials
For these, you don't need anything fancy, just the basics and a few snack drawer staples. If you're looking for other treats to make with your pantry, you might enjoy these easy shortbread cookies for something a bit more understated.
- 1 cup (225g) unsalted butter, browned and cooled slightly Why this? Provides the toasted, nutty flavor base
- 3/4 cup (150g) brown sugar, packed Why this? Adds moisture and a deep caramel note
- 1/2 cup (100g) granulated sugar Why this? Helps create those crisp, golden edges
- 1 large (50g) egg, room temperature Why this? Binds everything and adds structure
- 2 tsp (10ml) vanilla extract Why this? Rounds out the sweetness
- 2 1/4 cups (280g) all purpose flour Why this? The main structure of the cookie
- 1 tsp (5g) baking soda Why this? Causes the cookies to rise and brown
- 1/2 tsp (3g) sea salt Why this? Cuts through the richness
- 1 cup (170g) semi sweet chocolate chips Why this? Classic sweetness and melt
- 1/2 cup (60g) ridged potato chips, roughly chopped Why this? Adds a salty, shatter crisp texture
- 1/2 cup (60g) mini pretzels, crushed Why this? Adds a distinct crunch and salt
- 1/2 cup (115g) caramels or toffee bits, chopped Why this? Creates gooey, chewy pockets
- 1/2 cup (60g) roasted salted peanuts Why this? Adds an earthy, savory crunch
| Original Ingredient | Substitute | Why It Works |
|---|---|---|
| Unsalted Butter | Salted Butter | Similar fat content. Note: Reduce sea salt by 1/4 tsp to avoid oversalting |
| All Purpose Flour | Almond Flour | gluten-free alternative. Note: Results in a denser, softer crumb |
| Semi sweet Chips | Dark Chocolate | Higher cocoa content. Note: Less sweet, more intense chocolate flavor |
| Peanuts | Pecans | Similar fat and crunch. Note: Adds a more buttery, rich taste |
Tools for the Job
You don't need a professional kitchen to make these, but a few specific tools make the process way smoother. I usually use a medium saucepan for the butter and a sturdy spatula for folding.
First, a mixing bowl that's larger than you think you need. When you start adding the chips, pretzels, and peanuts, the volume grows quickly, and you don't want ingredients flying over the side.
A baking sheet lined with parchment paper is non negotiable. These cookies have caramels and chocolate that can stick to the pan, and scrubbing burnt caramel off a tray is a nightmare I wouldn't wish on anyone.
Finally, a cookie scoop (about 3 tablespoons) helps keep the sizes consistent. If some are huge and some are tiny, the small ones will burn before the big ones are even set.
Steps to Cookie Heaven

Let's crack on with the actual making. Pay close attention to the smells and colors, as that's how you'll know you're on the right track.
- Melt the butter in a saucepan over medium heat, whisking constantly. Watch for the milk solids to turn a deep mahogany color and smell nutty. Remove from heat immediately so it doesn't burn.
- Cream together the browned butter, brown sugar, and granulated sugar. Mix until it looks like wet sand.Note: Don't overbeat here, we just want them combined.
- Beat in the egg and vanilla extract. Continue until the batter looks glossy and smooth.
- Sift in the flour, baking soda, and sea salt. Fold with a spatula until just combined and no white streaks remain.
- Gently stir in the chocolate chips, potato chips, pretzels, and caramels. Be careful not to overmix or you'll crush the chips.
- Chill the dough in the refrigerator for 30 minutes. This prevents the cookies from spreading into one giant sheet.
- Scoop 3 tablespoon portions onto your lined baking sheets. Leave about 2 inches of space between each.
- Bake at 350°F (175°C) for 10-12 minutes until edges are golden but centers still look slightly underbaked.
- Let the cookies rest on the pan for 5 minutes. The carryover heat finishes the cooking in the middle. Then transfer to a wire rack.
Chef's Note: If you want a more professional look, press a few extra chocolate chips and a piece of pretzel into the top of each cookie immediately after they come out of the oven.
Fixing Common Cookie Fails
Even for those of us who live in the kitchen, things can go sideways. Most cookie issues come down to temperature or mixing.
Troubleshooting Common Issues
| Issue | Solution | |||
|---|---|---|---|---|
| Why Your Cookies Spread Too Much | This usually happens if the butter was too hot when you added the sugars, or if you skipped the 30 minute chill. When the fat is too liquid, it doesn't hold the structure of the flour, and the cookies | |||
| Why the Mix ins Fall Out | If your chips and pretzels are just sitting on top rather than embedded, it's often because the dough was too stiff or the mix ins were added too quickly. Folding them in gently but thoroughly is the | |||
| Why the Bottoms Are Burnt | This is often caused by a dark colored baking sheet that absorbs too much heat or an oven rack that's too low. Moving the rack to the center position usually solves this. | Problem | Root Cause | Solu |
Customizing Your Mix Ins
The beauty of this recipe is that it's a template. While the classic mix is great, you can definitely tweak it to fit what's in your cupboard. If you enjoy a more traditional cookie base, you could try some peanut butter cookies for a different kind of salty sweet vibe.
For a more "Christmas" version, swap the potato chips for crushed candy canes and the peanuts for dried cranberries. It turns into a festive treat that looks as good as it tastes.
If you're going for a gluten-free version, you can use a 1:1 gluten-free baking flour. Just be aware that the texture will be a bit more fragile, so let them cool completely on the pan before moving them.
Another favorite of mine is the "Dark & Salty" version. Use 70% dark chocolate, add a pinch of espresso powder to the flour, and use smoked sea salt on top. It makes the cookie feel a bit more adult and less like a snack drawer experiment.
| Method | Time | Texture | Best For |
|---|---|---|---|
| Standard Oven | 62 min | Balanced Chew | Classic batches |
| Air Fryer | 45 min | Crispier Edges | Small 2-3 cookie cravings |
| Convection | 55 min | Evenly Golden | Large party batches |
Debunking Cookie Myths
There's a lot of advice out there that just doesn't hold up in a real home kitchen. Let's clear a few things up.
One big myth is that you need to "cream" butter and sugar for 5 minutes to get the right lift. While that's true for fluffy cakes, for these cookies, we want a denser, chewier result. Over creaming adds too much air, which can make the cookies cakey rather than fudgy.
Another one is that you should never use melted butter. In reality, melted or browned butter is exactly what gives these cookies their rich, toffee like flavor and denser texture. Cold butter is for shortbread; browned butter is for decadence.
Keeping Cookies Fresh
Since these have a lot of moisture from the caramels and fats from the nuts, they can go soft if you're not careful.
Store these in an airtight container at room temperature for up to 4 days. If you want to keep them longer, the freezer is your best friend. I like to freeze the scooped dough balls on a tray first, then toss them into a freezer bag.
You can bake them straight from frozen - just add 2 minutes to the cook time.
To reheat, just pop a cookie in the microwave for 8-10 seconds. It brings the chocolate and caramel back to that velvety, melty state, making it feel like they just came out of the oven.
For zero waste, if you have leftover browned butter in the pan, don't wash it out! Use it to sauté some mushrooms or stir it into a batch of mashed potatoes for a nutty, savory twist.
Tasty Pairings and Sides
These cookies are incredibly rich, so you need something to cut through that sweetness. A cold glass of whole milk is the classic choice, but a tart Granny Smith apple slice on the side works wonders.
If you're serving these at a party, try pairing them with a strong, bitter coffee or a dark roast. The bitterness of the coffee balances the sugar and salt of the cookies perfectly.
For a more indulgent treat, serve a warm cookie with a scoop of vanilla bean ice cream and a drizzle of salted caramel sauce. It's a total dessert overload, but that's exactly why we make kitchen sink cookies in the first place.
Recipe FAQs
Why do they call it a Kitchen Sink Cookie?
It refers to the phrase "everything but the kitchen sink." This means the cookie includes a wide variety of sweet and salty mix-ins rather than just one type of chocolate.
What does a Kitchen Sink Cookie have in it?
It contains a mix of salty and sweet ingredients. This specific recipe uses chocolate chips, potato chips, pretzels, caramels, and roasted salted peanuts.
Why do I need to chill the dough for 30 minutes?
It prevents the cookies from spreading too thin. Chilling firms up the browned butter so the cookies maintain their thickness and chewy texture during baking.
How to brown the butter for this recipe?
Melt butter in a saucepan over medium heat while whisking constantly. Remove it from the heat immediately once the milk solids reach a mahogany color and smell nutty.
Why did my cookies spread too much during baking?
The butter was likely too hot when mixed or the dough wasn't chilled. If the fat is too liquid, it cannot support the flour's structure. If you enjoyed controlling cookie spread here, the same fat ratio logic applies to our chewy chocolate chip cookies.
Is it true I can skip browning the butter to save time?
No, this is a common misconception. Browning the butter creates the deep, nutty flavor profile essential for balancing the salty pretzels and potato chips.
How to tell when the cookies are perfectly baked?
Bake until the edges are golden but the centers remain slightly underbaked. Let them rest on the baking pan for 5 minutes to finish setting before transferring to a wire rack.
Brown Butter Kitchen Sink Cookies