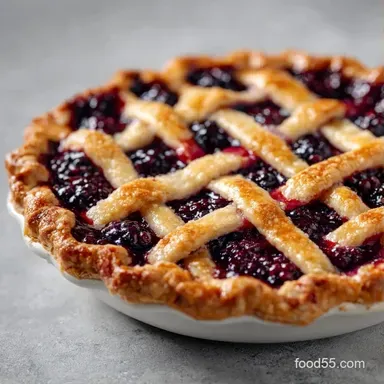
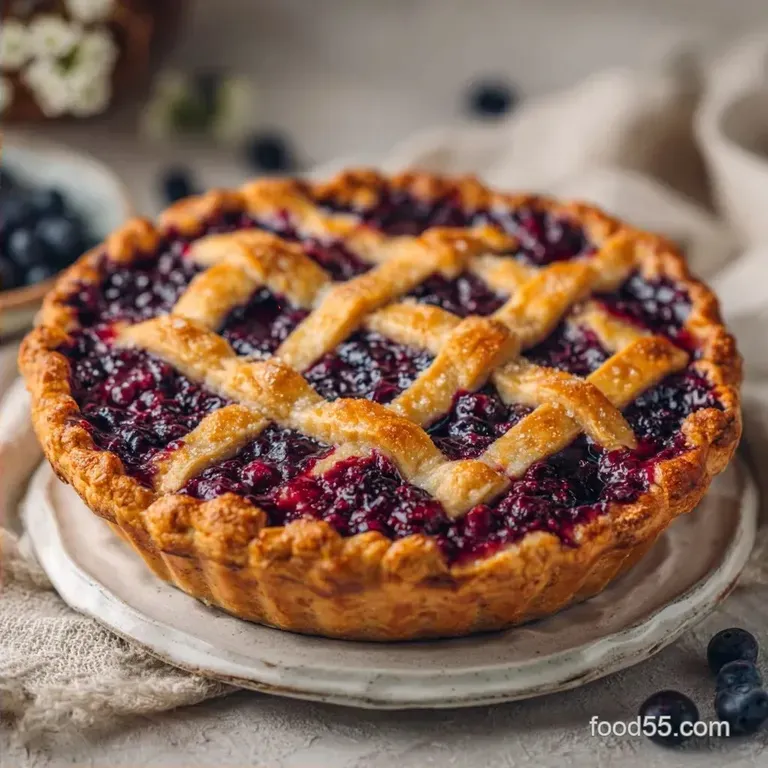
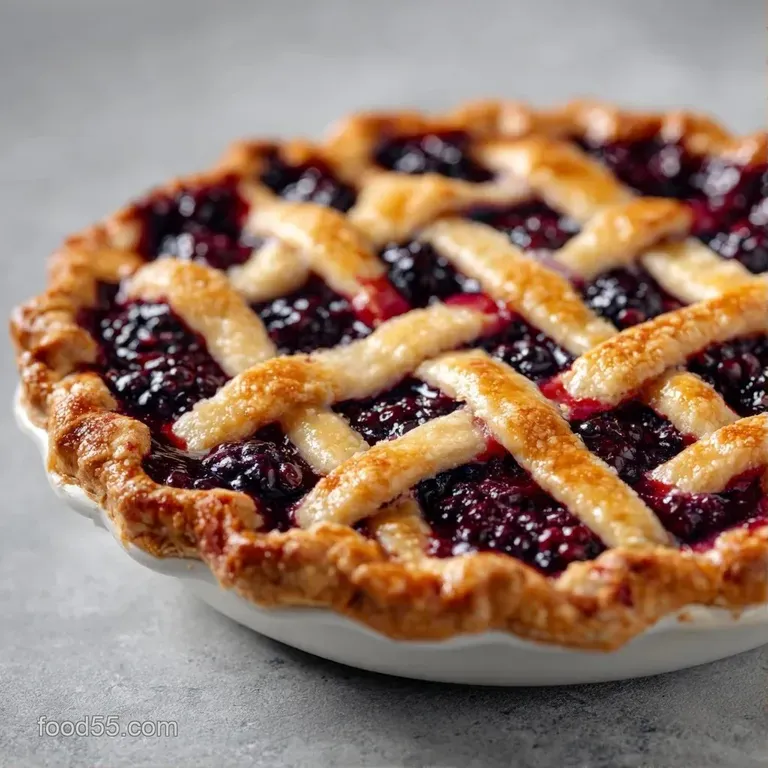
Old Fashioned Fresh Mulberry Pie: Flaky and Tart
- Time: 30 min active + 55 min baking
- Flavor/Texture Hook: Velvety berries in a mahogany, flaky crust
- Perfect for: Seasonal summer gatherings or a cozy weekend dessert
Fresh Mulberry Pie
The scent of simmering berries and toasted butter always takes me back to my grandmother's backyard. I remember spending entire July afternoons under the heavy branches of her mulberry tree, my fingers stained a deep, stubborn purple that wouldn't wash off for days.
Those berries are different from blackberries - they're softer, sweeter, and have this wild, honey like quality that disappears the moment they hit the heat of the oven.
For a long time, I tried using frozen berries or substituting with raspberries, but it never hit the mark. The moisture content is just different. When you use local, seasonal produce, the filling has a natural thickness that doesn't need a mountain of thickener. This Fresh Mulberry Pie is all about celebrating that short window when the berries are ripe and bursting.
You can expect a dessert that isn't overly sweet. The tartness of the lemon juice cuts through the richness of the butter crust, creating a balance that lets the berries be the star. It's a rustic dish, meant to be served warm with a scoop of ice cream melting down the side.
Why Most Recipes Fail
Most people treat mulberry pie like a standard blueberry pie, but that's where the trouble starts. Mulberries are significantly more delicate and release more liquid than blueberries. If you don't account for that extra juice, you end up with a "soup" inside a soggy shell.
The Sugar Trap
Adding too much sugar early on draws the water out of the fruit too quickly. This leads to a filling that separates, leaving you with a layer of syrup at the bottom and mushy berries on top. The trick is to whisk the sugar with the cornstarch first, ensuring every berry is coated evenly before it hits the oven.
The Moisture Mistake
Many recipes skip the chilling step for the crust. When the dough goes from room temperature straight into a hot oven, the butter melts too fast. You lose those tiny pockets of steam that create a flaky texture. If the dough isn't cold, it shrinks during baking, leaving a gap between the crust and the filling.
The Temperature Gap
Baking at one constant temperature often leads to a dilemma: either the crust is burnt and the middle is raw, or the crust is pale and the filling is overcooked. By starting high to set the crust and then dropping the heat, you get a mahogany finish without scorching the sugar in the filling.
Recipe Specs
When you're timing your day, remember that the active work is mostly in the crust. The filling comes together in minutes, but the bake time is non negotiable.
Time and Yield
- Prep time:30 minutes
- Cook time:55 minutes
- Total time: 1 hour 35 mins
- Servings: 8 servings
Cooking Method Comparison
| Feature | Oven Method (This Recipe) | Stovetop Pre Cooked |
|---|---|---|
| Texture | Fresh, jammy, slightly tart | Thicker, more like a preserve |
| Bake Time | Longer (55 mins) | Shorter (30-40 mins) |
| Best For | Vibrant, seasonal flavor | Guaranteed stability |
What You'll Need
The quality of your butter makes or breaks this. I always use unsalted butter so I can control the salt levels in the crust. If you're looking for more tips on pastry textures, King Arthur Baking has some great guides on fat distribution.
Crust Ingredients
- 2.5 cups (310g) all purpose flour
- 1 cup (225g) unsalted butter, chilled and cubedWhy this? High fat creates the shatter crisp layers
- 1 tsp (6g) salt
- 1 tbsp (12g) granulated sugar
- 8 tbsp (120ml) ice water
Filling Ingredients
- 5 cups (750g) fresh mulberriesWhy this? Local seasonal berries have the best pectin
- 0.5 cup (100g) granulated sugar
- 3 tbsp (25g) cornstarchWhy this? Holds the juice without tasting like paste
- 1 tbsp (15ml) lemon juice
- 1 tsp (5ml) vanilla extract
- 0.25 tsp (1g) ground cinnamon
- 1 tbsp (15g) unsalted butter (for dotting)
Substitution Options
| Original Ingredient | Substitute | Why It Works |
|---|---|---|
| Fresh Mulberries | Blackberries | Similar tartness. Note: Seeds are larger and crunchier |
| All Purpose Flour | 1:1 gluten-free Blend | Works for texture. Note: Crust may be more fragile |
| Unsalted Butter | Vegan Butter Sticks | Maintains fat ratio. Note: Check for salt content |
Essential Equipment
You don't need a professional kitchen, but a few things make this way easier. A 9 inch pie dish is standard, but make sure it's glass or ceramic to handle the temperature shift.
- 9 inch pie plate: Glass or ceramic.
- Rolling pin: For an even crust.
- Large mixing bowl: To toss the berries without crushing them.
- Whisk: For combining the cornstarch and sugar.
- Pastry cutter or forks: To incorporate the cold butter.
Step-by-step Guide
Right then, let's get into the actual making. Be gentle with the berries; they bruise easily.
- Roll the base. Roll the first dough disk on a floured surface until it's 2 inches wider than your 9 inch dish. Press it in and put the whole thing in the freezer for 10 minutes. Note: This stops the dough from sliding down the sides.
- Prep the berries. In a large bowl, toss the fresh mulberries with lemon juice, vanilla, and cinnamon.
- Thicken the mix. Whisk the sugar and cornstarch in a small bowl, then fold it into the berries. Do this gently so the berries stay whole.
- Fill the shell. Pour the mulberry filling into the chilled crust.
- Add fat. Dot the top of the filling with small pieces of the 1 tbsp unsalted butter. Note: This adds a velvety richness to the sauce.
- Seal the pie. Cover with the second crust, seal the edges with a firm crimp, and cut three 1 inch vents in the center.
- Initial blast. Bake at 375°F (190°C) for 15 minutes until the edges start to set.
- Final bake. Reduce heat to 350°F (175°C) and bake for another 30-40 minutes until the crust is mahogany colored and the filling bubbles through the vents.
Pro Tips and Pitfalls
I've had my share of "pie disasters," usually involving a bottom crust that felt like a wet sponge. To avoid that, don't overwork the dough. If you knead it too much, you develop gluten, and the crust becomes tough instead of flaky.
Chef's Note: To get those professional looking edges, use a fork to press the dough into the rim of the plate, then use your thumb to smooth it out before crimping.
Troubleshooting Common Issues
| Issue | Solution |
|---|---|
| Why Your Crust Is Tough | If the crust feels more like bread than pastry, you likely used too much water or rolled it too many times. The goal is to see visible chunks of butter in the dough before it goes into the oven. |
| Why Your Filling Is Runny | This usually happens if the berries were frozen or if you skipped the cornstarch sugar whisking step. The cornstarch needs to be evenly distributed to catch the juices as they release. |
| Why The Bottom Is Pale | A pale bottom usually means the heat didn't reach the base. If you have a baking sheet, place your pie dish on it to help conduct heat more evenly. Troubleshooting Guide |
Common Mistakes Checklist
- ✓ Did you use ice cold water for the crust?
- ✓ Is the oven preheated to 375°F for the first 15 minutes?
- ✓ Did you whisk the sugar and cornstarch together before adding to fruit?
- ✓ Are the vents large enough for steam to escape?
- ✓ Did you let the pie cool for at least 2 hours before slicing?
Variations and Substitutions
If you're feeling adventurous, you can tweak this. I love a Cookie Dough Reese's as a separate treat, but for this pie, keep the flavors natural.
Mulberry Pie Crumble
Instead of a second crust, mix 1 cup flour, 1/2 cup brown sugar, and 1/2 cup cold butter. Rub it together until it looks like wet sand and pile it on top of the berries.
Blackberry Mulberry Blend
If you can't find enough mulberries, blend them 50/50 with blackberries. The blackberries add a bit more structure and a deeper purple hue.
Gluten-free Crust Swap
Use a 1:1 gluten-free flour blend. You'll need to be extra careful when rolling, as the dough lacks elasticity. Chill it for 20 minutes instead of 10.
Adjustment Guide
- Scaling Down (1/2 size): Use a 6 inch pan. Reduce bake time by 20% and use one egg white if you're doing an egg wash.
- Scaling Up (2x size): Bake in two separate 9 inch pans. Do not double the thickness in one pan or the middle will never cook.
Freezing and Reheating Guide
This pie holds up surprisingly well in the cold. The keys are the cooling process and the container.
Fridge and Freezer
- Fridge: Store in an airtight container for up to 5 days.
- Freezer: You can freeze the unbaked pie for 2 months. Wrap the crust in plastic and the filling in a separate freezer bag.
- Zero Waste: Don't throw away the mulberry stems if you're foraging. While you can't put them in the pie, they make a decent, mild tea when steeped in hot water.
Reheating Specifics Avoid the microwave; it makes the crust chewy. Put a slice in a 300°F (150°C) oven for 10 minutes. It brings back that mahogany crispness and makes the filling velvety again.
Serving and Plating
Depending on who you're feeding, you can change how you present this Fresh Mulberry Pie. Since the colors are so vibrant, the presentation does most of the work for you.
Plating Levels
| Level | Style | Key Tweaks |
|---|---|---|
| Simple | Home Style | Warm slice on a plain white plate |
| Polished | Dinner Party | Dust with powdered sugar, add a mint leaf, side of vanilla ice cream |
| Restaurant | Professional | Offset slice, berry reduction drizzle, quenelle of whipped cream |
If you want a more savory contrast for your meal, you could serve a side of Homemade Slow Cooker BBQ Sauce with some grilled meats before bringing this out for dessert.
Decision Shortcut
- If you want it extra tart → Add 1 tsp extra lemon juice.
- If you want a crunchier top → Brush the crust with heavy cream and sprinkle coarse sugar.
- If you're short on time → Use a store-bought refrigerated crust (though it won't be as flaky).
This Fresh Mulberry Pie is a reminder of why seasonal cooking is so rewarding. It’s not about having the most expensive tools, but about using the right ingredients at the right time. Once you taste the difference between fresh and frozen berries, you'll never go back. Let's crack on and get baking!
Recipe FAQs
Why are mulberries not sold in grocery stores?
They are too fragile for commercial shipping. Their short shelf life and tendency to bruise easily make them impractical for mass distribution.
How many mulberries do you need for a pie?
Use 5 cups (750g) of fresh mulberries. This amount ensures a full, hearty filling for a standard 9 inch pie dish.
How do you prepare mulberries for pie?
Toss the berries with lemon juice, vanilla, and cinnamon. Fold in a whisked mixture of sugar and cornstarch to ensure a velvety consistency.
Why is my pie filling runny?
You likely skipped the cornstarch whisking step or used frozen berries. Cornstarch must be evenly distributed to effectively thicken the juices as they release during baking.
How do I prevent the crust from shrinking?
Chill the pressed dough in the freezer for 10 minutes. This sets the fat and prevents the sides from sliding down the pie plate. If you enjoyed working with this pastry dough, see how we adapt dough handling for our garlic herb bread.
Is it true that frozen mulberries work just as well as fresh?
No, this is a common misconception. Frozen berries release significantly more moisture, which often results in a runny filling regardless of the thickener used.
How should I bake the pie for a mahogany crust?
Bake at 375°F (190°C) for 15 minutes, then reduce to 350°F (175°C) for 30-40 minutes. This two-stage temperature method sets the crust first before slowly browning the exterior.
Fresh Mulberry Pie