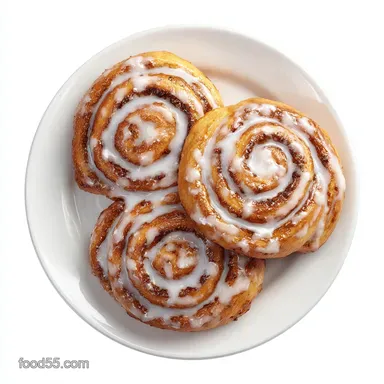
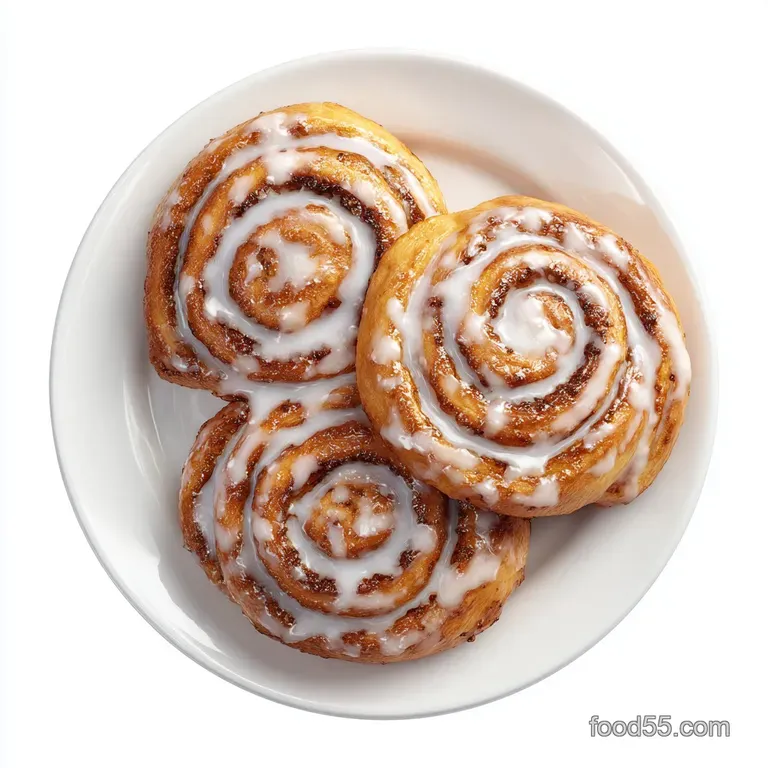
Cinnamon Rolls: Foolproof and Without Yeast

- Time: 20 min active + 25 min baking = Total 45 mins
- Flavor/Texture Hook: Velvety glaze over warm, buttery swirls
- Perfect for: Lazy Sunday mornings or sudden dessert cravings
That smell hits you the second you open the oven door - a warm, spicy cloud of cinnamon and melted butter that fills every corner of the house. I remember one rainy Tuesday when I wanted something cozy but realized my yeast was expired.
I spent an hour trying to "revive" it with warm water and sugar, only to end up with a flat, sad mess of dough.
That failure led me to experiment with self rising flour. I wanted that same spiral of sweetness without the stressful waiting game. After a few batches, I realized that skipping the yeast actually gives you a different, almost nostalgic texture, like a cross between a pastry and a fluffy biscuit.
These Cinnamon Rolls are for the days when you want the reward without the labor. You get the soft pull, the sugary gooeyness, and that hit of vanilla, all in under an hour. Trust me, once you try the no yeast method, you'll keep it in your back pocket for those "I need it now" moments.
Fluffy and Fast Cinnamon Rolls
The real magic here is the speed. Most people think you need a whole afternoon to get a decent roll, but this version proves otherwise. Since we aren't waiting for biological bubbles to form, we're relying on the quick reaction of baking powder.
It's basically a high speed version of the classics, and honestly, it's just as satisfying.
When you first roll out the dough, it feels a bit more like a pie crust than a bread dough, but don't let that fool you. Once it hits the heat, it puffs up into these pillowy spirals. I've found that the secret to the "wow" factor is the temperature of the butter.
If it's too warm, the rolls flatten; if it's just right, they stay tall and airy.
Right then, let's look at why this specific method actually works. It's not just about cutting corners; it's about using different tools to get to the same destination of sugary bliss.
Understanding the Lift
- Rapid Air Pockets: The baking powder in the self rising flour reacts instantly with the heat and moisture, creating bubbles that push the dough upward.
- Cold Fat Pockets: Using cold cubed butter creates tiny layers of fat that steam during baking, which helps the rolls feel light rather than dense.
- Sugar Softening: The brown sugar in the filling melts into a syrup that steams the dough from the inside out, keeping the center velvety.
- Immediate Glazing: Applying the glaze while the rolls are hot allows some of it to soak into the crumb, ensuring they don't dry out.
| Method | Rise Time | Texture | Best For |
|---|---|---|---|
| Fast (No Yeast) | 0 mins | Tender, biscuit like | Quick cravings |
| Classic (Yeast) | 2-3 hours | Chewy, bread like | Traditional brunch |
When you're working with dough, the feel is everything. If you've ever made fluffy homemade naan, you know that overworking the dough is the enemy. The same applies here. The moment the flour disappears, you stop. If you keep kneading, you develop too much gluten, and your rolls will be tough instead of tender.
Component Analysis
| Ingredient | Science Role | Pro Secret |
|---|---|---|
| Self Rising Flour | Leavening & Structure | Sift it if it looks clumpy for a smoother roll |
| Cold Butter | Flakiness | Keep it in the fridge until the exact second you need it |
| Brown Sugar | Moisture & Flavor | Pack it tight for a more concentrated caramel swirl |
| Heavy Cream | Glaze Stability | Use full fat to prevent the glaze from becoming translucent |
Shopping List Breakdown
For the dough: 2 cups (250g) self rising flour Why this? Contains pre mixed baking powder and salt for speed 1/4 cup (50g) granulated sugar Why this? Adds sweetness and helps with browning 1/4 cup (60ml) cold unsalted butter, cubed Why
This? Creates the flaky, tender layers 3/4 cup (180ml) cold whole milk Why this? Provides fat and moisture for a soft crumb 1 tsp (5ml) vanilla extract Why this? Adds a floral depth to the dough
For the filling: 1/4 cup (55g) unsalted butter, softened Why this? Needs to be spreadable without tearing the dough 1/2 cup (100g) packed light brown sugar Why this? Molasses notes create a caramel like flavor 2 tbsp (16g) ground cinnamon
Why this? The star spice - use fresh for better aroma
For the glaze: 1 cup (120g) powdered sugar Why this? Dissolves instantly for a smooth finish 2 tbsp (30ml) heavy cream Why this? Gives the glaze a velvety, professional thickness 1/2 tsp (2.5ml) vanilla extract Why this? Ties the
Glaze to the dough flavor 1 pinch salt Why this? Cuts through the intense sweetness
| Original Ingredient | Substitute | Why It Works |
|---|---|---|
| Self Rising Flour | AP Flour + 1.5 tsp Baking Powder + 1/2 tsp Salt | Manual mix. Note: Ensure powder is fresh or rolls won't rise |
| Whole Milk | Full fat Greek Yogurt | Similar acidity and fat. Note: Results in a tangier, denser roll |
| Heavy Cream | Whole Milk | Still works for glaze. Note: Glaze will be thinner and less opaque |
| Brown Sugar | Coconut Sugar | Similar color/depth. Note: Slightly grainier texture in the filling |
If you're feeling fancy, you can make your own handmade butter to use in the filling. The higher fat content in homemade cultured butter adds a rich, slightly tangy note that balances the sugar beautifully.
Necessary Baking Tools
You don't need a professional kitchen for this, but a few things make it way easier. A pastry cutter is great for the butter, but your fingertips work just as well - just keep them moving so they don't melt the butter. A 9x9 inch baking pan is the standard here to ensure the rolls touch, which keeps the sides soft.
For slicing, I highly recommend using unflavored dental floss. It sounds weird, but a knife often squishes the dough, flattening your beautiful spirals. The floss slices right through without putting any pressure on the roll.
Step by step Process
Phase 1: Prepping the Dough
- Whisk the flour and sugar in a large bowl until fully integrated.
- Use a pastry cutter or your fingertips to work the cold cubed butter into the flour until the mixture resembles coarse crumbs. Note: You want some pea sized lumps of butter remaining
- Stir in the milk and vanilla extract. Mix until a soft dough forms; stop the moment the flour disappears to avoid toughness.
Phase 2: Rolling and Filling
- Turn the dough onto a floured surface and roll into a 12x12 inch square.
- Spread the softened butter evenly across the surface, leaving a 1/2 inch border. Sprinkle the brown sugar and cinnamon mixture over the butter, pressing lightly with your palm.
- Roll the dough tightly from the long edge into a log. Slice into 9 even rounds using dental floss or a serrated knife.
Phase 3: Baking and Finishing
- Place rolls in a 9x9 inch baking pan. Bake at 375°F (190°C) for 22-25 minutes until the tops are golden brown.
- Whisk together the powdered sugar, cream, vanilla, and salt to create the glaze.
- Pour the glaze over the rolls immediately after they leave the oven. Note: The heat helps the glaze set into a velvety layer
Pro Tips and Pitfalls
One mistake I once made was using butter that was too soft for the dough. It basically turned into a paste, and my rolls didn't have any lift. Always keep that dough butter ice cold. If your kitchen is hot, I actually suggest popping the rolled log in the fridge for 10 minutes before slicing.
This makes the cuts cleaner and prevents the filling from leaking.
Another trick for the filling: don't be afraid to press the cinnamon sugar into the butter. If it just sits on top, it can bubble over the sides of the pan and burn on the bottom. A light press with your palm locks everything in place.
Preventing Tough Dough
If you find your rolls are too bread like or "rubbery", you're likely overmixing. For more on how gluten works in quick breads, King Arthur Baking has a great breakdown on handling tender doughs. The goal is "just combined", not "smooth".
Stopping the Filling Leak
Filling leak happens when the sugar butter ratio is too wet. Make sure your brown sugar is packed and your cinnamon is well mixed. If you see a puddle in the pan, you might have used too much butter in the filling spread.
Avoiding Dry Rolls
Dryness usually comes from overbaking. Check them at the 22 minute mark. You want a golden top, but the center should still feel like it has a slight "spring" to it.
| Problem | Root Cause | Solution |
|---|---|---|
| Flat Rolls | Butter melted before baking | Chill the log for 10 mins before slicing |
| Dry/Crumbly | Too much flour during rolling | Use a light touch with the flour duster |
| Glaze Runny | Too much cream added | Whisk in 1 tbsp more powdered sugar |
Common Mistakes Checklist
- ✓ Butter is chilled and cubed, not melted.
- ✓ Dough was mixed only until the flour disappeared.
- ✓ Filling was pressed lightly into the butter.
- ✓ Rolls were glazed while still steaming hot.
- ✓ Oven was fully preheated to 190°C.
Swaps and Variations
If you want to change the vibe, this recipe is incredibly flexible. For a "citrus twist", add the zest of one lemon to the dough and replace the vanilla in the glaze with lemon extract. It turns these into a bright, zesty morning treat that feels a bit lighter.
For those who love a crunch, you can sprinkle toasted pecans or walnuts over the cinnamon sugar before rolling. The nuts toast further in the oven and add a salty contrast to the sugar.
Diet Swaps
If you're avoiding gluten, you can use a 1:1 gluten-free baking flour blend. However, be aware that GF flours absorb more liquid, so you might need to add an extra tablespoon of milk if the dough feels too crumbly to roll.
Using All Purpose Flour
If you don't have self rising flour, just use all purpose. For every cup of flour, add 1.5 teaspoons of baking powder and a half teaspoon of salt. It's the exact same thing, just a bit more work for you.
Scaling the Batch
If you're making a double batch for a crowd, don't just double the baking time. Use two separate 9x9 pans. If you crowd them too much in one big pan, the centers won't cook through before the edges burn.
For the spices, I usually only increase them to 1.5x rather than 2x, as cinnamon can become overpowering in large volumes.
Storage and Reheating Guide
These are best eaten within 24 hours, but they keep well if stored correctly. Place them in an airtight container once they've cooled completely. In the fridge, they'll stay good for about 3 days.
For the freezer, I recommend freezing them before baking. Roll the log, slice the rounds, and freeze them on a tray before transferring to a bag. When you're ready, just pop them in the pan and bake as usual - just add about 5 minutes to the cook time.
To reheat, avoid the microwave if you want that slight exterior crust. Use a toaster oven or a regular oven at 150°C (300°F) for about 5-8 minutes. This wakes up the butter and makes the glaze velvety again.
Zero Waste Tip: If you have leftover glaze, don't toss it! It's basically a vanilla icing. Use it to drizzle over pancakes, waffles, or even a slice of plain toast for a quick sweet treat.
Serving Your Rolls
I love serving these with a strong, black coffee. The bitterness of the coffee cuts right through the richness of the cinnamon and glaze, making every bite taste like the first one. If you're serving them for a brunch, a side of fresh raspberries or sliced strawberries adds a nice acidic pop.
For a real indulgence, serve them warm with a small dollop of salted butter on top. As the butter melts into the warm spirals, it creates a rich, savory sweet combination that's hard to beat. Whether you're sharing them with family or sneaking one at midnight, these rolls are all about that simple, comforting joy.
Right then, you've got everything you need. Stop reading and go get that butter in the fridge - it's time to get these Cinnamon Rolls in the oven!
Recipe FAQs
What can I use for cinnamon rolls if I don't have yeast?
Use self rising flour. This recipe utilizes the leavening agents already present in the flour to provide lift without the need for yeast or proofing time.
Why did my cinnamon rolls turn out dry or tough?
You likely overmixed the dough. Stop stirring the moment the flour disappears to prevent overworking the gluten, which is the primary cause of toughness.
Can I prepare the rolls ahead of time and bake them the next morning?
Yes, by freezing them. Freeze the sliced rounds on a tray before transferring them to a bag; simply add 5 minutes to the cook time when baking from frozen.
My cinnamon filling leaked out and burned on the pan. What went wrong?
The log was not rolled tightly enough. Ensure you roll the dough firmly from the long edge to keep the cinnamon sugar mixture contained during the 22-25 minute bake.
What is the best way to store leftover cinnamon rolls and reheat them?
Store them in an airtight container. They stay fresh in the fridge for 3 days; reheat them in a toaster oven rather than a microwave to preserve the exterior crust.
Are cinnamon rolls ok for diabetics?
Generally no. The high concentration of granulated and brown sugars, combined with refined flour, can cause significant blood glucose spikes.
How can I make a richer glaze instead of a simple one?
Whisk more heavy cream into the powdered sugar. This increases the fat content for a more luxurious mouthfeel. If you enjoyed balancing the sweetness here, see how we apply the same flavor balancing principle in our Christmas Cranberry Sauce.
No Yeast Cinnamon Rolls